Configuraciones del examen
Nota: Esta es una traducción de una página de la documentación en idioma Inglés (Docs), que se considera particularmente importante, y que en su versión original se actualiza frecuentemente. Por ello, se le recomienda que revise la página original en idioma inglés: Quiz settings.
Nota: Pendiente de Traducir. ¡Anímese a traducir esta página!. ( y otras páginas pendientes)
Nota del traductor: En el Español internacional se le llama cuestionario [sic] a la traducción de la palabra inglesa quiz, que en el Español de México se llama examen. No deben confundirse con el Módulo cuestionario (questionnaire).
La creación de un nuevo examen es un proceso de dos pasos. En el primer paso, Usted crea la actividad de examen y le configura sus opciones que especifican las reglas para interactuar con el examen. En el segundo paso, Usted añade las preguntas al examen. Esta página describe las opciones que Usted puede configurar para la actividad examen. La página Construyendo un examen describe el cómo configurar las preguntas para el examen.
Administración del examen
When you first set up your quiz from Add an activity or resource > Quiz, (or, if you don't have this link, the dropdown Add an activity>Quiz) you will get the following settings, (which can also be changed later in the Edit Settings link of the Quiz administration settings block) All settings may expanded by clicking the "Expand all" link top right.
General
- Name
- This is the standard name field. This name will appear on the home page of the course, navigation menu and other places which will show or provide links to this quiz.
- Description
- Describe the purpose of the glossary and provide instructions or background information, links etc. Click "Show editing tools" to display the rich text editor, and drag the bottom right of the text box out to expand it.
- Display description on course page
- If ticked, the quiz description will appear on the course page directly under the quiz name.
Tiempo
(These settings are collapsed by default)
- Open the quiz
- You can specify times when the quiz is accessible for people to make attempts. Before the opening time the quiz will be unavailable to students. They will be able to view the quiz introduction but will not be able to view the questions. Quizzes with start times in the future diasplay both the open and close date for students.
Note: You can make the quiz available at different times for different groups or users in the Group or User override sections of the Quiz Administration settings block.
- Close the quiz
- After the closing time, the students will not be able to start new attempts. Answers that the student submits after the quiz closing date will be saved but they will not be marked.
- Even after the quiz has closed students will still be able to see the quiz description and review their attempts. What exactly they will see depends on the settings you choose for review options (see below).
- Time limit
- By default, quizzes do not have a time limit, which allows students as much time as they need to complete the quiz. If you do specify a time limit, several things are done to try and ensure that quizzes are completed within that time:
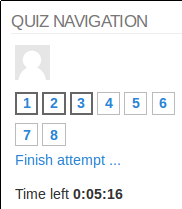
- A countdown timer is shown in the quiz navigation block
- When the timer has run out, the quiz is submitted automatically with whatever answers have been filled in so far
- If a student manages to cheat and goes over the allotted time, no marks are awarded for any answers entered after the time ran out
Note: You can make the quiz available last a different period of time for different groups or users in the Group or User override sections of the Quiz Administration settings block (see below).
- When time expires..
There are three options as to what will happen when the time limit is up. Choose the one you need from the dropdown menu:
- Open attempts are submitted automatically
- There is a grace period when open attempts can be submitted, but no more questions answered
- Attempts must be submitted before time expires, or they are not counted (default)
If you select "There is a grace period..." then you can check the box to enable the "Submission grace period" and specify a period of time during which learners may still submit the quiz after the time is up.
Ejemplos de cómo se maneja el tiempo
- A student starts a quiz at noon. The quiz has a one-hour time-limit, and a 1 hour delay between attempts. The student gets distracted, and so actually does not submit (using the overdue handling) until 1:30pm. They are allowed to start their second attempt at 2. pm
- The quiz count-down timer submits a student's quiz attempt at the last second when time expires. Because the server is heavily loaded, it takes 30 seconds to process the student's attempt. The submission is accepted nonetheless.
- Same situation as above but with a 120 second delay: The submission is rejected.
- The delay is not because of server load but because the student found a way to cheat the timer. Moodle cannot know what causes a delay.The behaviour is controlled by the admin setting(quiz | graceperiodmin), 60 seconds by default.
- A student is a member of 3 groups,all of which have different override settings. Which limits will apply to this student? If there is any user-specific override, then that is used, and the group overrides for that setting are not used at all. Otherwise, if there are multiple group overrides, the most generous values are used (the earliest open date, the latest close date, the longest time limit, the most number of attempts, and the student can type any of the passwords).
Calificación
(These settings are collapsed by default)
- Grade category
If you have categories in your gradebook, select the one you wish the quiz to be in here.
- Attempts allowed
- Students may be allowed to have multiple attempts at a quiz. This can help make the process of taking the quiz more of an educational activity rather than simply an assessment. If the quiz is randomized then the student will get a new version for each attempt. This is useful for practice purposes.
Note: You can change the allowed number of attempts for different groups or users in the Group or User override sections of the Quiz Administration settings block.
- Grading method
- When multiple attempts are allowed, there are different ways you can use the grades to calculate the student's final grade for the quiz.
- Highest grade - the final grade is the highest (best) grade in any attempt
- Average grade - the final grade is the average (simple mean) grade of all attempts
- First grade - the final grade is the grade earned on the first attempt (other attempts are ignored)
- Last grade - the final grade is the grade earned on the most recent attempt only
Diseño
(These settings are collapsed by default)
- Question order
- If 'Shuffled randomly' is selected, then the order of questions in the quiz will be randomly shuffled each time a student starts a new attempt at the quiz. The intention is to make it a little harder for students to copy from each other.
- New page
- For longer quizzes it makes sense to stretch the quiz over several pages by limiting the number of questions per page. When adding questions to the quiz, page breaks will automatically be inserted according to the setting you choose here. However, you will also be able to move page breaks around by hand later on the editing page.
- Note that changing this setting has no effect on questions you have already added to the quiz. The setting will only apply to questions you add subsequently. To change the page breaks in an existing quiz, you need to go to the quiz editing screen, tick the 'Show page breaks' checkbox, then use the repaginate control.
- Navigation method (available by clicking Show More)
By choosing Sequential instead of Free, the teacher is forcing the student to progress through the questions in order without being able to go back to a previous question or skip to a later one.
Comportamiento de pregunta
(Estas configuraciones están colapsadas por defecto)
- Barajar dentro de las preguntas
Si se configura a 'Si', entonces cada vez que el estudiante tome un examen, las partes (opciones correcta y distractores) de la pregunta se barajarán aleatoriamente.
- Cómo se comportan las preguntas
- Retroalimentación diferida - Los estudiantes deben de escribir una respuesta para cada pregunta y después enviar el examen completo, antes de que sea calificado y reciban cualquier retroalimentación.
- Modo adaptativo y Modo adaptativo (sin penalizaciones) - Le permite a los estudiante tener múltiples intentos de contestar una pregunta antes de pasar a la pregunta siguiente.
- Modo interactivo - Después de enviar una respuesta, y leer la retroalimentación correspondiente, el estudiante tiene que elegir el botón para "Intentarlo de nuevo" antes de que puedan intentar contestar con una nueva respuesta. Una vez que el estudiante consiga tener una respuesta correcta, no podrán cambiar la respuesta. Una vez que el estudiante haya tenido la respuesta equivocada demasiadas veces, se les califica como mala (o parcialmente correcta) y se les da la retroalimentación y ya no podrán cambiar más la respuesta. Puede haber retroalimentación diferente cada vez que el estudiante hace un nuevo intento.
- Retroalimentación inmediata - Similar al modo interactivo en cuanto que el estudiante puede enviar su respuesta inmediatamente durante el intento del examen, y ser calificado. Sin embargo, solamente pueden enviar una respuesta, no podrán cambiarla después.
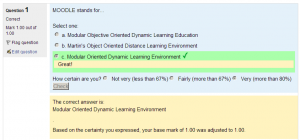
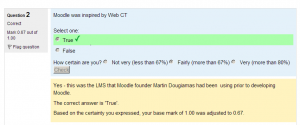
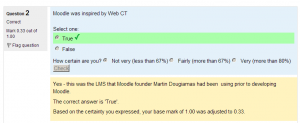
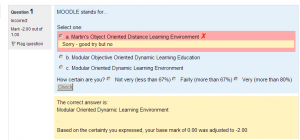
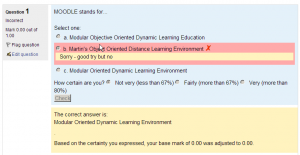
- Retroalimentación diferida o retroalimentación inmediata con Puntuación basada en certeza (Certainty-based marking = CBM) - Con CBM, el estudiante no solamente contesta una pregunta, sino que también tienen que indicar que tan seguros (certeros) están de tener la respuesta correcta. La calificación es ajustada por la elección de la certeza, de forma tal que los estudiantes tienen que reflejar honestamente su propio nivel de conocimiento, para poder obtener la mejor puntuación. Vea la sección de Vea también debajo para conocer un ejemplo de un examen que usa CBM y una publicación en blog que explica su filosofía.
Nota: También existe una opción para "Calificación manual", que puede habilitarse desde Administración > Administración del sitio > Plugins > Comportamiento de preguntas . Esta hace que todas las preguntas del examen requieran calificación manual.
Puntuación basada en certeza (Certainty-based marking)
Cuando un estudiante responde una pregunta, también tienen que poner qué tan seguros están de su respuesta: no mucho (menos del 67%); bastante (más del 67%), o mucho (más del 80%). Su calificación será entonces ajustada de acuerdo a que tan seguros (certeros) están; lo que significa que, por ejemplo, si contestaron correctamente, pero solamente estaban adivinando, su puntuación se ajustará del 1 original a 0.33. Si contestaron equivocadamente, pero estaban muy seguros, su puntuación se ajustará y cambiará del 0 original a -2. Vea también la discusión en el foro: CBM too harsh?
- Cada intento se continúa con el anterior (disponible al elegir "Mostrar más")
- Si están permitidos intentos múltiples, y esta configuración está en 'Si', entonces cada cada nuevo intento contiene los resultados del intento anterior. Esto le permiute al estudiante que está haciendo un nuevo intento, concentrarse en solamente aquellas preguntas que fueron contestadas equivocadamente en su intento anterior. Si se elige esta opción, entonces cada intento por un estudiante en particular utiliza las mismas preguntas en el mismo orden, de forma independiente a las configuraciones de aleatorización (barajar preguntas y barajar respuestas). Para mostrar un examen fresco (nuevo, diferente, original) en cada intento, seleccione 'No' para esta configuración.
Opciones para revisión
(Estas configuraciones están colapsadas por defecto)
Esta sección controla qué información se les mostrará a los estudiantes cuando revisen sus intentos anteriores de un examen, y durante el intento en modo adaptativo. Es una matriz con casillas de selección.
Las diferentes partes de de información que pueden ser controladas son:
- El intento
- Mostrará cómo respondió cada pregunta el estudiante.
- Si está correcta
- Mostrará si es que la respuesta del estudiante para cada pregunta era correcta o incorrecta.
- Puntos
- Revela los puntos otorgados al estudiante y la calificación para el examen.
- Retroalimentación específica
- Will show the feedback for the response to the answer as set when adding the question to the quiz. Each response to a question can have feedback for both correct and incorrect answers.
- Retroalimentación general
- Displays the general feedback for the whole question as set when adding the question to the quiz. You can use the general feedback to give students some background to what knowledge the question was testing.
- Respuesta correcta
- Revela la respuesta correcta para cada pregunta, sea que el estudiante la haya o no contestado correctamente (Vea la nota inferior).
- Overall feedback
- Displays feedback for the entire quiz as set in the quiz settings (See note below).
For each of the above items, you can determine the timeframe when the students will see them:
- During the attempt
- is only available when ‘How questions behave’ has been set to ‘Immediate feedback’, ‘Immediate feedback with CBM’ and ‘Interactive with multiple tries’. If set to one of these options then a ‘Check’ button will appear below the answer and when clicked the student will submit that response and then receive immediate feedback.
- Immediately after the attempt
- means within 2 minutes of the student clicking "submit all and finish".
- Later, while the quiz is still open
- means after 2 minutes, but before the close date (if the quiz does not have a close date, this phase never ends).
- After the quiz is closed
- means what it says (you never get here for quizzes without a close date).
- Tip: Checking any of the boxes in the timeframe row, will reveal the test to the student. For example, to allow students to see their quiz immediately after taking it but not later, make sure none of the boxes in "Later" or "After" rows are checked. The student will be able to see their grade but not get into the quiz.
Note: Currently, the Answers display is a bit inconsistent between different question types. For example, the matching question type shows students which of their responses are correct, but does not tell them the right answer for the ones they got wrong. The short answer and multiple choices question types do tell the student what the correct answer is.
Users with the capability 'View hidden grades' moodle/grade:viewhidden (typically teachers and administrators) are not affected by these settings and will always by able to review all information about a student's attempt at any time.
In your list of review options, you must have 'The attempt' (the first option in the lists) selected before you can enable the options to show 'Whether correct', 'Specific feedback', 'General feedback', and 'Right answer'. If you choose not to let the students review the attempt, your only options are to display 'Marks' and 'Overall feedback'.
Apariencia
(Estas configuraciones están colapsadas por defecto)
Archivo:quizdappearance.png Configuraciones expandidas para Vista |
Moodle 2.6
- Mostrar la foto del usuario
Ahora es posible, al mostrar la foto del perfil del usuario para propósitos de supervisión, elegir entre mostrar una imagen grande o una chiquita.
- Número de decimales en calificaciones
- Esta opción determina cuantos decimales se mostrarán después del separador decimal (un punto en México y una coma en España) cuando se muestre la calificvación. Una configuración de 0, por ejemplo, significa que las calificaciones se mostrarán como números enteros. Esta configuración sólamente se usa para mostrar las calificaciones; no se usa para mostrar o calificar las respuestas.
Restricciones extra en los intentos
(Estas restricciones están colapsadas por defecto y solamente están disponibles al elegir "Mostrar más"")
- Requerir contraseña
- Este campo es opcional.
- Si Usted especifica aquí una contraseña, entonces los participantes deberán de escribir esta misma contraseña antes de que se les permita hacer un intento para contestar el examen. Esto es útil para darle acceso al examen a sólamente un grupo selecto de estudiantes.
- Requerir dirección de red
- Este campo es opcional.
- You can restrict access for a quiz to particular subnets on the LAN or Internet by specifying a comma-separated list of partial or full IP address numbers. This is especially useful for a proctored (invigilated) quiz, where you want to be sure that only people in a certain room are able to access the quiz. For example: 192.168. , 231.54.211.0/20, 231.3.56.211
- There are three types of numbers you can use (you can not use text based domain names like example.com):
- Full IP addresses, such as 192.168.10.1 which will match a single computer (or proxy).
- Partial addresses, such as 192.168 which will match anything starting with those numbers.
- CIDR notation, such as 231.54.211.0/20 which allows you to specify more detailed subnets.
- los espacios son ignorados.
- Retraso obligado entre intentos
- Estos dos campos son opcionales.
- You can set a time (from seconds to weeks) between the first and second attempt of a quiz. You can also (or alternatively) set a time from seconds to weeks for subsequent attempts after the second attempt. Thus, you might allow a student to take the quiz twice immediately with no delay, but if they want to improve their score with a third attempt, they are forced to wait a week and use the time for extra revision.
- Seguridad del navegador
- This is by default an advanced field, visible by clicking "Show advanced".
- The options in this section offer various ways to try to restrict how students may try to 'cheat' while attempting a quiz. However, this is not a simple issue, and what in one situation is considered 'cheating' may, in another situation, just be effective use of information technology. (For example, the ability to quickly find answers using a search engine.)
- Note also that this is not just at problem of technology with a technical solution. Cheating has been going on since long before computers, and while computers make certain actions, like copy and paste, easier, they also make it easier for teachers to detect cheating - for example using the quiz reports. The options provided here are not fool-proof, and while they do make some forms of cheating harder for students, they also make it more inconvenient for students to attempt the quizzes, and they are not fool-proof.
- Full screen pop-up with some JavaScript security
- There is a limit to what the quiz, which runs on a web server, can do to restrict what the student sitting at their computer can do while attempting the quiz. However, this option does what is possible:
- The quiz will only start if the student has a JavaScript-enabled web-browser.
- The quiz appears in a fullscreen popup window that covers all the other windows and has no course navigation controls.
- The students are prevented, as far as is possible, from using facilities like copy and paste.
- This setting does not work well with the MyMobile theme for mobile devices included in the standard installation. In particular, quiz time limits do not function correctly (MDL-32047).
- Requerir el uso del Navegador de Examen Seguro ("Safe Exam Browser")
- This option will only appear if your administrator has enabled it in Settings > Site administration > Development > Experimental > Experimental settings.
- Navegador de examen seguro is a customised web browser that must be downloaded and installed on the computer that the student uses to attempt the quiz. It restricts student use more effectively than a pop up window option. Features include full screen, without web navigation options, shortcut keys including copy and paste are disabled and of course surfing the web during an exam.
Retroalimentación general
(These setttings are collapsed by default)
Overall feedback is shown to a student after they have completed an attempt at the quiz. The text that is shown can depend on the grade the student got. Click "Show editing tools" to display the rich text editor, and drag the bottom right of the text box out to expand it.
For example, if you entered:
- Grade boundary: 100%
- Feedback: "Well done"
- Grade boundary: 40%
- Feedback: "Please study this week's work again"
- Grade boundary: 0%
Then students who score between 100% and 40% will see the "Well done" message, and those who score between 39.99% and 0% will see "Please study this week's work again". That is, the grade boundaries define ranges of grades, and each feedback string is displayed to scores within the appropriate range.
Grade boundaries can be specified either as a percentage, for example "31.41%", or as a number, for example "7". If your quiz is out of 10 marks, a grade boundary of 7 means 7/10 or better.
Note that the maximum and minimum grade boundaries (100% and 0%) are set automatically.
You can set as many or as few grade boundaries as you wish. The form allows you up to 5 ranges at first, but you can add more by clicking the "Add 3 fields to form" button underneath.
If you're getting confusing error messages about a boundary being out of sequence (when it's obviously *in* sequence), or "boundaries must be between 0% and 100%" (and they are) -- check that the Maximum Grade for this quiz is set to something greater than zero.
Competencias
This setting will only appear if Competencias have been enabled by the administrator and are used in the course. See Outcomes for how to remove an outcome once it has been added to a quiz.
Configuraciones comunes del módulo
(These settings are collapsed by default) See Configuraciones comunes del módulo
Restringir acceso/Finalización de actividad
(Estas configuraciones están colapsadas por defecto)
Las configuraciones para restringir acceso y finalización de actividad están visibles si Actividades condicionales y Finalización de actividad han sido habilitadas en el sitio y en el curso.
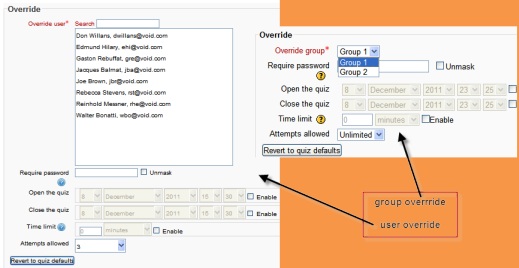
Anulaciones para Grupo y Usuario
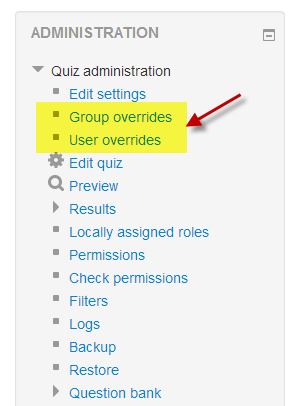
Dates, timing and number of allowed attempts may be changed for individual users or groups by following the links Group Overrides or User Overrides in the Quiz Administration settings block.
Anulaciones para Grupo
To change a quiz setting for a particular group, click the "add group override" button in Quiz Administration>Group overrides, make the changes you wish and save or enter another override.
Anulaciones para Usuario
To change a quiz setting for a particular user or users, click the "add user override"button in Quiz Administration>Group overrides, make the changes you wish and save or enter another override.
Configuraciones de administración del sitio
The quiz module has additional settings which may be changed by an administrator in Administration > Site administration > Plugins > Activity modules > Quiz.
¡Nueva característica
en Moodle 2.5!
- Autosave period
- If enabled, student responses will be saved every minute/two minutes/five minutes (according to selection) This is useful so that students don't lose work but does increase the load on the server.
How questions behave can be configured in Administration>Site administration>Plugins>Question behaviours>Manage question
behaviours
Vea también
- Moodle 2.x Quiz MoodleBites video on YouTube
School demo example of a quiz with CBM Log into with username "parent" and password "moodle"


