Diferencia entre revisiones de «39/Editor de texto»
- Editor de texto
- Editor Atto
- Editor TinyMCE
- Editor TinyMCE (antiguo) Moodle 4.1 y anteriores
- Formateando texto
- Editor de texto FAQ
(added page) |
(update to Moodle 3.9) |
||
| Línea 3: | Línea 3: | ||
{{Nota|En Moodle 2.6 y anteriores, [[TinyMCE]] era el editor de texto por defecto, pero a partir de Moodle 2.7, el editor de texto HTML por defecto es '''[https://docs.moodle.org/dev/Atto Atto]''', un editor JavaScript hecho específicamente para Moodle, aunque también coexisten el antiguo [[Editor TinyMCE]] y un editor de texto plano (texto simple).}} | {{Nota|En Moodle 2.6 y anteriores, [[TinyMCE]] era el editor de texto por defecto, pero a partir de Moodle 2.7, el editor de texto HTML por defecto es '''[https://docs.moodle.org/dev/Atto Atto]''', un editor JavaScript hecho específicamente para Moodle, aunque también coexisten el antiguo [[Editor TinyMCE]] y un editor de texto plano (texto simple).}} | ||
==Usando un editor de texto== | ==Usando un editor de texto== | ||
The text editor (sometimes referred to as the 'HTML editor') has many icons to assist the user in entering content. Many of these icons and functions should be familiar to anyone who uses a word processor. | |||
Some examples of where you will see the text editor include: Editing Section headings, description of an activity, writing an answer to a quiz question or editing the content of many blocks. | |||
The default text editor in Moodle is the Atto editor, built specifically for Moodle. There is also a version of the [[TinyMCE editor]] and a plain text editor. | |||
Text editors can be enabled, disabled or a different one set to default from ''Administration > Site administration > Plugins > Text editors > Manage editors''. The order of priority may also be specified here. | |||
If more than one text editor is enabled, users can select their preferred editor via their preferences page in the user menu (top right). | |||
==Atto HTML editor== | |||
{{MediaPlayer | url = https://youtu.be/GzOOWM8UdEc | desc = }} | |||
===Displaying the HTML code=== | |||
{{MediaPlayer | url = https://youtu.be/EpceMkMpfCs | desc = }} | |||
==Atto editor toolbar layout== | |||
[[File:Attotopline1382.png]] | |||
Atto Row 1 | |||
{| class="nicetable" | |||
|- | |||
|- | |||
| 1:Expand | |||
| 2.Style | |||
| 3.Bold | |||
| 4.Italic | |||
|- | |||
| 5.Bulleted list | |||
| 6.Numbered list | |||
| 7.Add link | |||
| 8.Unlink | |||
|- | |||
| 9.Add image | |||
| 10.Add smiley (if enabled) | |||
| 11.Add media | |||
| 12.Record audio | |||
|- | |||
| 13. Record video | |||
| 14. Manage embedded files | |||
| 15. H5P | |||
|} | |||
[[File:Attobottomline.png]] | |||
Atto Row 2 | |||
{| class="nicetable" | |||
|- | |||
|- | |||
| 1. Underline | |||
| 2. Strikethrough | |||
| 3. Subscript | |||
| 4. Superscript | |||
|- | |||
| 5. Align left/centre/right | |||
| 6. Decrease/increase indent | |||
| 7. Equation editor | |||
| 8. Special character | |||
|- | |||
| 9. Table | |||
| 10. Clear formatting | |||
| 11. Undo/redo | |||
| 12. Accessibility checker | |||
|- | |||
| 13. Screenreader helper | |||
| 14. HTML/code view | |||
| | |||
|} | |||
==Manage embedded files== | |||
This allows users to add, delete or override files embedded in the current text area, for example in a label or topic summary. (It complements the [[Embedded files repository]]) | |||
[[File:26embeddefiles2.png|thumb|400px|center]] | |||
===Image drag and drop=== | |||
If your browser allows it (and if it does, you will see a message at the top of your screen when the editing is on) you can add images into the Atto editor simply by dragging them from your computer: | |||
[[File:Attodragdrop29.png|thumb|600px|center|Drag an image directly into the editor]] | |||
===Autosave=== | |||
Text typed into the Atto editor is automatically saved if you leave the page. The default of 60 seconds may be changed by the administrator in ''Site administration>Plugins>Text editors>Atto HTML editor>Atto toolbar settings.'' If the user accidentally closes the tab or otherwise leaves the form without submitting, the text in the editor will be restored next time he opens the page. To discard a restored draft, the user needs to cancel the form or press the "Undo" button in the editor. | |||
[[File:AtttoAutosave.png|thumb|600px|center]] | |||
===Accessibility checker=== | |||
One of the tools available in the text editor is an automated [[Accessibility|accessibility]] checker which checks for some common errors in the text. These are usually things in the way the text is constructed that can prevent all users from having equal access to information and functionality. The list of problems that the accessibility checker looks for is: | |||
* Images with missing or empty alt text (unless they have the presentation role) | |||
* Contrast of font colour and background colour meets [https://en.wikipedia.org/wiki/Web_Content_Accessibility_Guidelines WCAG AA guidelines] | |||
* Long blocks of text are sufficiently broken up into headings | |||
* All tables require captions | |||
* Tables should not contain merged cells as they are difficult to navigate with screen readers | |||
* All tables should contain row or column headers | |||
===Screenreader helper=== | |||
Screen readers basically treat a content editable region like a text box - which is wrong, because it can contain images, links and more. | |||
The screen reader helper provides additional information about the currently selected text (e.g. is it bold), as well as a listing of any images or links in the text. | |||
==Equation editor== | |||
If either the [[MathJax filter|MathJax]] or the [[TeX notation filter|TeX notation]] filters are enabled (in ''Administration > Site administration > Plugins > Filters > Manage filters'') then an equation editor button is provided in the toolbar for launching the equation editor. | |||
In Moodle 3.0 onwards, extra buttons are provided for square roots, fractions and vectors. | |||
[[Image:30equationeditor.png|thumb|center|Equation editor]] | |||
==Table editor== | |||
If the administrator has enabled the extra settings for the Atto table editor (see below) then border styling, sizing and colours are available when creating a table: | |||
[[File:AttoTableRevised.png|center|thumb|center]] | |||
==Keyboard shortcuts== | |||
The following keyboard shortcuts will work in the Atto text editor in most browsers. Note that for many of these commands to work you need to either click in the text editor or select content in the text editor. | |||
{| class="wikitable" | |||
|- | |||
! Windows Command | |||
! Mac Command | |||
! Function | |||
|- | |||
| Ctrl + c | |||
| ⌘ + c | |||
| Copy | |||
|- | |||
| Ctrl + v | |||
| ⌘ + v | |||
| Paste | |||
|- | |||
| Ctrl + Shift + v | |||
| ⌘ + Shift + v | |||
| Paste without formatting (very useful) | |||
|- | |||
| Ctrl + x | |||
| ⌘ + x | |||
| Cut | |||
|- | |||
| Ctrl + z | |||
| ⌘ + z | |||
| Undo (careful - can undo a lot of text and doesn't always work) | |||
|- | |||
| Ctrl + y | |||
| ⌘ + y | |||
| Redo | |||
|- | |||
| Ctrl + a | |||
| ⌘ + a | |||
| Select all | |||
|- | |||
| Double-click | |||
| Double-click | |||
| Select word | |||
|- | |||
| Triple-click | |||
| Triple-click | |||
| Select line | |||
|- | |||
| Ctrl + f | |||
| ⌘ + f | |||
| Find on page | |||
|- | |||
| F3 | |||
| F3 | |||
| Find next | |||
|- | |||
| Shift + F3 | |||
| Shift + F3 | |||
| Find previous | |||
|- | |||
| Ctrl + b | |||
| ⌘ + b | |||
| Bold | |||
|- | |||
| Ctrl + i | |||
| ⌘ + i | |||
| Italics | |||
|- | |||
| Ctrl + u | |||
| ⌘ + u | |||
| Underline | |||
|- | |||
| Ctrl + k | |||
| ⌘ + k | |||
| Insert/edit link | |||
|- | |||
| Ctrl + Right arrow | |||
| ⌘ + Right arrow | |||
| Move to the end of the next word | |||
|- | |||
| Ctrl + Left arrow | |||
| ⌘ + Left arrow | |||
| Move to the end of the previous word | |||
|- | |||
| Ctrl + Shift + Right arrow | |||
| ⌘ + Shift + Right arrow | |||
| Select the next word or letter | |||
|- | |||
| Ctrl + Shift + Left arrow | |||
| ⌘ + Shift + Left arrow | |||
| Select the previous word or letter | |||
|- | |||
| Ctrl + Shift + Home | |||
| ⌘ + Shift + Home | |||
| Select from the cursor to the beginning of the page | |||
|- | |||
| Ctrl + Shift + End | |||
| ⌘ + Shift + End | |||
| Select from the cursor to the end of the page | |||
|- | |||
| Ctrl + Home | |||
| ⌘ + Home | |||
| Move to the beginning of the page | |||
|- | |||
| Ctrl + End | |||
| ⌘ + End | |||
| Move to the end of the page | |||
|- | |||
| Ctrl + Backspace | |||
| ⌘ + Backspace | |||
| Delete word or letter to the left | |||
|- | |||
| Ctrl + Delete | |||
| ⌘ + Delete | |||
| Delete word or letter to the right | |||
|- | |||
| Ctrl and + | |||
| ⌘ and + | |||
| Zoom in (not specific to the editor, but very useful) | |||
|- | |||
| Ctrl and - | |||
| ⌘ and - | |||
| Zoom out (not specific to the editor, but very useful) | |||
|- | |||
| Ctrl and 0 | |||
| ⌘ and 0 | |||
| Reset zoom (not specific to the editor, but very useful) | |||
|} | |||
<span style="font-size:80%">Source: [https://confluence.royalroads.ca:8443/pages/viewpage.action?pageId=47778173 Jason 1keddie, Royal Roads University (Creative Commons Attribution-ShareAlike)]</span> | |||
==Site administration settings== | |||
===Toolbar settings=== | |||
The administrator can specify which plugins to display and in which order from ''Administration > Site administration > Plugins > Text editors > Atto HTML editor > Atto toolbar settings''. | |||
[[File:atto-plugins.png|thumb|center|450px|Atto Plugins]] | |||
====Toolbar config table==== | |||
The toolbar is split into groups of related buttons. The format for the config setting is: | |||
groupname1 = button1, button2, button3 | |||
groupname2 = button1, button2, button3 | |||
The group names on the left have no effect on how the toolbar works; they just need to be different for each button (and no spaces please). The list of buttons says which button goes in which group and in what order. The exact word to insert here for each button is listed in the "Toolbar config" column above. | |||
The reason there are names for the groups is that it helps to make you think about how to group the buttons sensibly and not just stick new buttons in random locations. Ie. all the buttons in the "files" group interact with the file picker in some way | |||
===Adding extra buttons=== | |||
Extra plugins from the list (for example 'Font color') may be added by typing the toolbarconfig term into the toolbar config table. | |||
[[File:toolbarconfig.png]] | |||
Here for example are the available colours when 'fontcolor' is added: | |||
[[File:fontcolor.png]] | |||
The icons are displayed in related groups and the administrator can decide how many groups to display in the default collapsed state of the toolbar (that is, how many groups to display on Row 1). | |||
====Autosave frequency==== | |||
Text is automatically saved at regular intervals so it may be restored when the user returns to a form they had previously left. This setting allows the administrator to specify the time between autosaves. The default is one minute. | |||
==== Non default Atto plugins ==== | |||
Not all plugins are enabled by default and the administrator of each site should give careful thought as to which plugins they choose to enable for their users. Here are some things to consider before enabling the non-default plugins: | |||
===== Background colour / Font colour ===== | |||
While these are very popular plugins, there are downsides to enabling their use on a site. Firstly - user specified colours may conflict visually with the site colours chosen by the theme designer. Even if the colours of the content do not conflict with the colours of the current theme, if the theme is changed in future, or the content is reused on a different site conflicts may be introduced. There are 2 possible types of conflicts, the first is just a visually unappealing combination of colours, the second is a combination of colours that may produce text that is hard to read for some people. It is preferable if the theme designer uses some interesting colours that meet the accessibility standards required for the site in the theme for the site, and the person creating the content simply uses the proper heading levels (for example) to make use of those styles. | |||
===== Emoji picker ===== | |||
An emoji picker button may be added by typing 'emojipicker' into the toolbar config table. | |||
[[File:toolbar with emoji picker.png|thumb|Toolbar with emoji picker button]] | |||
To add the emoji picker button to the top row: | |||
# Enter the line <code>emoji = emojipicker</code> under the line <code>files = image, emoticon, media, managefiles, recordrtc, h5p</code> | |||
# Go to 'Collapse toolbar settings' and change 'Show first (n) groups when collapsed' to 6 and save changes. | |||
===== Emoticons ===== | |||
The emoticon plugin inserts text representations of the emoticons in the content. The emoticon filter is responsible for converting these text sequences into proper smiley images. The emoticon filter is not enabled by default, which is why the emoticon plugin for Atto is not enabled by default. | |||
===== No-auto link ===== | |||
In general, the more plugins are added to the Atto toolbar, the harder it becomes to find specific plugins. Because the no-auto link plugin is not felt to be widely used it is not enabled by default. | |||
===== Right to left ===== | |||
Because this plugin is only useful for courses where text needs to be written in a mixture of both "left to right" and "right to left" languages, it is not enabled by default. | |||
==== Moodle plugins directory ==== | |||
There are more plugins available for Atto than just those included in a default install. | |||
See the [https://moodle.org/plugins/browse.php?list=category&id=53 Moodle plugins directory] for additional plugins. | |||
Some example plugins include the following: | |||
===== Cloze editor for Atto===== | |||
[[Cloze editor for Atto|This]] is a plugin for easily making [[Embedded Answers (Cloze) question type]] questions inside the standard Moodle Atto text editor. | |||
===== Toggle preview ===== | |||
This plugin allows you view the content as it would be seen by a reader. | |||
===== Chemistry plugins ===== | |||
There are a number of chemistry plugins that support chemistry equations and structures. | |||
===== Text import plugins ===== | |||
There are a number of plugins that support importing text from other sources. | |||
The [https://moodle.org/plugins/view/atto_pastespecial Paste special] plugin minimises the amount of superfluous HTML markup | |||
included when pasting content from an external editor such as Microsoft Word. | |||
The [https://moodle.org/plugins/view/atto_wordimport Word Import] plugin (beta) supports importing an entire Word document, | |||
including embedded images. | |||
===Equation editor settings=== | |||
Equation editor commands may be removed, added or reordered in ''Administration > Site administration > Plugins > Text editors > Atto HTML editor > Equation editor settings''. | |||
[[File:equationeditor.png]] | |||
===Table editor settings=== | |||
Styles, colours and sizes for tables and their borders may be enabled from ''Administration > Site administraton >Plugins > Test editors > Atto HTML editor > Table settings.'' | |||
==See also== | |||
* [https://www.youtube.com/watch?v=NBx0O9cQzBA Moodle HQ screencast demonstrating Atto editor] | |||
* [[Text editor FAQ]] | |||
* [[Embedded files repository]] | |||
* [[Word count quick guide]] - Word count is a plugin for the [[Text editor|Atto text editor]] which is used to create content within Moodle. This plugin enables the author of text, such as a student, to check how many words and letters are in a piece of text. | |||
El editor de texto ('editor HTML') tiene muchos íconos para asistir al usuario al escribir contenido. Muchos de estos íconos y funciones le deberían de ser familiares a cualquier persona que use un procesador de texto. | El editor de texto ('editor HTML') tiene muchos íconos para asistir al usuario al escribir contenido. Muchos de estos íconos y funciones le deberían de ser familiares a cualquier persona que use un procesador de texto. | ||
Revisión del 14:12 16 jun 2020
Moodle 3.9
| Existe documentación diferente para varias versiones de Moodle: Esta página es acerca del Editor de texto para Moodle 3.9 y más recientes. Para la documentación de otras versiones, vaya a Editor de texto. |
| Nota: En Moodle 2.6 y anteriores, TinyMCE era el editor de texto por defecto, pero a partir de Moodle 2.7, el editor de texto HTML por defecto es Atto, un editor JavaScript hecho específicamente para Moodle, aunque también coexisten el antiguo Editor TinyMCE y un editor de texto plano (texto simple). |
Usando un editor de texto
The text editor (sometimes referred to as the 'HTML editor') has many icons to assist the user in entering content. Many of these icons and functions should be familiar to anyone who uses a word processor.
Some examples of where you will see the text editor include: Editing Section headings, description of an activity, writing an answer to a quiz question or editing the content of many blocks.
The default text editor in Moodle is the Atto editor, built specifically for Moodle. There is also a version of the TinyMCE editor and a plain text editor.
Text editors can be enabled, disabled or a different one set to default from Administration > Site administration > Plugins > Text editors > Manage editors. The order of priority may also be specified here.
If more than one text editor is enabled, users can select their preferred editor via their preferences page in the user menu (top right).
Atto HTML editor
Displaying the HTML code
Atto editor toolbar layout

Atto Row 1
| 1:Expand | 2.Style | 3.Bold | 4.Italic |
| 5.Bulleted list | 6.Numbered list | 7.Add link | 8.Unlink |
| 9.Add image | 10.Add smiley (if enabled) | 11.Add media | 12.Record audio |
| 13. Record video | 14. Manage embedded files | 15. H5P |

Atto Row 2
| 1. Underline | 2. Strikethrough | 3. Subscript | 4. Superscript |
| 5. Align left/centre/right | 6. Decrease/increase indent | 7. Equation editor | 8. Special character |
| 9. Table | 10. Clear formatting | 11. Undo/redo | 12. Accessibility checker |
| 13. Screenreader helper | 14. HTML/code view |
Manage embedded files
This allows users to add, delete or override files embedded in the current text area, for example in a label or topic summary. (It complements the Embedded files repository)

Image drag and drop
If your browser allows it (and if it does, you will see a message at the top of your screen when the editing is on) you can add images into the Atto editor simply by dragging them from your computer:

Autosave
Text typed into the Atto editor is automatically saved if you leave the page. The default of 60 seconds may be changed by the administrator in Site administration>Plugins>Text editors>Atto HTML editor>Atto toolbar settings. If the user accidentally closes the tab or otherwise leaves the form without submitting, the text in the editor will be restored next time he opens the page. To discard a restored draft, the user needs to cancel the form or press the "Undo" button in the editor.

Accessibility checker
One of the tools available in the text editor is an automated accessibility checker which checks for some common errors in the text. These are usually things in the way the text is constructed that can prevent all users from having equal access to information and functionality. The list of problems that the accessibility checker looks for is:
- Images with missing or empty alt text (unless they have the presentation role)
- Contrast of font colour and background colour meets WCAG AA guidelines
- Long blocks of text are sufficiently broken up into headings
- All tables require captions
- Tables should not contain merged cells as they are difficult to navigate with screen readers
- All tables should contain row or column headers
Screenreader helper
Screen readers basically treat a content editable region like a text box - which is wrong, because it can contain images, links and more.
The screen reader helper provides additional information about the currently selected text (e.g. is it bold), as well as a listing of any images or links in the text.
Equation editor
If either the MathJax or the TeX notation filters are enabled (in Administration > Site administration > Plugins > Filters > Manage filters) then an equation editor button is provided in the toolbar for launching the equation editor.
In Moodle 3.0 onwards, extra buttons are provided for square roots, fractions and vectors.

Table editor
If the administrator has enabled the extra settings for the Atto table editor (see below) then border styling, sizing and colours are available when creating a table:

Keyboard shortcuts
The following keyboard shortcuts will work in the Atto text editor in most browsers. Note that for many of these commands to work you need to either click in the text editor or select content in the text editor.
| Windows Command | Mac Command | Function |
|---|---|---|
| Ctrl + c | ⌘ + c | Copy |
| Ctrl + v | ⌘ + v | Paste |
| Ctrl + Shift + v | ⌘ + Shift + v | Paste without formatting (very useful) |
| Ctrl + x | ⌘ + x | Cut |
| Ctrl + z | ⌘ + z | Undo (careful - can undo a lot of text and doesn't always work) |
| Ctrl + y | ⌘ + y | Redo |
| Ctrl + a | ⌘ + a | Select all |
| Double-click | Double-click | Select word |
| Triple-click | Triple-click | Select line |
| Ctrl + f | ⌘ + f | Find on page |
| F3 | F3 | Find next |
| Shift + F3 | Shift + F3 | Find previous |
| Ctrl + b | ⌘ + b | Bold |
| Ctrl + i | ⌘ + i | Italics |
| Ctrl + u | ⌘ + u | Underline |
| Ctrl + k | ⌘ + k | Insert/edit link |
| Ctrl + Right arrow | ⌘ + Right arrow | Move to the end of the next word |
| Ctrl + Left arrow | ⌘ + Left arrow | Move to the end of the previous word |
| Ctrl + Shift + Right arrow | ⌘ + Shift + Right arrow | Select the next word or letter |
| Ctrl + Shift + Left arrow | ⌘ + Shift + Left arrow | Select the previous word or letter |
| Ctrl + Shift + Home | ⌘ + Shift + Home | Select from the cursor to the beginning of the page |
| Ctrl + Shift + End | ⌘ + Shift + End | Select from the cursor to the end of the page |
| Ctrl + Home | ⌘ + Home | Move to the beginning of the page |
| Ctrl + End | ⌘ + End | Move to the end of the page |
| Ctrl + Backspace | ⌘ + Backspace | Delete word or letter to the left |
| Ctrl + Delete | ⌘ + Delete | Delete word or letter to the right |
| Ctrl and + | ⌘ and + | Zoom in (not specific to the editor, but very useful) |
| Ctrl and - | ⌘ and - | Zoom out (not specific to the editor, but very useful) |
| Ctrl and 0 | ⌘ and 0 | Reset zoom (not specific to the editor, but very useful) |
Source: Jason 1keddie, Royal Roads University (Creative Commons Attribution-ShareAlike)
Site administration settings
Toolbar settings
The administrator can specify which plugins to display and in which order from Administration > Site administration > Plugins > Text editors > Atto HTML editor > Atto toolbar settings.

Toolbar config table
The toolbar is split into groups of related buttons. The format for the config setting is:
groupname1 = button1, button2, button3 groupname2 = button1, button2, button3
The group names on the left have no effect on how the toolbar works; they just need to be different for each button (and no spaces please). The list of buttons says which button goes in which group and in what order. The exact word to insert here for each button is listed in the "Toolbar config" column above.
The reason there are names for the groups is that it helps to make you think about how to group the buttons sensibly and not just stick new buttons in random locations. Ie. all the buttons in the "files" group interact with the file picker in some way
Adding extra buttons
Extra plugins from the list (for example 'Font color') may be added by typing the toolbarconfig term into the toolbar config table.

Here for example are the available colours when 'fontcolor' is added:

The icons are displayed in related groups and the administrator can decide how many groups to display in the default collapsed state of the toolbar (that is, how many groups to display on Row 1).
Autosave frequency
Text is automatically saved at regular intervals so it may be restored when the user returns to a form they had previously left. This setting allows the administrator to specify the time between autosaves. The default is one minute.
Non default Atto plugins
Not all plugins are enabled by default and the administrator of each site should give careful thought as to which plugins they choose to enable for their users. Here are some things to consider before enabling the non-default plugins:
Background colour / Font colour
While these are very popular plugins, there are downsides to enabling their use on a site. Firstly - user specified colours may conflict visually with the site colours chosen by the theme designer. Even if the colours of the content do not conflict with the colours of the current theme, if the theme is changed in future, or the content is reused on a different site conflicts may be introduced. There are 2 possible types of conflicts, the first is just a visually unappealing combination of colours, the second is a combination of colours that may produce text that is hard to read for some people. It is preferable if the theme designer uses some interesting colours that meet the accessibility standards required for the site in the theme for the site, and the person creating the content simply uses the proper heading levels (for example) to make use of those styles.
Emoji picker
An emoji picker button may be added by typing 'emojipicker' into the toolbar config table.
To add the emoji picker button to the top row:
- Enter the line
emoji = emojipickerunder the linefiles = image, emoticon, media, managefiles, recordrtc, h5p - Go to 'Collapse toolbar settings' and change 'Show first (n) groups when collapsed' to 6 and save changes.
Emoticons
The emoticon plugin inserts text representations of the emoticons in the content. The emoticon filter is responsible for converting these text sequences into proper smiley images. The emoticon filter is not enabled by default, which is why the emoticon plugin for Atto is not enabled by default.
No-auto link
In general, the more plugins are added to the Atto toolbar, the harder it becomes to find specific plugins. Because the no-auto link plugin is not felt to be widely used it is not enabled by default.
Right to left
Because this plugin is only useful for courses where text needs to be written in a mixture of both "left to right" and "right to left" languages, it is not enabled by default.
Moodle plugins directory
There are more plugins available for Atto than just those included in a default install. See the Moodle plugins directory for additional plugins. Some example plugins include the following:
Cloze editor for Atto
This is a plugin for easily making Embedded Answers (Cloze) question type questions inside the standard Moodle Atto text editor.
Toggle preview
This plugin allows you view the content as it would be seen by a reader.
Chemistry plugins
There are a number of chemistry plugins that support chemistry equations and structures.
Text import plugins
There are a number of plugins that support importing text from other sources. The Paste special plugin minimises the amount of superfluous HTML markup included when pasting content from an external editor such as Microsoft Word.
The Word Import plugin (beta) supports importing an entire Word document, including embedded images.
Equation editor settings
Equation editor commands may be removed, added or reordered in Administration > Site administration > Plugins > Text editors > Atto HTML editor > Equation editor settings.

Table editor settings
Styles, colours and sizes for tables and their borders may be enabled from Administration > Site administraton >Plugins > Test editors > Atto HTML editor > Table settings.
See also
- Text editor FAQ
- Embedded files repository
- Word count quick guide - Word count is a plugin for the Atto text editor which is used to create content within Moodle. This plugin enables the author of text, such as a student, to check how many words and letters are in a piece of text.
El editor de texto ('editor HTML') tiene muchos íconos para asistir al usuario al escribir contenido. Muchos de estos íconos y funciones le deberían de ser familiares a cualquier persona que use un procesador de texto.
Nota del traductor: Sin embargo, escribir en la web para la web es diferente, y especialmente con consideraciones para diseño y Accesibilidad, el editor Atto puede que no haga lo que Usted esperaría que hiciera un editor normal, o inclusive el antiguo editor TinyMCE en versiones anteriores de Moodle. Para comentarios al respecto, por favor vea esta publicación en foro..
Algunos ejemplos de donde verá Usted el editor de texto incluyen: Editar encabezados de secciones, descripción de una actividad, al escribir la respuesta a una pregunta dentro de un examen, o al editar el contenido de muchos bloques.
En Moodle 2.7 en adelante, el editor de texto por defecto es el editor Atto, que fuera hecho específicamente para Moodle. También existe una versión del Editor TinyMCE y un editor de texto simple.
Los editores de texto pueden habilitarse, deshabilitarse o configurar uno diferente como editor por defecto desde Administración > Administración del sitio > Plugins >Editores de etxto > Gestionar editores . Aquí también puede especificarse el orden de prioridad.
Si estuviera habilitado más de un editor de texto, un usuario individal puede seleccionar su editor preferido en (Moodle 2.9 y superiores) desde su página de Preferencias en el menú del usuario (arriba a la derecha).
Editor Atto de HTML
Mostrar el código HTML
Diseño de la barra de herramientas de editor Atto
Atto Fila 1
| 1: Expander | 2. Estilo | 3. Negritas | 4. Cursivas |
| 5. Lista con viñetas | 6. Lista numerada | 7. Añadir enlace | 8. Des-enlazar |
| 9. Añadir carita sonriente (si está habilitado) | 10. Añadir medio | 11. Añadir medio | 12. Grabar audio |
| 13. Grabar video | 14. Gestionar archivos incrustados | 15. H5P ¡Nueva característica en Moodle 3.8! |
Atto Fila2
| 1: Subrayar | 2. Tachar | 3. Subíndice | 4. Superíndice |
| 5. Alinear a la izquierda/derecha/centro | 6. Disminuir/aumentar indentación | 7. Editor de ecuación | 8. Caracter especial |
| 9. Tabla | 10. Limpiar formato | 11. Deshacer/rehacer | 12. Revisor de accesibilidad |
| 13. Ayuda para lector de pantalla | 14. Vista de código/HTML |
Gestionar imágenes incrustadas
Esto le permite a los usuarios el añadir, eliminar o anular archivos incrustados en el área actual de texto; por ejemplo, en una etiqueta o resumen de un tópico. (Complementa el Repositorio archivos incrustados)
Arrastrar y soltar imagen
Si su navegador de Internet lo permite (y si así fuera, Usted verá un mensaje en la parte superior de su pantalla cuando esté activada la edicion) Usted puede añadir imágenes dentro del editor Atto simplemente al arrastrarlas desxde su computadora:
Autoguardar
El texto tecleado dentro del editor Atto es automáticamente guardado si Usted abandona la página. El lapso por defecto es de 60 segundos y puede cambiarse por el administración en Administración del sitio > Plugins > Editores de texto > Editor Atto HTML > Configuraciones de barra de herramientas de Atto . Si el usuario cerrara accidentalmente la pestaña, o de alguna otra forma abandonara el formato (formulario) sin enviarlo, el texto en el editor será restaurado la siguiente ocasión en que abra la página. Para descartar un borrador restaurado, el usuario necesita cancelar el formato (formulario) o presionar el botón para "Deshacer" en el editor.
Revisor de accesibilidad
Una de las herramientas disponibles en el editor de texto es un revisor de accesibilidad automatizado que revisa algunos errores comunes en el texto. Estos errores son generalmente cosas que estorban la forma en la cual está construido el texto y que pueden evitar que todos los usuarios tengan el mismo acceso a la información y funcionalidad. La lista de problemas que el revisor de accesibilidad revisa son:
- Imágenes a las que les falta o tienen vacío el texto alterno (a menos que tengan el rol de presentación)
- Contraste de los colores del font y del fondo que cumpla con la normatividad WCAG AA
- Largos bloques de texto deben estar suficientemente subdivididos por encabezados
- Todas las tablas que necesiten letreritos deben tenerlos
- Las tablas no deberían de contener celdas unidas, ya que son difíciles de navegar con lectores de pantalla
- Todas las tablas deberían tener encabezados de fila o columna
Ayudante para lector-de-pantalla
Los lectores de pantalla básicamente tratan a una región de contenido editable como si fuera una caja de texto - lo cual está mal, porque podría contener imágenes, enlaces y más.
El ayudante del lector de pantalla proporciona información adicional acerca del texto actualmente seleccionado (por ejemplo, si estuviera en negritas), además de enlistar cualquier imagen o enlace en el texto.
Editor de ecuaciones
Si estuviera habilitado algún filtro , ya sea MathJax o la Notación TeX (en Administración > Administración del sitio > Plugins > Filtros > Gestionar filtros), entonces se proporciona un botón para edición de ecuaciones en la barra de herramientas, el cual invoca al editor de ecuaciones.
A partir de Moodle 3.0 en adelante, se proporcionan botones adicionales para raices cuadradas, fracciones y vectores.
Editor de tabla
Si el administrador ha habilitado las configuraciones extra para el editor de tabla de Atto (vea debajo), entonces estarán disponibles estilo del borde, tamaño y color, al crear una tabla:
Atajos del teclado
Los siguientes atajos del teclado funcionarán en el editor de texto Atto en la mayoría de los navegadores. Tenga en cuenta que para que funcionen muchos de estos comandos, Usted necesita, o hacer cilc dentro del editor de texto, o seleccionar contenido dentro del editor de texto.
| Comando en Windows | Comando en Mac | Función |
|---|---|---|
| Ctrl + c | ⌘ + c | Copiar |
| Ctrl + v | ⌘ + v | Pegar |
| Ctrl + Shift + v | ⌘ + Shift + v | Pegar sin formato (muy útil) |
| Ctrl + x | ⌘ + x | Cortar |
| Ctrl + z | ⌘ + z | Deshacer (cuidado - puede deshacer muchísimo texto y no siempre funciona) |
| Ctrl + y | ⌘ + y | Rehacer |
| Ctrl + a | ⌘ + a | Seleccionar todo |
| Doble-clic | Doble-clic | Seleccionar palabra |
| Triple-clic | Triple-clic | Seleccionar líinea |
| Ctrl + f | ⌘ + f | Encontrar en página |
| F3 | F3 | Encontrar siguiente |
| Shift + F3 | Shift + F3 | Encontrar anterior |
| Ctrl + b | ⌘ + b | Negritas |
| Ctrl + i | ⌘ + i | Cursivas |
| Ctrl + u | ⌘ + u | Subrayado |
| Ctrl + k | ⌘ + k | Insertar/editar enlace |
| Ctrl + Flecha derecha | ⌘ + Flecha derecha | Mover al final de la siguiente palabra |
| Ctrl + Flecha izquierda | ⌘ + Flecha izquierda | Mover al final de la palabra anterior |
| Ctrl + Shift + Flecha derecha | ⌘ + Shift + Flecha derecha | Seleccionar la siguiente palabra o letra |
| Ctrl + Shift + Flecha izquierda | ⌘ + Shift + Flecha izquierda | Seleccionar la palabra o letra anterior |
| Ctrl + Shift + Inicio | ⌘ + Shift + Inicio | Seleccionar desde el curso hasta el principio de la página |
| Ctrl + Shift + Fin | ⌘ + Shift + Fin | Seleccionar desde el curso hasta el final de la página |
| Ctrl + Inicio | ⌘ + Inicio | Mover al principio de la página |
| Ctrl + Fin | ⌘ + Fin | Mover al final de la página |
| Ctrl + Retroceder | ⌘ + Retroceder | Eliminar palabra o letra a la izquierda |
| Ctrl + Supr | ⌘ + Supr | Eliminar palabra o letra a la derecha |
| Ctrl y_además + | ⌘ y_además + | Aumentar Zoom (no específico al editor, pero muy útil) |
| Ctrl y_además - | ⌘ y_además - | Disminuir Zoom out (no específico al editor, pero muy útil) |
| Ctrl y_además 0 | ⌘ y_además 0 | Reiniciar zoom (no específico al editor, pero muy útil) |
Source: Jason 1keddie, Royal Roads University (Creative Commons Attribution-ShareAlike)
Configuraciones de administración del sitio
Configuraciones de Barra de Herramientas
El administrador puede especificar cuales plugins mostrar y en qué orden desde Administración > Administración del sitio > Plugins > Editores de texto >Editor HTML Atto > Configuraciones de barra de herramientas de Atto
Tabla de configuración de la Barra de Herramientas
La Barra de Herramientas está dividida en grupos de botones relacionados. El formato para el ajuste de la configuración es:
groupname1 = button1, button2, button3 groupname2 = button1, button2, button3
Los nombres de los grupos en la izquierda no tienen efecto sobre de cómo funciona la Barra de Herramientas; solamente necesitan ser diferentes para cada botón (y sin espacios, por favor). La lista de botones dice cual botón va en cual grupo y en cual orden. La palabra exacta a insertar aquí para cada botón está enlistada en la columna superior de "Toolbar config" (Configuración de la Barra de Herramientas).
La razón por la que existen nombres para los grupos es que esto ayuda a hacerlo a Usted pensar acerca del cómo agrupar los botones de manera sensata y no simplemente poner botones nuevos en lugares aleatorios (por ejemplo, todos los botones dentro del grupo de "files" (archivos) interactuan de alguna manera con el Selector de archivos.
Añadir botones extra
Pueden añadirse plugins adicionales a esta lista (por ejemplo, 'Color de letra' al escribir el término toolbarconfig dentro de la tabla de configuración de la barra de herramientas.
Aquí, por ejemplo, están los colores disponibles cuando se añade 'fontcolor':
Los íconos son mostrados en grupos relacionados y desde Administración > Administración del sitio > Plugins > Editores de texto > Editor HTML Atto > Configuraciones de barra de herramientas Atto , el administrador puede decidir cuantos grupos mostrar en el estado colapsado por defecto de la barra de herramientas (esto es, cuantos grupos mostrar en la Fila 1.)
Frecuencia de autoguardado
El texto es guardado automáticamente a intervalos regulares, para que pueda restaurarse cuando el usuario regresa a un formato que había dejado anteriormente. Esta configuración le permite al administrador especificar el tiempo entre autoguardados. El valor por defecto es de un minuto.
Plugins opcionales para Atto
No todos los plugins están habilitados por defecto; y el administrador de cada sitio debe de considerar cuidadosamente cuales eligirá habilitar para sus usuarios. Aquí hay algunos asuntos a considerar antes de habilitar plugins que no son estándar:
Color del fondo / Color del tipo de letra (font)
Aunque estos plugins son muy populares, hay desventajas de habilitar su uso en un sitio. Primeramente, - los colores especificados por el usuario pueden conflictuar visualmente con los colores del sitio elegidos por el diseñador del tema gráfico. Aun y cuando los colores del contenido no conflictuaran con los colores del tema actual, si el tema se cambiara en el futuro, o si el contenido se re-usara en un sitio diferente, se pueden introducir conflictos. Hay dos tipos de conflicto posibles; el primero es solamente una combinación visualmente desagradable de colores, el segundo es una combinación de colores que puede producir texto que es dificil para leer para algunas personas. Es preferible que el diseñador del tema use algunos colores interesantes que cumplan con los estándares de Accesibilidad requeridos para el sitio en el tema para el sitio, y que la persona que cree los contenidos simplemente use los niveles de encabezados apropiados (por ejemplo) para aprovechar estos estilos.
Selector de emoji
¡Nueva característica
en Moodle 3.8!
Un botón del selector de emoji puede ser añadido al escribir 'emojipicker' dentro de la tabla de configuración de la barra de heramientas.
Para añadir el botón del selector de emoji a la fila superior:
- Escriba la línea
emoji = emojipickerdebajo de la líneafiles = image, emoticon, media, managefiles, recordrtc, h5p - Vaya a 'Colapsar configuraciones de barra de herramientas' y cambie 'Mostrar los primeros (n) grupos cuando esté colapsada' a 6 y guarde los cambios.
Emoticones
El plugin para emoticones inserta representaciones en texto de los emoticones en el contenido. El Filtro para mostrar emoticones como imágenes es el responsable de convertir estas secuencias de texto a imágenes apropiadas de caritas sonrientes. El Filtro para mostrar emoticones como imágenes no está habilitado por defecto, razón por la que el plugin para emoticones de Atto tampoco está habilitado por defecto.
No-auto enlace
En general, cuantos más plugins le añada Usted a la barra de herramientas de Atto, tanto más dificil se volverá el poder encontrar plugins específicos. Debido a que se considera que el filtro de no-auto-enlace no tiene un uso amplio, no está habilitado por defecto.
De derecha a izquierda
Debido a que este filtro solamente es utilizado para cursos en donde necesita escribirse texto en una mezcla de idiomas que escriben "de izquierda a derecha" (español, inglés...) y "de derecha a izquierda" (hebreo, sirio y algunos tipos de árabe... ), no está habilitado por defecto.
Directorio de plugins de Moodle
Existen más plugins disponibles para Atto de los que vienen incluidos en una instalación estándar.
Vea el Moodle plugins directory para plugins adicionales. Algunos plugins, por ejemplo, incluyen:
Editor Cloze para Atto
Este plugin le permite a Usted hacer preguntas con respuestas incrustadas (Cloze) con facilidad en el editor de texto Atto estándar de Moodle.
Alternar vista previa
Este plugin le permite a Usted ver el contenido tal como sería visto por un lector
Plugins para Química
Hay varios plugins para química que soportan estructuras y ecuaciones químicas
Plugins para importar texto
Hay varios plugins que soportan la importación de texto de otras fuentes.
El plugin Paste special (pegado especial) minimiza la cantidad de código HTML markup superfluo incluido al pegar contenido proveniente de un editor externo como Microsoft Word.
El plugin Word Import (importar desde Word) (beta) soporta la importación de un documento de MS Word completo, incluyendo imágenes incrustadas.
Configuraciones del Editor de Ecuaciones
El ícono del editor de ecuaciones aparecerá si se habilitan, ya sea el Filtro de notación TeX o el Filtro MathJax en Administración > Administración del sitio > Plugins > Filtros > Gestionar filtros .
Se pueden añadir, quitar o reordenar comandos (órdenes) desde Administración > Administración del sitio > Plugins > Editores de texto > Editor HTML Atto > Configuraciones del editor de ecuaciones
Configuraciones del editor de tabla
Estilos, colores y tamaños para tablas y sus bordes pueden ser habilitados desde Administración del sitio > Plugins > Editores de texto > Editor Atto HTML > Configuraciones de tabla.
Documentación adicional, no incluida en la página original en idioma inglés
Arrastrar y soltar imágenes dentro del editor de texto
- Si su navegador de Internet lo soporta, Usted puede arrastrar y soltar imágenes dentro de una página, una pregunta y una etiqueta.
- Las imágenes arrastradas hacia una publicación dentro de un foro no aparecerán, a menos que Usted esté usando el editor Atto y tenga instalado el plugin adicional para Arrastrar y colocar.
- Las imágenes no pueden arrastrarse y soltarse con Chrome ni con Internet Explorer, pero si es posible hacerlo con Firefox.
- This forum thread tiene más discusiones al respecto.
- Hay un asunto en el tracker respecto a arrastrar y soltar dentro de Atto en https://tracker.moodle.org/browse/MDL-43996
Insertar tabla
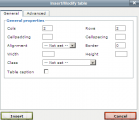
Pestaña General

Pestaña Avanzado


Para agregar bordes a una tabla
Los bordes en celdas son cruciales para ayudar a los lectores a seguir las filas a través de la pantalla. Si estos no se están mostrando, puedes agregarlos de este modo:
- En la página Wiki que contiene su tabla, hacer click en la pestaña Editar
- Cuidadosamente seleccione todas las celdas de la tabla
- Luego haga click del botón derecho (Macs: Command+click o Ctrl+Click) sobre cualquier parte de la selección para obtener el menú contextual, de éste seleccione Celda > Propiedades de la celda. Se cargará entonces el cuadro de dialogo de propiedades de la celda.
- Haga click en la pestaña Avanzado, seleccione el Color de borde negro (por ejemplo), luego presione Aplicar, y luego haga click en Actualizar.
- Haga click en Guardar, la página Wiki conteniendo su tabla se mostrará con sus bordes.
Vea también
- Moodle HQ screencast demonstrating Atto editor
- Editor de texto FAQ
- Repositorio archivos incrustados
- Guía rápida de Conteo de palabras - Conteo de palabras es un plugin para el editor de texto Atto que es usado para crear contenido dentro de Moodle. Este plugin le permite al autor del texto, como por ejemplo un estudiante, revisar cuantas palabras y cuantas letras hay en un trozo de texto.