Instalar plugins
- Instalación de Moodle
- Guía rápida de instalación
- Cron
- Instalar plugins
- Instalación FAQ
- Actualización
- Visión general de actualización
- Implementar actualizaciones automáticas
- Git para Administradores
- Administración por línea de comando
- Actualización FAQ
- ...y también...
- Directorio Moodle del sitio Moodle
- BasedeDatos del sitio Moodle
- Directorio de datos del sitio Moodle
- Moodle en una netbook sin internet
- Migración de Moodle
- Tamaño de archivo subido
- Crear archivo .htaccess
Nota del traductor: El paquete de idioma Español internacional tradujo la palabra inglesa plugin como extensión, lo que causa confusión con las auténticas extensiones de PHP y las extensiones del sistema operativo Windows (como .ZIP). El paquete de Español de México usa la palabra inglesa plugin que es más exacta y no tiene las homonimias descritas. A principios del 2013 Moodle decidió renombrar los contributed plugins a add-ons, cuya traducción correcta es complementos.
Un complemento (add-on) es un plugin opcional para añadirle acarcterísticas y funcionalidad adicionales a Moodle, tales como nuevas actividades, nuevas preguntas para examen, nuevos reportes, integración con otros sistemas y muchas más.
¿Qué significan las palabras 'plugin' y complemento (add-on)?
Moodle= código del núcleo + plugins.
Los plugins pueden ser de dos tipos: los plugins estándar (incluídos en el paquete de descarga de Moodle) o complementos (en inglés = add-ons).
Antes de hacer cualquier cosa ...
MUY IMPORTANTE: Advertencia: Tenga en cuenta que algunos módulos y plugins aportados no han sido revisados, y la calidad y/o idoneidad para su sitio Moodle no ha sido comprobada. Por favor tenga cuidado cuando considere utilizar uno. Podría no hacer lo que se espera, podría tener serios problemas de seguridad o incluso no funcionar.
- ¿Realmente necesita utilizar el plugin? Mayor funcionalidad significa mas cosas a mantener, mas cosas que pueden (potencialmente) ir mal y mas cosas de que preocuparse al actualizar.
- ¿Tiene el plugin soporte y mantenimiento? ¿Si algo sale mal se puede obtener soporte? ¿Se repararán los errores?
- ¿Si el plugin no funciona en una versión futura de Moodle, que puede hacer?
- ¡Tenga cuidado con los parches! Si un plugin modifica o reemplaza archivos del core entonces tenga mucho cuidado. Sólo puede ser garantizado para trabajar con la versión de Moodle que fue creado y es muy poco probable que sobreviva a una actualización de Moodle.
Instalación de un complemento
To install an add-on, its source code must be put (deployed) into the appropriate location inside the Moodle installation directory and the main administration page Administration > Site administration > Notifications must be visited. There are three ways how the add-on code can be deployed into Moodle.
¡Nueva característica
en Moodle 2.5!
In Moodle 2.5 onwards, an add-on code may be deployed from within Moodle, either directly from the Moodle plugins directory or by uploading a ZIP file. The web server process has to have write access to the plugin type folder where the new add-on is to be installed in order to use either of these methods.
Alternatively, an add-on code may be deployed manually at the server.
Instalación directamente desde el directorio de plugins de Moodle
- Login as an admin and go to Administration > Site administration > Plugins > Install add-ons.
- Click the button 'Install add-ons from Moodle plugins directory'.
- Search for a plugin with an Install button (i.e. suitable for 2.5), click the Install button then click Continue.
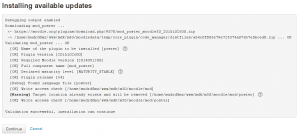
- Check that you obtain a 'Validation passed!' message, then click the button 'Install add-on'.
Instalación mediante archivo ZIP subido al sitio
- Go to the Moodle plugins directory, select Moodle 2.5 as version, then choose an add-on with a Download button and download the ZIP file.
- Login to your Moodle site as an admin and go to Administration > Site administration > Plugins > Install add-ons.
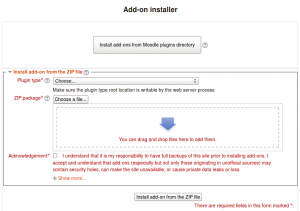
- Upload the ZIP file, select the appropriate plugin type, tick the acknowledgement checkbox, then click the button 'Install add-on from the ZIP file'.
- Check that you obtain a 'Validation passed!' message, then click the button 'Install add-on'.
For both of the above methods, after clicking the button 'Install add-on', you will then be automatically redirected to Settings > Site administration > Notifications and the installation process (i.e. creating required database tables etc) will happen.
Instalación manual en el servidor
If you can't deploy the add-on code via the administration web interface, you have to copy it to the server file system manually (e.g. if the web server process does not have write access to the Moodle installation tree to do this for you).
First, establish the correct place in the Moodle code tree for the add-on type. Common locations are:
- /path/to/moodle/theme/ - themes
- /path/to/moodle/mod/ - activity modules and resources
- /path/to/moodle/blocks/ - sidebar blocks
- /path/to/moodle/question/type/ - question types
- /path/to/moodle/course/format/ - course formats
- /path/to/moodle/admin/report/ - admin reports
See dev:Plugins for the full list of all plugin types and their locations within the Moodle tree.
- Go to the Moodle plugins directory, select Moodle 2.5 as version, then choose an add-on with a Download button and download the ZIP file.
- Upload or copy it to your Moodle server.
- Unzip it in the right place for the plugin type (or follow add-on instructions).
- In your Moodle site (as admin) go to Settings > Site administration > Notifications (you should, for most plugin types, get a message saying the add-on is installed).
Note: The add-on may contain language files. They'll be found by your Moodle automatically. These language strings can be customized using the standard Settings > Site administration > Language editing interface.
Correccción de problemas
Errores
If you obtain an error, please turn debugging on to obtain additional information about the cause of the error.
- tool_installaddon/err_curl_exec - cURL error 60
- This suggests problems with the validation of the SSL certificate of the remote (moodle.org) site. This is also a known problem in Moodle Windows 7 servers running the Moodle package for Windows. See SSL certificate for moodle.org for more info and possible solutions.
Al instalar manualmente
- Comprobar los permisos de los archivos. El servidor web debe ser capaz de leer los archivos del plugin. Si el resto de Moodle funciona, entonces intente que los permisos y la titularidad del plugin coincidan.
- ¿Está seguro de que ha descomprimido o instalado el bloque en el lugar correcto?
- Ya que Moodle escanea las carpetas de los plugins para encontrar nuevos, no se pueden dejar otros archivos o carpetas en ellas. Asegúrese de que ha borrado el archivo zip y no intente cambiar el nombre (por ejemplo) a una versión anterior del plugin – saldrá un error.
- Asegúrese de que el nombre del directorio del plugin es correcto. Todos los nombres tienen que coincidir. Si cambia el nombre no funcionará.
- Active la depuración – ¿algún mensaje de error?
Obtención de ayuda
- Pregunte en el foro adecuado en Using Moodle sección 3, 'Moodle contrib' (o en Español ) . Asegúrese de que describe su sistema (incluyendo versiones de MySQL, PHP etc.), lo que ha intentado y lo que ha pasado. Copie y pegue el mensaje de directamente. Por favor proporcione el link a la versión del plugin que ha descargado (algunos tienen nombres muy similares).
Desinstalación de un complemento
Para desinstalar un complemento
- Ir a Opciones > Administración del sitio > Plugins > Plugins overview y clic al botón de Uninstall en frente del plugin que se quiera quitar.
- Utilice el administrador de archivos para quitar/eliminar el directorio de plugins según las instrucciones, de lo contrario, Moodle, voverá a instalarlo la próxima vez que acceda administración del sitio
Nota: Algunos tipos de plugin ofrecen la remoción del disco también, aunque todavía no lo hacen todos..
Vista general de plugins
The Plugins overview page in Administration > Site Administration > Plugins > Plugins overview lists all installed plugins, together with the version number, availability (enabled or disabled) and settings link (if applicable).
A 'Check for available updates' button enables admins to quickly check for any updates available to standard plugins or add-ons installed on the site (from the plugins directory). Any updates available are highlighted, with further information and a download link in the notes column opposite the plugin.
Actualización de plugin desde adentro de Moodle
In Moodle 2.4 onwards, an administrator can enable updates deployment in Administration > Site Administration > Server > Update notifications. Then when updates are available, 'Install this update' buttons are shown on the Plugins overview page. Vea Implementar actualizaciones automáticas para más detalles.
Preventing installing add-ons from within Moodle
If required, installing and updating from within Moodle can be prevented by copying the following lines of code from config-dist.php and pasting them in config.php.
// Use the following flag to completely disable the On-click add-on installation
// feature and hide it from the server administration UI.
//
//      $CFG->disableonclickaddoninstall = true;
Vea también
- Notificaciones para mayores detalles acerca de notificaciones de actualizaciones
- Add-on FAQ
- Using Moodle General add-ons forum
- Installing a contributed extension from its Git repository
Para desarrolladores:


