Usando Tarea
| Existe documentación diferente para varias versiones de Moodle: Esta documentación es para Moodle 3.1 y más recientes. Para la documentación anterior vea 29/Usando Tarea. |
Esta página necesita actualizarse con la información existente en la documentación vigente/moderna/actualizada en el idioma inglés original para Moodle. Se le sugiere al lector que consulte la página original en idioma inglés cuyo enlace está al fondo de esta página. y que, por favor, actualice esta información y quite la plantilla {{Actualizar}} cuando haya terminado. (otras páginas pendientes de actualizar)
¿Qué opciones existen para enviar trabajos en Moodle?
Las formas estándar en que los estudiantes pueden enviar tareas son:
- Envío de archivos (los estudiantes envían un archivo para su calificación)
- Texto en línea (los estudiantes pueden escribir sus respuestas directamente en Moodle)
- Comentarios a las tareas
Notas
- También es posible usar el módulo Tarea para evaluar una "tarea fuera-de-línea (offline)", ej: una en la cual el trabajo se ha realizado fuera de Moodle. Esto se hace simplemente desmarcando las tres opciones indicadas anteriormente.
- Si no está seguro de qué tipo de Tarea se adapta mejor a sus necesidades, eche un vistazo a la siguiente sección #¿Qué tipo de envío le acomoda mejor?
¿Cómo envían sus tareas los estudiantes?
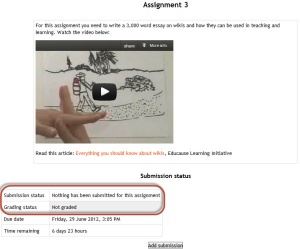
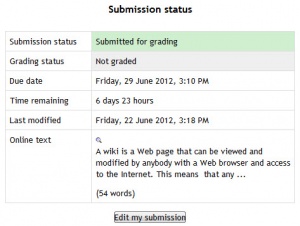
La primera pagina que verán los estudiantes cuando hagan click en el enlace de la actividad Tarea desde la página del curso les mostrará el nombre de la tarea, su descripción y el estatus del envío. La vez primera que un estudiante vea la tarea se verá así:
La sección del estatus del envío incluye:
- Estatus del envío
- Estatus de calificación
- Fecha esperada
- Tiempo restante
- Última modificación
- Detalles del envío
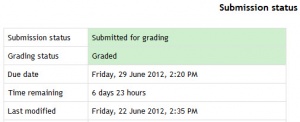
Conforme los estudiantes progresan en la tarea, el estatus del envío y el estatus de la calificación se actualizarán y aparecerá la fecha de la última modificación.
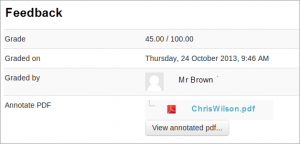
Si el estudiante sube un archivo, al cual el profesor le ha hecho anotaciones, éstas estarán disponibles en la sección de retroalimentación. El estudiante puede buscar en el documento y filtrar comentarios específicos.
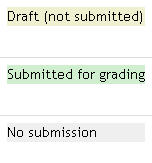
Los estatus del envío incluyen:
- No se envió nada para esta tarea
- Borrador (no enviado)
- Enviado para que sea calificado
Los estatus de calificacióonincluyen:
- No calificado
- Calificado
Nota: Urgente de Traducir. ¡ Anímese a traducir esta muy importante página !. ( y otras páginas muy importantes que urge traducir)
Envío de archivo
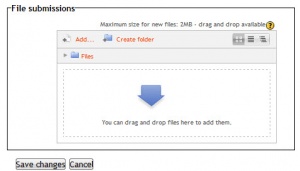
To submit a file submission, students complete the following steps:
- Click the ‘Add submission’ button to bring up the file upload page.
- Upload the relevant file into the submission. They are able to ‘drag and drop’ the file into the submission box.
- Click ‘Save Changes’.
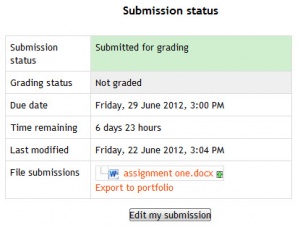
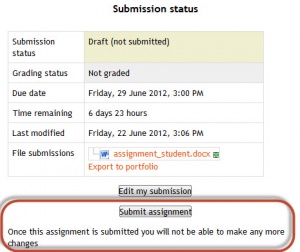
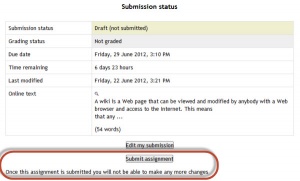
There should now be a Last modified date and the file(s) uploaded will also be displayed. Depending on how the assignment is setup the status will either read ‘Submitted for grading’ - in which case no further action is need, or ‘Draft (not submitted)’.
- If changes are required, click on ‘Edit submission’.
- Once ready to submit, click ‘Submit assignment’.
Note that once the assignment is 'submitted’ no further changes are allowed.
Note: Depending on how the assignment is setup students may see both a file submission page and an online text editor.
Enlaces de acceso controlado
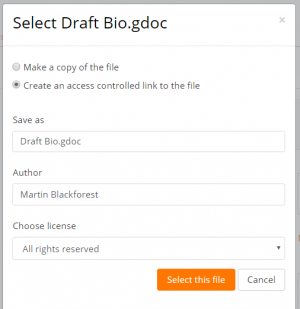
Si el administrador ha habilitado esta característica para, ya sea el Repositorio Google Drive o el Repositorio OneDrive entonces los estudiantes pueden subir un archivo como un 'enlace de acceso controlado' desde cualquiera de estos repositorios. El archivo será entonces copiado a la cuenta del sitio y el estudiante ya no podrá editarlo.El estudiante conserva el archivo original en su propio Google Drive o OneDrive. Al profesor se le otorga permiso para editar el archivo con la finalidad de calificarlo, y al estudiante se le envía una copia del archivo editado.
Texto en-línea
To submit online text, students complete the following steps:
- Click the ‘Add submission’ button to bring up the online text editor page.
- Type the relevant text into the editor de texto, or paste from a previously written file.
- Click ‘Save Changes’.
There should now be a Last modified date and the first 100 characters entered will also be displayed. Depending on how the assignment is setup the status will either read ‘Submitted for grading’ - in which case no further action is need, or ‘Draft (not submitted)’.
- If changes are required, click on ‘Edit my submission’.
- Once ready to submit, click ‘Submit assignment’.
Note that once the assignment is 'submitted’ no further changes are allowed.
Comentarios al envío
Depending on how the assignment has been setup, there may be a section where students can leave submission comments.
Calificar y retroalimentación
Cuando los estudiantes hayan enviado sus tareas, se puede acceder a ellas haciendo clic en la actividad de la tarea. Aparecerá la página Resumen de calificaciones.
La página Resumen de calificaciones muestra un resumen de la tarea, incluyendo: número de participantes, número de borradores, número de tareas enviadas, fecha de entrega y tiempo restante.
Si hace clic en "Calificar", accederá al primer estudiante de la lista para que pueda empezar a calificar individualmente. Si hace clic en "Ver todos los envíos", accederá a la tabla de calificaciones, donde podrá ver a todos los estudiantes.
La tabla de calificaciones contiene columnas con información sobre el estudiante, el estado de su envío, un enlace para calificar su envío, un enlace a cada envío y comentarios y archivos (si están activados).
Filtrando envíos
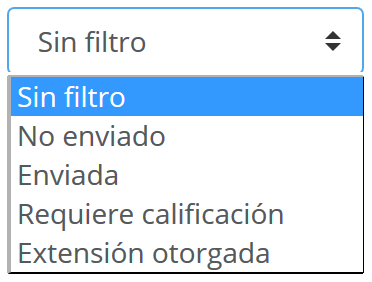
Un menú desplegable al que se accede desde la sección de 'Opciones' le permite a Usted filtrar los envíos de forma tal que Usted pueda, por ejemplo, ver rápidamente cuales estudiantes todavía no han enviado.
Nuevo en Moodle 3.3: Usted también puede filtrar envíos a los que les hayan otorgado extensiones (para entregarlos después).
Asignando envíos a personas que califican
Si Usted necesita dividir los envíos entre más de una persona, Usted puede aplicar Grupos a la Tarea y hacerles saber a las personas que califican cuales grupos les toca calificar. Tome nota de que debido a que la membresía al grupo en sí misma no está anonimizada, esto podría hacer que los envíos anonimizados sean un poco menos anónimos, aunque mientras los grupos no sean mucho muy pequeños, esto debería de ser aceptable.
Una alternativa es usar asignación de calificadores - esto le permite a cualquier persona con rol de profesor asignar a una persona que califique para cada envío. Esto funciona particularmente bien si la acción de calificar es asignada según la especialidad del tema.
Estatus del envío
Si va a asignar calificaciones a los trabajos de los estudiantes, es posible que desee comprobar el estado del envío antes de comenzar el proceso de calificación. Si ha pedido a los estudiantes que hagan clic en el botón Enviar, puede encontrar que algunos envíos todavía están marcados como Borrador (no enviado), lo que significa que el estudiante ha cargado un archivo o ha introducido algún texto, pero no ha hecho clic en "Enviar tarea".
Si es después de la fecha de vencimiento y está a punto de comenzar la calificación, utilice "Impedir cambios en el envío" para evitar que los estudiantes realicen cambios en su tarea. Puede hacerlo uno por uno utilizando el icono de la columna Editar.
O puede seleccionar dos o más estudiantes marcando la casilla en la columna de selección y yendo a "Bloquear envíos" en el menú Con seleccionados bajo la tabla de calificaciones.
También puede revertir el envío de un estudiante a borrador si ha subido el archivo incorrecto. En lugar de seleccionar "Impedir cambios en el envío", seleccione "Revertir el envío a borrador", o marque los estudiantes seleccionados y elija "Revertir el envío al estado de borrador" en el menú "Con seleccionados" de la tabla de calificaciones.
Si la configuración del envío "Reintentos permitidos" se establece en "Automáticamente hasta aprobar" y un envío se califica por debajo de la calificación para aprobar, entonces el envío se desbloquea automáticamente cuando se guarda la calificación. Del mismo modo, si la configuración del envío "Reintentos permitidos" se establece en Manual y un profesor selecciona "Permitir otro intento", el envío se desbloquea automáticamente (antes de la versión 3.0.3, el envío debía desbloquearse manualmente).
Anulando fechas límites de tarea
¡Nueva característica
en Moodle 3.2!
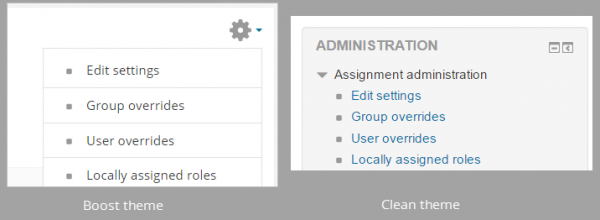
Un profesor puede anular una fecha límite para un individuo o para un grupo desde el enlace para configuraciones de la ttarea (menú del engrane en el Tema Boost o en la Administración para otros temas.) Vea el screencast Assignment overrides para una demostración.
Al añadir anulaciones para un grupo, es posible tener que una anulación de un grupo tenga prioridad por sobre de otra. Esto se logra al mover la anulación hacia arriba/abajo en la página de anulaciones de grupo:
Esta situación, un estudiante en ambos grupo (ejemplo, Frodo Baggins) tendrá la anulación de "The Council of Elrond" aplicada. Al presionar los íconos de flecha a la derecha, la anulación para "The Fellowship" puede moverse hacia la parte superior de la lista, y tendrá mayor prioridad.
Tome nota también de que si existiera una anulación de usuario para un estudiante, siempre tendrá precedencia por sobre de cualquier anulación de grupo.
Conceder extensiones
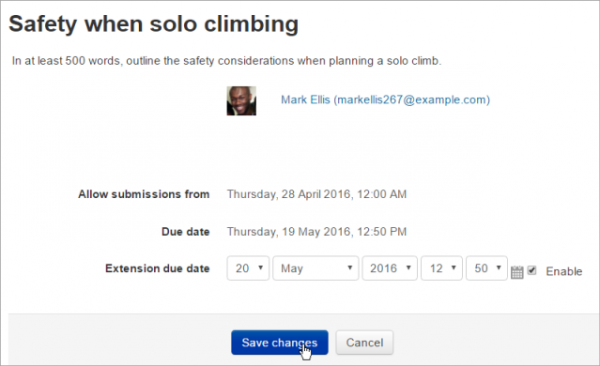
Si la tarea tuviera una fecha límite, un profesor puede otorgar extensiones individuales o grupales a la fecha de la tarea al seleccionar el enlace para Editar junto a un estudiante o grupo particular.
- Para otorgar una extensión, abra la tarea
- Haga click en "Ver todos los envíos"
- Localice al estudiante al que se le permitirá enviar después de la "Fecha de corte"
- Haga click en el menú colapsable y seleccione "Otorgar extensión"
- Configure la fecha y la hora de la extensión. El nombre del grupo del estudiante también es mostrado en esta pantalla.
- Haga click en "Guardar cambios".
Calificación rápida
Quick grading allows you to enter numeric grades directly into the grading table, bypassing the more detailed grading interface. Please note:
- if you want to give feedback, you need to use the more detailed Grade interface.
- Quick grading is incompatible with advanced grading e.g. Rubrics, and is not recommended when there are multiple markers.
- Submission comments are a two-way private conversation between a student and staff and are visible to students immediately i.e. markers use the grading interface to give feedback, not the submission comments.
To access the Quick Grading interface, from the Grading Summary page click 'View all submissions'; the Grading Table displays. Scroll to bottom of the page to configure Options, and check the box for 'Quick grading'. While you're down there, you can also set the number of assignments to display per page, filter the assignments e.g. to see who has not submitted, unmarked assignments, etc.
When you are ready to Quick Grade:
- You can enter grades directly into the grading table.
- Scroll to the bottom of the grading table and click 'Save all quick grading changes'
- A confirmation displays.
Calificar envíos individuales
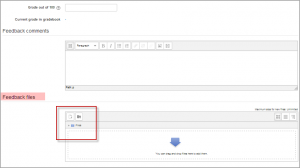
If you have enabled File Feedback in the Configuraciones de tarea and wish to upload either the marked student assignment, a completed text based feedback document or audio feedback, click on the green tick in the Grade column (or use the icon in the Edit column and select Grade).
This brings you to the Student Grading Page where you can give grades, feedback comments and feedback files (if enabled in the Configuraciones de tarea). You can use drag and drop to upload feedback files.
Hacer anotaciones a los envíos
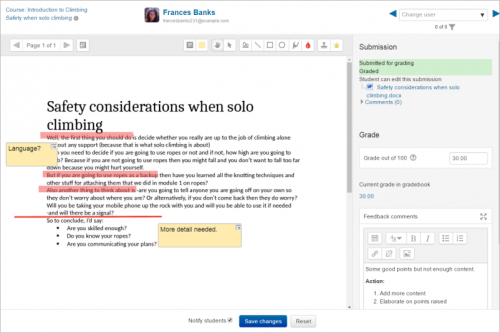
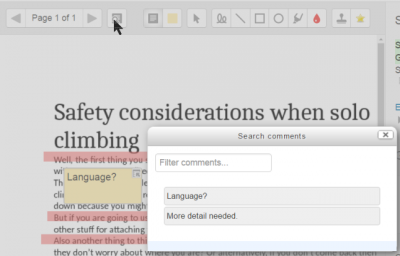
Si el estudiante ha subido un archivo PDF, DOCX u ODT, o si Usted configura 'Comentario en-línea ' par aun envío de texto en-línea, entonces sus envíos se mostrarán en la pantalla para calificarlos, lo que le permite a USted hacerles anotaciones, usando una variedad de herramientas, sellos (si los subió el administrador) y comentarios que pueden ser guardados en un banco de comentarios. Cuando las anotaciones estén completas, haga click en 'Guardar los cambios', lo que causará que se le muestren al estudiante como parte de su retroalimentación.
¡Nueva característica
en Moodle 3.7!
Nuevos íconos para 'rotar' le permiten cambiar la orientación de un documento subido si el estudiante lo subió en modo apaisado, por ejemplo.
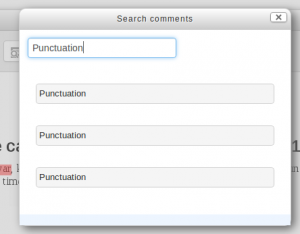
Los comentarios pueden añadirse y después guardarse en una lista rápida para uso futuro (1) Haga click en el ícono del papel/lupa a la derecha del selector de página para buscar comentarios guardados previamente (2)
- En la ventana emergente para Buscar comentarios, escriba el término que quiere buscar en la caja para Filtrar comentarios....
- Al hacer click en el comentario lo llevará a la parte del escrito en donde se ha añadido ese comentario.
| Nota: Para segurar que los comentarios se les muestren a los estudiantes de la forma que pretende el evaluador, instruya a los estudiantes para que descarguen el PDF con anotaciones en lugar de que simplemente vean la vista previa. La vista previa en ocasiones muestra los comentarios en una forrma tal que oscurece al texto original. |
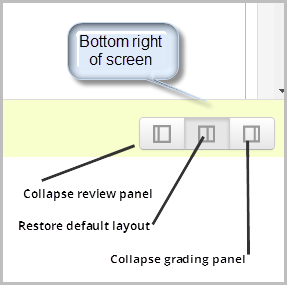
El panel para revisar o el panel para calificar pueden ser colapsados al hacer click en los íconos en la parte inferior derecha de la pantalla.
| Nota: Si Usted no puede hacerle anotaciones a los envíos de los estudiantes, revise con su administrador que estén instalados Ghostscript y unoconv 07. |
Controlar cuando notificarle a los estudiantes sobre su trabajo calificado
Notificar conforme Usted califica
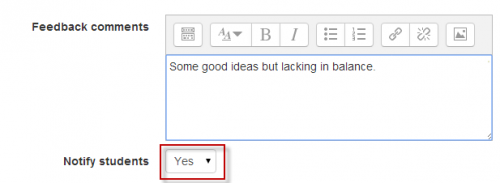
If you need to notify individual students, one by one, as you mark, the Notify students checkbox is available when grading individual submissions. Choose Yes to notify the student immediately or No to grade without notifying the student. Assuming you are not hiding grades in the ways outlined below, then Moodle will send a notification.
| Nota: El cómo reciban los estudiantes las notificaciones de Moodle depende de sus configuraciones locales por defecto, y cualquier cambio que los estudiantes hubieran hecho a estas configuraciones. |
Mantener ocultas las calificaciones hasta una fecha de liberación
Los evaluadores a menudo deciden ocultar las calificaciones hasta que hayan terminado de calificar todo, y después las liberan todas a la vez. Hay dos alternativas para hacer esto:
- Ocultar el ítem en el Reporte del calificador. Esto es conveniente si hay pocas personas que califican y Usted ha decidido en una fecha provisional para liberar los puntajes y la retroalimentación.
- O habilitar el usar flujograma para calificar en las Configuraciones de Tarea. Esta forma es la mejor cuando hay muchas personas que califican o cuando Usted no tiene elegida una fecha provisional para liberar los puntajes y las retroalimentaciones.
(Si Usted quisiera que la Tarea de Moodle tuviera sus propias configuraciones para liberar las calificaciones y la retroalimentación puede votar por MDL-18722.)
Calificar fuera-de-línea - descargar y subir calificaciones múltiples y archivos de retroalimentación
If you don't have an internet connection or prefer to grade outside Moodle, you can do so (including with anonymous submissions). These easy stages explained below:
- Download the submitted work.
- Download the spreadsheet (grading worksheet) to record grades.
- Grade and annotate (if applicable) the submitted work .
- Upload the completed grading worksheet.
- Upload the annotated submissions (if applicable).
| Nota: Usted no podrá subir puntajes ni retroalimentación a Moodle si Usted ha habilitado Rúbricas o Guía de puntaje. |
Antes de comenzar, habilite las configuraciones para subida de múltiples archivos
Go to the settings of that assignment. For Feedback types, ensure that the Moodle Assignment settings, Feedback comments, Feedback files, and Offline grading worksheet are ticked.
Descargar el trabajo enviado
- Click on the assignment name on the Moodle course homepage to access the summary page and click View all submissions; a page with the Grading Table displays.
- From the Grading action drop-down menu choose Download all submissions; save the zip file (i.e. the compressed and bundled submissions).
- In your file management software go to the place you saved the zip file.
- Extract the contents of the zip file, usually by double-clicking and following the prompts. Extract to a new folder so all the feedback files can easily be zipped back together later if you need to upload them with feedback.
Descargar la Hoja_de_cálculo para guardar las calificaciones
- Next, to download the spreadsheet in which you'll enter the grades and brief comments, return to the Moodle Assignment page and from its Grading action drop-down menu choose Download grading worksheet and save that file (keep its csv file format).
| Nota: Optimísticamente la hoja-de-cálculo descargada contendrá las calificaciones existentes y comentarios resumidos que hayan sido dados para esa tarea. Por ejemplo, si ya hubiera comenzado la calificación. Sin embargo, para ver los comentarios pre-existentes completamente, Usted necesita configurar su hoja-de-cálculo para que el texto 'de la vuelta' adentro de las celdas. |
Calificar y hacerle anotaciones (si aplica) al trabajo enviado
After downloading the submissions and the grading worksheet:
- Open a downloaded assignment file to assess it.
- Open the csv file in a spreadsheet editor e.g. Excel.
- For that student's record (if anonymous, a number corresponding to the submission file name will display), enter grades in the Grade column and summary comments in the Feedback comments column for each student.
- Leave the other data untouched unless you know exactly what you're doing.
- Repeat as needed.
- Save the csv file.
| Nota: Tenga mucho cuidado en ingresar los datos en la columna correcta de la hoja-de-cálculo. |
If you are annotating the submissions to return to students as feedback:
- Open a downloaded submission.
- Carry out your annotations.
- Save it in its original place i.e. the folder corresponding to that student.
- Repeat as needed.
If you have separate feedback files to upload to students:
- Save these within that student's folder.
- You can give students multiple feedback files in this way e.g. annotations on their work along with a separate pro forma.
| Nota: No cambie el nombre ni la localización de la carpeta - Moodle necesita esta información para asignar los archivos correctamente. |
Compress (zip) all the feedback files:
- Locate the folder containing the feedback files in Moodle, select them all (Ctrl+A within the folder), then zip them:
- Windows: Right click one of the selected files and Send to > Compressed (zipped) folder.
- Mac: Right Click (or Ctrl+click) one of the selected files and click Compress.
- They are now ready for upload (see below).
Subir la hoja_de_trabajo para calificar completada
When you are ready to upload grades and summary feedback:
- Click on the assignment name on the Moodle course homepage to access the summary page and click View/grade all submissions.
- From the Grading action drop-down menu choose Upload grading worksheet.
- Click Choose a file... and upload the grading worksheet to Moodle, or drag the csv file to the arrow and wait for the file name to appear in the box.
- There is a checkbox to overwrite records that have been modified more recently in Moodle than in the spreadsheet - only check this if you want to spreadsheet to overwrite all Moodle records, including ones made more recently than the spreadsheet.
- Click Upload grading worksheet; a Confirmation box displays the students grades and feedback that will be imported - check this carefully.
- If you are ready to proceed, click Confirm; a summary of updates displays.
- Click Continue.
Subir archivos de retroalimentación (si aplicara)
- Click on the assignment name on the Moodle course homepage to access the summary page and click View/grade all submissions.
- From the Grading action drop-down menu choose Upload multiple feedback files in a zip.
- Click Choose a file... and upload the zipped assignments file to Moodle, or drag the compressed/zipped file to the arrow and wait for the file name to appear in the box.
- Click Import feedback file(s).
- The Confirmation box will list all the feedback files and student names that will be imported.
- Click Confirm; the next screen summarises the changes.
- Click Continue.
- From the page containing the Grading Table, you can check your feedback files by enabling Quick grading (see Options at the bottom of that page) and scrolling horizontally, if needed.
Darle el mismo archivo de retroalimentación a varios estudiantes
If you have high level feedback you want to give to an entire cohort, it is generally a good idea to give this feedback in the context of the assignment, rather than e.g. separately via a Forum. Moodle allows you to select some or all students and attach a single, common feedback file to their assignment feedback. This common feedback will appear to each student along with any other individual feedback files you have prepared for each.
- Prepare the single file of feedback.
- Click on the link to the Assignment; its summary page displays.
- Click View all submissions; the assignment's Grading Table displays.
- Use the checkboxes to select all or some students to receive the feedback (you may first prefer to configure the Grading Table to show as many students as possible on a single page).
- Underneath the Grading Table click the With selected... menu, choose Send feedback files, then click Go; a page displays a list of selected students above a file upload area.
- Upload the file of feedback you prepapred, or drag it to the arrow and wait for the file name to appear in the box.
- Click Send feedback files; the Grading Table displays again.
- Check your file is in place by scrolling horizontally to the Feedback files column.
¿Cual tipo de envío de tarea le conviene mejor?
Usted quiere que los estudiantes escriban respuestas más cortas o más largas directamente en-línea
- Set Online text to Yes. This works well for younger children who will only manage a sentence or two and works just as well for higher education students who write more.
- Advantage - quick for the student to get started; no need to use a word-processing program and upload the file. The text is saved on a regular basis so it will be preserved if the student loses the page for some reason.
- Disadvantage: if the word count is expected to be large, setting Online text to No and File submission to Yes might be a better option.
Usted quiere que los estudiantes envíen trabajo que Usted pueda descargar en un programa específico
- Set File submission to Yes, set the number of files you will allow using the Maximum number of uploaded files setting and the file sizes by using the Maximum submission size setting.
- Advantage - better than students emailing work as the whole class's work is collated in one space on your course. Markers can provide comments directly on the student work.
- Advantage - with "Attempts reopened" enabled, teachers can see the progression through various drafts of a student's work.
- Disadvantage - assignments must downloaded to be viewed (but they can be descargardas en forma masiva) and the teacher needs the appropriate program to open them.
Usted quiere que ls estudiantes envien archivos en diferentes tiempos para un proyecto
- Set File submission to Yes, and use Maximum number of uploaded files to set the maximum number of separate files they can upload
- Advantage - all project files are in one assignment area for grading so they get a single grade.
- Disadvantage - all project files are in one assignment area for grading - so they can only have a single grade!
Usted quiere que los estudiantes escriban una respuesta a un video/archivo de sonido/imagen
- Set up an assignment allowing online text submission and get students to use the Moodle media icon to add video/sound/image files.
Usted quiere que los estudiantes repondan a una serie de preguntas en un archivo/una imagen de video/sonido
- Investigue el módulo de Examen. Las Tareas realmente son para una única pregunta solamente.
Usted quiere calificar el trabajo que los estudiantes han hecho fuera-de-línea
- Uncheck the submission types when setting up the assignment. Students won't be required to do anything but you can use the assignment to grade them for work done outside of Moodle.
Usted quiere ver, hacerle comentarios y regresar las tareas de los estudiantes
- Set up an assignment allowing file submissions.
- Advantage: useful for teachers who like using the "comment" options in word-processing programs for example. If you have Ghostscript enabled on your server and the students upload PDF files, you can annotate them inline. See the section Hacer anotaciones a los envíos below.
- Disadvantage: if students upload other file types, you have to download them, comment and then re-upload them.
Usted quiere que los estudiantes le manden un comentario o nota junto con su trabajo que suban
- Although previous versions of Moodle allowed the Submission comments submission plugin to be toggled, this is no longer the case. If comments are enabled site-wide, students will be able to add submission comments; if comments are disabled site-wide, students will not be given the option to add submission comments.
Usted quiere permitirles a los estudiantes que re-escriban su borrador y decidan cuando enviar su trabajo
- In the settings set Require students click submit button to Yes. Students can then control when their draft work is submitted to the teacher.
Usted quiere que los estudiantes conserven un registro tipo diario o que hagan una tarea iteractiva
- In the settings set Require students click submit button to No. Students can continue to make changes to their assignment and at no point do they 'submit'. If the work will be graded at some point it is recommended that either Prevent late submissions is set to Yes to ensure that no changes can be made after the due date, or todos los envíos están bloqueados when grading commences to ensure that the work is not altered during grading.
- Advantage: the work remains in one place and is constantly improved, graded (if needed) and improved again.
- Disadvantage: there is no record/history of previous attempts (such as with the Wiki). The online text assignment does not replicate the display of a journal or blog where each new entry is additional to the previous ones.
Usted quiere que los estudiantes envien su trabajo en grupos
En la configuración, en el apartado "Configuración de entrega por grupo" establezca "Entrega por grupos" en Sí.
- Si sólo hace esto, entonces una vez que un estudiante haya enviado algo, la tarea será marcada como enviada aunque los otros no hayan enviado nada.
- En cambio, si quiere obligar a que todos envíen una aportación, establezca "Requerir a los estudiantes que hagan clic en el botón de envío" en Sí y luego cambie "Requerir a todos los miembros del grupo envíen" a Sí. La tarea sólo se clasificará como enviada cuando cada miembro haya contribuido, y una vez que un estudiante haya enviado la tarea, los nombres de los miembros restantes se mostrarán al grupo para ver quién necesita todavía añadir su aportación.
Usted quiere calificar de forma anónima el trabajo de los estudiantes
- In the settings, choose 'Anonymous submissions'. When students submit assignments, their names will be replaced by randomly-generated participant numbers so you will not know who is who. Note that this is not totally anonymous because you can reveal their identities in the assignment settings and you can work out identities from the logs - so this might not be suitable if your establishment has very precise privacy requirements.
Usted quiere leer y calificar fuera-de-línea las tareas de los estudiantes
- In the settings, choose "Offline grading worksheet". When students have submitted, click "View/grade all submissions" and you can download their assignments from the link "Download all submissions" and download the grading sheet from the link "Download grading worksheet". You can then edit grades and re-upload the grading worksheet. You can also upload multiple feedback files in a zip from this drop down menu. See Configuraciones de tarea for an explanation of how to use the "upload multiple feedback files as zip" feature.
Usted quiere ocultar las calificaciones de los estudiantes hasta una fecha que Usted elija.
Use 'flujograma de calificación' como se explica en Configuraciones de tarea
Usted quiere moderar la calificación que hagan otros colegas o asignar a ciertos profesores para ciertos estudiantes
Use 'asignación de calificadores' como se explica en Configuraciones de tarea
Mantener registros (archivar, exportar, respaldar)
When students unenrol from a Moodle area, their records become invisible through the Gradebook interface. In order to have the information to hand, departments or course teaching teams may need systems in place to keep their own records for the data retention period required in their particular context. There are two separate procedures for exporting student submissions and marks.
To export marks (with or without feedback):
- Go to your course administration block and click Grades.
- From the Grader Report Settings block, select Export; a menu displays.
- From the menu, if you need easy viewing and running calculations you probably want to select one of the spreadsheet formats; a page of export settings loads
- Use the Visible Groups pulldown menu to limit the export to specific groups, as required
- In Options, you indicate whether feedback comments are included
- In Grade Items To Be Included lists you can, if required, omit particular Activities from the report
- When you've finished with the settings, click on Submit; a preview of your export displays
- Click on Download to export to the format you chose, and save the file.
To download the original student submissions:
- In your course area, click the link to the Assignment whose submissions you want to download.
- Click on the link to View/Grade all submissions; the Grading Table will load.
- Click the link to 'Download all submissions' and save the file.
Sugerencias y Trucos
- Want to use an Assignment activity again in another Moodle site? Use las opciones de respaldo y restauración.
- Want to use an Assignment activity in another course you teach? Use the función de importación in the course administration block.
- Moodle will sometimes appear not to be uploading a resubmitted assignment - you seem to be downloading the original assignment. This is a cache issue, in short, go to "Tools > Clear Recent History" in Firefox or "Tools > Delete Browsing History > Delete Temporary Files" in Windows Explorer. The newer file will then appear.
Vea también
Ejemplos del School sitio demostrativo
- Teacher view of a PDF assignment which can be annotated inline.Ingrese con username 'teacher' y password 'moodle'
- Teacher view of allocated markers and marking workflow status. Ingrese con username 'teacher' y password 'moodle'
- Student view of an assignment. Ingrese con username 'student' y password 'moodle'. Deslícese hacia abajo para ver la rúbrica y la retroalimentación.
- Student view of a student submission statement Ingrese con username 'student' y password 'moodle'
- Student view of group assignment grading screen Ingrese con username 'student' y password 'moodle'
- Teacher view of a group assignment grading screen Ingrese con username 'teacher' y password 'moodle'.
- Teacher view of Anonymous submissions grading screen Log in with username 'teacher' and password 'moodle'
Otros
- One approach to group project grading blog post by Gavin Henrick
- Advantages of using Assignment upload over emailing a document forum discussion
