Editing a quiz
After a teacher has created a quiz activity, they may click on the edit tab of the quiz. Depending upon the context, there are 2 different ways this tab screen will appear. There is one view for a quiz which has not been taken (compiling view) by a student and an other when students have taken the quiz. You may want to look at previewing an existing quiz or editing questions in the Question bank.
The basic ideas of quiz-making
The main concepts you need to understand while creating quizzes and the questions they contain are:
- The quiz, divided into pages
- The question bank, which stores all the questions organised into categories
- Random questions
You can think of a quiz as being like traditional pen-and-paper quiz (or exam or test). It contains questions. You can arrange the questions in a quiz into several pages or you can keep them all on one page. As you create the questions, and add them to the quiz, you also set up how the questions are graded (or marked). This is like the mark-scheme for a traditional quiz.
When you create questions, they are stored in the question bank. In the question bank you can create categories, which are similar to folders on your computer. You can use them to create a hierarchy for organising your questions, for example, by topic. Even if you create and add a question directly into the quiz, a copy is automatically stored in the question bank too.
You can use random questions so that different students get different questions, or so that one student gets different questions each time they attempt the quiz. For example, this can reduce cheating by making it harder for students to copy from each other. When a student starts an attempt at the quiz, the random question will be replaced by an actual question, picked at random from a certain category in the question bank. You create a random question by adding the selection of questions you want to a question bank category, and then adding a random question for that category into the quiz.
Compiling a new quiz
Overall process
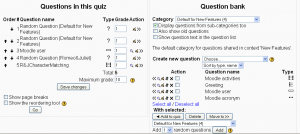
After creating a quiz activity module, the teacher will be shown a quiz compiling screen (the edit tab). Here the teacher can select the question category to move questions into the quiz. It is also possible to create new questions from this screen and these questions will be added to the previously selected category. After adding questions to a quiz that no student has taken, you can remove individual questions.
What the teacher will see on the edit tab will depend upon what has happened with the quiz at that point.
- On the left side of the screen (or in the middle if the quiz has already been attempted) you’ll see a block where the questions you’ve added to the current quiz are displayed. If this is a new quiz you will not have any questions there and Moodle tells you this.
- On the right side of the screen (if the quiz has not yet been attempted), you’ll see a Categories section above the question editing block. These two areas are where you can add new questions, edit existing questions, or move questions between categories. This is explained in more detail on the Question bank page.
Adding questions to a quiz
Once you’ve created your questions, you’ll need to add them to the quiz. There are many types in the Question bank that you can use. Alternatively, you may choose to import questions.
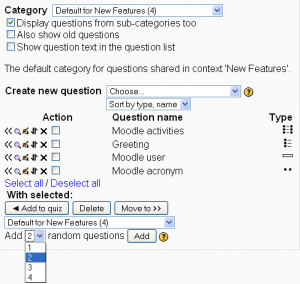
First use the 'Category' menu to select the category containing the questions you want to add (item 3 in the diagram below).
The chevrons (<< icons) to the left of the questions are used to add individual questions to the quiz. You can also select several questions using the checkboxes on the left of the question list and then click the "Add to quiz" button at the bottom of the list to add then all at once. If you want to add all the displayed questions then use the 'Select all' link.
If you have created a lot of questions, you may want to sort the question list by type and name or by age. You can also choose to display the question text below each question name by checking the box "Show question text in the question list" above the question list (Moodle 1.8 onwards).
Editing question order in a quiz
Once you’ve added a question to the quiz, they appears on the left side of the screen in the quiz question list. This edit view can only be see when no attempts have been made by students.
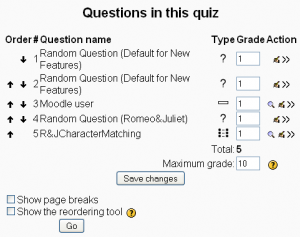
You can change the order of the questions with the move icons. You can move a question out of the quiz with the chevrons (>> icons). Of course you can use the edit and preview icons next to any question that will bring up a pop up window. The teacher can move or reset the page breaks on this screen.
Quiz will not let you add the same question to the same quiz more than once and will not display the same question twice to the students when both random and fixed questions are used from a single category.
- Remember if the Quiz setting is set to randomize question order, the order you see in this view will not be what your students see when they make an attempt.
Grading questions
You will also need to set the grade for each question. You can set the number of points for each question in the Grade column. This allows you to set the relative weight of each question in the quiz. You may want to make certain questions or question types worth more than others. You should also set the 'Maximum grade' for the whole quiz. This does not have to be equal to the sum of the grades for the individual questions. The grades achieved by the students will be rescaled to be out of this maximum grade. After adjusting these grade settings you should click on the 'Save grades' button.
Adding random questions
A random question places a link that will select a unique question at random from a specific question category. Random questions are selected when the quiz is generated for a specific student attempt.
This means that different students are likely to get a different selection of questions when they attempt this quiz. For example, when a quiz has 10 random questions that draw on a question category with 30 questions. If a quiz allows multiple attempts for each student then each attempt will also contain a new selection of questions.
The same question will never appear twice in a quiz. If you include several random questions then different questions will always be chosen for each of them. If you mix random questions with non-random questions then the random questions will be chosen so that they do not duplicate one of the non-random questions. This does imply that you need to provide enough questions in the category from which the random questions are chosen, otherwise the student will be shown a friendly error message. The more questions you provide the more likely it will be that students get different questions on each attempt.
The grade for the randomly chosen question will be rescaled so that the maximum grade is what you have chosen as the grade for the random question.
To add random questions, select the question category you wish to use, then use the drop-down menu at the bottom of the Question Bank in the right column. Select the number of random questions you wish to add, and click 'Add'. The random question link will appear on the quiz question list in the left column.
Previewing questions
After you have added questions to the quiz, they will appear on the left. Notice the preview and edit icons next to the fixed questions. These will open a popup window. The move icons will allow you to change the order of the questions (if Quiz is setup to randomize the order, this will not have an effect).
When you’re done, you will probably also want to preview your entire quiz by clicking on the Preview tab. This will bring you to the Quiz preview screen, but in teacher preview mode.
Setting page breaks
After you have added question to the quiz, they will appear on the left. You can manually move the page breaks, or reset the page breaks so that a standard number of questions appear on a single page.
For example, you set the quiz up to show 5 questions per page. You realize that 10 would be a better number. Change the number of questions per page from 5 to 10 and click on go. The quiz will automatically change the breaks.
For example, you want a description on the first page with 3 questions, followed by a page with 10 questions, and a last page of 6 question and a description. The quiz was set up with 5 questions per page. You should add and or move the questions and descriptions in the order you want. Then move the existing page breaks to achieve the effect you want. Make sure to turn off "shuffle questions" in the quiz setting.
After quiz has been attempted
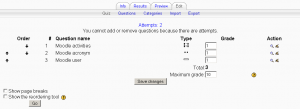
If one or more students have taken the quiz, you will see a list of all the questions in the quiz and a notice saying that you cannot add or remove questions.
You can move questions in a different order, re grade questions, preview an individual question and click on an question edit link that will allow you to directly edit the question stored in the question bank.
- TIP: You can delete all quiz attempts by students and then edit the quiz as if no students had attempted it. To do this, go to the "Info" tab, select the Attempts link. This will present a list of students and their scores. Use the check box on the left of each student and the delete button/menu item.
- TIP: There are several ways to deal with bad questions in a quiz.
- Change the grade for the bad question to 0 in the quiz.
- Edit the question, changing what you will accept as a correct answer, then regrading the exam. Remember when changing a question that the next time it is used it will be as it was in the last edit. Also, regrading will only effect one quiz at a time.
- You can edit the question to explain the situation to the student and then you can set the grade for the question to zero. After you make such changes you should regrade the quiz by clicking on the Results tab and then the Regrade tab. This will change the grade for all students who have taken the quiz so far. Remember, if the question is used by another quiz, your "explanation" will appear as part of that quiz.
- You can change the grade for the bad question and then move or delete the question from your question category. The question will still appear on the quiz. Some places do not like to delete any question, but will move them to a "dead" or "bad" question category.
- When you discover a bad question in your quiz, it may effect the question bank. Remember that a final might be made up of a certain number of random questions drawn from different question categories, the same categories used in a smaller subject quiz. It can be very important do something about bad or invalid questions in a question category when the categories are use in other places.


