Diferencia entre revisiones de «Rol paterno»
(copied from 3.8 Docs) |
(update as English Docs) |
||
| Línea 51: | Línea 51: | ||
:'''NOTA:''' El mismo padre puede ser asignado a varios estudiantes, hermanos o no. | :'''NOTA:''' El mismo padre puede ser asignado a varios estudiantes, hermanos o no. | ||
===Agreeing to policies on behalf of the child=== | |||
If the parent has been given the [[Capabilities/tool/policy:acceptbehalf]] then they can click on the child's profile, click the Policies and agreements link and agree to the policies there: | |||
[[File:ParentConsent.png|center|thumb|500px]] | |||
===Adding the Mentees Block=== | |||
This block needs to be added so parents can see links to their child's profile. | |||
* On the Front Page, turn editing on. | |||
*Go to the '''Add Blocks''' block and select the [[Mentees block]] and when it appears, click on the Configuration icon. | |||
*Edit the configuration settings to suit the needs of the site. When complete, save the changes and return to the Front Page. | |||
{| | |||
| [[File:addmenteesblock.png|thumb|Accessing the Add Blocks]] | |||
| [[File:configuringmenteesblock.png|thumb|Setting the configuration values]] | |||
|} | |||
===How a parent sees their child's activities=== | |||
*Once the mentees block has been added, a parent/mentor sees the link to any children/mentees they are responsible for. | |||
*They click on a name and will be taken to the profile page of that user. | |||
*They then select from "Course profiles" - the name of a course the user is enrolled in. | |||
*Grades may then be viewed by clicking in the Reports section | |||
*Forum posts or similar may also be viewed from the user's profile in the Miscellaneous section. | |||
{| | |||
| [[File:MOParentRole01a.png|thumb|Click the name of a course in the profile]] | |||
| [[File:MOParentRole02.png|thumb|Only '''then''' choose an item, for example grades]] | |||
| [[File:MOParentRole03.png|thumb|The course grades are now visible]] | |||
|} | |||
*To view activity in another course, the parent needs to click back to the user's main profile and then select another course link. | |||
==Can I assign the role in bulk?== | |||
Nearly but not quite! If you have a parent with several children, you can do the following: | |||
# Create a system cohort with (for example) the name of the family; | |||
# Add the children to that cohort; | |||
# From Site administration > Users > Permissions > Assign user roles to cohort, add the parent from Select users to assign role; | |||
# Select role: Parent. (This will only appear if you created the role in the user context.) | |||
# From Select cohorts choose the Family cohort. | |||
The parent will be linked to the children once a scheduled task has run. | |||
[[File:cohortparent.png|center|thumb|500px]] | |||
==See also== | |||
*[[Create_custom_roles|Create a custom role]] | |||
*[https://moodle.org/mod/forum/discuss.php?d=389146#p1568758 Forum discussion regarding limitations to the mentor role] | |||
Revisión del 18:18 8 ene 2023
- El rol de Padre puede usarse para proporcionarle a los padres/mentores/tutores el permiso para ver cierta información, tal como reportes de actividad, calificaciones, entradas del blog y publicaciones en foros, de sus hijos/aprendices/tutorados.
- El rol de padre también puede tener permitido el acordar políticas a nombre y en representación de sus hijos menores de edad. Vea la sección sobre acordar con políticas a nombre y en representación del niño.
Crear un nuevo rol
- Como administrador, vaya a Administración > Administración del sitio > Usuarios > Permisos > Definir roles y haga click en el botón para "Añadir un nuevo rol".
- Para rol arquetipo elija "Sin rol (Ningun rol)."
- Dele un nombre corto al rol (por ejemplo, "Padre", pero pudiera ser cualquier nombre apropiado, como tutor/mentor)
- Dele un nombre completo personalizado al rol (por ejemplo, "Padre", pero pudiera ser cualquier nombre apropiado, como tutor/mentor)
- Debajo de tipos de contextos en donde puede asignarse este rol, active la casilla del contexto usuario.
- Debajo del encabezado de Curso
- Cambie moodle/user:viewdetails a permitir - acceder al perfil del estudiante
- Debajo del encabezado de Usuarios
- Cambie moodle/user:viewalldetails a permitir - ver todos los aspectos del perfil del estudiante
- Cambie algunas/todas las siguientes capacidades a permitir
- moodle/user:readuserblogs - leer las entradas de blog del estudiante
- moodle/user:readuserposts - leer las publicaciones en foro del estudiante
- moodle/user:viewuseractivitiesreport - ver los reportes de actividad y las calificaciones del estudiante
- moodle/user:editprofile - editar el perfil del estudiante
- tool/policy:acceptbehalf para aceptar políticas a nombre y en representación del estudiante.
- Haga click en el botón para "Crear este rol".
Es posible que algunos permisos ya estuvieran configurados a Permitir ("Allow"), o que los permisos otorgados aquí no sean los necesarios para ese Rol. Este conjunto de permisos significan que este rol le permite a cualquier persona obtener el Rol Paterno, y después ser enlazado al Rol de Estudiante, para editarle el perfil o leer los blogs de ese estudiante - no le permite ver o editar los perfiles o blogs de nadie más.
Asignarle el padre al estudiante
- Acceda a la página del perfil del niño, mediante Administración del sitio ► Usuarios ► Cuentas ► Ojear lista de usuarios
- Haga click en el nombre del niño para ver el perfil.
- En la sección de administración, haga click en Preferencias
- En la sección de Roles, haga click en Asignar roles relativo a este usuario
- Elegir el rol a asignar, como por ejemplo Padre al hacer click en la palabra.
- Seleccionar al padre en la lista de usuarios potenciales y usar el botón Añadir para añadirlo a la lista de usuarios existentes.
En este momento Usted puede regresar a la página "Asignar roles en usuario:" y Usted debería de ver que el nombre del padre ahora está en la columna de "Usuarios con Rol".
- NOTA: El mismo padre puede ser asignado a varios estudiantes, hermanos o no.
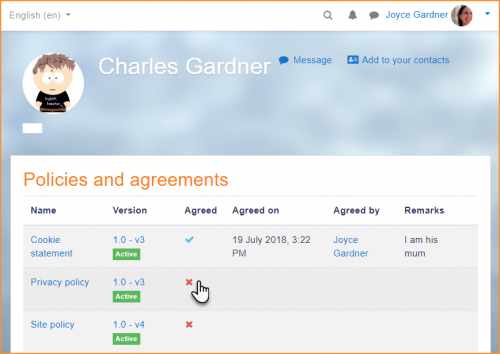
Agreeing to policies on behalf of the child
If the parent has been given the Capabilities/tool/policy:acceptbehalf then they can click on the child's profile, click the Policies and agreements link and agree to the policies there:
Adding the Mentees Block
This block needs to be added so parents can see links to their child's profile.
- On the Front Page, turn editing on.
- Go to the Add Blocks block and select the Mentees block and when it appears, click on the Configuration icon.
- Edit the configuration settings to suit the needs of the site. When complete, save the changes and return to the Front Page.
How a parent sees their child's activities
- Once the mentees block has been added, a parent/mentor sees the link to any children/mentees they are responsible for.
- They click on a name and will be taken to the profile page of that user.
- They then select from "Course profiles" - the name of a course the user is enrolled in.
- Grades may then be viewed by clicking in the Reports section
- Forum posts or similar may also be viewed from the user's profile in the Miscellaneous section.
- To view activity in another course, the parent needs to click back to the user's main profile and then select another course link.
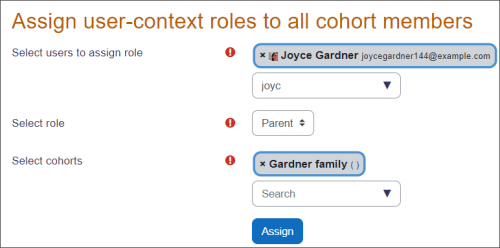
Can I assign the role in bulk?
Nearly but not quite! If you have a parent with several children, you can do the following:
- Create a system cohort with (for example) the name of the family;
- Add the children to that cohort;
- From Site administration > Users > Permissions > Assign user roles to cohort, add the parent from Select users to assign role;
- Select role: Parent. (This will only appear if you created the role in the user context.)
- From Select cohorts choose the Family cohort.
The parent will be linked to the children once a scheduled task has run.
See also
Acordar a políticas a nombre y en representación del niño
Si a un padre se le ha dado Capabilities/tool/policy:acceptbehalf entonces puede hacer click en el perfil del niño, hacer click en el enlace hacia Políticas y acuerdos y acordar a las políticas allí:
Añadir el bloque de Apendices (Mentees)
Este bloque necesita ser añadido para que los padres puedan ver enlaces hacia los perfiles de sus niños.
- En la Portada, active la edición.
- Vaya al bloque para Añadir Bloques y seleccione el Bloque de aprendices y en cuanto aparezca, haga click en el ícono para Configuración.
- Edite los ajustes de la Configuración para que se acomoden a las necesidades del sitio. Cuando esté completado, guarde los cambios y regrese a la Portada.
Cómo un padre ve las actividades de sus hijos
- Una vez que el bloque de aprendices (mentees) ha sido añadido, un padre/mentor ve el enlace hacia los niños/aprendices que son su responsabilidad.
- Cuando ellos hacen click en un nombre, serán llevados a la página del perfil de dicho usuario.
- Ellos entonces seleccionarán de entre "Perfiles de curso" - el nombre de un curso en el cual está inscrito (matriculado) el usuario.
- Entonces pueden verse las calificaciones al hacer click en la sección de reportes
- También pueden verse publicaciones en foros desde el perfil del usuario en la sección de Misceláneos.
- Para ver actividad en otro curso, el padre necesita hacer click de regreso al perfil principal del usuario y entonces seleccionar el enlace hacia otro curso.
Un pequeño cambio que puede hacer que la lista del curso sea un poco más legible, especialmente para listas largas de cursos, es cambiar el formato a una lista vertical:
- Edite el archivo moodle/user/view.php file y busque las líneas siguientes (alrededor de la línea 302-304 en mi Moodle 2.3.2 ):
. $cfullname . "</a>, ";
               } else {
                   $courselisting .= $cfullname . ", ";
- y cámbielo a : :
. $cfullname . "</a>,
";
               } else {
                   $courselisting .= $cfullname . "
";;
- Entonces guárdelo
Esto afectará la vista del perfil en un curso.
- Edite el archivo moodle/user/profile.php y busque las líneas siguientes (alrededor de la línea 3332 en mi Moodle 2.3.2 ):
$courselisting .= "<a href=\"{$CFG->wwwroot}/user/view.php?id={$user->id}&course={$mycourse->id}\" $class >" . format_string($mycourse->fullname) . "</a>,
";
- y cámbielo a :
$courselisting .= "<a href=\"{$CFG->wwwroot}/user/view.php?id={$user->id}&course={$mycourse->id}\" $class >" . format_string($mycourse->fullname) . "</a>,
";
- Entonces guárdelo
Esto afectará la vista del perfil desde la página principal.
Vea también
Using Moodle forum discussions:
Vea también
Using Moodle forum discussions:


