File system repository
The file system repository allows access to files which have been uploaded (e.g. via FTP) into designated folders on the server. (Note that these folders are not created inside the Moodle site, but on the server where Moodle is hosted.)
A file system repository may be available site wide for everyone or within an individual course (set up by admin) or for an individual administrator. See MDL-28656 regarding course and individual repository configuration.
This must be done by a systems admin who has write permissions to the server directories.
When a file from the file system repository is re-used elsewhere on Moodle, the teacher has the option to make a copy (a new, unconnected version) or to create a shortcut or alias. See Working with files for more details.
Once a repository has been created and files uploaded to it, the files can be made available within the file picker for use within a course. There are several steps to take to implement this feature:-
These must be done by a systems admin who has write permissions to the server directories and admin permissions within Moodle.
Creating folders for your file system repositories
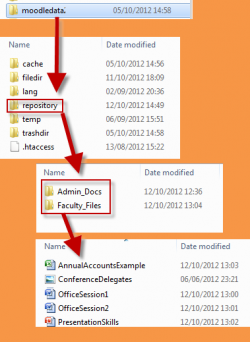
- Find the moodledata folder on the server
- Inside it, create a folder called "repository"
- Inside that folder, create as many folders as you need, named appropriately.
- Copy into the appropriate folder the files you want (using FTP, SFTP, shared folder etc.). (The folders can hold all types of files)
Enabling the File System repository plugin
- Go to Settings > Site administration > Plugins > Repositories > Manage Repositories;
- Select from the drop down next to File system "Enabled and visible"
- Click the Settings link..
Setting up a site-wide file system repository
Having clicked the "Settings" link as above:
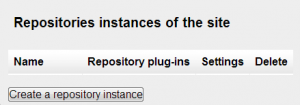
- Scroll down to Repositories instances of the site
- Click Create a repository instance
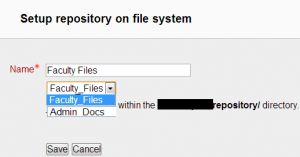
- Give it a name and (if there are several folders on the server) choose from the dropdown the one you want. Click Save.
- It will now be available in the file picker in all courses.
NOTE: Just repeat the process to get more than one site wide file system repository
Setting up a repository inside a course
NOTE only Moodle admins can do this
Enable repositories as in the instructions above. On the Settings page:
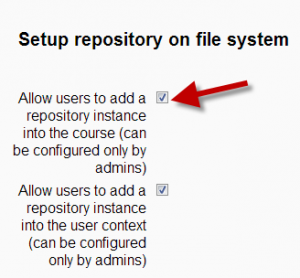
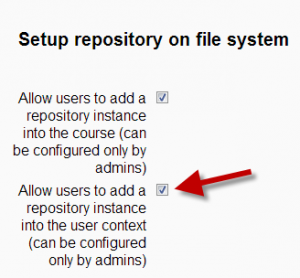
- Check the top box allowing users to add a repository instance to the course (1 below)
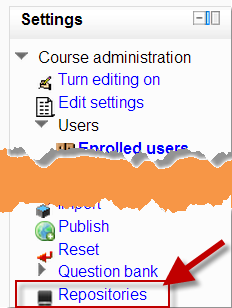
- Go to the desired course and click on “repositories” in the administration block(2 below)
- Scroll down and click "Create File System instance" (3 below)
- Follow the same process as here
Setting up an individual file system repository instance
NOTE: Only Moodle admins can do this
Enable repositories as in the instructions above. On the Settings page:
- Check the top box allowing users to add a repository instance to the user context (1 below)
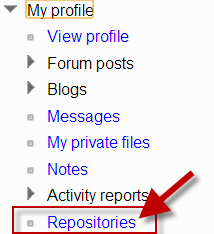
- In the navigation block, click on “my profile”
- Click on “Repositories” (2 below)
- Click “Create File System instance”
- Follow the same process as here
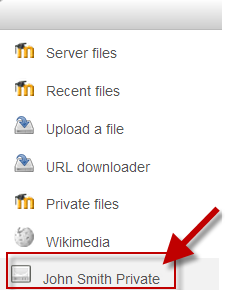
- This will create a personal file system repository connecting just you to a folder on the server (3 below)
- Upload any files required by course creators to the appropriate folders
Server permissions are needed here to add via FTP (or other method) the required files.
From this point on the check boxes need not be set - leaving them set just invites people to create a repository instance and then advises them that they do not have sufficient privilges.
Using a File System repository file
- A user can now make use of the uploaded files by accessing the repository from within the file picker, creating a resource link to a document, for example. This process copies the uploaded file into Moodle and students may access the resource.
Note that file types are respected (based on file extensions), so if you are adding an image in the editor, then you won't see Office docs (for example) appear in the File Picker.
Repository capabilities
There is just one capability, View file system repository, which is allowed for the default authenticated user role. This means that if a student is required to upload a file - upload assignment, for example, then the repository files may be browsed. It may be more appropriate for this permission to be changed so that course creators have the capabilty, but not students.
See also
- File system repository FAQ
- Overview of Repositories
- FTP files into Moodle 2.0 with the repository API article from somerandomthoughts.com including screencast
