Abstimmung anlegen
![]() Diese Seite ist noch nicht vollständig übersetzt.
Diese Seite ist noch nicht vollständig übersetzt.
Siehe en:Adding/editing a choice
Eine Abstimmung zum Kurs hinzufügen
Wechseln Sie zunächst durch Anklicken des Buttons "Bearbeiten einschalten" rechts oben auf der Kursseite in den Bearbeitungsmodus.
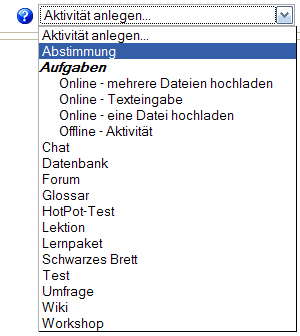
Wählen Sie danach im Auswahlmenü "Aktivität anlegen..." den Punkt "Abstimmung" aus.
Eine Abstimmung konfigurieren
Grundeinträge
- Name der Abstimmung
- Das ist das Standardfeld Name, das es bei jeder Lernaktivität gibt. Dieser Name wird für den Link zum Test auf der Kursseite bzw. der Übersichtsseite aller Abstimmungen im Kurs verwendet.
- Fragestellung
- Beschreiben Sie hier die Aktivität. Die Beschreibung sollte die Fragestellung enthalten, über die die Teilnehmer abstimmen sollen. Ein Beispiel könnte sein: "Was ist Ihre Lieblingsfarbe?"
- Limit
- Diese Option ermöglicht es Ihnen, die Zahl der Stimmen, die für eine einzelne Auswahloption abgegeben werden können, zu begrenzen. Wenn Sie diese Möglichkeit nutzen möchten, aktivieren Sie zunächst die Checkbox Limit für die Zahl der Stimmungabgaben. Sobald diese Einstellung aktiviert ist, können Sie für jede einzelne Antwort auf Ihre Fragestellung ein Limit festlegen, wie viele Stimmabgaben für diese Option möglich sind. Sobald dieses Limit erreicht ist, kann kein weiterer Teilnehmer diese Auswahloption der Abstimmung mehr wählen. Ein Limit gleich Null bedeutet, dass niemand diese Antwort wählen kann.
- Wenn Limits ausgeschaltet sind, ist die Anzahl der Stimmabgaben pro Antwort unbegrenzt.
- Antwort 1 ~ Antwort 4
- Hier legen Sie die einzelnen Antwortmöglichkeiten für Ihre Fragestellung fest. In unserem Beispiel mit den Farben wären also mögliche Antworten blau, rot, gelb oder grün.
- Moodle1.8
- Ab Moodle 1.8 sind standardmäßig vier Antwortfelder vorgegeben. Sie können beliebig viele Antwortfelder ausfüllen (oder auch freilassen). Wenn Sie mehr Felder benötigen, klicken Sie auf den Button 3 Felder zum Formular hinzufügen.
Abstimmung nur im Zeitraum
- Abstimmung nur im Zeitraum
This setting allows you to define a time window within which participants are allowed to make a choice.
To set an open-ended close date just set the time very far in the future.
If you don't need this at all then uncheck the box.
- von/bis (Datum, Uhrzeit)
Verschiedene Eisntellungen
- Anzeigemodus
This setting allows you to choose how the choices will be displayed to the participants: horizontally, or vertically.
Hint: In most cases, if there are only a few choices with little text, they may be positioned horizontally. However, if there are more than 5-6 choices or if the text of the choices is longer than 2-3 words, it should be better to display them vertically. (red arrow, below)
- Ergebnisse veröffentlichen
This setting determines whether (and when) the students will be able to view the results of the choice activity. They may:
- never see the results of the choice
- see the results only after they have given the answer themselves
- see the results only after the closing date of the choice
- always see the results
(teal arrow, above)
- Anonymität
If the choice results are shown to students, this setting determines whether the results will be anonymous.
(orange arrow, above)
- Abstimmung kann bearbeitet werden
If this is set to "Yes", students can change their mind after they have voted. If it's set to "No", students cannot change their choice. (lime green arrow, above)
- Spalte für Teilnehmer/innen ohne Stimmabgabe
If set to "Yes", this will display a column showing how many participants have not answered the choice activity yet. If set to "No", the results will only include the participants who have already voted.
(purple arrow, above)
Weitere Modul-Einstellungen
- Gruppenmodus
The group mode can be one of three levels:
- No groups - There are no sub groups, everyone is part of one big community
- Separate groups - Each group can only see their own group, others are invisible
- Visible groups - Each group works in their own group, but can also see other groups
The group mode can be defined at two levels:
- Course level - The group mode defined at the course level is the default mode for all activities defined within that course
- Activity level - Each activity that supports groups can also define its own grouping mode. If the course is set to "force group mode" then the setting for each activity is ignored.
(pink arrow, above)
- Sichtbar
You can hide the activity from students by selecting "Hide" here. It is useful if you wouldn't like to make the activity available immediately.
(black arrow, above)
Siehe auch
- Mehr als zehn Auswahloptionen? - Forumsbeitrag im Kurs Using Moodle auf moodle.org.
- Abstimmung anlegen in Moodle 1.8.2 - Flash-Film, erstellt von Tanja Wissert, Anne Heidmann, Sabrina-Nathalie Meßmer und Nicole Ernst im Rahmen einer Projektarbeit an der Hochschule Offenburg
