Appointments
The Appointment Booking activity allows you to organise and manage face-to-face training activities and to keep track of in-person activities.
Overview
Appointment booking is an activity that is placed within a course like any other Moodle activity. An appointment booking comprises one or many appointments, and each appointment consists of one or many sessions. Sign-up always takes place at the appointment level. A user can only be signed up for a single appointment per appointment booking.
Adding a new appointment booking activity
Turn Edit mode on and add a new course activity. It will be listed along with all other installed course activities.
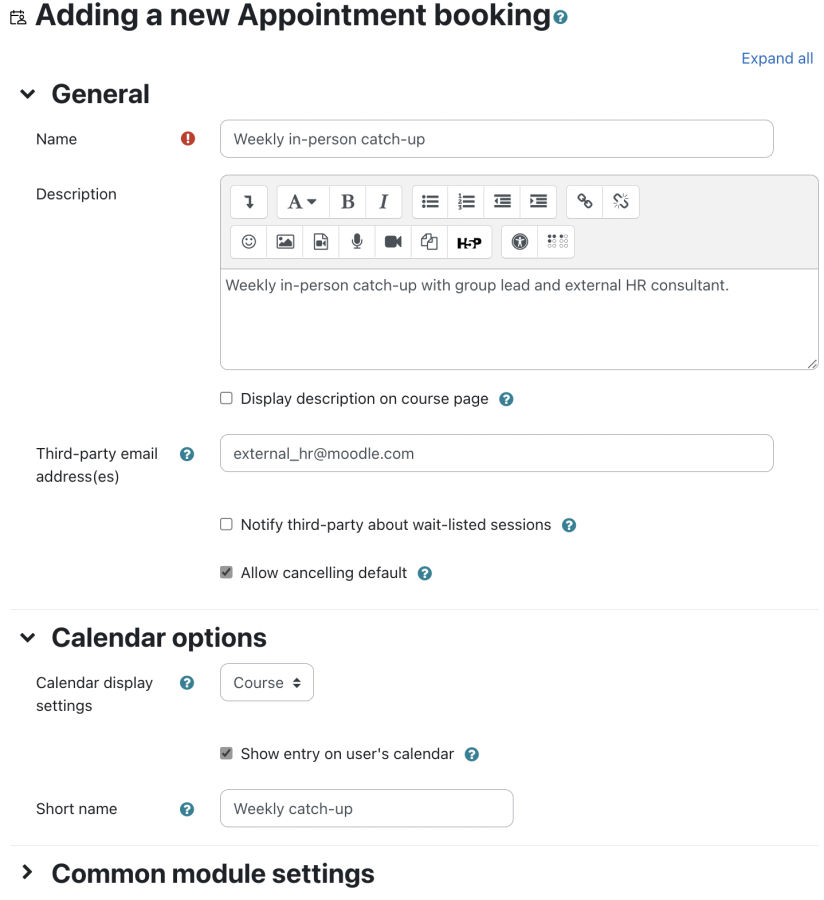
Once the Appointment booking activity has been selected from the activity chooser, the following appointment-specific configuration options become available:
- General
- Name and Description: standard Moodle fields
- Third-party email address(es) (optional): Specify users' email addresses, such as an external instructor, who will then receive notification messages whenever a user signs up for or cancels a session. Multiple email addresses have to be separated by a comma.
- Notify third-party about wait-listed sessions: If checked, third-parties will be notified when a user signs up for a wait-listed session. If unchecked (default), third-parties will only receive notification messages whenever a user signs up for or cancels a scheduled session.
- Allow cancelling default: If checked, the default setting, when creating new sessions for this activity, will be to allow sign-up cancellations.
- Calendar options
- Calendar display settings:
- Site: Sessions will be displayed on the site calendar as a global event. All site users will be able to view session details.
- Course: Sessions will be displayed on the course calendar as a course event. All users enrolled in the course will be able to view session details.
- None: Sessions will only be displayed on the calendar of confirmed attendees as a user event, provided the Show entry on user's calendar option has been selected.
- Show entry on user's calendar: If checked, a user event will be added to an attendee's calendar. If unchecked, duplicate events will be prevented in a user's calendar when Calendar display settings is set to Site or Course.
- Short name (optional): Description of the session's calendar entry. The Name field of the activity will be used if left empty.
- Calendar display settings:
There are two Activity completion criteria available in the Appointment activity:
- Learner must book an appointment to complete this activity: Triggered when the learner learner status is "Booked", "Fully attended", or "Partially attended". Not triggered when the status is "Cancelled", "Wait-listed", or "No show"
- Learner must book and attend the appointment to complete this activity: Triggered when the learner learner status is "Fully attended" or "Partially attended".
Appointments and sessions
An appointment booking consists of one or more appointments, which themselves comprise sessions. To manage appointments and sessions, select the appointment booking activity at course level.
Each row represents an appointment. The first two columns display session-related information—namely, the Date and Time. An appointment can comprise either one or multiple sessions. For each appointment, the Booked / Capacity information is displayed (this takes the format of the number of users signed up/the total number of seats), as well as the Status field (displaying either Open, Session in progress, Finished, or Full).
Selecting the Expand option will show information on the appointment's description and any custom fields, should they exist. Note that empty fields will not be shown in the expanded view. The Collapse option, will hide the information again.
If the status is set to Open, users can sign up for the appointment via the Book button; if the status is set to Full, a waitlist can be joined if it has been enabled.
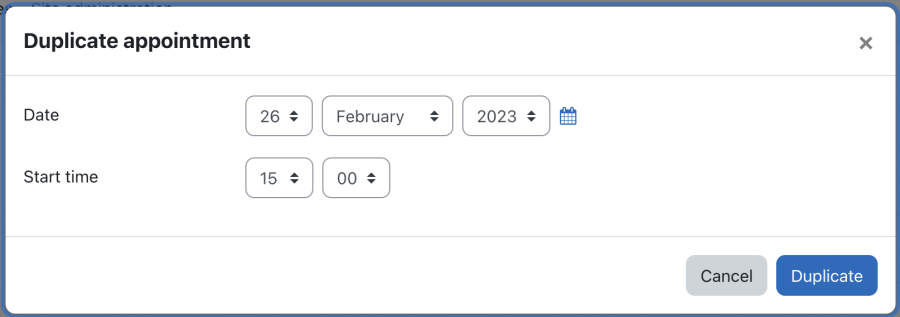
When you duplicate an appointment, you have to provide a new Start date and Start time. If the appointments has multiple sessions, the new dates are applied to the first date and time, and the following slots are offset automatically.
Adding a single appointment
To add a single appointment, select Appointment from the Add menu at the top right. You will see a pop-up screen where the first section deals with sessions. A session is created automatically with the following default values:
- Date: Today's date
- Start time: The next full hour
- End time: 1 hour after the start time
You will need to adjust these three values to the date and times of your actual session. You can add more sessions via the Add session button.
It is possible to create an appointment with no session (remove the initially created session via the Delete session button). Any users signing up for this appointment will be put on the waitlist. Session-less appointments are an excellent way to mimic an interested-in feature; once there is sufficient interest, the session information can be added to the appointment.
The Advanced section contains the following appointment settings:
- Capacity (default 10): The maximum number of participants who can sign up for the appointment
- Enable waitlist (default off): If ticked, sign-up will remain open once the capacity limit has been exceeded. Potential participants will be put on a waitlist.
- Allow cancelling (default on): If enabled, users can withdraw after they have signed up. The first user on the waitlist will automatically be given the available seat.
- Description: Textual details about the appointment.
In the Other fields section, you can specify appointment-related parameters, such as location, venue, and room. The Manage custom fields link will guide you to the Appointment custom fields page.
Adding multiple appointments
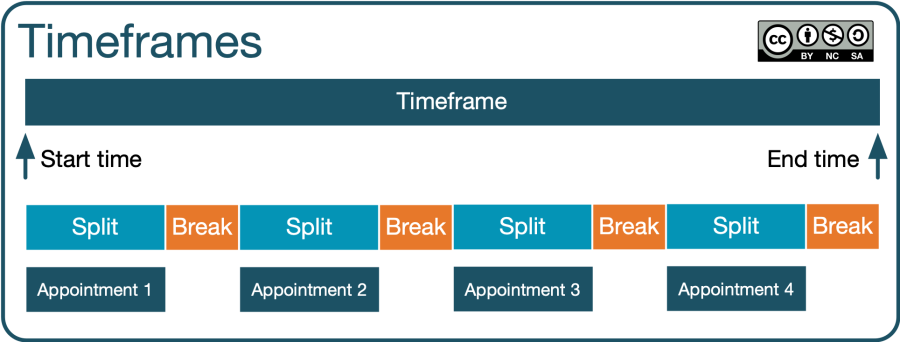
To set up recurring sessions within one or many timeframes, select the Multiple appointments option from the Add menu at the top-right. A timeframe is a one-off template specifying how appointments are created automatically.
For the specified Date field, you need to provide a Start time (beginning of timeframe) and an End time (end of timeframe). Within this timeframe, the Automatic split (duration of each appointment) and Break time (pause between splits) are distributed equally.
If the split is set to 0, a single appointment will be created, covering the entire timeframe. If the break is set to 0, appointments will be created back to back. If a split-break combo doesn't exactly fit in the timeframe, the last appointment will run over, as long as it commences within the timeframe.
Appointment workflows
The appointment booking activity supports several workflows relevant in face-to-face settings:
- Signing-up: Booking a place for an appointment or being booked by another user
- Waitlist: The handling of participants on standby
- Cancellation: Support for self-withdrawals
- Attendance: The users signed up for the appointment, and their attendance status
Signing up
Users can either book a place on an appointment by themselves or be signed up by another user.
Booking a place for myself
A user has to be enrolled in a course to sign up for an appointment and have the mod/appointment:signup capability.
Users will see the number of available seats for all appointments and each appointment activity. Accessing the appointment activity displays the list of available appointments and the Book button in the expanded section to sign up. After the user has signed up for an appointment, the status will change from Open to Booked, and the course page will now show the date of the next session rather than the number of available seats. If the date is not set, the user will just see the Booked status.
Every email contains information about the appointment and an attachment with the iCalendar invitation. The content and layout of the appointment notification can be specified via Customised notifications.
Booking a place for another user
To add other users to an appointment session, the mod/appointment:addattendees capability is required.
To sign up users, you will need to select the Attendees option from the menu to the right-hand side of the appointment. This will direct you to a screen that displays the list of all the participants already signed up and an option at the bottom labelled Add/remove attendees.
Once you select this link, you will see the standard Moodle user-selection screen where all users enrolled in the course are available for selection.
At the bottom left, there is an option called Suppress email notifications, which should be enabled if you wish to add participants from an appointment silently. If this option is toggled, no email confirmation will be sent to the newly selected users.
When a user signs up other users, it is possible to overbook an appointment, effectively bypassing the waitlist mechanism.
Waitlisting
A waitlist is a queue of users who wish to sign up for an appointment, where its capacity limit has already been reached (appointment status is Full). If the waitlist facility has been enabled at the appointment level, potential attendees can add themselves to the waitlist via the Join waitlist button. The waitlist operates on a first-in, first-out basis. The first person who joins the waitlist will be at the top of the queue. Once a place becomes available, this first user will be moved to the list of attendees, and all users on the waitlist move up a spot.
To sign-up for full sessions that don't have waitlist enabled, the mod/appointment:overbook capability is required.
Cancellation
A user can cancel a booking if cancellations are permitted in the expanded part of an appointment. Once the user has selected the Cancel button, an optional Reason for cancellation can be provided.
The user will then be removed from the list of attendees. If a waitlist is in place, the next user in line will take the freed-up spot.
The Appointment report source supports the cancellation status as a selectable field (User cancelled) in Attendees status for columns, filters and conditions.
To cancel other users, you need to follow this same process, but instead of adding users to the list of participants, you need to select participants and remove them from the list. To remove users, the mod/appointment:removeattendees capability is required.
Attendance
Once a session has started or is finished, any user with the mod/appointment:takeattendance capability can take attendance. First, go to the Attendees option in the menu to the right of the appointment and select Take attendance at the bottom left of the screen. Once you select this, you will be shown the list of all the signed-up users, as well as options to specify the attendance status: No show, Partially attended, and Fully attended.
The Appointment report source supports the attendance status as a column, filter and condition.
Appointment notifications
Participants and external users receive email notifications as a result of session booking actions, such as sign-up or cancelling.
The following notification text templates can be configured in the Customised notifications setting:
- Confirmation message: Sent out when signing up for the appointment takes place
- Update message: Sent out when either an appointment booked or a joined waitlist has changed
- Reminder message: Sent out a number of days before the session start date. The number of days is defined in the Days before message is sent setting.
- Wait-listed message: Sent out when a user is added to the waitlist
- Cancellation message: Sent out when a user's participation is cancelled
The following placeholders are available for all subjects and message bodies:
| Placeholder | Description |
| [alldates] | Dates and times of all sessions |
| [appointmentname] | Name of appointment activity |
| [attendeeslink] | Link to the list of all attendees |
| [details] | Session details |
| [duration] | Session duration |
| [finishtime] | Session finishing time |
| [firstname] | First name of the attendee |
| [lastname] | Last name of the attendee |
| [reminderperiod] | Time period when reminder will be send (before session) |
| [sessiondate] | Date of the session (no time added) |
| [starttime] | Session start time |
| [session:location] | Session location |
| [session:venue] | Session venue |
| [session:room] | Session room |
| [session:<custom_field_name>] | Shortname of <custom_field_name> |
There are settings in Appointment settings, which have an impact on appointment notifications.
Appointment Reporting
Moodle Workplace's report builder provides a report source called Appointments. Once added, the following fields are available:
- Appointment
- Name
- Description
- Appointment session
- Description
- Capacity
- Allow waitlisting (Yes / No)
- Allow cancelling (Yes / No)
- Seats booked
- Booked / Capacity
- Session status (Open / Session in progress / Finished / Full)
- Custom fields
- Appointment session dates
- Session start date
- Session start time
- Session end date
- Attendees
- Status (User cancelled / Wait-listed / Booked / No show / Partially attended / Fully attended)
There are two additional filters / conditions:
- Session availability in Appointment session: Full (Booked = Capacity), Empty (Booked = 0), or Partially full (Booked < Capacity)
- Duration in Appointment session dates: Less than / Greater than <value> second(s) / minute(s) / hour(s) / day(s)
Course reset
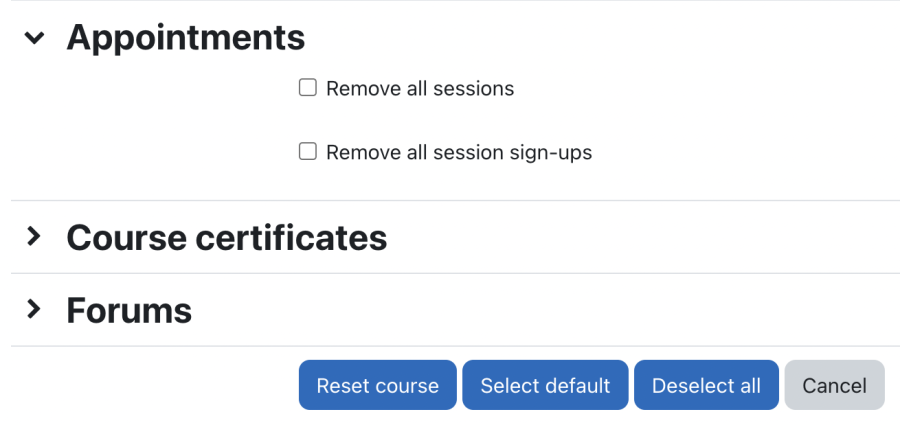
When resetting a course, there are two settings in the Appointments section: Remove all sessions and Remove all session sign-ups.
Permissions
There are a number of capabilities relevant to the Appointment Booking activity:
- Manage custom fields for Appointment session (mod/appointment:managecustomfields)
- Add attendees to an Appointment session (mod/appointment:addattendees)
- Add instance (mod/appointment:addinstance)
- Allow the configuration of sign-up cancellations upon adding/editing an Appointment activity (mod/appointment:configurecancellation)
- Remove attendees from an Appointment session (mod/appointment:removeattendees)
- Take attendance (mod/appointment:takeattendance)
- View cancellations (mod/appointment:viewcancellations)
- Add, edit, copy and delete Appointment sessions (mod/appointment:editsessions)
- Sign-up to full sessions that don't have waitlist enabled (mod/appointment:overbook)
- Sign-up for a session (mod/appointment:signup)
- View Appointment activities and sessions (mod/appointment:view)
- View attendance list and attendees (mod/appointment:viewattendees)


