OAuth 2認証
再作成中です - Mitsuhiro Yoshida (トーク)
概要 Overview
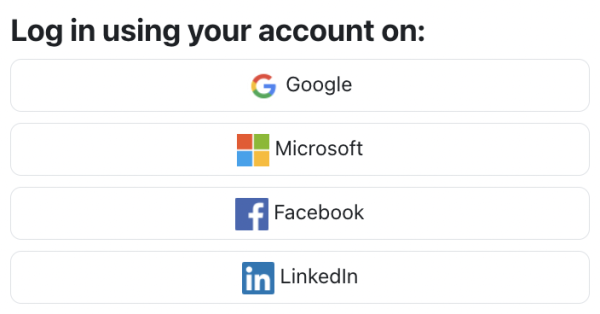
OAuth 2.0 is the de facto industry standard protocol for user authorisation. OAuth 2 authentication enables users to access Moodle via buttons on the login page using their credentials from popular service providers, such as Google, Microsoft, Facebook, and LinkedIn. OAuth 2.0はユーザ認証のための事実上の業界標準プロトコルです。OAuth 2認証により、ユーザはGoogle、Microsoft、FacebookおよびLinkedIなどの一般的なサービスプロバイダからの認証情報を使用して、ログインページのボタンからMoodleにアクセスできます。
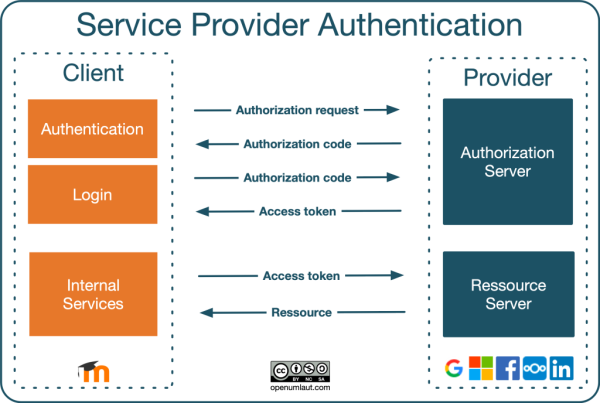
The following high-level interaction process illustrates how OAuth 2 authentication works in a Moodle context: 以下のハイレベルな対話プロセスではOAuth 2認証がMoodleコンテクストでどのように動作するか示しています:
An OAuth service provider is an external system (“in the cloud”) that provides identity (via the authorisation server) and API access (via the resource server) by issuing OAuth access tokens to a client (Moodle). Let’s go through the interactions from top to bottom:
- A user sends an authorisation request; that is, a user logs in to the service provider via the client. This step is initiated via the service provider buttons on the Moodle login screen.
- The authorisation server issues an authorisation code if the entered credentials are valid. Once this has taken place, the user is authenticated with Moodle. If account creation is enabled (the Prevent account creation when authenticating setting), a new account will be created. Otherwise, the user will be prompted to link the authorisation to an existing account with the same email address. An entry can be found in the Linked logins section in the user’s preferences.
- An access token will be issued when the user logs in using the stored authorisation code. A scheduled task exists to regularly update the OAuth 2 tokens (\core\oauth2\refresh_ system_tokens_task).
- Moodle uses this access token for any internal services that require a resource from the service provider, for instance, a link to files in a repository. Some internal services require a system account to be connected.
OAuth 2認証をセットアップする Setting up OAuth 2 authentication
To use OAuth 2 authentication, an administrator must follow the following steps:
- Configure OAuth 2 services: Go to Site administration > Server > OAuth 2 services, and following the instructions on the OAuth 2 services page.
- Enable OAuth 2: Go to Site administration > Plugins > Authentication, enable OAuth 2.
- Configure OAuth 2 lock user fields: To control if and how certain user data fields are being populated, click on the Settings link and configure your Lock user fields.
- Prevent account creation: By default, account creation is enabled. If you wish to prevent account creation, go to Site administration > Plugins > Authentication and enable the setting "authpreventaccountcreation".
- Testing, testing, testing: To verify that your OAuth 2 configuration is working, go to Site administration > Plugins > Authentication and click on the Test settings link in the OAuth 2 row. Here, you can select a service and test its connection.
OAuth 2 authentication is supported by the following Moodle features:
- Repositories: Dropbox repository, Google Drive repository, Microsoft OneDrive repository, and Nextcloud repository
- Portfolios: Google Drive portfolio
- Badges: Open Badges 2.1
- Mail: Incoming and outgoing mail configuration
- Document converters: Google Drive converter
関連情報 See also
別のサイトのアカウントを使用してログイン
OAuth 2認証プラグインを使用すると、ユーザはログインページのボタンからGoogle、Microsoft、Facebookのアカウントを使用してログインできます。
アカウントの作成が有効になっている場合、ユーザが初めてログインすると、新しいアカウントが作成されます。それ以外の場合は、同じメールアドレスで既存のアカウントにリンクするように求められます。
OAuth 2認証を有効にする
OAuth 2認証を使用するには、管理者は最初に必要なOAuth 2サービスを作成する必要があります。
- サイト管理 > サーバの 'OAuth 2サービス' に移動し、ボタンをクリックして新しいサービスを作成します。
- OAuth 2 Googleサービス、OAuth 2 Microsoftサービス、またはOAuth 2 Facebookサービスの指示に従って、クライアントIDと秘密鍵を取得します。
- クライアントIDと秘密鍵を入力し、'ログインページに表示する' がチェックされていることを確認して、変更を保存します。
必要に応じて、'メール確認を必要とする' チェックボックスをオフにすると、確認メールが送信されません。これは、ドメインにGoogleを使用している教育機関に役立ちます。 Google OAuthプロバイダは、そのドメインに対して信頼されていると見なすことができます。
必要に応じて、追加のサービスについて繰り返します。 OAuth 2認証の場合、システムアカウントに接続する必要はありません。
次に:
- サイト管理の '認証管理' に移動し、OAuth 2認証プラグインを有効にします。
- オプション: OAuth 2設定で、選択したユーザデータフィールドをロックし、変更を保存します。
新しいアカウントの作成を防止する
ユーザがOAuth 2サービスでログインするときに新しいアカウントを作成したくない場合:
- サイト管理の '認証管理' に移動し、'ユーザ認証時のアカウント作成を抑制する'(authpreventaccountcreation)ボックスにチェックを入れます。
- '変更を保存する' ボタンをクリックします。
トラブルシューティング
'OAuth 2サービス' ページに、'ログインを許可' の赤い十字があります
ログインを許可するための緑色のチェックマークを取得するには、OAuth 2サービスを編集し、'ログインページに表示する' の設定がチェックされていることを確認します。
OAuth 2認証を有効にした後、コーディングエラーが発生します
サイトにインストールされている以前のバージョンのOAuth 2プラグインはありますか?その場合、標準のOAuth 2認証を使用するには、プラグインのアンインストールが必要です。
Facebookを使用してログインしようとすると、エラーメッセージが表示されます
エラーメッセージ '返されたユーザ情報に、ユーザ名とメールアドレスが含まれていませんでした。 OAuth 2サービスが正しく設定されていない可能性があります。' というメッセージは、ユーザのFacebookアカウントが携帯電話の番号を使って作成されたものである可能性が高いです。
解決策は、ユーザが最初にFacebookにログインし、そこにユーザ名とメールアドレスを追加することです。
OAuth 2サービスにログインした後、"必要なパラメータ(コード)がありませんでした" というエラーが表示されます
'必要なパラメータ(コード)がありませんでした' というエラーメッセージは、ウェブサーバの設定ミスが原因の場合があります。OAuth 2 は url パラメータとして渡される長いトークンに依存しており、ウェブサーバの設定によってはこれが機能しない場合があります。
GoogleとFacebookの/admin/tool/oauth2/issuers.phpページにすべて緑色のチェックマークがありますが、サーバのログインページにボタンが表示されません
(おそらくセキュリティ上の理由から)Moodle 3.4の新規インストールでは、OAuth 2のプラグイン設定が無効な状態になっています。サイト管理 > プラグイン > 認証 > 認証管理(/admin/settings.php?section=manageauths)のページに移動し、OAuth 2のレコードを有効にしてください。レコードの設定を微調整することもできます。


