「バックパック」の版間の差分
Mitsuhiro Yoshida (トーク | 投稿記録) |
Mitsuhiro Yoshida (トーク | 投稿記録) 編集の要約なし |
||
| 62行目: | 62行目: | ||
# 「サイト管理 / バッジ / バックパックを管理する」に移動してください。Go to Site administration / Badges / Manage backpacks. | # 「サイト管理 / バッジ / バックパックを管理する」に移動してください。Go to Site administration / Badges / Manage backpacks. | ||
# Click the button 'Add a new backpack'. | # Click the button 'Add a new backpack'. | ||
# 「新しいバックパックを追加する」ボタンをクリックしてください。Click the button 'Add a new backpack'. | |||
# Create this backpack with the following details: | # Create this backpack with the following details: | ||
#* API version - Open Badges v2.1 | #* API version - Open Badges v2.1 | ||
2024年1月2日 (火) 15:05時点における版
作成中です - Mitsuhiro Yoshida (トーク)
Enabling users to connect to an external backpack means they can add badges from their Moodle site to their backpack and also display badges from other sites in their Moodle profile. ユーザが外部バックパックに接続できるようにした場合、ユーザが自分のMoodleサイトのバッジをバックパックに追加できること、また他のサイトのバッジをMoodleプロファイルに表示できることを意味します。
! NOTE: There is a currently known problem with displaying badges from other sites - see https://tracker.moodle.org/browse/MDL-79302 ! 注意: 現在、他のサイトからのバッジを表示する場合に既知の問題があります - 詳細は次をご覧ください: https://tracker.moodle.org/browse/MDL-79302
サイト管理設定 Site administration settings
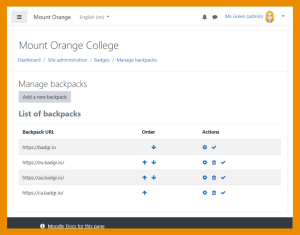
The backpack badgr.io is provided by default. Admins can add additional backpacks, for users with an account on eu.badgr.io, ca.badgr.io or au.badgr.io. バックパックbadgr.ioはデフォルトで提供されています。管理者はeu.badgr.io、ca.badgr.ioまたはau.badgr.ioにアカウントを持つユーザのためにバックパックを追加できます。
For example, to add the eu.badgr.io follow the steps: 例えば以下の手順でeu.badgr.ioを追加できます:
- Go to Site administration / Badges / Manage backpacks.
- 「サイト管理 / バッジ / バッジを管理する」に移動してください。
- Click the button 'Add a new backpack'.
- 「新しいバックパックを追加する」ボタンをクリックしてください。
- Create this backpack with the following details:
- このバックパックを以下の内容で作成してください:
- Backpack API URL - https://api.eu.badgr.io/v2
- バックパックAPI URL - https://api.eu.badgr.io/v2
- Backpack URL - https://eu.badgr.io
- バックパックURL - https://eu.badgr.io
- API version - Open Badges v2.0
- APIバージョン - オップンバッジ v2.0
- (Leave 'Include authentication details with the backpack' unticked.)
- (「バックパックに認証詳細を含む]はチェックしないままにしてください。)
Follow the same process for ca.badgr.io and au.badgr.io changing only the region letters (the eu in the above URLs to ca or au). ca.badgr.ioとau.badgr.ioも同じ手順で国名コード (前述のURLの「eu」を「ca」または「au」) のみを変更してください。
Note the admin can set the order in which backpacks are listed for users. メモ: 管理者はバックパックの表示順を設定できます。
個人ユーザ設定 Individual user settings
You can connect to your backpack as follows: 以下の手順であなたのバックアップに接続できます:
- In the user menu (top right), select Preferences, then 'Backpack settings' under Badges.
- ユーザメニュー (右上) のプレファレンス (設定) を選択して、バッジの下にある「バックパック設定」を選択してください。
- If necessary, select your backpack provider.
- 必要であれば、あなたのバックパックプロバイダを選択してください。
- Enter your Badgr user account email and password.
- あなたのバッジャユーザアカウントのメールアドレスおよびパスワードを入力してください。
- Look in your mailbox for a verification email and copy and paste the link to verify your connection to the backpack.
- メールボックスの確認メール内のリンクをウェブブラウザのアドレスバーにコピー&ペーストしてバックパックへの接続を確認してください。
バックパック接続が正常に確立された場合、あなたのバックパックのバッジがバッジページおよびプロファイルページに表示されます。After the backpack connection is successfully established, badges from your backpack can be displayed on your badges page and your profile page. バッジ管理 (プレファレンス/バッジ) に移動した後、アイコンをクリックして、あなたのバッジをバックパックに追加してください。
Go to Manage badges (via Preferences / Badges) and click the icon to add your badge to your backpack.
「バッジを管理する (プレファレンス / バッジ経由)」に移動した後、追加アイコンをクリックしてあなたのバックパックにバッジを追加してください。
You can also select collections of badges from your backpack that you would like to display in your profile. あなたはバックパックからプロフィールに表示したいバッジのコレクションも選択できます。
オープンバッジ v 2.1 Open Badges v 2.1
Moodle is Open Badges v 2.1 compliant and a new OAuth 2 Open Badges service enables users to connect to their OB v 2.1 compliant backpack without having to enter their credentials into Moodle. Moodle is Open Badges v 2.1 compliant and a new OAuth 2 Open Badges service enables users to connect to their OB v 2.1 compliant backpack without having to enter their credentials into Moodle. MoodleはOpen Badges v 2.1に準拠しており、ユーザは新しいOAuth 2 Open BadgesサービスでMoodleにクレデンシャルを入力することなく、OB v 2.1に準拠したバックパックに接続できます。
To connect to an OB v 2.1 compliant backpack such as badgr.com badgr.comのようなOB v 2.1準拠のバックパックに接続するには:
- Go to Site administration / Badges / Manage backpacks.
- 「サイト管理 / バッジ / バックパックを管理する」に移動してください。Go to Site administration / Badges / Manage backpacks.
- Click the button 'Add a new backpack'.
- 「新しいバックパックを追加する」ボタンをクリックしてください。Click the button 'Add a new backpack'.
- Create this backpack with the following details:
- API version - Open Badges v2.1
- Backpack URL - https://badgr.com
When you connect to an OB v 2.1 compliant backpack, a Badges service in OAuth 2 services is created automatically. [[1]] [[2]]
