User tours
User tours are step-by-step guides to various areas of Moodle. The multi-lang filter allow for tours to display in different languages. Watch the screencast User tours to see a demonstration.
How is it set up?
- As an administrator, access 'User tours' from Site administration, Appearance.
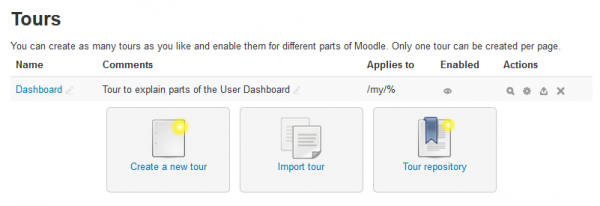
- Here you see any existing user tours and have the option to create a new tour, import a tour or browse user tours on the Moodle.net User tours repository. (An administrator and a teacher tour have been added to new and upgraded sites to introduce the Boost theme and get you started.)
- For each of your existing tours, you can click either directly on its name or on its View action icon to view its current listed steps
- Each tour can be individually enabled or disabled as required in its settings page.
Note: You can have multiple tours created for the same page destination, but you should only have one per page enabled at one time.
- Icons against each tour allow you to view, edit, export or delete it.
- Tours will be displayed on any page whose URL matches the specified path value, for instance:
- /my/% - to match the Dashboard
- /course/view.php?id=2 - to match a specific course
- /mod/forum/view.php% - to match the forum discussion list
- /user/profile.php% - to match the user profile page
- FRONTPAGE to use the tour on your site's home page.
- Each tour will be configured with default step settings which you can edit in the settings page:
- Placement: Top, Bottom (Default), Left, Right. This determines where the step shows relative to its matching block or CSS selector on the page.
- Show if target not found: No (Default), Yes. This determines whether the step is shown or not when the target has not been found.
- Show with backdrop: No (Default), Yes. If yes, the step appears surrounded by a darkened backdrop to emphasis its content and location.
- Move on click: No (Default), Yes. If yes, the tour continues to the next step when the user clicks within the block or area targeted by the current step.
Note: If you want users to be able to fill in forms as they work through the tour, then don't use a backdrop.
- Tour filters allow you to choose the role(s) and theme(s) for which the tour will be displayed.
How do I add steps to a tour ?
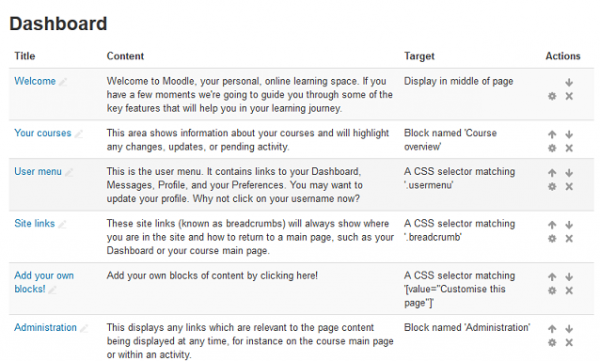
- Either click directly on its name or on its View action icon to view the currently listed steps.
- Here are the initial steps for a sample tour for the Dashboard page:
- Click on the 'New step' link and select what you want to highlight:
- Block - to display next to a matching block on the page. Select the block you want from the dropdown. (Note you can select blocks which are not available on your chosen area. If they are later added, then the tour will display that step.)
- CSS Selector - to display next to a matching selector on the page. Type in the relevant selector. (See examples below.)
- Display in the middle of the page
- Add the title and content
- For all types, select whether to display the step with a darkened backdrop
- For blocks or selectors, select the Placement option for where to place the display
- For blocks or selectors, select whether to display the step if its target isn’t found
- For blocks or selectors, select whether to move on click, ie move to next step when target is clicked
- Click on 'Save changes'
How do user tours work?
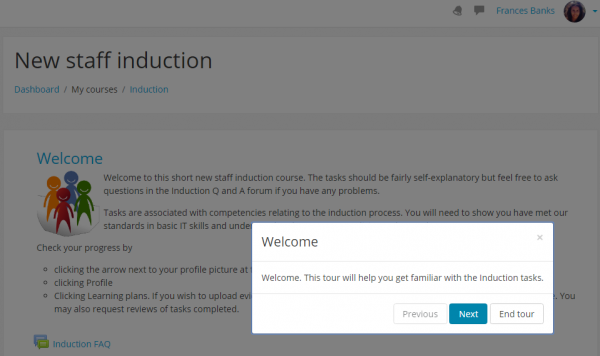
Once a user tour has been created and enabled, the first time that any user views a page which matches that user tour’s page (path) settings, the user tour will automatically start to display, starting with the first step. Each tour step will display its title and content, along with three button options:
- Prev - to return to the previous step in the tour
- Next - to go to the next step in the tour
- End Tour - to exit out of the tour completely
Any time a user wishes to re-run the page's tour, they can click on the "Reset user tour on this page" link at the bottom of the page.
Help with CSS selectors
If you wish to use CSS selectors as part of your user tour, your browser's developer tools will be very useful in helping you create these selectors:
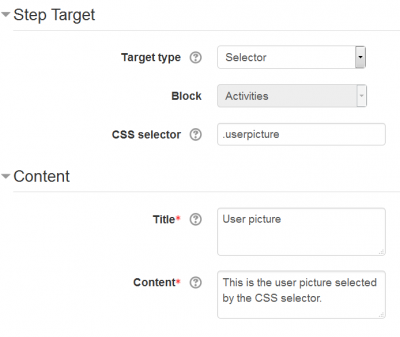
Example of a very simple CSS selector
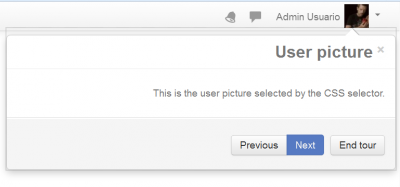
The settings above will produce this in the user tour:
- How did we know that .userpicture would select just the Moodle user picture?
- By looking at the page with an HTML inspector in Firefox, as described in the 'Help with CSS selectors' section above.
Other simple CSS selector examples
.breadcrumb These site links (known as breadcrumbs) will always show where you are in the site and how to return to a main page, such as your Dashboard or your course main page.
.usermenu This is the user menu. It contains links to your Dashboard, Messages, Profile, and your Preferences.
[value="Customise this page"] Add your own blocks of content by clicking here!
Multi-language capability
If your Moodle site is already set up or intending to be enabled for multi-lingual usage, tours are completely compatible with this requirement. Using the multi-lang filter formatting, each tour step’s titles and content, displayed to the user, can be edited to cater for multi-lingual requirements. Please see Multi-language_content_filter for further detailed instructions on how to enable, format and submit multi-lingual strings for your Moodle site.
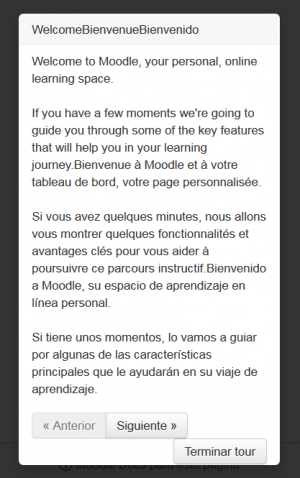
Please remember to go to Dashboard ► Site administration ► Plugins ► Filters ► Manage filters in order to enable the Multi-language_content_filter before importing any multi-language user tours into your site, or the users will see ALL the texts in ALL the languages simultaneously, as the following image illustrates:
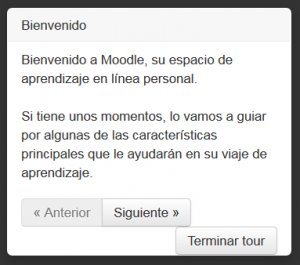
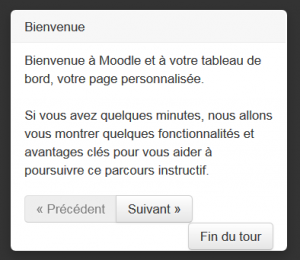
When properly configured, a multi-language user tour will be automatically displayed in the user's preferred language, as seen in the following Dashboard tours starting pages in Spanish, English and French (in the same server):
Translating user tours
See how to translate user tours in the developer's documentation..
Sharing is caring
We really hope that you are able to create some really powerful tours to help guide your users around your site. We certainly think you will and we encourage you to share any of the tours you create with others.
We've created a Moodle.net User tours repository where you can share your creations and also find inspiration from the ideas of others.
This work was paid for and sponsored by the kind folk of Dublin City University.
User tour capabilities
There is just one capability, which is allowed for the default role of manager:
See also
- JSONLint - a JSON validator useful for checking the workings of a JSON file
- How to go to HTML Blocks in User Tour? forum discussion
