Assignment settings
Adding an assignment
- Go to the course where you want the assignment; turn on the editing, and in the section you want the assignment, click 'Add an activity or resource'.
- From the Activity chooser, click the Assignment button and click 'Add'.
- (If you want to edit an existing assignment, click the Edit link to its right and choose the action you wish to take, eg 'Edit settings'.)
Assignment settings
General
Give your assignment a name (which students will see to click on) and, if required, a description. If you want the description to display on the course page, check the box.
- Additional files
- Here you can add files which may be of help to the students as they do their assignment, such as example submissions or answer templates.
Availability
- Allow submissions from
- This stops students from submitting before the shown date but it doesn't hide the assignment and any included instructions or materials.
- Due date
- Submissions are still allowed after this date but will be marked as late. Disable it by unticking the checkbox. Assignments without a due date will appear on the dashboard with 'No Due Date' displayed.
- Cut-off date
- After this date, students will not be able to submit and the submit button will disappear. If you want to grant an extension, go to the assignment grading screen by clicking 'view submissions', click 'Edit' alongside the relevant student and choose 'Grant extension'. To grant an extension to multiple students, select the checkbox alongside their names and use the With selected... menu at the bottom of the page to Grant extension. (See screencast Assignment Extensions
Submission types
Here you can decide how you wish students to submit their work to you.
| Note: If Submission comments are enabled in Administration>Plugins>Activity modules>Assignment>Submission plugins, students will be able to add a note to their teacher on submitting work. If Anonymous (blind) marking is enabled, student comments display in the gradebook as from "Participant 01 etc" to avoid revealing identities. |
- Online text
- Students type their responses directly in Moodle using a text editor (such as the Atto editor which automatically saves text at regular intervals.)
It's possible to set a word limit on an online text assignment. Students get a warning if they try to exceed the word limit. Numbers are counted as words and abbreviations such as I'm or they're are counted as single words.
- File submissions
- Students can upload one or more files of any type the teacher can open. New feature
in Moodle 3.1!
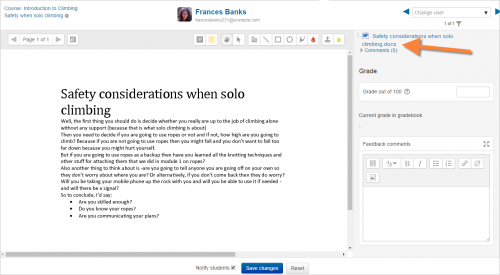
The teacher can annotate uploaded PDFs, docx and odt files within the browser, and on saving, the annotated file is made available to the student. (Check with your admin that Ghostscript and unoconv are enabled, if you can't annotate uploaded files.) In the screenshot below, a docx file has been uploaded and converted so that the teacher may use the annotation tools to comment directly on the student's assignment:
- Maximum submission size
- The maximum upload size refers to each file a student uploads. It cannot be larger than the limit in the Course settings.
Feedback types
- Feedback comments
- With this enabled,markers can leave comments for each submission (which appear on the assignment grading screen.)
- Offline grading worksheet
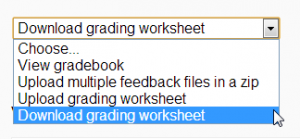
- This is useful if you wish to download the grading list and edit it in a program such as MS Excel. (It does not yet work for non-English users - see MDL-40597.)
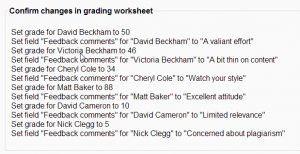
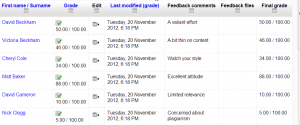
When the teacher has completed their grading offline, they can then upload the spreadsheet, confirm the changes and the grades and comments will be transferred over into Moodle's gradebook:
See also Offline grading worksheet blog post by Gavin Henrick.
- Feedback files
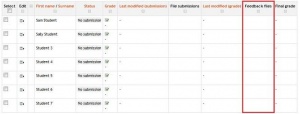
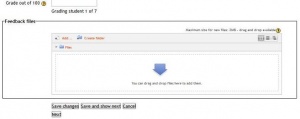
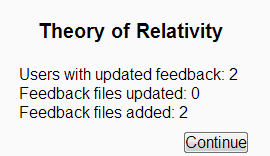
- This allows markers to upload files with feedback when marking. These files may be the marked up student assignments, documents with comments, a completed marking guide, or spoken audio feedback. It enables the Feedback Files column in the assignment grading screen (accessed from 'View/Grade all submissions'.) To upload feedback files, click on the green tick in the grade column on the grading table and then upload either with drag and drop or using the File picker.
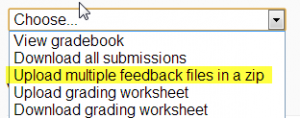
Uploading multiple feedback files is also possible:
- Download the students' assignments using the "Download all submissions" link from the same dropdown menu;
- Extract the folder offline and add your comments to the student's submissions.Keep the names the same.
- Select the students' submissions and zip them into a new folder. Important: Don't just edit them inside their original folder and re-zip this; it will not work. The folder name does not matter as long as the feedback files have the same names as before.
- Upload this newly zipped folder.
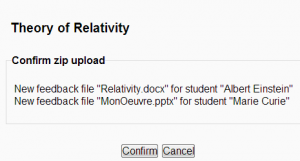
- You will be presented with a confirmation screen displaying your feedback files. (If you zip files from a Mac,make sure to remove the folder _MACOSX)
- Comment inline
- This usefully allows you to comment directly on an 'online text' type submission.
Submission settings
- Require students click submit button
- If this is set to 'No' students can make changes to their submission at any time. (If you want to stop them changing work once you are ready to grade, click 'View/Grade all submissions'; locate the student and From the Edit column, click the action icon and select 'Prevent submission changes.'
- If set to 'Yes', students can upload draft versions of the assignment until such time as they are ready to submit. Clicking the submit button tells the teacher they have finished drafting and want the work to be graded. They can no longer edit it and must ask the teacher to revert to draft status if they need to change it again.To do that, click 'View/Grade all submissions; locate the student and from the Edit column, click the action icon and select 'Revert the submission to draft'.
- Require that students accept the Submission statement
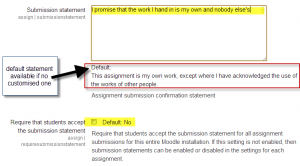
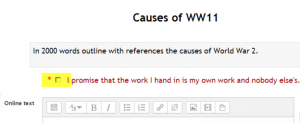
- An administrator can define a "Submission statement", ie, a statement where students promise the work is their own and which they must agree to before submitting their work. This may be done via Site administration>Plugins>Activity modules>Assignment. (A default statement is also available.) If the administrator has given teachers the option of using a submission statement or not, then it will be available in the assignment settings screen. If the administrator has forced the statement throughout the site, a teacher will not have this option in the settings but a student will see the statement when accessing their assignment.
- Attempts reopened
- If 'require students to click submit' is enabled, then students may only submit once. You can change this here to 'Manually' and reopen it for students to resubmit, or you can change it to 'Automatically until pass', for the students to keep resubmitting until they get a pass grade.
- Maximum attempts
- Here you can decide how many attempts to allow if students can resubmit. If a student has to keep trying until they get a pass grade, you might decide to limit the attempts even though they have not yet passed - or they might be trying for ever!
Groups submission settings
These settings allow students to collaborage on a single assignment, eg, working in the same online area or uploading , editing and reuploading an MS Powerpoint in the common assignment area.
When grading, the teacher may choose to give a common grade and feedback to all students in the group or to give individual grades and feedback to each member.
- Require group to make submission
- Students not in a group can still submit assignments unless this is forced in Site administration > Plugins > Assignment > Assignment settings . Moodle will then display a message You're not a member of any group; please contact your teacher , and the student will not be able to submit the assignment.
- Require all group members submit
- This setting will only appear if the teacher has ticked the "Require students click submit button" earlier. The assignment will not be classed as "submitted" until all members of the group have made a contribution. When one student has submitted, the other members of the group will be able to see who still has to submit.
- Grouping for student groups
- If a particular grouping is selected here, then the gradebook will display any other groups and non-grouped students in the "default group", while naming the group(s) that are in the chosen grouping. If "none" is selected, then the gradebook will display the names of all groups and put any non-grouped students in the "default group". See this forum post on grouping for student groups for examples of how this might be used.
Notifications
Please note that if you are using group mode then course teachers need to be members of the group in order to receive submission and late submission notifications.
Grade
- See Grade points and Advanced grading methods for more information on the settings here.
- Setting a passing grade may be connected with Activity completion and Restrict access such that a student will not be able to access a follow up activity until they have passed this assignment.
Anonymous marking
Sometimes known as 'blind marking', anonymous marking prevents assessors from seeing students' names on submissions. Instead, they will see randomly generated Participant numbers. (The student view of the assignment does not change.) This is also the case if student comments have been enabled.
Because of the nature of anonymous marking, the students cannot see the final grade until all of the students' names have been revealed. If you are grading an assignment using an advanced grading method such as a rubric, the rubric will also be hidden from students' view until the names are revealed. To reveal student names after you are finished grading, look under Assignment settings > Reveal student identities. Feedback comments will appear whether or not student names are hidden or revealed. Note that this level of anonymity might not suit the privacy requirements of your organisation. See MDL-35390 for more details.
Users with the capability mod/assign:viewblinddetails can view student identities and participant numbers (in Moodle 3.0.3 onwards).
Use marking (grading) workflow
Enable Marking Workflow if you need to:
- keep grades and feedback hidden until you are ready to release them (otherwise by default they display to each student as you save them).
- state where you are up to in your grading.
- coordinate multiple markers.
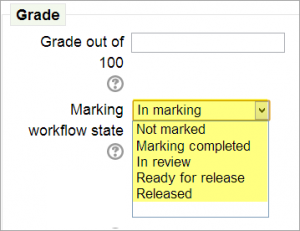
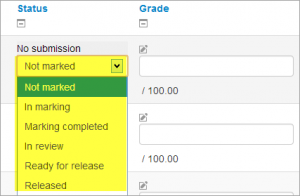
One advantage of using marking workflow is that the grades can be hidden from students until they are set to 'Released'. The actual list of steps are:
- Not marked (the marker has not yet started)
- In marking (the marker has started but not yet finished)
- Marking completed (the marker has finished but might need to go back for checking/corrections)
- In review (the marking is now with the teacher in charge for quality checking)
- Ready for release (the teacher in charge is satisfied with the marking but wait before giving students access to the marking)
- Released (the student can access the grades/feedback)
Example use cases
One marker, Marker, wants to release all grades at the same time
- Marker enables "Use marking workflow"
- Marker marks each submission and transitions the grading to "Marking completed" as each submission is graded.
- Marker then uses the batch operations to transition all grades to "Released" at the same time.
Multiple markers,
- Marker enables "Use marking workflow"
- Marker marks each submission and transitions the grading to "Marking completed" as each submission is graded.
- Marker then uses the batch operations to transition all grades to "Released" at the same time.
Use marking allocation
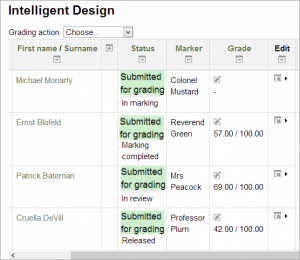
If marking workflow (see above) is set to Yes, it is possible to enable marking allocation. This means that teachers can be selected to grade or review the submitted work of specific students. Colleagues can monitor progress through the displayed marking workflow states:
Locally assigned roles
In Administration > Assignment administration > Locally assigned roles selected users can be given additional roles in the activity. See the Using Moodle Custom role for 'Course Monitor' forum discussion for an example.
Assignment capabilities
Role permissions for the activity can be changed in Course administration > Assignment administration > Permissions.
Site administration settings
Administrators can access assignment configuration options by expanding Administration > Site administration > Plugins > Activity modules > Assignment.
Assignment settings
Here, the administrator can set defaults for certain settings. They may also make certain settings 'Advanced' which means a course teacher has to click the 'Show more' link to see them, or they may 'lock' settings which means a course teacher cannot alter that setting.
New feature
in Moodle 3.1!
In Moodle 3.1 onwards, if the site contains courses with over 100 participants, the number of assignments listed on the assignment grading page may be limited using the Maximum assignments per page (assign | maxperpage) setting. This removes 'All' from the 'Assignments per page' setting.
- Submission statement
- Here is where the administrator can enter text into a box which will appear when students are about to submit an assignment:
If it is left as the default "No", then teachers will have the choice within their own assignments to force this or not.
The submission statement may be shown in different languages. See Multi-language content filter for how to do this.
Submission plugins
Here the administrator can enable, disable or change the order and default settings for any submission plugins.
- Submission comments
- Note that if submission comments are enabled here AND AND comments enabled globally in Site Administration > Advanced features) then students will be able to send a message to their teacher when submitting their assignment. If either of those settings is disabled, then the submission comments link will not appear.
Feedback plugins
Manage assignment feedback plugins
Here the administrator can enable, disable or change the order and default settings for any feedback plugins.
- Annotate PDF
- This is the place to upload stamps for teachers to use when annotating student PDFs.
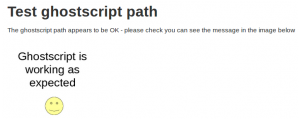
Check Ghostscript
You can also check the ghostscript path from here:
If the default stamps are deleted by accident, they can be found in mod/assign/feedback/editpdf/pix and re-uploaded.
Check Unoconv
(New in 3.1:) Unoconv v07 is required for converting files to PDF. You can test the correct path to unoconv here, and download a test converted PDF.
See also
Synergy Learning blog post: Assignment resubmissions
