Nota: Aquesta pàgina està en procés de traducció. Si us plau aneu a la pàgina de comentaris o al fòrum de traductors de la documentació a moodle.org per a qualsevol dubte o suggeriment
Moodle 2.4
Nota: Aquesta pàgina és per a l'ús de la tasca a les versions 2.3 i següents. Per la documentació de les tasques antigues (2.2), vegeu Using Assignment (en anglès).
Diferents tipus de tasca
El nou mòdul de tasca converteix els tipus existents a les versions anteriors en un sol tipus amb paràmetres editables. Això vol dir que es pot crear una tasca que combini els tipus de tasca en línia i de pujar arxius. Per tant, més que preguntar-vos "Quin tipus de tasca vull", ara podeu crear la tasca i seleccionar les opcions que necessiteu.
Les opcions de tramesa estàndard existents són:
- Tramesa de fitxers (els estudiants pugen un fitxer per a ser corregit)
- Text en línia (els estudiants escriuren les respostes directament a la pàgina de Moodle)
- Comentaris de la tramesa
També es pot crear una tasca 'fora de línia', o sigui una que no té cap component Moodle.
Tramesa de fitxers
Una tasca de tramesa de fitxers permet als estudiants trametre/pujar fitxer(s) per corregir, per exemple un document word. A les versions de Moodle 2.1 i anteriors, això es coneixia com "Pujar un fitxer" i "Càrrega avançada de fitxers"
L'avantatge de la tramesa de fitxers és que el treball dels estudiants queda contingut en un sol lloc, i és fàcil de localitzar. Les tasques es poden obrir des del Moodle, o es poden descarregar en massa per a la seva correcció.
- Desplaceu-vos fins a ‘Paràmetres de la tramesa’
- Assegureu-vos que ‘Tramesa de fitxers’ té el valor ‘Sí’.
- A ‘Quantitat màxima de fitxers carregats’ cliqueu per obrir el desplegable i seleccioneu el nombre adequat.
- El camp 'Mida màxima de la tramesa' permet fixar una mida màxima per a cada fitxer. Seleccioneu la mida apropiada.
Noteu que també podeu permetre un text en línia. Si voleu això en la vostra tasca, cliqueu "Sí" al paràmetre del text en línia
Text en línia
El text en línia permet als estudiants redactar i editar el text en pantalla amb l'ajuda de l'editor HTML estàndard de Moodle. Poden emprar totes les funcionalitats de l'editor. Poden entrar text, formatejar-lo, afegir imatges i enllaços a pàgines web i fitxers.
L'avantatge del text en línia és que la tasca es desa i es pot obrir des del Moodle, sense haver de descarregar fitxers. S'aconsella particularment per a treballs curts.
- Desplaceu-vos fins a ‘Paràmetres de la tramesa’
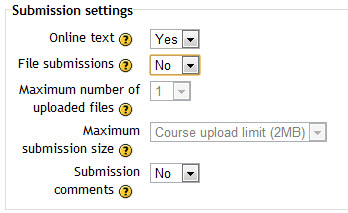
- Per a tasques de text en línia, poseu el paràmetre ‘Text en Línia’ a ‘Sí’.
- Canvieu el paràmetre ‘Tramesa de fitxers’ a ‘No’, per impedir que els estudiants pugin fitxers. Noteu, però, que les estudiants encara poden afegir fitxers a través del botó ‘insertar/editar enllaç’.
Noteu que podeu també permetre pujar un fitxer en una tasca de text en línia. Per a això, poseu a 'Sí' el paràmetre de tramesa de fitxers i establiu un nombre màxim i una mida màxima per als fitxers.
Comentaris de la tramesa
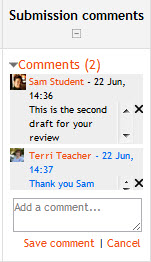
Els comentaris de la tramesa substitueixen la "nota" en versions anteriors. Els comentaris de la tramesa permeten als estudiants entrar comentaris a la seva tasca i als professors respondre a aquests comentaris. Els comentaris del professorat són diferents que els comentaris de retroacció disponibles quan es corregeix la tasca.
Tasca fora de línia
En versions prèvies de Moodle hi havia un tipus de tasca separat anomenat "Tasca fora de línia". Aquest tipus de tasca servia per a activitats realitzades fora del Moodle, permetent però la seva qualificació i retroacció dins el Moodle. A més, com en tots els tipus de tasca, la data de tramesa apareix al calendari.
Aquest tipus de tasca es pot fer a Moodle 2.3 i següents utilitzant els paràmetres:
- Desplaceu-vos fins a ‘Paràmetres de la tramesa’
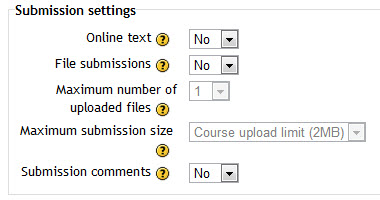
- Assegureu-vos que el paràmetre Text en línia és a ‘No’ per impedir que els estudiants hi entrin text.
- Canvieu el paràmetre ‘Tramesa de fitxers’ a ‘No’, per impedir que els estudiants trametin fitxers.
- Podeu permetre o no els 'Comentaris de la tramesa'.
Quin tipus de tasca voleu?
Voleu que els estudiants entrin respostes curtes o llargues directament en línia
- Poseu Text en línia a Sí. Això funciona tant amb els més joves que només aconseguiran formar una frase com amb els estudiants de secundària o universitaris que treballen amb textos més llargs.
- Avantatge - més ràpid per a l'estudiant; sense necessitat d'utilitzar un editor de textos i pujar un fitxer.
- Inconvenient - problemes potencials si es talla la connexió i el text entrat es pot perdre. Si els treballs han de ser llargs, potser és millor triar Text en línia a No i Tramesa de fitxers a Sí.
Voleu que els estudiants trametin treballs per obrir-los amb un programa específic
- Poseu Tramesa de fitxers a Sí, establiu el nombre i la mida dels fitxers amb els paràmetres Quantitat màxima de fitxers carregats i Mida màxima de cada fitxer de la tramesa.
- Avantatge - molt millor que fer-vos enviar els treballs per correu electrònic, ja que els treballs de tota la classe quedaran en un sol lloc dins el vostre curs. Durant la correcció es poden afegir comentaris directament en la tasca.
- Inconvenient - cal descarregar els fitxers per a veure els treballs (però es poden [[Assignment_FAQ|descarregar en massa] i el professorat ha de disposar del programari apropiat.
Voelu que els estudiants vagin pujant fitxers en diferents fases d'un projecte
- Poseu Tramesa de fitxers a Sí, i utilitzeu el paràmetre Quantitat màxima de fitxers carregats per a establir el nombre màxim de fitxers que poden pujar.
- Avantatge - tots els fitxers del projecte queden en un sol espai per tal d'obtenir una qualificació conjunta.
- Inconvenient - tots els fitxers del projecte queden en un sol espai i només poden obtenir una sola qualifcació!
Voleu que els estudiants trametin respostes en format vídeo/so/imatge
- Configureu una tasca amb la modalitat de tramesa Text en línia i feu que els estudiants utilitzin la icona Moodle media per afegir fitxers de vídeo/so/imatge.
Voleu que els estudiants responguin una sèrie de preguntes sobre un vídeo/so/imatge
- Investigueu el mòdul Qüestionari. Les tasques són més per a una sola pregunta.
Voleu veure, comentar i retornar les tasques als alumnes
- Configureu una tasca que permeti Tramesa de fitxers que us permetrà descarregar, editar, desar i tornar a pujar el document directament a la tasca.
- Avantatge: útil per a professors que vulguin utilitzar l'opció "comentari" dels programes de processador de textos, per exemple
- Inconvenient: els fitxers s'han de descarregar, editar, desar i tornar a pujar. No es poden editar en línia.
Voleu que els estudiants enviïn un comentari junt amb la tramesa del seu treball
- Als paràmetres, poseu Comentaris de la tramesa a Sí.
Voleu permetre als estudiants treballar en un esborrany i decidir quan volen fer la tramesa definitiva
- Als paràmetres, poseu Requereix que l'estudiantat faci clic al botó Tramet a Sí. Ara l'estudiantat podrà controlar quan el seu treball està llest per corregir.
Voleu que els estudiants mantinguin un diari actualitzat o facin una feina repetitiva
- Als paràmetres poseu Requereix que l'estudiantat faci clic al botó Tramet a No. L'estudiantat podrà continuar fent canvis al seu treball i en cap moment han de fer "tramet". Si els treballs s'han de corregir en algun moment es recomana que Impedeix trameses fora de data es posi a Sí per assegurar que no poden fer canvis a partir de la data de correcció, o que es bloquegen tots els enviaments quan comenci la correcció.
- Avantatge: tots els treballs són en un sol lloc i es poden anar millorant constantment, es poden corregir i (si convé) tornar a millorar.
- Inconvenient: no queda un registre dels intents previs (com passaria amb un wiki). La tasca tipus Text en línia no s'assembla a un Diari o a un Blog on cada entrada s'afegeix a les anteriors.
Voleu que els estudiants trametin la tasca en grup
- Als paràmetres de la tasca, poseu "Els estudiants envien la tasca en grup" a Sí. Si ho feu així, un cop un estudiant ha enviat la tasca, per als altres membres del grup també quedarà marcada com a enviada, encara que no hagin fet res. Si us voleu assegurar que tots els estudiants fan la feina, establiu "Requereix que l'estudiantat faci clic al botó Tramet" a Sí i canvieu "Requereix la tramesa de tots els membres del grup" a Sí. Ara la tasca només quedarà com enviada si cadascun dels membres del grup ha contribuït, i es veurà quins dels membres encara no han enviat la tasca.
Voleu que els estudiants treballin anònimament
- Als paràmetres, seleccioneu "Qualificació a cegues". Quan els estudiants enviïn tasques, els seus noms seran substituïts per números generats a l'atzar, de manera que els qui corregeixin no sabran qui és qui. Noteu que la correcció no és totalment cega perquè el professor editor pot revelar les identitats canviant els paràmetres i també podrà deduir les identitats a través dels informes de registres - això podria no ser acceptable si la vostra institució té alts requeriments de privacitat.
- Aquest paràmetre us pot ser molt útil si modifiqueu una tasca perquè els estudiants es puguin avaluar uns als altres: assignant-los rol de professor no editor, no veuran la identitat dels seus companys ni podran canviar els paràmetres de la tasca.
Voleu llegir i corregir les tasques fora de línia
- Als paràmetres, activeu "Full de qualificació fora de línia". Quan tothom hagi enviat la tramesa, cliqueu a "Visualitza/Qualifica totes les trameses" i veureu un enllaç "Descarrega totes les trameses". Podreu editar el full de càlcul posant-hi qualificacions i després tornar a carregar l'arxiu. També podeu pujar múltiples arxius de feedback en un zip des del mateix menú. Vegeu Paràmetres de la tasca per una explicació de com utilitzar la funció "Pujar múltiples arxius en un zip".
How do students submit their assignments?
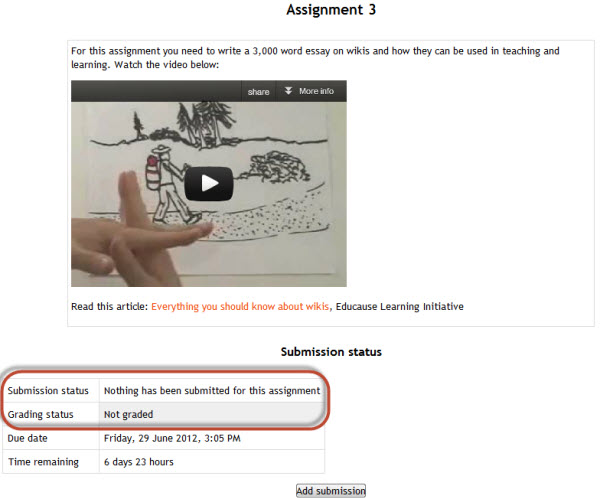
The first page students will see when they click on the assignment activity link from the course page will display the assignment name, description and the submission status. The first time a student views the assignment it will look like this:
The submission status section includes:
- Submission status
- Grading status
- Due date
- Time remaining
- Last modified
- Submission details
As they progress through the assignment the Submission status and Grading status will update and the Last modified date will appear.
Submission statuses include:
- Nothing submitted for this assignment
- Draft (not submitted)
- Submitted for grading
Grading statuses include:
- Not graded
- Graded
Tramesa de fitxers
To submit a Tramesa de fitxers, students complete the following steps:
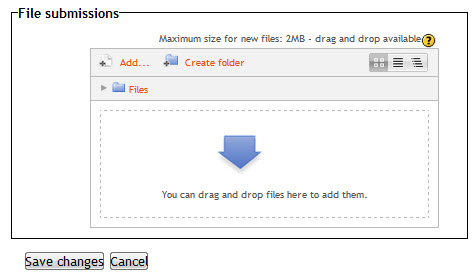
- Click the ‘Add submission’ button to bring up the file upload page.
- Upload the relevant file into the submission. They are able to ‘drag and drop’ the file into the submission box.
- Click ‘Save Changes’.
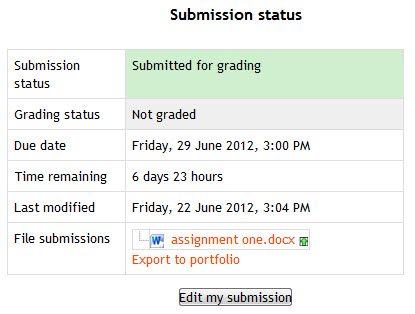
- There should now be a Last modified date and the file(s) uploaded will also be displayed.
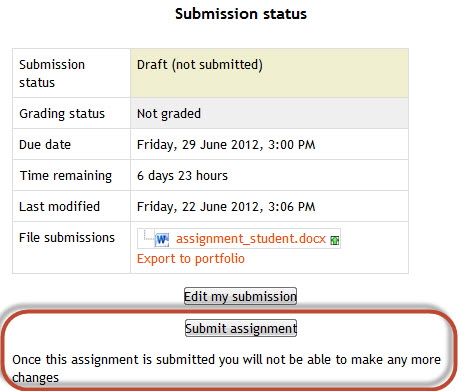
- Depending on how the assignment is setup the status will either read ‘Submitted for grading’ - in which case no further action is need, or ‘Draft (not submitted)’.
- If changes are required, click on ‘Edit my submission’.
- Once ready to submit, click ‘Submit assignment’. Note that once the assignment is 'submitted’ no further changes are allowed.
Note: Depending on how the assignment is setup students may see both a Tramesa de fitxers page and an Text en línia editor.
Text en línia
To submit an Text en línia submission, students complete the following steps:
- Click the ‘Add submission’ button to bring up the Text en línia editor page
- Type the relevant text into the HTML editor, or paste from a previously written file.
- Click ‘Save Changes’.
- There should now be a Last modified date and the first 100 characters entered will also be displayed.
- Depending on how the assignment is setup the status will either read ‘Submitted for grading’ - in which case no further action is need, or ‘Draft (not submitted)’
- If changes are required, click on ‘Edit my submission’.
- Once ready to submit, click ‘Submit assignment’. Note that once the assignment is 'submitted’ no further changes are allowed.
Note: Depending on how the assignment is setup students may see both a Tramesa de fitxers page and an Text en línia editor.
Submission comments
Depending on how the assignment has been setup, there may be a section where students can leave submission comments.
Submission notifications
Moodle allows the sending of a notification to the student when a student submits an assignment. This feature provides reassurance to the students that they have correctly submitted their assignments, especially when using features like draft submissions and file uploads. Moodle also allows notifications to teachers either when students submit assignments, or when students submit assignments late, or both. This feature notifies markers of the presence of assignments, or provides a reminder to access assignments submitted after the due date.
Why is this useful?
- Provides a receipt for student that the assignment has been successfully submitted
- Provides notification to marker that assignment are submitted
- Notifies of any changes to submission - for student’s record and to notify marker
- Provides notification to student that assignment feedback is available
When is it sent?
If ‘Require students to hit submit button’ is enabled within the assignment (formerly ‘enable send for marking button’ in 2.2), which requires students to click a final submit button and prevents further changes, only one notification will be sent upon hitting the submit button.
If ‘Require students to hit submit button’ is not enabled, and students are allowed to make alterations or add/remove files from their submission, this receipt will be sent every time the file is altered - ie once on adding the file, once on adding a second file, once on removal of file, once on uploading a new file.
Where are these settings?
Submission Notification for Grader - Assignment > Edit Settings The grader is given two options:
- Notify Graders about Submissions - YES/NO
- Notify Graders about Late Submissions - YES/NO
The first option will notify the grader on any/all submissions made. The second will only send a notification for assignments submitted after the ‘Due Date’.
The Late Submissions option will be greyed out unless ‘Notify Graders about Submissions’ is selected as NO because ‘Notify Graders about Submissions’ will also send receipts for assignments submitted after the due date. To fully disable the grader receiving notifications, change both options to NO.
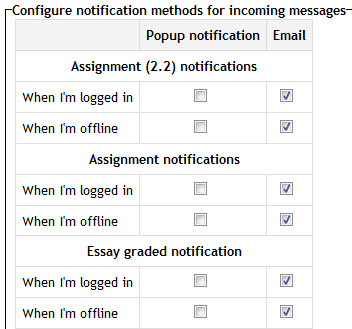
Submission Notification for Students - My Profile Settings > Messaging Tickboxes on the messaging page can be set by the student depending on their preference. A student can opt to receive notification via email, popup message or both.
Assignment notification - On submission of an assignment, the student will receive a notification that their assignment has been successfully received.
Essay graded notification - Once a grader has provided a mark/feedback for assignments, students will be notified (within the hour) that this feedback is available.
Viewing and grading submitted assignments
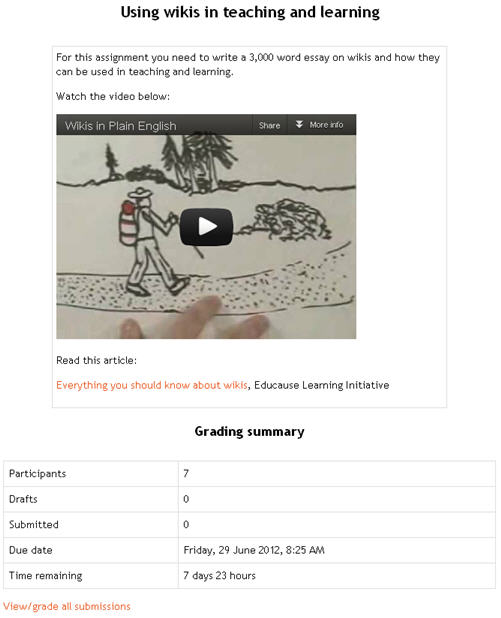
When students have submitted their assignments, they can be accessed by clicking on the assignment activity. This will bring up the Grading Summary page.
The Grading Summary page displays a summary of the assignment, including; number of participants, number of drafts, number of submitted assignments, due date and time remaining.
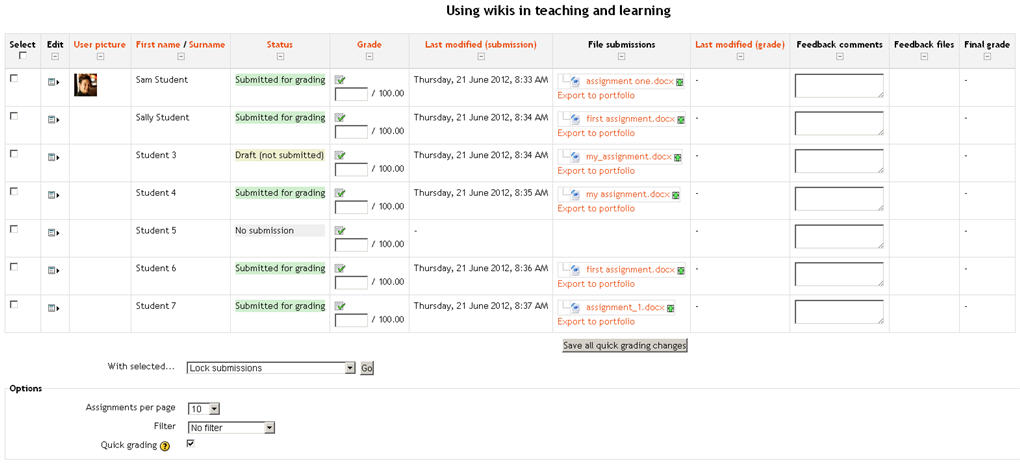
Clicking on the the ‘View/grade all submissions’ link will bring up the Grading Table.
The Grading Table contains columns of information about the student, the status of their submission, a link to grade their submission, a link to each submission and feedback comments and files (if enabled).
Submission status
If you will be assigning grades to student work, you may want to take note of the submission status before you begin the marking process. If you have required students click the Submit button, you may find that some submissions are still marked as Draft (not submitted), meaning the student has either uploaded a file(s) or entered some text, but has not clicked ‘Submit assignment’.
It is suggested that if it's after the due date and you are about to commencing marking that you use ‘Prevent submission changes’ to stop students from making changes to their assignment. You can do this one by one by using the icon in the Edit column.
Or you can select two or more students by putting a tick in the select column and going to 'Lock submissions’ from the With selected menu under the grading table.
Likewise you can also revert a student's submission to draft if they have uploaded the incorrect file. Instead of selecting ‘Prevent submission changes’ select ‘Revert the submission to draft’, or place ticks against selected students and choose 'Revert the submission to draft status' from the With selected menu under the grading table.
Quick grading
Under Options (scroll to bottom of the page) you can determine your preferences for the number of assignments you wish to display per page. You can also filter assignments either to show all (no filter), submitted, or requires grading. This is also where you can turn on quick grading.
Quick grading allows you to enter grades and a feedback comment (if enabled in Assignment settings) directly into the grading table. Quick grading is not compatible with advanced grading and is not recommended when there are multiple markers.
You can enter grades and feedback comments using quick grading. It is now possible to enter grades in decimal format. You will not be able to return a feedback file to your students (if enabled in the Assignment settings).
Enter the grades
Scroll to the bottom of the grading table and click 'Save all quick grading changes'
A confirmation screen will appear.
Student grading page
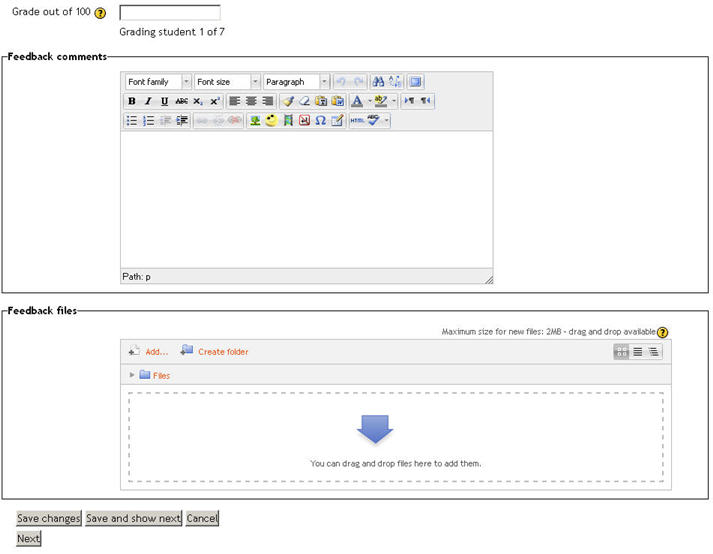
If you have enabled File Feedback in the Assignment settings and wish to upload either the marked student assignment, a completed text based feedback document or audio feedback, click on the green tick in the Grade column (or use the icon in the Edit column and select Grade).
Here you can enter grades, feedback comments and feedback files (if enabled in the Assignment settings). You can use drag and drop to upload feedback files.
View gradebook
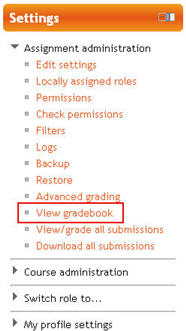
You can jump directly to the gradebook for this course by selecting the ‘View gradebook’ option under the Choose menu at the top of the grading table, or clicking on ‘View gradebook’ in the settings menu.
Downloading student submissions
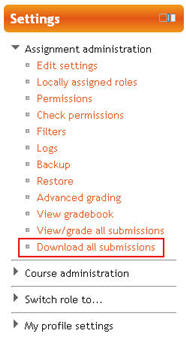
You can download a zip file containing all of the assignment submissions by selecting the ‘Download all submissions’ options from the Choose menu at the top of the grading table, or in the settings menu.
Tramesa de fitxerss will be downloaded in the format uploaded by the student. Text en línia submissions will be downloaded as html files. Each file in the zip will include the student first and lastname at the beginning of the filename for identification purposes.
Keeping records (archiving, exporting, backing up)
When students unenrol from a Moodle area, their records become invisible through the Gradebook interface. In order to have the information to hand, departments or course teaching teams may need systems in place to keep their own records for the data retention period required in their particular context. There are two separate procedures for exporting student submissions and marks.
To export marks (with or without feedback):
- Go to your course area
- From its front page Settings block, select Grades; the Grader Report loads.
- From the Grader Report Settings block, select Export; a menu displays.
- From the menu, if you need easy viewing and running calculations you probably want to select one of the spreadsheet formats; a page of export settings loads
- Use the Visible Groups pulldown menu to limit the export to specific groups, as required
- In Options, you indicate whether feedback comments are included
- In Grade Items To Be Included lists you can, if required, omit particular Activities from the report
- When you've finished with the settings, click on Submit; a preview of your export displays
- Click on Download to export to the format you chose, and save the file.
To download the original student submissions:
- In your course area, click the link to the Assignment whose submissions you want to download.
- Click on the link to View/Grade all submissions; the Grading Table will load.
- Click the link to 'Download all submissions' (either from the Choose menu or from the Settings block), and save the file.
Tips and Tricks
- Want to use an Assignment activity again in another Moodle site? Use the backup and restore options.
- Want to use an Assignment activity in another course you teach? Use the Import function in the course administration block.
- Moodle will sometimes appear not to be uploading a resubmitted assignment - you seem to be downloading the original assignment. This is a cache issue, in short, go to "Tools > Clear Recent History" in Firefox or "Tools > Delete Browsing History > Delete Temporary Files" in Windows Explorer. The newer file will then appear.
See also
One approach to group project grading Blog post by Gavin Henrick.
Examples from School demo site
Student view of an assignment. Log in with username 'student' and password 'moodle'. Scroll down to see the rubric and feedback.
Student view of a student submission statement Log in with username 'student' and password 'moodle'
Student view of group assignment grading screen Log in with username 'student' and password 'moodle'
Teacher view of a group assignment grading screen Log in with username 'teacher' and password 'moodle'.
Teacher view of blind marking grading screen Log in with username 'teacher' and password 'moodle'
Other
- Using Moodle of using Assignment upload over emailing a document forum discussion


