Using certainty-based marking
Note: CBM in Moodle is based on strategies developed by Prof. Gardner-Medwin at UCL (London, UK). More documentation can be sourced here.
What is Certainty-Based marking (CBM)?
- After each answer, you say how sure you are that your answer is correct.
- This is on a 3-point scale: C=1 (low), C=2 (mid) or C=3 (high)
- We don't rely on words like 'sure' or 'very sure' because these mean different things to different people
- The mark scheme and the risk of a penalty determine when you should use each C level:
| Certainty level | C=1 | C=2 | C=3 | No Response or 'No Idea' |
|---|---|---|---|---|
| Mark if correct | 1 | 2 | 3 | ( 0 ) |
| Mark if wrong | 0 | -2 | -6 | ( 0 ) |
| Probability correct | < 67% | 67–80% | >80% | - |
| Description | Unsure | Mid | Quite sure | - |
- Certainty levels 1, 2, 3 always give you marks 1, 2, or 3 when you are correct
- If you are wrong, then unless you opted for C=1 you will lose marks: -2 at C=2 and -6 at C=3
Why use CBM?
- To make students think about how reliable their answer is.
- To encourage students to try to understand the issues, not just react immediately to a question.
- To challenge: if a student won't risk losing marks if wrong then they don't really know the answer.
- If a student is a careful thinker but not very confident. they will gain in confidence.
- It is more fair - a thoughtful and confident correct answer deserves more marks than a lucky hunch.
- Students need to pay attention if they make confident wrong answers: think, reflect, learn!
- Efficient study requires constantly questioning how our ideas arise and how reliable they are.
How to decide on the best certainty level
- If you're sure, obviously you do best with C=3. But you will lose twice over (-6) if you are actually wrong!
- If unsure, you should avoid any risk of penalty by choosing C=1
- In between, you are best to use C=2: you gain 2 or lose 2 depending on whether you are right.
- The graph shows how the average mark at each C level depends on the probability that your answer will be right.
- Suppose you think you only have a 50% chance of being right: The highest graph for 50% on the bottom scale is black (for C=1). So you will expect to boost your marks on average most by acknowledging your low certainty (C=1).
- If you think you can justify your answer well, with more than an 80% chance of being correct, then the red graph is highest, for C=3. Opt for this.
- Note that you can't ever expect to gain by misrepresenting your certainty. If you click C=3 (the red line) when you aren't sure, you will expect to do badly - with very likely a negative mark. You might be lucky; but on average you will lose! If you understand the topic well, and think your answer is reliable, then you will lose if you opt for C=1 or C=2 rather than C=3. You will do best if you can distinguish which answers are reliable and which uncertain.
Feedback about your CBM performance
- If you are using CBM with feedback given after each answer, then the mark tells you a lot: -6 will make you ask how you justified confidence in a wrong answer. Think (along with any available explanations and your books or notes) how to tie together different bits of your knowledge.
- If you repeatedly get answers right with C=1 then ask yourself if perhaps you know the subject better than you think. Ask how you might relate your answers to things that you definitely do know and are more confident about.
- When you finally submit, you will see your percentages correct for each C level you used. Ideally these might be around 50%,70%,90% for C=1,2,3 whether you know the subject well (lots of answers at C=3) or poorly (lots at C=1). The feedback will warn if you are tending to overestimate or underestimate how reliable your answers are. If overconfident, think about why! Perhaps you were careless; perhaps you have misconceptions, or are giving confident answers to questions you don't really understand or that are phrased ambiguously. Use this to guide your study and to improve your interaction with teachers.
- Note that some questions in a quiz may carry more weight than others, so for example you might get -12 if the question carries double weight and you make a confident error. Since this makes feedback harder to interpret, it probably isn't a good idea for quiz-setters to vary weights in this way when using CBM.
- If you've only answered a few questions, CBM feedback may not mean very much: 2 or 3 unconfident correct answers may just be luck! What is important is that you think about why you were confident or unconfident, and learn from that.
CBM Grades and Scores
CBM Average Mark and Accuracy
- The CBM Average can range between 3 and -6. If all the questions in the quiz have the same weight, then it is simply the average CBM mark, as shown in the CBM table above. If the weights (w) vary, then for CBM marks (m) awarded on each question the CBM Average = Σ(wm)/Σ(w).
- Accuracy is a conventional measure of how much you got right in the quiz, ignoring CBM ratings. If all questions carry equal weight, it is the percentage of answers that were correct (with perhaps some answers being counted as partially correct). If questions have different weights w, and answers have fractional correctness f (between 0 and 1) then Accuracy = Σ(wf)/Σ(w).
- Partially Correct Answers. If Moodle answers are partially correct (assigned a fraction f greater than zero), then for C=1, 2,or 3 the mark awarded will be f, 2f or 3f. If f is negative (implying that any correct portion of a response is outweighed by errors) then the mark awarded will be the same as for a wrong answer (0,-2 or -6).
What do Average CBM marks and Accuracy tell you?
The graph* shows the scores (Accuracy and CBM average) for several thousand online submissions on a variety of voluntary CBM self-tests for learning and revision, mostly with university students. It is annotated with interpretations of the students' knowledge in different zones of the graph.
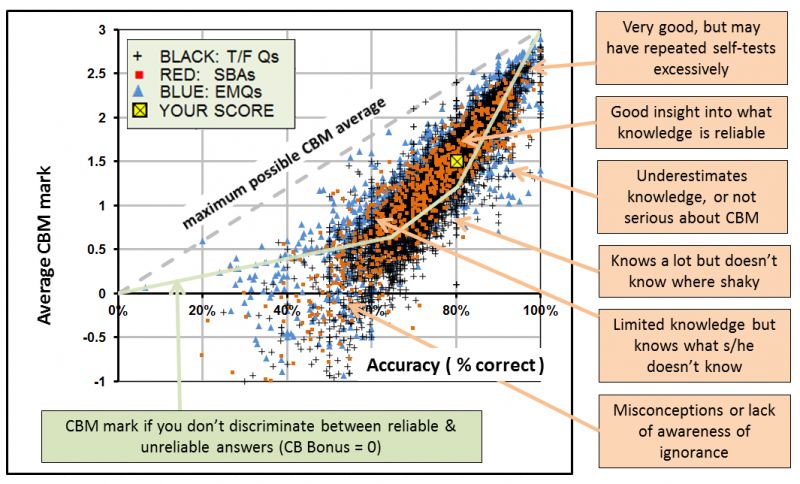
- * This graphical form is used in CBM Self-Tests (not currently in Moodle) to present a student's score after submission.
- Note that the CBM average is always less, as a percentage of maximum, than accuracy. For the score shown in yellow, the CBM average (1.5) was 50% of maximum, while the accuracy (which ignores C ratings) was 80%. You obviously shouldn't worry that your CBM average is less, expressed in this way, than your conventional score. It always is!
- If you didn't discriminate at all between reliable and uncertain answers (giving them all the same C rating, appropriate just for how well you know the topics on average), then your scores would lie somewhere on the green line on the graph.
- If your score lies above the green line, then you are successfully distinguishing reliable answers from uncertain ones. If your score lies below, then you are either misjudging how well you know and understand the topics, or you may have serious misconceptions (things you confidently believe, but that are not so!).
CBM Bonus, CB Accuracy and CB Grades
It is convenient to express a student's success at distinguishing reliable from uncertain knowledge in terms of a CBM Bonus that can be added to (or subtracted from) their conventional accuracy, expressing the percent correct in their answers. The CBM Bonus is determined by how much the CBM average lies above or below the green line on the graph above. A negative bonus** means the student has discriminated badly or misjudged the reliability of their answers. For the example score shown in yellow, the CBM average is 0.3 marks above the line, which is multiplied by a standard factor β (=10%)* to give a CB bonus = +3%. When added to the Accuracy (= 80%) this gives CB Accuracy = 83%. The CB Grade is simply the CB Accuracy multiplied by the grade value assigned to the quiz. Use of CB Accuracy makes it easy for students and examiners to compare conventional and CB grades, while the difference (the CB Bonus) is an indication of the student's critical awareness of which parts of his or her knowledge are and are not reliable.
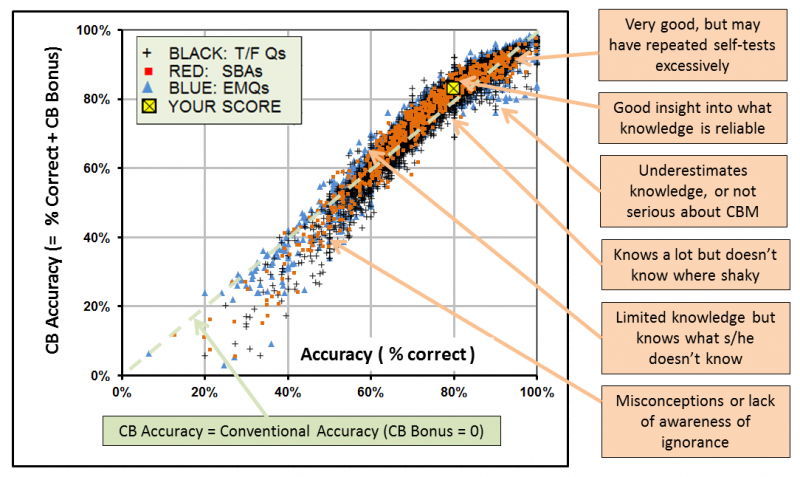
- * The factor β=10% used to calculate CB Bonus is optimally chosen to maximize the statistical reliability of the resultant total score (Accuracy + Bonus): its ability to predict accurately the performance on related tests. Ref: Gardner-Medwin, 2013
- ** If you think a negative bonus strange, think how much better the world would be if bankers' bonuses could go negative. A negative CBM bonus typically flags what were described by Confucius as an inability "when you do not know a thing, to allow that you do not know it" and by Donald Rumsfeld, more concisely, as "unknown unknowns". They are both essentially negative knowledge, worse than acknowledged ignorance.
CBM Data in Exams
By the time students take exams, many of their misconceptions (confident errors, leading to negative marks) will have gone, and students should be better judges of their areas of mastery and uncertainty. This means that CB Bonuses tend to be more uniformly positive. CB Accuracy allows examiners to make a direct comparison of CB standards criteria with conventional standards.
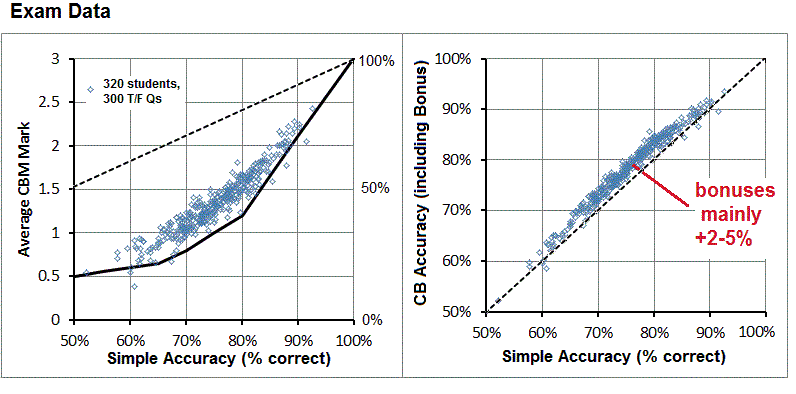
Example CBM data from a UCL medical exam using True/False questions.
CBM is particularly valuable for self-tests, where students challenge themselves as part of their study. Answers may be omitted because they are not on a topic of current interest, they are too easy, or perhaps not yet studied. CBM scores can then be presented relative to the set of questions the student has chosen to respond to. All correct on just half of a quiz would then show as 100% accurate. It is up to the student to interpret such scores: obviously if questions are omitted because they are difficult, then the relative score may overestimate competence in the subject. Moodle 'Grades' are always relative to the whole quiz, and this is the default presentation for other scores too.
Moodle Grades with CBM
The Moodle Grade is the total of marks awarded, scaled relative to a nominal value for the whole quiz. Grades are sometimes shown 'out of' this value, but with CBM the grade can be up to 3 times as big (if all answers are correct at C=3). This simple form of grading is not easily compared with conventional grades. The CB Grade (see above) is preferred, but until Moodle Grades are calculated this way when CBM is in use, staff should use the data shown in tables under Quiz - Results - CBM Grades or Attempt - Reviews for the clearest assessment of student performance. Beware that unless 'Unlimited Grades' are set (see below) Moodle Grades will often be shown quite incorrectly in gradebook displays.
Essential ADMIN actions for CBM
Essential PLUGIN for staff viewing of CBM data in Moodle 2.6 +
Moodle 2.6-2.9 require a Quiz Report Plugin to be installed for CBM data to be visible in CBM grade reports. Earlier Moodle versions (<2.6) can use the downloadable code modifications instead, which show CBM data in the regular reports.
Essential 'Unlimited Grades' Setting
'Unlimited Grades' must be set 'on', under Site Administration -> Grades -> General settings so that grades are not limited to 100%. Moodle currently calculates these gradebook entries based on raw marks (up to 300% of marks obtainable without CBM). Without this setting, most student grades may be shown as '100%' due to imposition of the limit. If the core code were changed to show grades as the CB Grade (designed to be properly comparable with conventional grades) this admin setting would no longer matter.
ARGM August 2014.
More information: Certainty-Based Marking .