Adding/editing a course
This page provides teacher documentation on how to add and edit a new course, the main learning and teaching space in Moodle.
Creating your new course
- A regular Teacher in Moodle can only edit and add content to courses which have already been created. If you need to have a brand new course, you must either ask your admin to set up the blank course for you or else give you Course Creator privileges.
- If you have been given Course Creatorprivileges then in the Category where you wish to set up your new course, you will see a button "add a new course" beneath the current courses. Click on it to create your new, blank course.
- Enter the course settings, then click the "Save changes" button. (You can always go back and change settings later.)
- On the next screen, choose your students/teachers to assign to the course. (You can skip this step and do it later)
Getting started on your course
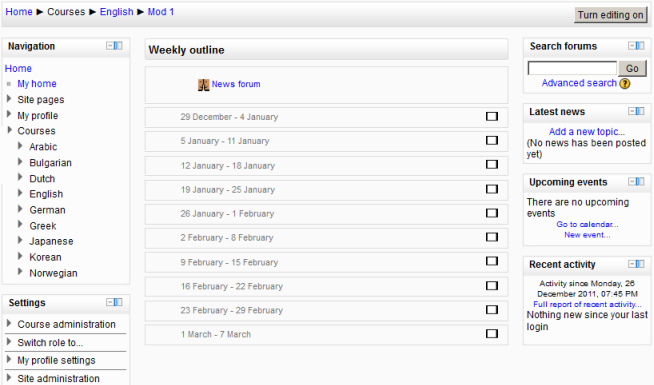
- A blank course looks typically something like the following screenshot, but it may vary according to the theme and default settings of your establishment's Moodle. Down the left and right sides are blocks which can be added to and removed, and in the middle is the "work area". This is your course homepage
- Once you have a new blank course, you can start work on it by turning on the editing, either with the button top right or the link in the Course Administration block:
- NOTE: If you don't see either the button or the link,then you need to ask your admin to give you Teacher rights in the new course.
Editing elements of your course
With the editing turned on, each item on your course homepage and each section/block will have icons next to it which all perform different functions such as edit/move/copy/delete/hide. Note: your theme may have icons different from these below::
 - the move here icon appears when moving a course element. Click into the box to re-locate your item.
 - the "crosshairs" move icon allows you to move items or sections by dragging and dropping. It appears if your admin has enabled Ajax in Settings > Site Administration > Appearance > Ajax and Javascript
The following icons are visible when editing is both on and off
The following icon only applies to sections
Adding activities to your course
- Moodle provides a great number of learning activities for students. There are 14 standard activities, but there are many others which your admin can add to your Moodle. The Activities page shows you how to set these up and use them.
- To add an activity, turn on your editing, choose the section in your Course homepage where you'd like it to appear and click the drop down menu "Add an activity".
- You can have students send in their work to you via Assignments or have Moodle mark it automatically using Quiz or SCORM activities. You can set up independent or step-by-step tutorials with Lessons.Students may collaboarate with others on Wikis, Databases or Glossaries. They may communicate and share knowledge via Chats and Forums. They may peer or self-assess using Workshops and evaluate their learning with Choice, Feedback or Surveys.
Adding Resources to your course
- As well as adding interactive exercises for your students, you can provide them with static resources. The Resources page shows you how to add and use static resources such as useful weblinks or documents.
- To add a resource, turn on your editing, choose the section in your Course homepage where you'd like it to appear and click the drop down menu "Add a resource".
- You can share individual Files - either from your own computer or from any external sites your Moodle admin has allowed. You can save time and space by displaying a whole Folder or by adding your information directly onto a Moodle Page. It is also easy to share links to websites or import pre-made content as an IMS content package. A Label is a "spacer" that helps break up your Course homepage.
Adding Blocks to your course
- Blocks appear to the right and left of the central "work" area into which you add your Activities and Resources
- There are many standard blocks which allow you, for example, to display a Calendar share Quiz results or Glossary entries, display RSS feeds, add personalised content, show who is online or allow Comments on your course. The Blocks page shows you how to set up and use the blocks.
- A teacher can add new blocks when the editing is turned on by clicking the "add block" drop down menu at the bottom right of the screen:
- As well as the standard blocks, there are many contributed blocks which your admin could add to your Moodle.
To move a Block
Blocks appear at the side(s) of your course area. To move one,
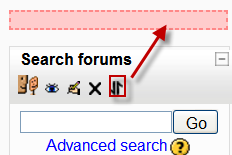
- Turn Editing On and *click and release* the Block's crosshair icon. Place holders - zones with a dashed border - appear on the screen indicating the possible areas where your Block can appear.
- Click the placeholder where you want the Block appear. On course area homepages, you can move Blocks from one side to the other, but not into the middle.
- The block should now appear in the location you chose.
Managing your course
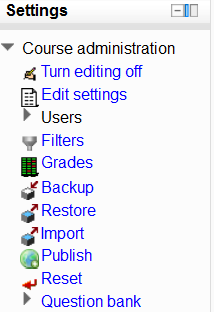
- The Course Administration section of the Settings block allows teachers to manage different aspects of their course. (Note that you might see more or fewer of the options in the following screenshot according to what your Moodle admin has allowed)
- Edit Settings - this takes you to the Course settings page (which you see when first creating a course. Here you can, for example, rename the course, change its format from Weekly to Topic or alter the number of sections.
- Users = this is where you can enrol new users - see Course enrolment for details on how to do this.
- Filters - here is where you can enable or disable any allowed Filters for your course.
- Grades -this section allows you to view, add and edit your students' Grades. (You might also have Outcomes enabled here too.)
- Backup/Restore - these links allow you to make copies of your course or bring in courses backed up elsewere. See Course backup and Course restore for more information.
- Import -you can import activities into your course here. The Page Import course data gives you details of how to do this.
- Publish - if your Moodle admin allows it, you can publish your course to one of the Community hubs here.
- Reset -this lets you remove all old user information at the end of an academic year or session in order to start afresh. The page Reset course gives you more information about this.
NOTE: These links are only available to teachers of the course. Students will see their own version of the block which will display a link to their own gradebook and, if enabled, their own course reports.
General advice
- Subscribe yourself to all of the forums in your course so that you can keep in touch with your class activity.
- Encourage all of the students to fill out their user profile (including photos) and read them all - this will help provide some context to their later writings and help you to respond in ways that are tailored to their own needs.
- Use the Notes feature to make notes about students. This is especially useful when team teaching.
- Use the Course reports link in the Navigation block to get access to logs, activity and participation reports.
- Respond quickly to students. Don't leave it for later - do it right away. Not only is it easy to become overwhelmed with the volume that can be generated, but it's a crucial part of building and maintaining a community feel in your course.
- Don't be afraid to experiment: feel free to poke around and change things. It's hard to break anything in a Moodle course, and even if you do it's usually easy to fix it.
See also
- Teaching with Moodle - inspiring links
- Teaching do's and don'ts - handy poster
- Moodle books- published books on Moodle. Buy one from here to help support Moodle development!
- Moodle manuals - A list of links to othere manuals and books.
- Using Moodle book - the original book about Moodle, free to download and print off but dealing with an older version of Moodle. (1.8)
- Teaching FAQ - common questions
- Student FAQ - answers to some common questions students might have about using Moodle


