Custom pages
Overview
Custom pages enable site and tenant administrators to create personalised experiences for different audiences by easily adding new pages to the navigation. The content on these pages can be customised using standard Moodle Workplace blocks.
There are two types of custom pages:
- Global custom pages are shared across all tenants, but they don’t require the Shared Space to be enabled.
- Tenant custom pages are specific to a single tenant, which is selected on creation and cannot be changed later.
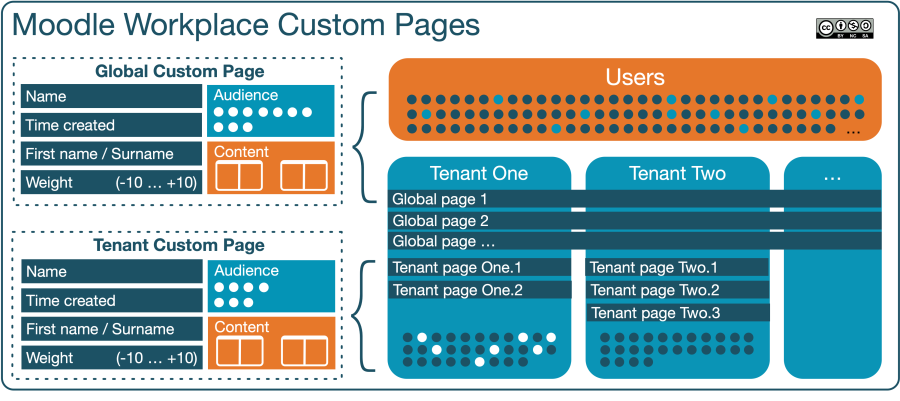
The following diagram demonstrates the key differences between global custom pages and tenant custom pages:
While the structure of both custom page types is identical, the reach and its audiences are different:
- Global pages are available across all tenants; a tenant page is restricted to the tenant it has been created in.
- Who can see a page is determined by the page audience. In global pages, the audience is a subset of all site users; in tenant pages, it is a subset of all tenant users.
The My teams page is created by default on site installation or on upgrade to Workplace 4.x- This page is created as a global page with the audience "Managers" (available to both Managers and Department Leads) and contains one My Teams block.
Dashboards vs Custom Pages
Dashboards and custom pages let you add and arrange standard Moodle Workplace blocks. So, what are the differences between custom pages and dashboards?
Dashboards:
- Dashboards are copied for each user when they log in for the first time.
- When a change is made in the site or tenant’s default dashboard page, it needs to be manually propagated to all users by resetting their dashboard configuration to the default.
- By default, users can edit their own dashboard (capability-based).
Custom Pages:
- Custom pages are not copied for each user; they work as templates instead.
- Only site and tenant Administrators can create custom pages.
- Users can’t edit their own version of the custom pages.
- Changes are immediately applied to the custom pages for all users in the audiences.
Custom pages are read-only dashboards for different audiences. Thanks to custom pages, administrators can protect the dashboard by adding only essential blocks and organising everything else into custom pages, improving the experience for learners and managers.
Managing custom pages
You can access the management of programs via Site administration > Appearance > Custom pages or directly via the Custom pages icon in the Workplace launcher.
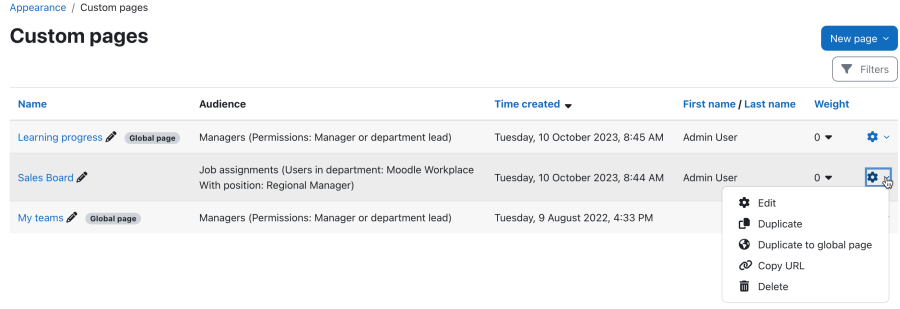
The following columns and actions are available for custom pages:
- Name: The name of custom page
- Type indicator: The options are Global page or empty (tenant page)
- Audience: Displays all selected audiences. If empty, no user can view this page.
- Time created: The date the page has been created
- First name / Last name: The name of the page creator
- Weight: Indicates the order in which the page titles are shown in the user's navigation - the page with the lowest number is shown first, the one with the highest number last.
- Actions
- Edit: Change custom page content, details, and audience
- Duplicate: Create a copy of the custom page of the same type
- Duplicate to tenant page: Create a copy of a global page in a tenant (global pages only)
- Duplicate to global page: Create a copy of a tenant page as a global page (tenant pages only)
- Copy URL: Lets the user copy the page url to the clipboard. This is mainly relevant for sharing non-published custom pages.
- Delete: Remove page
You can filter the custom page table by the following fields:
- Page type: Global page or Tenant page
- Name: Text filters
- Time created: Date filters
- User: Text filters
Creating new custom pages
To create a new custom page, press the New page button and select one of the two options:
- New global page: create a custom page that is available across tenants
- New tenant page: create a custom page that is only available in the current tenant
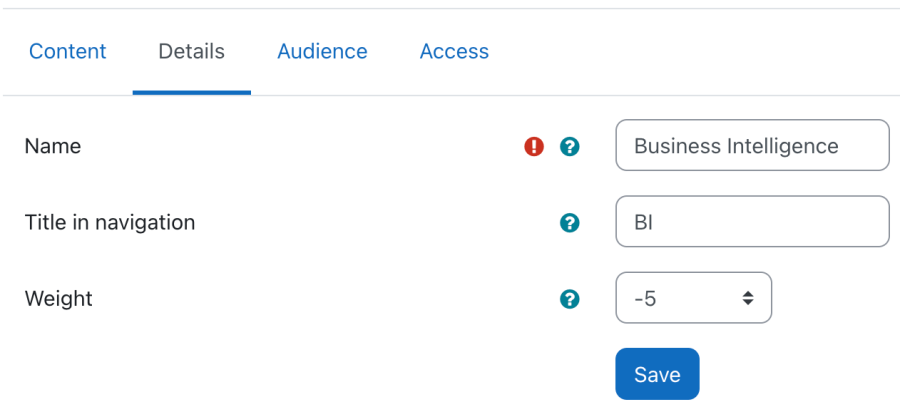
The fields to be provided are identical for both page types:
- Name: The name will be used as page heading and as the text in the primary navigation
- Title in navigation: The text in the primary navigation can be overridden here
- Weight: Specify the order this page will have in the primary navigation. Lower numbers will be displayed first.
As soon as you Save the settings, a new custom page will be created, and you will be directed to the Content tab.
Custom page content
To add or edit the content of a custom page, select the Content tab and Edit page. Ensure that editing mode is also turned on! You can add custom blocks in any block region defined in your theme. By default, these are the center of the page (content) and the block drawer (side-pre). Once you have completed the page editing, its structure is shown in the content tab.
Custom page audience
Custom page audiences indicate which users have access to the page. To access audiences, select the Audience tab of a custom page.
You can add the following criteria to a custom page audience (multiple audiences are OR connected.):
- Custom pages
- Administrators: Select at least one administrator who will be given access to the page (only available on Global pages)
- All authenticated users: Use this audience to give access to all logged in users in the tenant to any report
- Assigned category role: Select at least one category role; all users who have been assigned this role are given access to the page (only available on Tenant pages)
- Assigned system role: Select at least one system role; all users who have been assigned this role are given access to the page
- Manually added users: Select at least one user (via name or email address). Only email addresses of registered users are supported as schedule recipients.
- Member of cohort: Select at least one cohort; all users who are members of this cohort are given access to the page (only active if cohorts exist)
- Non-authenticated users: Give access to guest users and other non-authenticated users. See Public guest pages.
- Organisation structure
- Job assignments: Select a Department and a Position, and optionally include subdepartments and subpositions, respectively
- Managers: Make pages available to managers. The Manager type options available are Manager, Manager (assigned manually), and Department Lead.
- Multi-tenancy (only available on Global pages)
- Tenant users: Choose one of the following three options:
- Users in all tenants (including future ones): effectively the same as the 'All users' setting in the 'Custom pages' section
- Users in the following tenants...: select one or multiple tenants; all their users will be included
- Users in all tenants except the following...: select one or multiple tenants; all their users will be excluded
- Tenant users: Choose one of the following three options:
Custom page details
This tab displays the same information when creating a new custom page. All values can be edited.
Custom page access
To see who can view the custom page, select the Access tab of a page where you'll see a report that can be filtered by Full name.
Accessing custom pages
The custom page name or, if provided, the navigation title is shown in the primary navigation. If multiple custom pages are available, the order is determined by the specified weights of the pages.
Public custom pages
Moodle Workplace supports the creation of custom pages that can be viewed by guest or other non-authenticated users. Public pages are useful on sites where you want to display information to users who are not registered with your site. To create a public custom page, follow the following steps:
- Ensure that forceloginforprofiles (General > Security > Site security settings > Force users to login for profiles) is enabled.
- Go to Plugins > Authentication > Manage authentication > Guest login button and change its value to Show.
- Create a new global custom page
- Add the "Non-authenticated users" audience
The new item will appear in the navbar for non logged-in users, e.g. guests.
Capabilities
The following custom pages capabilities are available:
- Edit custom page: tool/custompage:edit
- Edit all custom page: tool/custompage:editall
- Duplicate custom page blocks without validation: tool/custompage:skipblockvalidation


