Moodle Mobile custom apps: Difference between revisions
Juan Leyva (talk | contribs) |
Juan Leyva (talk | contribs) |
||
| Line 84: | Line 84: | ||
** Remote building (cloud service) | ** Remote building (cloud service) | ||
** This is the recommended way because it doesn’t require to install all the SDK, emulators (or having to buy a Mac for developing) | ** This is the recommended way because it doesn’t require to install all the SDK, emulators (or having to buy a Mac for developing) | ||
=== Building with Phonegap Build === | |||
* First of all, you need to create a new repository in GitHub. This is because Phonegap Build requires a different directory structure than Ionic CLI and we need a branch per platform. | |||
* In your forked repository, run gulp so the build files are updated. | |||
* Copy all the code inside the www/ in your forked repository directory to this new repo/branch. | |||
* Also copy the /resources directory from the ionic project to a new /resources directory in the phonegap build repository | |||
* You also have to place the /resources/icon.png and /resources/splash.png you used to create your resource files in the root folder in the phonegap build repository | |||
* Use this repository as an example: https://github.com/moodlehq/moodlemobile-phonegapbuild/tree/learn-moodle | |||
* In the Phonegap Build repo root folder you need to add a special config.xml file (different to the Ionic one), use this file https://raw.githubusercontent.com/moodlehq/moodlemobile-phonegapbuild/learn-moodle/config.xml as a template. Please, replace there the app name, versions, etc.. | |||
* Then, in the Phonegap build repo you need two create two additional branches based on master: android and ios | |||
Revision as of 12:11, 21 September 2016
Note: This page is a work-in-progress. Feedback and suggested improvements are welcome. Please join the discussion on moodle.org or use the page comments.
Overview
You will need a custom app if you want:
- Force the users to log in to your site URL
- Custom corporate image (name, app icon, theme, store entry)
- Add additional features or static pages
- Remove or change existing features
- Custom translation of the app
- Use your own notifications infrastructure
Requirements
- Code editor (Sublime, WebStorm, Eclipse, Netbeans...)
- Github account (http://github.com/)
- Github desktop app (http://windows.github.com/)
- PhonegapBuild account (https://build.phonegap.com/)
- Chromium browser as described here: https://docs.moodle.org/dev/Moodle_Mobile_development_using_Chrome_or_Chromium
Steps for creating your Custom App
Setting up your computer
Follow these guides:
- Setting up your development environment for Moodle Mobile 2: https://docs.moodle.org/dev/Setting_up_your_development_environment_for_Moodle_Mobile_2
- Moodle Mobile development using Chrome or Chromium: https://docs.moodle.org/dev/Moodle_Mobile_development_using_Chrome_or_Chromium
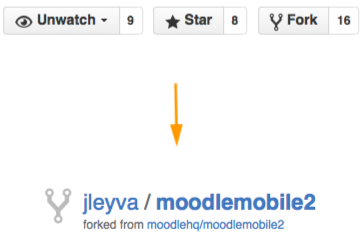
Fork the app
Use the Fork tool in: https://github.com/moodlehq/moodlemobile2
You must be logged with your Github user!
Clone the repo in your desktop
You can use your favourite GIT client (or GitHub Desktop clients)
Create a new branch
Having the code in a separate branch in the forked repository will make very easy to maintain our customizations using git tools (merge, rebase)
Edit the app settings file
/config.xml
- Change the widget id value (instead com.moodle.moodlemobile your own id)
- Change the app name and description
/www/config.json
- Change versionname
- Add a pre-fixed URL: Adding a field like “siteurl”: “http://mysite.abc”
- Change gcmpn (if you are using your custom Google Push infrastructure)
- Change the appid (required for making Push notifications work)
- Remove demo sites (“demo_sites”: “”)
Edit another app files
/www/core/component/settings/lang/x.json (x means all the languages)
- Change the “appname” string to match your custom app name (Not necessary in latest version Moodle Mobile 3.1.3), you can change it in config.json
/www/errorreport.js
- Change: var reportUrl to point to your custom error reporting system (if you want to use your custom one)
- Same for appVersion
Replace the app icons, splashscreen
- Replace the resources/ icon.png and splash images
- Replace also the www/img/moodle.png with an image matching your logo
- In a console:
- cd mycustomappdir/
- ionic resources
This will create your custom icon and splash images in all the required sizes
More information about Ionic’s image generation: http://ionicframework.com/docs/cli/icon-splashscreen.html
Add your custom styles
- Add your custom styles in scss/app.scss
- Sample theme available at: https://docs.moodle.org/dev/Moodle_Mobile_Themes
Building your Custom App
There are two options for building the app:
- Ionic CLI
- Local building (require installation of Android and iOs SDK and emulators)
- See http://ionicframework.com/docs/cli/run.html
- Phonegap Build
- Remote building (cloud service)
- This is the recommended way because it doesn’t require to install all the SDK, emulators (or having to buy a Mac for developing)
Building with Phonegap Build
- First of all, you need to create a new repository in GitHub. This is because Phonegap Build requires a different directory structure than Ionic CLI and we need a branch per platform.
- In your forked repository, run gulp so the build files are updated.
- Copy all the code inside the www/ in your forked repository directory to this new repo/branch.
- Also copy the /resources directory from the ionic project to a new /resources directory in the phonegap build repository
- You also have to place the /resources/icon.png and /resources/splash.png you used to create your resource files in the root folder in the phonegap build repository
- Use this repository as an example: https://github.com/moodlehq/moodlemobile-phonegapbuild/tree/learn-moodle
- In the Phonegap Build repo root folder you need to add a special config.xml file (different to the Ionic one), use this file https://raw.githubusercontent.com/moodlehq/moodlemobile-phonegapbuild/learn-moodle/config.xml as a template. Please, replace there the app name, versions, etc..
- Then, in the Phonegap build repo you need two create two additional branches based on master: android and ios


