|
|
| Line 1: |
Line 1: |
| {{Moodle Mobile}} | | {{Moodle Mobile}} |
| {{obsolete}}
| | |
| == Introduction == | | == Introduction == |
|
| |
|
| This tutorial describes all the steps needed for developing a plugin for the MoodleMobile app. | | This tutorial describes all the steps needed for developing an add-on for the Moodle Mobile app. |
|
| |
|
| In this tutorial we make the following assumptions: | | In this tutorial we make the following assumptions: |
|
| |
|
| * You have a medium/good skills/understand of Javascript, PHP and Moodle architecture | | * You have a medium/good skills/understand of AngularJS/Ionic, PHP and Moodle architecture |
| * You know what a Web Service is and how it works in Moodle | | * You know what a Web Service is and how it works in Moodle |
| * The plugin you are going to develop requires a Web Service in your Moodle installation to work | | * The plugin you are going to develop requires a Web Service in your Moodle installation to work |
|
| |
|
| '''Notice that neither the moodle plugin code and the moodle mobile plugin code are suitable for production environments'''
| | There is a second part of this tutorial where we extend the add-on features [[Moodle Mobile Developing a plugin tutorial part 2]] |
| | |
| There is a second part of this tutorial where we extend the current WebServices and create a new "forums" plugin, see [[Moodle Mobile Developing a plugin tutorial part 2]] | |
|
| |
|
| == Plugin spec == | | == Add-on spec == |
|
| |
|
| We want to develop a "grades" plugin that will display the current user grades for all the gradable activities in a course the user is enroll in. | | We want to develop a plugin that will display a new button in the user profile for adding new notes to the user. This plugin is suitable for course managers of teachers. |
|
| |
|
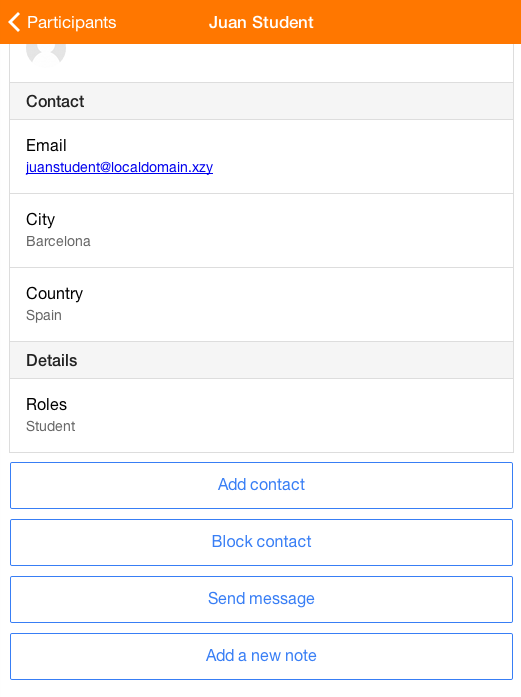
| A screenshot of the desired result: | | A screenshot of the desired result: |
|
| |
|
| [[File:MoodleMobileTutorial01.png]] | | [[File:MoodleMobile2Tutorial01.png]] |
| | |
| As you can see there is a new menu called "Grades" that displays a page in the middle panel showing all the course activities. When we click in an activity, the right panel shows the grade / maximum grade for the current user.
| |
| | |
| In order to achieve this we will have to develop:
| |
| * A plugin for Moodle containing a new Web Service that returns grades and..
| |
| * A MoodleMobile plugin
| |
|
| |
|
| == Steps == | | == Steps == |
| Line 33: |
Line 25: |
| === Set up your development environment === | | === Set up your development environment === |
|
| |
|
| Clone or fork the official git repository [https://github.com/moodlehq/moodlemobile] in a local directory.
| | Please, read [[Setting up your development environment for Moodle Mobile 2]] |
| | |
| Set up your development browser, see [[Moodle_Mobile]], I mainly use the Google Chrome browser.
| |
|
| |
|
| === Set up your Moodle installation === | | === Set up your Moodle installation === |
| Line 41: |
Line 31: |
| Enable debugging, disable caches, etc... the typical settings for developing. | | Enable debugging, disable caches, etc... the typical settings for developing. |
|
| |
|
| Enable the Web Services and also the protocols you are going to use for testing and developing (REST is mandatory). See [[Web Services]] documentation.
| | Enable the Mobile Service via Admin / Plugins / Web Services / Mobile |
| | |
| Enable the Mobile Service | |
| | |
| Enable the moodle/webservice:createtoken capability for the Authenticated User Role at System Context
| |
| | |
| === Develop the Moodle local/mod/block/... plugin ===
| |
| | |
| You can find the full source code here:
| |
| https://github.com/cvaconsulting/moodle-local_custommm
| |
| | |
| In this case we've developed a local plugin that contains a Web Service that returns grades as described here: https://tracker.moodle.org/browse/MDL-30085
| |
|
| |
|
| Notice that my version has some differences with the previous mentioned one. I have fixed some small bugs and changed some parameters.
| | === Develop the Moodle Web Services you are going to need === |
|
| |
|
| === Test your Web Services using a demo client ===
| | In this case we'll use an existing web service (core_notes_create_notes) that is already available in the Moodle Mobile app service, if you need custom functions you will need to develop a local plugin including there your new Web Services (see https://moodle.org/plugins/view/local_wstemplate) and create a custom service. |
|
| |
|
| Before continuing you must test that your Web Service works, the local plugin contains a demo REST client, see:
| | === Develop the Moodle Mobile plugin === |
|
| |
|
| https://github.com/cvaconsulting/moodle-local_custommm/blob/master/client/client.php
| | The full source code can be found here: https://github.com/moodlehq/moodlemobile2/tree/master/www/addons/notes |
| | |
| === Create your custom Service ===
| |
| | |
| A service is a set of functions for an specific purpose. Since Moodle 2.1 there is a pre-built service that contains all the functions needed for the official mobile app.
| |
| | |
| This service cannot be edited for adding new functions so we don't have a simple way for make available our new Web Service function to the mobile app.
| |
| | |
| The only way for fix this is creating a new Service in Moodle, and configuring our app for pointing to this new service.
| |
| | |
| There are two ways of creating a Service in Moodle:
| |
| | |
| * Using a db/services.php in your plugin as mentioned here: [[External services description]]
| |
| | |
| * Creating the service in your Moodle installation using the forms in Admin > Plugins > Web Services > External Services
| |
| | |
| In this case we've created the service using the Moodle forms because it gives more flexibility in some aspects, there is a big impediment, due to https://tracker.moodle.org/browse/MDL-29807 in order to add a shortname for the new Service, we have to edit manually the Moodle database for adding the shortname in the dbprefix_external_services table
| |
| | |
| [[File:MoodleMobileTutorial02.png]]
| |
| | |
| When creating, the flats "Can download files" and "Enabled" must be checked.
| |
| | |
| === Set up your MoodleMobile client ===
| |
| | |
| The most important change you have to do is edit the config.json file and change the wsservice parameter in order to point to the shortname of the Service you created before.
| |
| | |
| You have to add also the name of the plugin you are developing at the final of the plugins parameter:
| |
| | |
| "plugins" : ["notifications", "upload", "contents", "participants", "addcontact", "addnote", "sendmessage", "grades"],
| |
| | |
| Notice that, for avoid errors, this last change should be done once the file plugins/grades/main.js file exists
| |
| | |
| === Develop the MoodleMobile plugin ===
| |
| | |
| The full source code can be found here: | |
| | |
| https://github.com/cvaconsulting/moodlemobile-grades | |
| | |
| https://github.com/cvaconsulting/moodlemobile-grades/blob/master/lang/en.json - Contains the language strings, the string "pluginPLUGINname" is mandatory
| |
| | |
| https://github.com/cvaconsulting/moodlemobile-grades/blob/master/icon.png - The plugin icon
| |
| | |
| https://github.com/cvaconsulting/moodlemobile-grades/blob/master/activities.html - The template for the activities list (center panel)
| |
| | |
| https://github.com/cvaconsulting/moodlemobile-grades/blob/master/activitygrade.html - The template for showing the grade for an activity (right panel)
| |
| | |
| https://github.com/cvaconsulting/moodlemobile-grades/blob/master/main.js - The plugin's main code
| |
| | |
| Bellow, I summarize the most important parts of the code (always parts of the main.js file):
| |
|
| |
|
| | '''www/addons/notes/main.js''' |
| <code javascript> | | <code javascript> |
| | angular.module('mm.addons.notes', []) |
|
| |
|
| var templates = [
| | .run(function($mmUserDelegate, $mmaNotesHandlers) { |
| "root/externallib/text!root/plugins/grades/activities.html",
| |
| "root/externallib/text!root/plugins/grades/activitygrade.html",
| |
| "root/externallib/text!root/plugins/grades/lang/en.json"
| |
| ];
| |
|
| |
|
| define(templates,function (activities, activityGrade, langStrings) {
| | $mmUserDelegate.registerPlugin('mmaNotes:addNote', $mmaNotesHandlers.addNote); |
| var plugin = {
| |
| settings: {
| |
| name: "grades",
| |
| type: "course",
| |
| menuURL: "#course/grades/",
| |
| lang: {
| |
| component: "local_custommm",
| |
| strings: langStrings
| |
| }
| |
| },
| |
|
| |
|
| | }); |
| </code> | | </code> |
|
| |
|
| Notice that we required three files, the two templates (.html) and the .json file that contains the lang strings.
| | Here we declare the plugin, and register the Plugin (this means that the plugin will be displayed in the User profile. |
| | |
| In the plugin.settings structure, we define the lant attribute that contains two very important attributes:
| |
| | |
| * Component: It must refer to the Moodle component linked to this plugin
| |
| * strings: The lang strings in .json format (plain text). As you can see, with this line we are populating the plugin.settings.lang.strings var withe the contents of the lang/en.json files
| |
| | |
| <code javascript>
| |
| | |
| viewActivities: function(courseId) {
| |
| | |
| MM.panels.showLoading('center');
| |
| | |
| if (MM.deviceType == "tablet") {
| |
| MM.panels.html('right', '');
| |
| }
| |
| | |
| var data = {
| |
| "options[0][name]" : "",
| |
| "options[0][value]" : ""
| |
| };
| |
| data.courseid = courseId;
| |
|
| |
| MM.moodleWSCall('core_course_get_contents', data, function(contents) {
| |
| var course = MM.db.get("courses", MM.config.current_site.id + "-" + courseId);
| |
| | |
| var tpl = {
| |
| sections: contents,
| |
| course: course.toJSON() // Convert a model to a plain javascript object.
| |
| }
| |
| var html = MM.tpl.render(MM.plugins.grades.templates.activities.html, tpl);
| |
| MM.panels.show("center", html);
| |
| });
| |
| },
| |
|
| |
|
| </code>
| | We will use the $mmaNotesHandlers service for holding all the code related to the plugin availability and main functions |
|
| |
|
| The viewActivities is the function that displays in the center panel the list of activities inside a course, as you can see the code is pretty simple.
| | There are more delegates for registering your plugin, see: |
| * We call to the core_course_get_contents Web Service that returns all the activities and resources inside a course | | * www/addons/mod_forum/main.js (Module delegate, and module actions delegate) |
| * We render the template that will iterate over the sections and activities displaying the links to specifics activities | | * www/addons/messages/main.js (Main side menu delegate, and multiple delegates for the user profile) |
|
| |
|
| | '''www/addons/notes/services/handlers.js''' |
| <code javascript> | | <code javascript> |
| viewActivityGrade: function(activityName, courseId, modName, cmId) {
| |
|
| |
|
|
| |
| if (MM.deviceType == "tablet") {
| |
| MM.panels.showLoading('right');
| |
| }
| |
|
| |
| var data = {
| |
| "grades[courseid]" : courseId,
| |
| "grades[component]" : "mod_" + modName,
| |
| "grades[cmid]" : cmId,
| |
| "grades[userids][0]" : MM.config.current_site.userid
| |
| };
| |
|
| |
| MM.moodleWSCall('local_custommm_get_grades', data, function(contents) {
| |
| var course = MM.db.get("courses", MM.config.current_site.id + "-" + courseId);
| |
|
| |
| var grade= MM.lang.s("nogrades", "grades");
| |
|
| |
| if(contents.items[0]) {
| |
| grade = contents.items[0]["grades"][0]["str_long_grade"];
| |
| }
| |
|
| |
| var tpl = {
| |
| activityName: activityName,
| |
| sections: contents,
| |
| finalGrade: grade,
| |
| course: course.toJSON(), // Convert a model to a plain javascript object.
| |
| items: contents
| |
| }
| |
| var html = MM.tpl.render(MM.plugins.grades.templates.activityGrade.html, tpl);
| |
| MM.panels.show("right", html);
| |
| if (MM.deviceType == "tablet" && contents.length > 0) {
| |
| // First section.
| |
| MM.plugins.contents.viewCourseContentsSection(courseId, 0);
| |
| }
| |
| });
| |
| },
| |
| </code> | | </code> |
|
| |
| This function gets and displays the grade for the selected activity in the centered panel.
| |
|
| |
| We just call to the Web Service we developed and parse the result, if nothing is returned we display a generic message indicating that there is no grades information for the activity.
| |
| If a grades full structure is returned, we return the first grade for the first grade items (as Moodle usually does) that corresponds to the user grade for the activity
| |
|
| |
| Notice that:
| |
| * Some activities, like workshop, returns two different grades items (teacher and peer grades). The example doesn't implement any logic for this case.
| |
| * Some activities may return outcomes. The example doesn't implement any logic for this case.
| |
| * The rest grade information (grade min, grade max, feedback) is also covered by this example.
| |
|
| |
| === Deliver your plugin ===
| |
|
| |
| Android: Package your plugin using [https://build.phonegap.com/apps PhoneGap build]
| |
|
| |
| iOs: Further instructions soon
| |
|
| |
|
| == See also == | | == See also == |
|
| |
|
| [[Moodle Mobile Developing a plugin tutorial part 2]] | | [[Moodle Mobile Developing a plugin tutorial part 2]] |
Introduction
This tutorial describes all the steps needed for developing an add-on for the Moodle Mobile app.
In this tutorial we make the following assumptions:
- You have a medium/good skills/understand of AngularJS/Ionic, PHP and Moodle architecture
- You know what a Web Service is and how it works in Moodle
- The plugin you are going to develop requires a Web Service in your Moodle installation to work
There is a second part of this tutorial where we extend the add-on features Moodle Mobile Developing a plugin tutorial part 2
Add-on spec
We want to develop a plugin that will display a new button in the user profile for adding new notes to the user. This plugin is suitable for course managers of teachers.
A screenshot of the desired result:
Steps
Set up your development environment
Please, read Setting up your development environment for Moodle Mobile 2
Set up your Moodle installation
Enable debugging, disable caches, etc... the typical settings for developing.
Enable the Mobile Service via Admin / Plugins / Web Services / Mobile
Develop the Moodle Web Services you are going to need
In this case we'll use an existing web service (core_notes_create_notes) that is already available in the Moodle Mobile app service, if you need custom functions you will need to develop a local plugin including there your new Web Services (see https://moodle.org/plugins/view/local_wstemplate) and create a custom service.
Develop the Moodle Mobile plugin
The full source code can be found here: https://github.com/moodlehq/moodlemobile2/tree/master/www/addons/notes
www/addons/notes/main.js
angular.module('mm.addons.notes', [])
.run(function($mmUserDelegate, $mmaNotesHandlers) {
$mmUserDelegate.registerPlugin('mmaNotes:addNote', $mmaNotesHandlers.addNote);
});
Here we declare the plugin, and register the Plugin (this means that the plugin will be displayed in the User profile.
We will use the $mmaNotesHandlers service for holding all the code related to the plugin availability and main functions
There are more delegates for registering your plugin, see:
- www/addons/mod_forum/main.js (Module delegate, and module actions delegate)
- www/addons/messages/main.js (Main side menu delegate, and multiple delegates for the user profile)
www/addons/notes/services/handlers.js
See also
Moodle Mobile Developing a plugin tutorial part 2
