Diferencia entre revisiones de «Imágenes»
(tidy up) |
(update as English page) |
||
| (No se muestran 13 ediciones intermedias del mismo usuario) | |||
| Línea 1: | Línea 1: | ||
{{Trabajando con medios | {{Trabajando con medios}} | ||
Moodle les permite a profesores y alumnos el subir y mostrar imágenes de una variedad de fuentes mediante el ícono de imagen del [[Editor de texto]]. Las páginas del curso pueden enriquecerse con imágenes o ''banners'' en cada sección. Las [[Tareas]] pueden incluir imágenes para una mayor clarificación. Las imágenes anexadas a las publicaciones en [[Foros]] o dentro de preguntas en un [[Examen]] aparecerán incrustadas. | Moodle les permite a profesores y alumnos el subir y mostrar imágenes de una variedad de fuentes mediante el ícono de imagen del [[Editor de texto]]. Las páginas del curso pueden enriquecerse con imágenes o ''banners'' en cada sección. Las [[Tareas]] pueden incluir imágenes para una mayor clarificación. Las imágenes anexadas a las publicaciones en [[Foros]] o dentro de preguntas en un [[Examen]] aparecerán incrustadas. | ||
{{MediaPlayer | url = https://youtu.be/ | |||
{{MediaPlayer | url = https://youtu.be/6aqp6l5yb2s | desc = Añadir imágenes}} | |||
Moodle acepta formatos .jpg, .png, .svg y .gif. | Moodle acepta formatos .jpg, .png, .svg y .gif. | ||
==Arrastrar y soltar una imagen== | |||
*Las imágenes pueden ser arrastradas y soltadas directamente en el [[Editor Atto]] si Usted está usando un navegador soportado (que no sea IE 9, Safari 6 o inferior o versiones antiguas de Firefox) y pueden ser arrastradas y soltadas directamente dentro de páginas de curso si [[Activar la edición|la edición está activada]] y está habilitado el 'arrastrar y soltar medios" en ''Administración > Administración del sitio > Plugins > Módulos de actividad > Etiqueta''. | |||
* Vea [[Usando Etiqueta]] para más información. | |||
==Copiar y pegar una imagen== | |||
A partir de Moodle 3.9 en adelante, las imágenes pueden ser copiadas de cualquier parte y pegadas en el [[Editor Atto]]. Por ejemplo, Usted puede tomar una imagen de pantalla (pantallazo), copiarla a su portapapeles y entonces pegarla dentro del editor Atto. | |||
==Subir y mostrar una imagen desde su computadora== | ==Subir y mostrar una imagen desde su computadora== | ||
*''Nota:'' Es una buena idea el cambiar el tamaño de su imagen antes de subirla, en lugar de tratar de cambiar las dimensiones cuando ya está en línea.. | *''Nota:'' Es una buena idea el cambiar el tamaño de su imagen antes de subirla, en lugar de tratar de cambiar las dimensiones cuando ya está en línea.. | ||
* | *Con la [[Activar la edición|edición activada]], ir a donde desea mostrar la imagen (por ejemplo, en un resumen de un curso, una etiqueta o una página) | ||
*Haga | *Haga clic sobre del ícono de la imagen como se ve más abajo: | ||
[[File:Imageicon.png]] | [[File:Imageicon.png]] | ||
* | *Puede entonces, o escribir la URL de la imagen que ya existe en línea, o hacer clic en 'Mirar repositorios' para acceder al [[Selector de archivos]] | ||
[[File:uploadimageatto.png]] | [[File:uploadimageatto.png]] | ||
* | *Elija [[Subir un archivo]]. Busque y suba su imagen. Para mayor información, vea [[Selector de archivos]] | ||
* | *Añada una descripción a la imagen y elija ''Insertar'' o seleccione la casilla para 'Descripción no es necesaria | ||
* | *Cambie el tamaño y la alineación si fuera necesario y guarde la imagen. | ||
[[File:uploadedimageatto.png]] | [[File:uploadedimageatto.png]] | ||
== | ==Editar una imagen subida== | ||
* | *Si Usted necesita editar la imagen que ya ha subido al servidor, Usted puede hacer doble clic sobre la imagen desde adentro del [[Editor_de_texto| Editor de texto Atto]] y acceder a la ventana de propiedades de la imagen ''Tome nota de que es mucho mejor subir la imagen del tamaño apropiado en lugar de tener que modificarla posteriormente.'' | ||
== | ==Mostrar una imagen que ya está en línea== | ||
* | *Si Usted tiene imágenes disponibles en otro sitio en línea, Usted también puede mostrarlas sin tener que subirlas a Moodle. ''Nota:'' Si la imagen dejara de estar disponible en línea, será remplazada por una X roja en su página del curso. También tome nota de que hacer "enlaces calientes" [http://simple.wikipedia.org/wiki/Hot-linking (''hot linking'')] hacia imágenes en línea que no son de su propiedad no es recomendable. | ||
{{Urgente de traducir}} | |||
==Cambiar el tamaño de una imagen== | |||
If images are uploaded and embedded into a page or question, these are "responsive" automatically. This means that if the image doesn't fit into the space available on the page, it is automatically downscaled. If the page contains more space than the image would actually require, then it is displayed in it's maximum size but not upscaled. | |||
===Suitable images for scaling=== | |||
If images are scaled on a webpage naturally this leads to losses of the image quality. Image information either needs to be compressed when scaling down, or needs to be interpolated when upscaling is done. In both cases this may work well on ome image and not so good on others. Before uploading an image you may check this by opening the image in your browser and manually change the view, increase the percentage or lower it and check the result that is being displayed by the browser. | |||
Images that usually scale well are charts or images with a lot of lines. Small letters or symbols however, may not be well recognizable anymore because they are too small to read or contain too many artefacts when enlarged. Photographs usually do not look bad when they get downscaled. However, upscaling usually blurs them or reveal visible pixels. | |||
An exception are files of the type SVG. These files are so called vector graphics. The image doesn't store any pixels but definitions on how to draw geometric shapes. Depending on the scale these figures are | |||
smaller or larger but drawn from scratch. Also letters and that kind still look good. | |||
===Agrandar imágenes=== | |||
Sometimes it is desired that an image takes the whole width of the page even though the actual image is smaller. Then upscaling is needed. The image will be displayed in a larger size than it actually is. This does work automatically but must be adapted when inserting an image in the text. | |||
== | [[File:Image scaling.png|alt=Atto editor editing text|thumb|none|Atto editor: change the img tag in the in source mode]] | ||
[[File:tiny_en_scaling_img1.png|alt=TinyMCE editor change to source code view|thumb|none|TinyMCE editor: switch to source code view]] | |||
[[File:tiny_en_scaling_img2.png|alt=TinyMCE editor editing img tag in source mode|thumb|none|TinyMCE editor: change the img tag in the in source mode]] | |||
The | After inserting the image, the editors view must be changed into the source view (1). In the HTML the <img> tag must be searched (2). At the end of that <img> element there are two attributes, width and height (3). The value of the width attribute must be set to "100%", the height attribute can be removed entirely. After that, the editor can be switched back to WYSIWYG mode or the page/question can be saved. | ||
Note that whenever the image is reedited with the editor using the toolbar button and the dialogue, then the attributes are set back to the image size. Therefore, avoid reediting images with the editor or reapply the attribute changes. | |||
[[de:Bilder]] | [[de:Bilder]] | ||
[[en:Images]] | [[en:Images]] | ||
Revisión actual - 15:07 23 may 2023
Moodle les permite a profesores y alumnos el subir y mostrar imágenes de una variedad de fuentes mediante el ícono de imagen del Editor de texto. Las páginas del curso pueden enriquecerse con imágenes o banners en cada sección. Las Tareas pueden incluir imágenes para una mayor clarificación. Las imágenes anexadas a las publicaciones en Foros o dentro de preguntas en un Examen aparecerán incrustadas.
Moodle acepta formatos .jpg, .png, .svg y .gif.
Arrastrar y soltar una imagen
- Las imágenes pueden ser arrastradas y soltadas directamente en el Editor Atto si Usted está usando un navegador soportado (que no sea IE 9, Safari 6 o inferior o versiones antiguas de Firefox) y pueden ser arrastradas y soltadas directamente dentro de páginas de curso si la edición está activada y está habilitado el 'arrastrar y soltar medios" en Administración > Administración del sitio > Plugins > Módulos de actividad > Etiqueta.
- Vea Usando Etiqueta para más información.
Copiar y pegar una imagen
A partir de Moodle 3.9 en adelante, las imágenes pueden ser copiadas de cualquier parte y pegadas en el Editor Atto. Por ejemplo, Usted puede tomar una imagen de pantalla (pantallazo), copiarla a su portapapeles y entonces pegarla dentro del editor Atto.
Subir y mostrar una imagen desde su computadora
- Nota: Es una buena idea el cambiar el tamaño de su imagen antes de subirla, en lugar de tratar de cambiar las dimensiones cuando ya está en línea..
- Con la edición activada, ir a donde desea mostrar la imagen (por ejemplo, en un resumen de un curso, una etiqueta o una página)
- Haga clic sobre del ícono de la imagen como se ve más abajo:
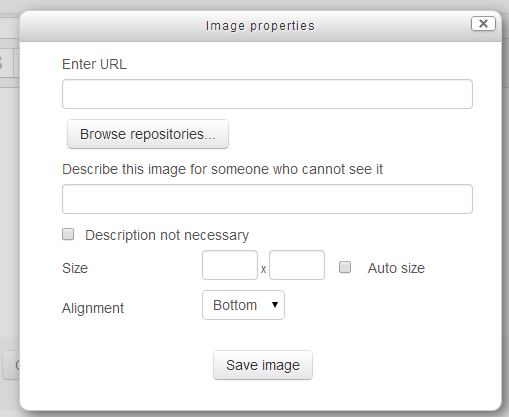
- Puede entonces, o escribir la URL de la imagen que ya existe en línea, o hacer clic en 'Mirar repositorios' para acceder al Selector de archivos
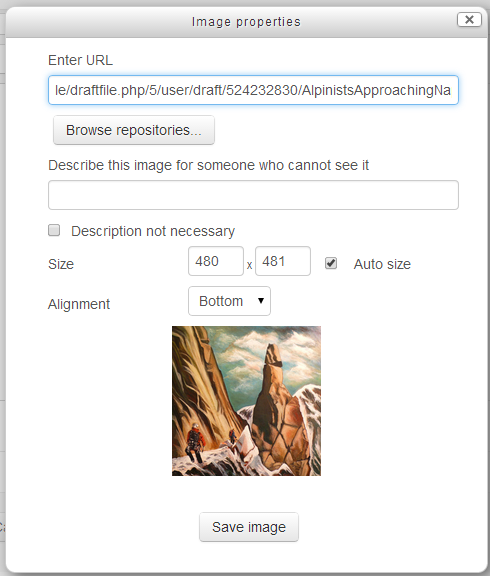
- Elija Subir un archivo. Busque y suba su imagen. Para mayor información, vea Selector de archivos
- Añada una descripción a la imagen y elija Insertar o seleccione la casilla para 'Descripción no es necesaria
- Cambie el tamaño y la alineación si fuera necesario y guarde la imagen.
Editar una imagen subida
- Si Usted necesita editar la imagen que ya ha subido al servidor, Usted puede hacer doble clic sobre la imagen desde adentro del Editor de texto Atto y acceder a la ventana de propiedades de la imagen Tome nota de que es mucho mejor subir la imagen del tamaño apropiado en lugar de tener que modificarla posteriormente.
Mostrar una imagen que ya está en línea
- Si Usted tiene imágenes disponibles en otro sitio en línea, Usted también puede mostrarlas sin tener que subirlas a Moodle. Nota: Si la imagen dejara de estar disponible en línea, será remplazada por una X roja en su página del curso. También tome nota de que hacer "enlaces calientes" (hot linking) hacia imágenes en línea que no son de su propiedad no es recomendable.
Nota: Urgente de Traducir. ¡ Anímese a traducir esta muy importante página !. ( y otras páginas muy importantes que urge traducir)
Cambiar el tamaño de una imagen
If images are uploaded and embedded into a page or question, these are "responsive" automatically. This means that if the image doesn't fit into the space available on the page, it is automatically downscaled. If the page contains more space than the image would actually require, then it is displayed in it's maximum size but not upscaled.
Suitable images for scaling
If images are scaled on a webpage naturally this leads to losses of the image quality. Image information either needs to be compressed when scaling down, or needs to be interpolated when upscaling is done. In both cases this may work well on ome image and not so good on others. Before uploading an image you may check this by opening the image in your browser and manually change the view, increase the percentage or lower it and check the result that is being displayed by the browser.
Images that usually scale well are charts or images with a lot of lines. Small letters or symbols however, may not be well recognizable anymore because they are too small to read or contain too many artefacts when enlarged. Photographs usually do not look bad when they get downscaled. However, upscaling usually blurs them or reveal visible pixels.
An exception are files of the type SVG. These files are so called vector graphics. The image doesn't store any pixels but definitions on how to draw geometric shapes. Depending on the scale these figures are smaller or larger but drawn from scratch. Also letters and that kind still look good.
Agrandar imágenes
Sometimes it is desired that an image takes the whole width of the page even though the actual image is smaller. Then upscaling is needed. The image will be displayed in a larger size than it actually is. This does work automatically but must be adapted when inserting an image in the text.
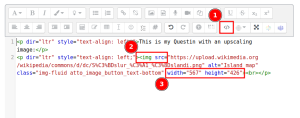
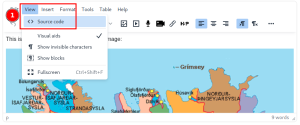
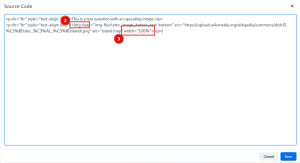
After inserting the image, the editors view must be changed into the source view (1). In the HTML the <img> tag must be searched (2). At the end of that <img> element there are two attributes, width and height (3). The value of the width attribute must be set to "100%", the height attribute can be removed entirely. After that, the editor can be switched back to WYSIWYG mode or the page/question can be saved. Note that whenever the image is reedited with the editor using the toolbar button and the dialogue, then the attributes are set back to the image size. Therefore, avoid reediting images with the editor or reapply the attribute changes.
