Diferencia entre revisiones de «Autenticación OAuth 2»
(tidy up) |
(tidy up) |
||
| (No se muestran 8 ediciones intermedias del mismo usuario) | |||
| Línea 1: | Línea 1: | ||
{{Autenticación}}{{Nuevas características de Moodle 3.3}} | {{Autenticación}}{{Nuevas características de Moodle 3.3}} | ||
{{ | {{Pendiente de traducir}} | ||
[[File: | == Vista general== | ||
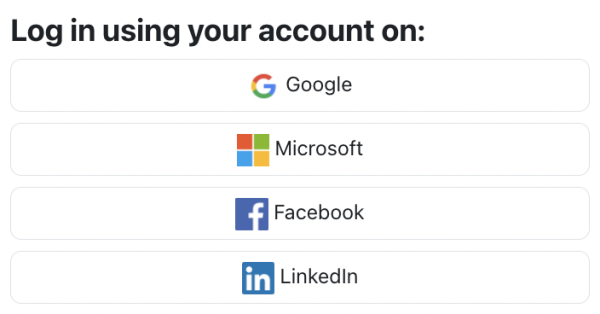
OAuth 2.0 is the de facto industry standard protocol for user authorisation. OAuth 2 authentication enables users to access Moodle via buttons on the login page using their credentials from popular service providers, such as Google, Microsoft, Facebook, and LinkedIn. | |||
[[File:OAuth Login.png|border|center|frameless|600x600px]] | |||
The following high-level interaction process illustrates how OAuth 2 authentication works in a Moodle context: | |||
[[File:OAuth - Service Provider Authentication.png|border|center|frameless|600x600px]] | |||
If account creation is enabled | An OAuth service provider is an external system (“in the cloud”) that provides identity (via the authorisation server) and API access (via the resource server) by issuing OAuth access tokens to a client (Moodle). Let’s go through the interactions from top to bottom: | ||
# A user sends an authorisation request; that is, a user logs in to the service provider via the client. This step is initiated via the service provider buttons on the Moodle login screen. | |||
# The authorisation server issues an authorisation code if the entered credentials are valid. Once this has taken place, the user is authenticated with Moodle. If account creation is enabled (the Prevent account creation when authenticating setting), a new account will be created. Otherwise, the user will be prompted to link the authorisation to an existing account with the same email address. An entry can be found in the [[Linked logins]] section in the user’s preferences. | |||
# An access token will be issued when the user logs in using the stored authorisation code. A scheduled task exists to regularly update the OAuth 2 tokens (\core\oauth2\refresh_ system_tokens_task). | |||
# Moodle uses this access token for any internal services that require a resource from the service provider, for instance, a link to files in a repository. Some internal services require a system account to be connected. | |||
== | ==Configurar una autenticación OAuth 2== | ||
To use OAuth 2 authentication, an administrator must follow the following steps: | |||
# Configure OAuth 2 services: Go to '''Site administration > Server > OAuth 2 services''', and following the instructions on the [[OAuth 2 services]] page. | |||
# Enable OAuth 2: Go to '''Site administration > Plugins > Authentication''', enable '''OAuth 2'''. | |||
# Configure OAuth 2 lock user fields: To control if and how certain user data fields are being populated, click on the '''Settings''' link and configure your '''Lock user fields'''. | |||
# Prevent account creation: By default, account creation is enabled. If you wish to prevent account creation, go to '''Site administration > Plugins > Authentication''' and enable the setting "authpreventaccountcreation". | |||
# Testing, testing, testing: To verify that your OAuth 2 configuration is working, go to '''Site administration > Plugins > Authentication''' and click on the '''Test settings''' link in the '''OAuth 2''' row. Here, you can select a service and test its connection. | |||
The following Moodle features require an OAuth2 service: | |||
* Repositories: [[Repositorio Dropbox]], [[Repositorio Google Drive]], Microsoft [[Repositorio OneDrive]], and [[Repositorio Nextcloud]] | |||
* Portfolios: [[Portafolio Google Drive]] | |||
* Badges: [[Mochilas|Open Badges 2.1]] | |||
* Mail: Incoming and outgoing [[Configuración del correo|configuración del correo]] | |||
* Document converters: [[Convertidor Google Drive]] | |||
==Vea también== | |||
* [https://docs.moodle.org/403/en/OAuth_2_Troubleshooting OAuth 2 troubleshooting] | |||
[[Categoría:OAuth 2]] | |||
[[en:OAuth 2 authentication]] | [[en:OAuth 2 authentication]] | ||
Revisión actual - 17:44 9 feb 2024
¡Nueva característica
en Moodle 3.3!
Nota: Pendiente de Traducir. ¡Anímese a traducir esta página!. ( y otras páginas pendientes)
Vista general
OAuth 2.0 is the de facto industry standard protocol for user authorisation. OAuth 2 authentication enables users to access Moodle via buttons on the login page using their credentials from popular service providers, such as Google, Microsoft, Facebook, and LinkedIn.
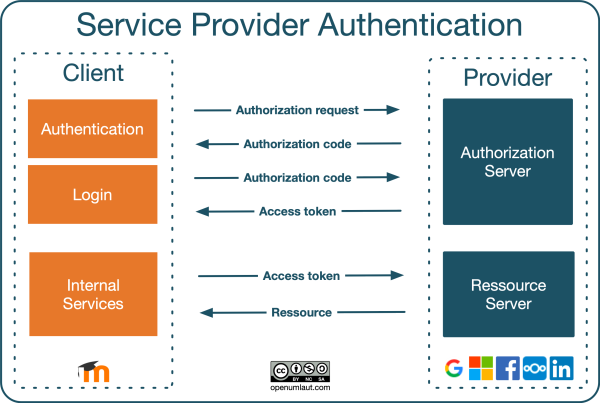
The following high-level interaction process illustrates how OAuth 2 authentication works in a Moodle context:
An OAuth service provider is an external system (“in the cloud”) that provides identity (via the authorisation server) and API access (via the resource server) by issuing OAuth access tokens to a client (Moodle). Let’s go through the interactions from top to bottom:
- A user sends an authorisation request; that is, a user logs in to the service provider via the client. This step is initiated via the service provider buttons on the Moodle login screen.
- The authorisation server issues an authorisation code if the entered credentials are valid. Once this has taken place, the user is authenticated with Moodle. If account creation is enabled (the Prevent account creation when authenticating setting), a new account will be created. Otherwise, the user will be prompted to link the authorisation to an existing account with the same email address. An entry can be found in the Linked logins section in the user’s preferences.
- An access token will be issued when the user logs in using the stored authorisation code. A scheduled task exists to regularly update the OAuth 2 tokens (\core\oauth2\refresh_ system_tokens_task).
- Moodle uses this access token for any internal services that require a resource from the service provider, for instance, a link to files in a repository. Some internal services require a system account to be connected.
Configurar una autenticación OAuth 2
To use OAuth 2 authentication, an administrator must follow the following steps:
- Configure OAuth 2 services: Go to Site administration > Server > OAuth 2 services, and following the instructions on the OAuth 2 services page.
- Enable OAuth 2: Go to Site administration > Plugins > Authentication, enable OAuth 2.
- Configure OAuth 2 lock user fields: To control if and how certain user data fields are being populated, click on the Settings link and configure your Lock user fields.
- Prevent account creation: By default, account creation is enabled. If you wish to prevent account creation, go to Site administration > Plugins > Authentication and enable the setting "authpreventaccountcreation".
- Testing, testing, testing: To verify that your OAuth 2 configuration is working, go to Site administration > Plugins > Authentication and click on the Test settings link in the OAuth 2 row. Here, you can select a service and test its connection.
The following Moodle features require an OAuth2 service:
- Repositories: Repositorio Dropbox, Repositorio Google Drive, Microsoft Repositorio OneDrive, and Repositorio Nextcloud
- Portfolios: Portafolio Google Drive
- Badges: Open Badges 2.1
- Mail: Incoming and outgoing configuración del correo
- Document converters: Convertidor Google Drive

