Diferencia entre revisiones de «Imágenes»
({{Moodle 3.7}}) |
(update from English 3.7) |
||
| Línea 3: | Línea 3: | ||
Moodle les permite a profesores y alumnos el subir y mostrar imágenes de una variedad de fuentes mediante el ícono de imagen del [[Editor de texto]]. Las páginas del curso pueden enriquecerse con imágenes o ''banners'' en cada sección. Las [[Tareas]] pueden incluir imágenes para una mayor clarificación. Las imágenes anexadas a las publicaciones en [[Foros]] o dentro de preguntas en un [[Examen]] aparecerán incrustadas. | Moodle les permite a profesores y alumnos el subir y mostrar imágenes de una variedad de fuentes mediante el ícono de imagen del [[Editor de texto]]. Las páginas del curso pueden enriquecerse con imágenes o ''banners'' en cada sección. Las [[Tareas]] pueden incluir imágenes para una mayor clarificación. Las imágenes anexadas a las publicaciones en [[Foros]] o dentro de preguntas en un [[Examen]] aparecerán incrustadas. | ||
{{MediaPlayer | url = https://youtu.be/rehPpxl2Jh4 | desc = Añadir imágenes}} | |||
Moodle acepta formatos .jpg, .png, .svg y .gif. | Moodle acepta formatos .jpg, .png, .svg y .gif. | ||
| Línea 13: | Línea 14: | ||
[[File:Imageicon.png]] | [[File:Imageicon.png]] | ||
*Either enter the URL of an image which is already online or click 'Browse repositories' to access the File picker | |||
[[File:uploadimageatto.png]] | |||
[[File | *Click [[Upload a file]]. Browse for and upload your image. For more information, see [[File picker]] | ||
*Either add a description of the image or tick/check the box 'Description not necessary'. | |||
*Alter the size and alignment if needed and save the image | |||
[[File:uploadedimageatto.png]] | |||
===Editing an uploaded image=== | |||
* | *If you need to edit the image once it has been uploaded,you can double-click on the image from within the [[Text editor| Atto text editor]] and access the image properties window. ''Note it is much better to upload an image of the desired size rather than modifying it afterwards.'' | ||
==Dragging and dropping an image== | |||
[[ | *Images may be dragged and dropped directly into a label onto the course page if you are using a supported browser (not IE 9, Safari 6 or below or earlier versions of Firefox) and 'media drag and drop" is enabled in ''Administration > Site administration > Plugins > Activity modules > Label'' and verify the box 'media drag and drop' setting is ticked. | ||
*As you drag the image, a prompt box appears where you choose "add image to course page" rather than "create a file resource" | |||
*See [[Using Label]] for full instructions how to do this. | |||
==Displaying an image already online== | |||
*If you have images available elsewhere online, you can display them too without the need to upload to Moodle. ''Note:'' If the image is taken offline, it will be replaced by a red X on your course page. Also, so-calledhot-linking [http://simple.wikipedia.org/wiki/Hot-linking]to images online if you don't own them yourself is not recommended. | |||
== | ===Method 1=== | ||
*Follow the instructions for Uploading and Displaying an image as above. | |||
* | *Paste the URL of the image you have online into the ''Enter URL'' box. | ||
*Add a description of the image or tick/check the box for no description | |||
=== | |||
* | |||
* | |||
* | |||
[[File:imageonlineatto.png]] | [[File:imageonlineatto.png]] | ||
* | *Save the image. | ||
=== | ===Method 2=== | ||
* | *It is possible to copy and paste an online image into the [[HTML|text editor]] in the same way that some students might copy and paste into a presentation. Care must be taken however that images pasted this way are not subject to copyright, and also that the image doesn't come with an unwanted hyperlink. | ||
== | ==Adding an image from image hosting sites like Flickr== | ||
* | *It is possible to search and display an image from Flickr. | ||
* | *For this, the [[Flickr public repository]] must be enabled by the administrator | ||
* | *After clicking into Find or Upload an image, click on the Flickr repository to search for a suitable image. | ||
[[File:Flickr.png]] | [[File:Flickr.png]] | ||
* | *The site administrator can also enable the [[Flickr repository|Flickr]] and [[Picasa web album repository|Picasa]] repositories for users to access images from their own accounts. | ||
==Why is there no 'Browse repositories' option available?== | |||
The filepicker and text editor in Moodle are affected if there are any Javascript errors in the page. So if you see any missing buttons etc. the first thing to check for is any errors in the Javascript console (F12 in Firefox or IE9+). | |||
The second thing to mention is that some text areas in Moodle support uploading files and some do not. There are reasons why a particular area does or doesn't support files such as the ability to backup/restore or compatibility with other areas in Moodle such as the gradebook. If a text editor does not support file areas, you can still use images, but only by entering the URL to an image already hosted somewhere else on the internet. | |||
[[de:Bilder]] | [[de:Bilder]] | ||
[[en:Images]] | [[en:Images]] | ||
Revisión del 13:05 16 jul 2019
Moodle 3.7
Moodle les permite a profesores y alumnos el subir y mostrar imágenes de una variedad de fuentes mediante el ícono de imagen del Editor de texto. Las páginas del curso pueden enriquecerse con imágenes o banners en cada sección. Las Tareas pueden incluir imágenes para una mayor clarificación. Las imágenes anexadas a las publicaciones en Foros o dentro de preguntas en un Examen aparecerán incrustadas.
Moodle acepta formatos .jpg, .png, .svg y .gif.
Subir y mostrar una imagen desde su computadora
- Nota: Es una buena idea el cambiar el tamaño de su imagen antes de subirla, en lugar de tratar de cambiar las dimensiones cuando ya está en línea..
- Una vey que haya activado la edición, acceda al editor de texto en donde Usted quiera mostrar su imagen (por ejemplo, en un resumen, Etiqueta o página del curso)
- Haga click sobre del ícono de la imagen como se ve más abajo:
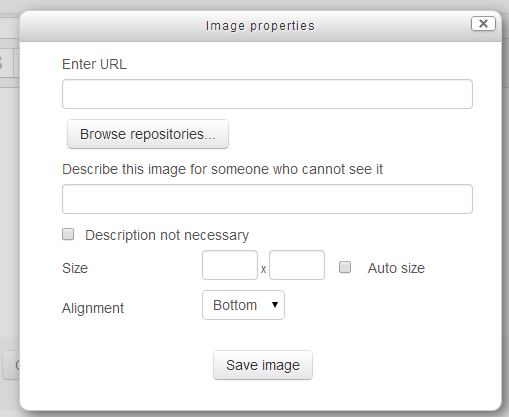
- Either enter the URL of an image which is already online or click 'Browse repositories' to access the File picker
- Click Upload a file. Browse for and upload your image. For more information, see File picker
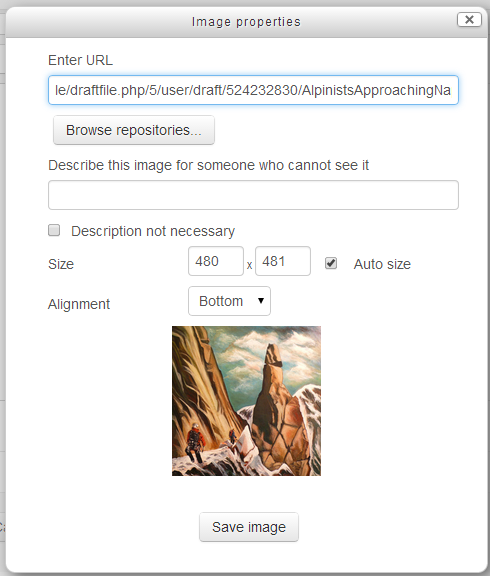
- Either add a description of the image or tick/check the box 'Description not necessary'.
- Alter the size and alignment if needed and save the image
Editing an uploaded image
- If you need to edit the image once it has been uploaded,you can double-click on the image from within the Atto text editor and access the image properties window. Note it is much better to upload an image of the desired size rather than modifying it afterwards.
Dragging and dropping an image
- Images may be dragged and dropped directly into a label onto the course page if you are using a supported browser (not IE 9, Safari 6 or below or earlier versions of Firefox) and 'media drag and drop" is enabled in Administration > Site administration > Plugins > Activity modules > Label and verify the box 'media drag and drop' setting is ticked.
- As you drag the image, a prompt box appears where you choose "add image to course page" rather than "create a file resource"
- See Using Label for full instructions how to do this.
Displaying an image already online
- If you have images available elsewhere online, you can display them too without the need to upload to Moodle. Note: If the image is taken offline, it will be replaced by a red X on your course page. Also, so-calledhot-linking [1]to images online if you don't own them yourself is not recommended.
Method 1
- Follow the instructions for Uploading and Displaying an image as above.
- Paste the URL of the image you have online into the Enter URL box.
- Add a description of the image or tick/check the box for no description
- Save the image.
Method 2
- It is possible to copy and paste an online image into the text editor in the same way that some students might copy and paste into a presentation. Care must be taken however that images pasted this way are not subject to copyright, and also that the image doesn't come with an unwanted hyperlink.
Adding an image from image hosting sites like Flickr
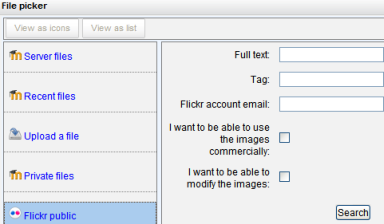
- It is possible to search and display an image from Flickr.
- For this, the Flickr public repository must be enabled by the administrator
- After clicking into Find or Upload an image, click on the Flickr repository to search for a suitable image.
- The site administrator can also enable the Flickr and Picasa repositories for users to access images from their own accounts.
Why is there no 'Browse repositories' option available?
The filepicker and text editor in Moodle are affected if there are any Javascript errors in the page. So if you see any missing buttons etc. the first thing to check for is any errors in the Javascript console (F12 in Firefox or IE9+).
The second thing to mention is that some text areas in Moodle support uploading files and some do not. There are reasons why a particular area does or doesn't support files such as the ability to backup/restore or compatibility with other areas in Moodle such as the gradebook. If a text editor does not support file areas, you can still use images, but only by entering the URL to an image already hosted somewhere else on the internet.


