Quick Start Guide
The Moodle Plugin Datalynx is a potent and powerful tool for complex interface design.
Still it is possible to get it up and running in minutes. The following concepts are important to understand: Fields and Views
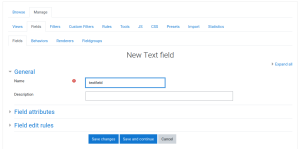
To create a working Datalynx instance we need to add a field. Open your new Datalynx instance and select in the "Add field" dialogue a simple "Text" for your first field type.
Here you see an easy to use dialogue, you have to give the new field type a name to continue with this Quick Start Guide. We will name our new field "textfield" for simplicities sake.
Click "Save changes" to continue to setting up a view.
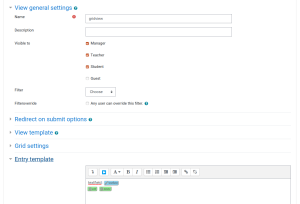
On the top user interface select "Views". You currently don't have any defined views, so from the dropdown menu "Add a view" we select "Grid". As you can see there are different types of views, but the most universal displays all fields in a grid pattern.
Naming this new view "gridview" we can have a closer look at the interface. The default setting adds all existing fields to your new view, we can check what fields are displayed with every entry by opening the area "Entry template". Simply click on the header to expose more details. You can now see that for every entry that a user added to your database the content of "textfield" is displayed in the blue marked area. Left of it you notice the "textfield: ", that will be displayed before the user entered data. You can remove this or add your own description later on.
Below every entry you will find - if your permissions allow it - two buttons to edit and to delete the entry. To remove these buttons, for example to make deleting entries harder, you can click on the green button "delete" and click "Delete tag".
This is it, you can now click "Save changes" to finish the process of adding a new view to your Datalynx.
You may have noticed that the table you are shown looks very complex. It has a lot of possible options and you need to select the view you created as your "Default view". The table heading reads "Name, Type, Description, Visible, D, E, M", we can ignore all but the column "D". This D stands for default, you can see an empty checkbox next to your "gridview". Once you clicked this checkbox a tickmark is shown and this specific view is now the default for this Datalynx instance.
That is it, you now have a fully configured Datalynx Instance you can use to collect information. To test this, click on "Browse" or simply reopen your Datalynx instance. At the top you see "Add a new entry", click this and create your first Datalynx entry.


