MooTyper
| MooTyper | |
|---|---|
| Type | Activity type |
| Set | N/A |
| Downloads | https://moodle.org/plugins/pluginversions.php?plugin=mod_mootyper |
| Issues | https://github.com/drachels/moodle-mod_mootyper/issues |
| Discussion | https://moodle.org/mod/forum/discuss.php?d=209535 |
| Maintainer(s) | AL Rachels |
MooTyper is an Activity module. A course admin, manager, or teacher creates the activity and prepares it for use by selecting the mode, the lesson, keyboard layout, and all the other settings to use.
MooTyper currently, has three activity modes.
Practice mode - students proceed through a lesson in the order of the exercises listed in the lesson. It also allows a student to delete the results of an exercise attempt, and try it over.
Lesson mode - like practice mode, students proceed through a lesson in the order of the exercises listed in the lesson. Only an admin, manager, or teacher can delete an exercise result, and let the student try again.
Exam mode - only one exercise from a lesson is presented for the student to attempt. Only an admin, manager, or teacher can delete an exam mode result, and let the student try again.
When a student finishes any exercise, in any mode, the results are saved into a MooTyper database, so the teacher can view individual student progress. Currently, the results are NOT added to the Moodle Grade table.
To use
- Login and navigate to your Moodle course.
- Turn editing on.
- Go to the topic you would like to add the MooTyper activity to, then from the Add an activity drop down, seletect MooTyper (assuming your installation has the plugin installed.)
- Add a title for the MooTyper activity. e.g. MooTyper - Practice - Lesson 13
- Decide whether you want to enable Open time or Close time and set them accordingly.
- At this point you can set Options, but it is more convenient to wait and do them on the next page.
- Decide whether you want to set Group mode, under Common module settings.
- Decide whether you want to set Access restrictions under Restrict access.
- Decide whether you want to set Completion tracking under Activity completion.
- Decide whether you want to set Tags under Tags.
- Decide whether you want to set Course Competencies and Upon activity completion: under Competencies Competencies.
- Click Save and display.
Setup/Settings
- After completing the above steps in the section, To use, you should see a page with a link to, Setup, which you should click. This page can also be accessed via the Settings button on the View page.
- Decide which Mode you want to use. Once saved, the Mode cannot be changed.
- Decide which Lesson name you want to use. Once saved, the Lesson name cannot be changed.
- Decide if you want to set a Time limit for each exercise in a Lesson. Enter the time as whole minutes. Zero minutes equals Unlimited, or no time limit for each exercise. If the Time limit expires, the exercise is halted and the current results posted.
- Decide if you want to set a Required precision. In Practice or Lesson mode, if the student does not achieve the required precision, the results in the grade pages are highlighted in red, and the student must attempt the same exercise, again, before they can proceed to a new exercise. In Exam mode, students are NOT automatically given the opportunity to try again if they do not achieve the required precision. Zero means Required precision will be ignored.
- Decide if you want to set a Required WPM (Word Per Minute) rate. This setting works the same as Required precision. Zero means Required WPM will be ignored.
- Decide whether you want the text the student is to type, is left aligned, center aligned, or right aligned.
- Turn on/off Continuous typing. On - the cursor moves for every keystroke. Off - the cursor does not advance until the correct letter is typed.
- Turn on/off Count mistyped spaces. On - every extra space typed counts as a mistake. Off - extra typed spaces are ignored and not added to the mistake count.
- Turn on/off Count all keystrokes. On - if Continuous typing is off, if you hit the same wrong key multiple times, each one is counted as a mistake. Off - if you hit the same wrong key multiple times, only the first one is counted as a mistake.
- Turn On/Off, Show keyboard. On - the selected layout is shown and gives a visual indication of which key to use to type the current character. Off - the layout must still be selected, but it will not be visible.
- Select which Keyboard layout to use. The selected layout must match the layout your Operating System is using so that mistakes can be tracked accurately, even if your have elected to NOT show the keyboard layout below the text to type.
- The rest of the settings are colors and until you have some experience, it is probably best to just use the defaults. Later, an admin, manager, or teacher can change them at any time. Colors can be entered as hex color codes, or standard HTML color names. e.g. #000000, #7FEF6C, red, pink, green, etc.
Examples
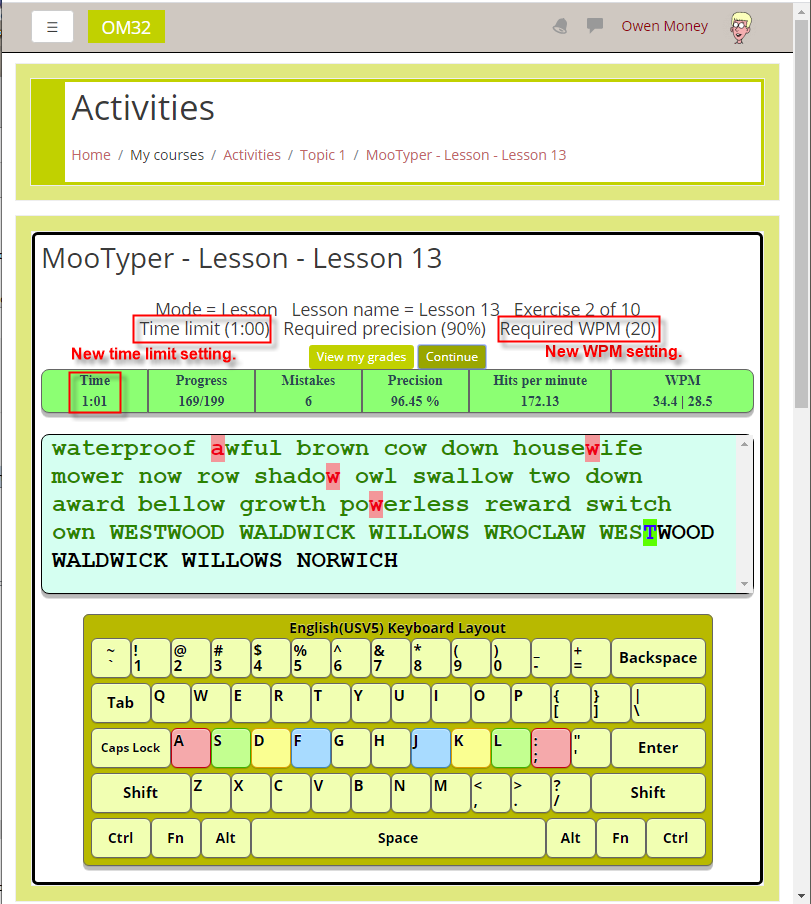
The screenshot below shows an example of a MooTyper activity being used to allow students to practice typing in Lesson mode. They have just finished the second of ten exercises in Lesson 13. They did not finish in allocated one minute time limit. The results of this attempt will be marked as passing because the both the Required precision (90%) and Required WPM (20) were exceeded.
