Report builder: Difference between revisions
(RB version 1) |
|||
| Line 1: | Line 1: | ||
{{Workplace}} | {{Workplace}} | ||
Moodle Workplace provides a powerful custom reporting tool. Custom reports are built using the report builder interface, which provides advanced customisation options to administrators. | |||
Moodle Workplace provides a | =Overview= | ||
Moodle Workplace distinguishes between two types of reports: | |||
*'''System reports''': Embedded, pre-defined reports that are part of Moodle Workplace. Every time you see a table that can be interacted with (sorting columns, applying filters, or downloading data in various formats), you are most likely using a system report. System reports cannot be modified or removed, since various Workplace features rely on them. Examples are the list of custom reports or [[Report builder#Scheduling Reports|report schedules]]. | |||
*'''Custom reports''': User-generated reports made available to other users such as managers and trainers. | |||
{{MediaPlayer | url = https://youtu.be/gvQ6WqFYGns | desc = Moodle Workplace | Training | Report Builder}} | {{MediaPlayer | url = https://youtu.be/gvQ6WqFYGns | desc = Moodle Workplace | Training | Report Builder}} | ||
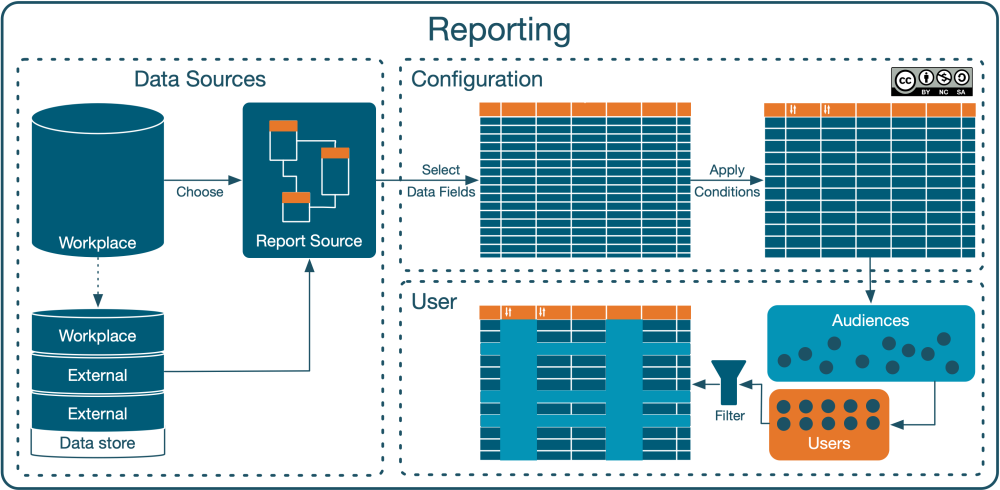
Moodle Workplace supports two types of reporting data sources: the '''Workplace database''' and the '''Workplace data store'''. The database is where all Workplace data is stored, excluding files. The data store is an alternative data source that keeps track of permanent records in Workplace as well as external sources. The following diagram illustrates the high-level elements of the reporting workflow: | |||
[[File:Report builder - Overview.png|border|center|frameless|1000x1000px|]] | |||
Workplace offers a range of '''report sources''' to simplify the usage of the report builder. A record source contains a predefined set of fields that are available when building a report. Based on the selected report source, a certain amount of data will be available, which can be reduced by the following mechanisms: | |||
*[[Report builder#Configuring fields|Configuring]] data fields lets you decide which columns are being made available, for example, user name, certification name, and completion status. | |||
*Applying [[Report builder#Conditions|conditions]] lets you decide which rows will be made available, for instance, all records from a selected department. | |||
*[[Report builder#Report Access|Access]] to reports is granted via audiences, for example, all members of a selected cohort. | |||
= | *[[Report builder#Filters|Filters]], which have to be configured by the report creator, allow the viewer to select one or more criteria to reduce the amount of data further, for instance, by the level of progress. | ||
=Creating custom reports= | |||
You can access the management of custom reports via '''Site administration > Reports > Manage custom reports''', or directly via the '''Report builder''' icon in the Workplace launcher. | |||
To create a new report, select the '''+New report''' button. | |||
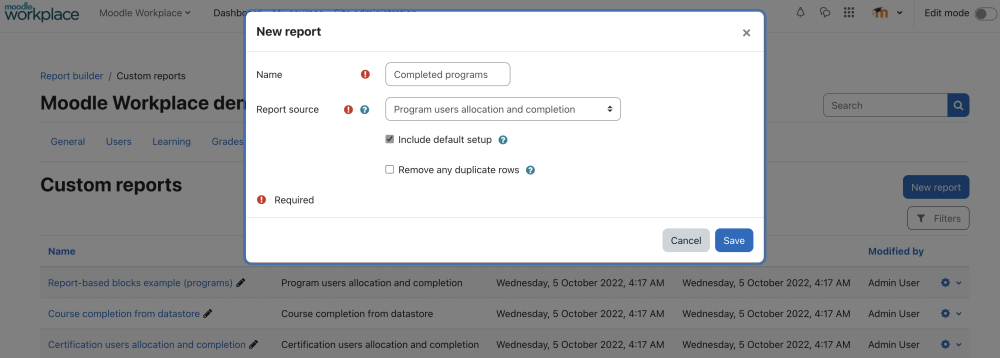
A report contains two required settings: '''Report name''' (displayed whenever the report is being made available to users) and '''Report source''' (defines where the data for the report will come from). When the '''Add default configuration''' option remains enabled, the report will be populated with several predefined columns, conditions, and filters. | |||
[[File:Report Builder - New report.png|border|center|frameless|1000x1000px|]] | |||
The following report sources are available in Moodle Workplace, grouped by report plugin: | |||
*'''Appointment''' | |||
**[[Appointments]]: Seminars, sessions and participants | |||
*'''Certifications''' | |||
**'''Certification users allocation and completion''': Certification details, including users’ progress information | |||
**'''Certifications''': Certification details | |||
*'''Program''' | |||
**'''Programs''': Program details | |||
**'''Programs users allocation and completion''': Program details, including users’ progress information | |||
*'''Report Builder''' | |||
**[[Report builder#Data Store|Course completion from datastore]]: Data in Workplace datastore | |||
**'''Course participants''': Course completion report | |||
**'''Course enrolments''': Course details, user enrolments, and course completion | |||
**'''Certificate templates''': Available certificate templates | |||
**'''Certificate issues''': Issued certificates to users | |||
**'''Users list''': Users and their job assignments | |||
*'''Workplace''' | |||
**Course reset for individual user: Course resetting data during recertification | |||
Once you have created the report, you will be redirected to the actual report builder. | |||
===Report Builder=== | |||
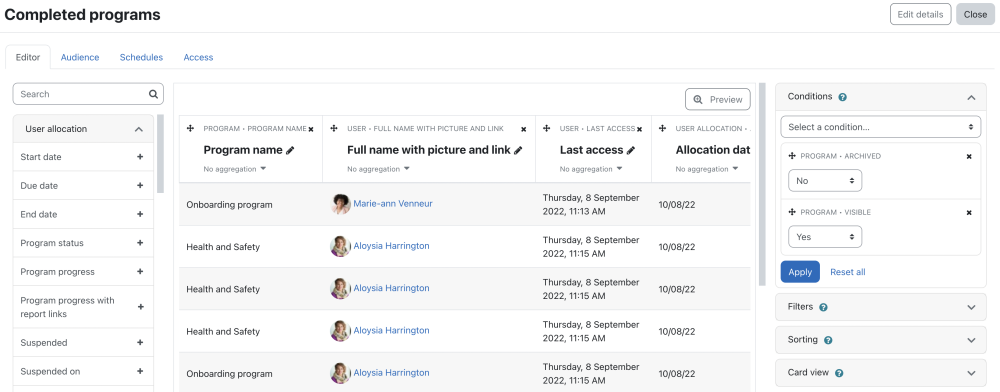
The interface of the report builder is divided into three panels: | |||
*'''Columns sidebar''' (left): Shows the list of available data fields grouped by entities, including a live search option. The sidebar can be shown/hidden via the data field sidebar toggle next to the report name. | |||
*'''Preview window''' (middle): Shows the data according to the current report configuration. Column headings and [[Report builder#Aggregation and Grouping|aggregation methods]] can be edited inline. To grasp a view of what the report will look like to users, select the Preview toggle. | |||
*'''Settings sidebar''' (right): Lets you configure [[Report builder#Conditions|conditions]], [[Report builder#Filters|filters]], [[Report builder#Sorting|sorting]], and [[Report builder#Card view|card view]] options. The accordion sidebar can be shown/hidden via the settings sidebar toggle. | |||
[[File:Report builder - Interface.png|border|center|frameless|1000x1000px]] | |||
== | Underneath the preview table, there is a '''Current query''' option that shows the underlying SQL query that is generated based on the configuration of your report: | ||
*Selected data fields: SELECT ... FROM ... | |||
*Conditions: WHERE | |||
* Aggregation: GROUP BY | |||
*Sorting: ORDER BY | |||
Viewers also have the option to download the table data in various formats, namely CSV, XLSX, HTML, JSON, ODS, and PDF. You can reduce or rearrange the options in that list in '''Site administration > Plugins > Data formats > Manage data formats'''. | |||
===Configuring fields=== | |||
In the left-hand side panel of the report generator, you will see all available fields for the selected report source, which have been grouped into entities. Each entity can be expanded or collapsed for better usability. You can also search for field entries to limit the number of displayed items. | |||
The | To add columns to the report, click on the selected field in the list on the left. The column will be added automatically as the rightmost column in the table. You can then rearrange the column order via the standard Move handle. To remove a column, click on the standard delete icon. | ||
[[File: | The following field types are available to be added as columns to a report: | ||
*'''Text fields''': For example, full name, job, or program name. Some text fields are preprocessed by the report generator to support additional functionality: | |||
**'''Hyperlinked text fields''': Mainly to direct viewers directly to entries, for example, to a user profile or a program | |||
**'''Highlighted text fields''': To visualise a status, for example, status fields in programs and certifications | |||
**'''Calculated text fields''': To provide a numeric value, for example, the number of courses in a certification or the course progress for each user as a percentage | |||
**'''Grouped text fields''': To provide multiple data points as a single cell, for example, all users registered for an appointment. The values are available one per line or comma-separated. | |||
*'''Image fields''': For example, program icon or user picture | |||
*'''Actions''': For example, sending a message to a user or viewing a progress report | |||
Custom fields, such as custom user profile fields or custom program fields, are fully supported by the report generator. They will appear in the list of available fields like any built-in variable. | |||
=== Aggregation and Grouping=== | |||
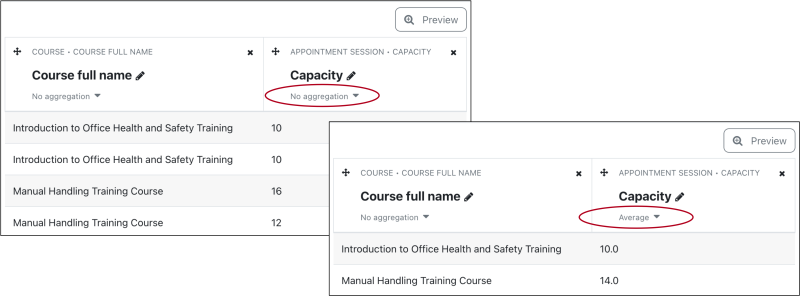
The Workplace report generator supports various aggregation and grouping operations at the column level. Depending on the data field selected, a set of possible aggregation methods is offered. Here is a full list of methods, along with their SQL function used internally: | |||
*'''Average''': Average of all (numeric) values / AVG() | |||
*'''Count''': Number of values in column / COUNT() | |||
*'''Count unique''': Number of unique values in column / COUNT DISTINCT() | |||
*'''Comma separate values''': List of data points, separated by comma / GROUP_CONCAT() | |||
*'''Comma separate distinct values''': List of unique data points, separated by comma / GROUP_CONCAT(DISTINCT) | |||
*'''Maximum''': Biggest (numeric) value in column / MAX() | |||
*'''Minimum''': Smallest (numeric) value in column / MIN() | |||
*'''Percentage''': Ratio of (boolean) values in percent / AVG() | |||
*'''Sum''': Sum of all (numeric) values in column / SUM() | |||
*'''Unique values''': Grouping operator / GROUP BY | |||
An aggregate function calculates on a set of values and returns a single value. Because an aggregate function operates on a set of values, it is often used in combination with the grouping operator ('''Unique values'''), which divides the result set into groups of value, where the aggregate function returns a single value for each group. | |||
[[File:Report Builder - Aggregation.png|border|center|frameless|800x800px]] | |||
===Report settings === | |||
Clicking on the '''Settings''' icon will expand the right accordion panel to define [[Report builder#Conditions|conditions]] and [[Report builder#Filters|filters]], set the default [[Report builder#Sorting|sorting]] order, and configure [[Report builder#Card view|card view]] options. | |||
====Conditions==== | |||
Conditions let you limit the number of data that is being presented to the report viewer. They are a predefined set of criteria that are applied when viewing a report. Conditions cannot be changed in viewing mode. Depending on the selected report source, the available conditions might differ slightly from the list of available fields. | |||
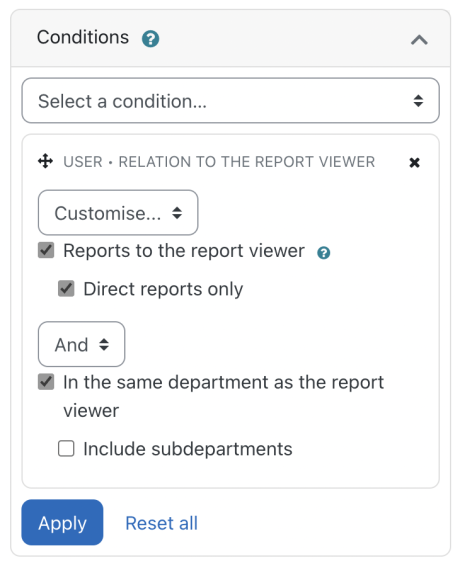
There is a special condition related to users called '''Relation to the report viewer''', which specifies which users should be listed in a report relative to the person viewing it. Using this condition, it is possible to create a single report that shows different results to different users, depending on their department or managerial duties. | |||
[[File:Report Builder - Conditions.png|border|center|frameless|563x563px]] | |||
The first relation is called '''Themselves''', which limits the report to information relating to the report viewer. The '''Customise'''... option provides the following two user relations: | |||
*'''Reports to the report viewer''': For users with a managerial position, this option will include users who report directly to the user viewing the report. | |||
*'''In the same department as the report viewer''': Includes users of the same department (optionally including sub-departments) as the user viewing the report. | |||
If both options are selected, it is possible to combine them with the AND and OR Boolean operators to refine the report content further. According to the user who is viewing the report, both relations take effect, meaning it will return different results according to the report viewer and/or their own position within the organization. | |||
====Filters==== | |||
Filters are a predefined set of criteria that are not applied automatically but are available for report viewers (via the '''Filters''' icon). Viewers of the report then have the ability to reduce the amount of data further via filters. | |||
= | There is no limit to the number of filters in a report. Furthermore, the list of filters is not limited to the fields shown in the report - you might add a filter to narrow down the search by fields that are not shown in the report but available in the data. | ||
====Sorting==== | |||
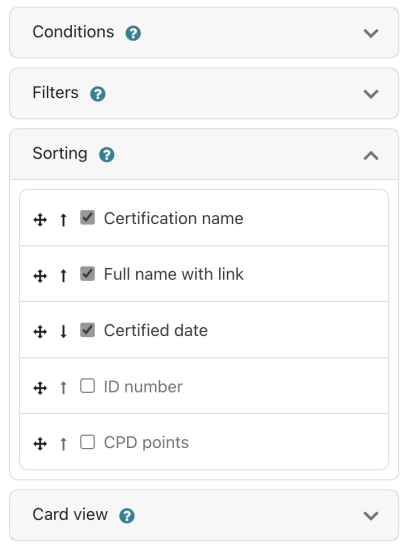
Sorting defines the initial order that fields are being ordered by. | |||
[[File:Report Builder - Sorting.png|border|center|frameless|546x546px]] | |||
The sorting order can be reversed by toggling the '''Up/Down''' icon. When in viewing mode, the order of all selected fields will initially be applied. Once a user has clicked on a column name, the data will be sorted by this field. When the same column is clicked again, the sort order will be reversed. | |||
====Card View==== | |||
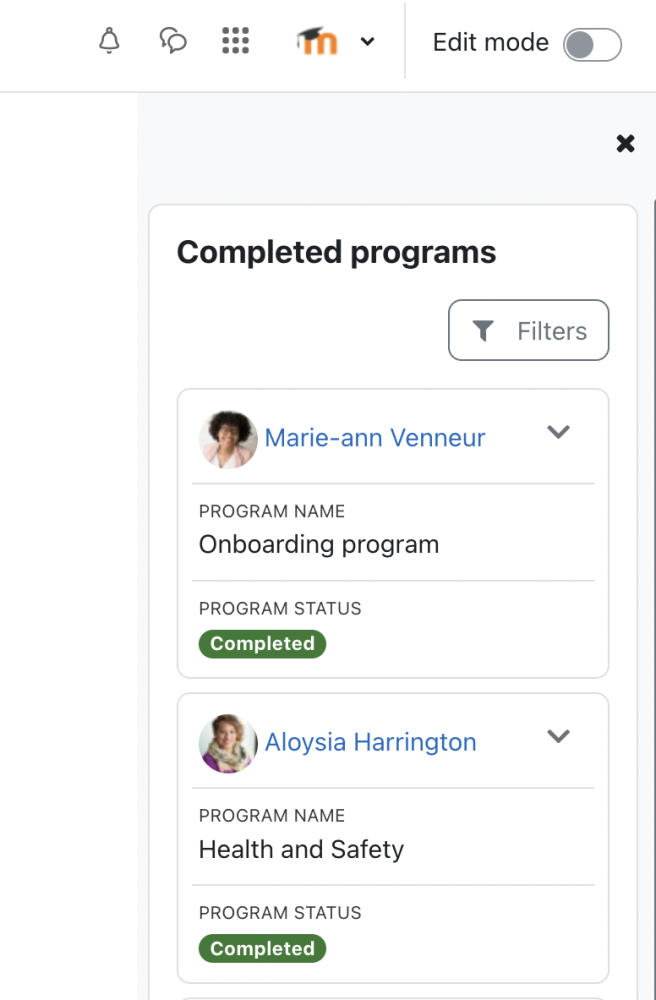
The card view feature supports responsive layout design in the report builder. Card View allows the configuration of the report layout for narrow views when the block is in the sidebar or a smaller device is used. A report will automatically switch to card view when displayed on small screens or in a narrow container via the [[Report block|report block]] in the sidebar, for instance, on the dashboard. | |||
[[File:Report Builder - Card view I.png|border|center|frameless|519x519px]] | |||
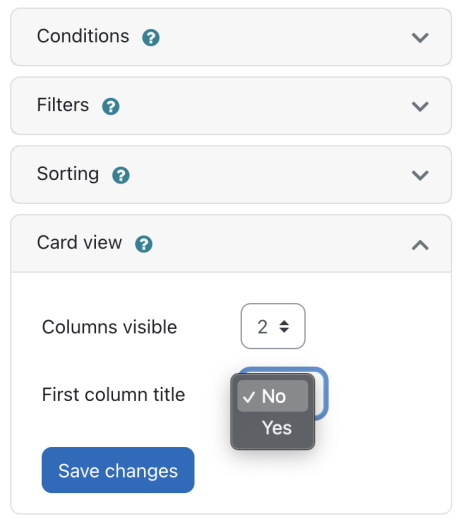
The following card view configuration options are available for every custom report: | |||
*'''Number of columns always visible''': indicates the number of columns that will be displayed expanded in the card view. | |||
*'''Show the first column title''': whether the first column title is shown or not. | |||
In the screenshot below, the number of columns always visible has been set to 3 with the first column title hidden. | |||
[[File:Report Builder - Card view II.png|border|center|frameless|1000x1000px]] | |||
==Report Audiences== | |||
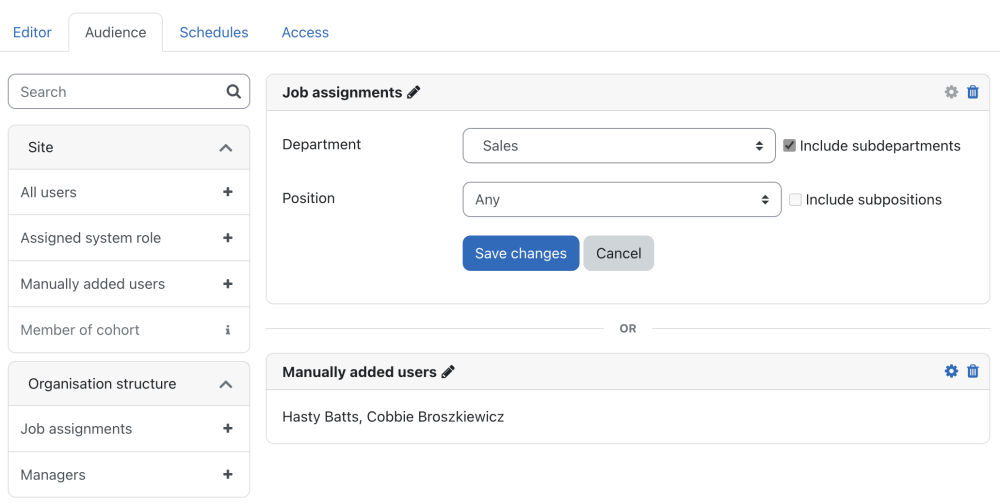
Report audiences indicate which users have access to the report. They can also be used as recipients in [[Report builder#Scheduling Reports|scheduled reports]]. To access audiences, select the '''Audiences''' tab of a report. | |||
[[File:Report builder - Audiences.png|border|center|frameless|1000x1000px]] | |||
* | In addition to selecting which position and department within an organisation should be included, it is also possible to manually select individual users and/or e-mail addresses. You can create the following audiences: | ||
* | *'''Job assignments''': Select a '''Department''' and a '''Position''', and optionally include subdepartments and subpositions, respectively | ||
* | *'''All users''': Use this audience to give access to all users in the tenant to any report | ||
* | *'''Assign system roles''': Select at least one system role | ||
*'''Manually added users''': Select at least one user (via name or e-mail address) | |||
*'''Member of cohort''': Select at least one cohort | |||
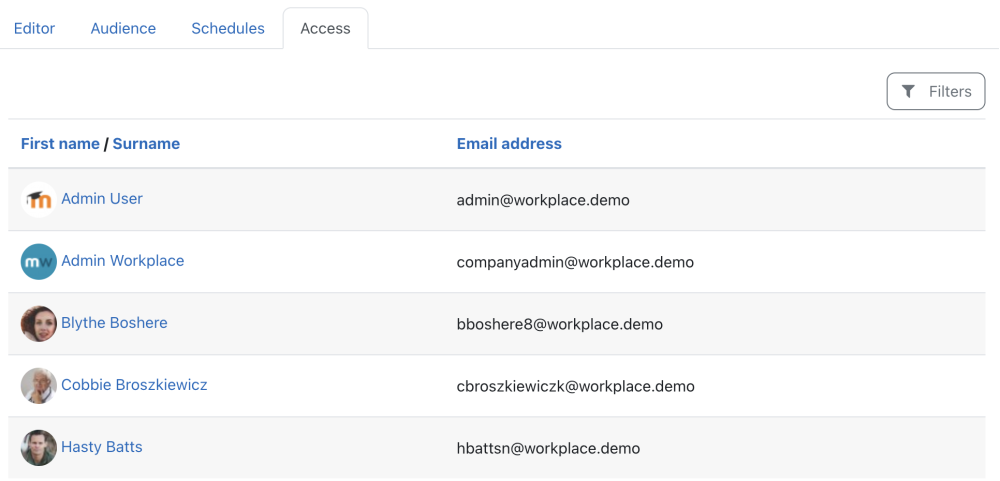
To confirm which users now have access to the report, switch to the [[Report builder#Report Access|Access]] tab. | |||
==Scheduling Reports== | |||
All reports are available as '''pull reports'''; that is, users have to select and view a report proactively. The '''report scheduler''' lets you configure the automatic delivery of reports to specific audiences, also known as '''push reports'''. | |||
[[File:Report builder - Schedules.png|border|center|frameless|1000x1000px]] | |||
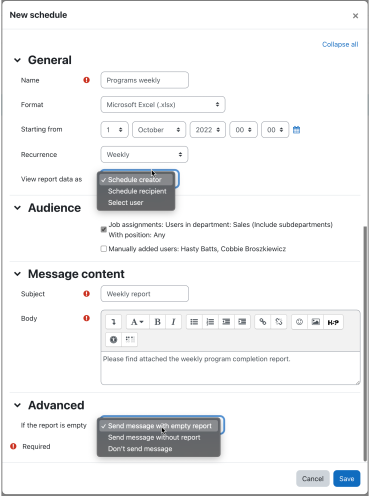
To access the scheduler, select the '''Schedules''' tab of a report and select the '''+ New Schedule''' button at the top right. | |||
[[ | Each schedule contains three parts: | ||
*'''Basic information''' | |||
**'''Schedule name''' is only used in the list of schedules | |||
**'''Format''': Any file format that has been allowed in '''Site administration > Plugins > Data formats > Manage data formats''' | |||
**'''Date''': Specifies when the report is to be sent for the first time | |||
**'''Recurrence''': Lets you specify whether the report should be sent once (Does not repeat) or sent frequently (Daily, Weekly, Monthly, Annually, Daily – Weekdays) | |||
**'''View report data as''': If a user is selected, the report data will be included as if viewed by the selected user; that is, all recipients will receive the same report. | |||
*'''Recipients''': To select which users will receive the scheduled report, you need to select at least one [[Report builder#Report Audiences|report audience]]. Scheduling a report will not be possible without any audiences, which have to be created first. | |||
*'''Custom message''': Standard elements of any email message, namely '''Subject''' and '''Message'''. | |||
[[File:Report builder - New schedule.png|border|center|frameless|497x497px|]] | |||
The [[Cron|cron]] process triggers the execution of the report. If you want to send a report straight away, select the '''Send''' option from the actions in the list of schedules. | |||
To access the schedules of all reports, select the '''Schedules''' tab in the main Report builder menu. | |||
==Report Access== | |||
By default, all users with permission [[Capabilities/tool/reportbuilder:read|tool/reportbuilder:read]] or [[Capabilities/tool/reportbuilder:edit|tool/reportbuilder:edit]] can view all custom reports defined in their tenant. Additional [[Report builder#Report Audiences|audiences]] can be specified to grant access to a report. | |||
To see who can view the report, select the '''Access''' tab of a report. Users who can see all reports in the tenant are labelled "Can view all reports" | |||
[[File:Report builder - Access.png|border|center|frameless|1000x1000px]] | |||
In addition to granting user access to reports, it is also possible to specify which users should be listed in any given report. To achieve this, the "Relation to the report viewer" [[Conditions|condition]] should be added to the report. This allows a manager to create a single report for others to view information about themselves or users in their departments or reporting lines. The condition takes effect according to the user who is viewing the report, meaning it will return different results according to the report viewer and/or their own position within the organisation. | |||
==Shared Reports== | |||
After enabling Shared space, users can create shared reports inside of it. These shared reports will be listed on the custom reports page in all tenants and marked with a "Shared space" label. | |||
This feature enables users to use the same report definition site-wide without duplicating the same reports in all tenants. It also allows the creation of cross-tenant reports. When a shared report is viewed from inside the tenant, it only displays the users and entities from this tenant. When a shared report is viewed from '''Shared space''', it shows information from all tenants. | |||
Reports in the shared space can be shared with all tenants or be only accessible to users with access to the shared space. | Reports in the shared space can be shared with all tenants or be only accessible to users with access to the shared space. | ||
[[File:Report builder - Shared reports.png|border|center|frameless|1000x1000px]] | |||
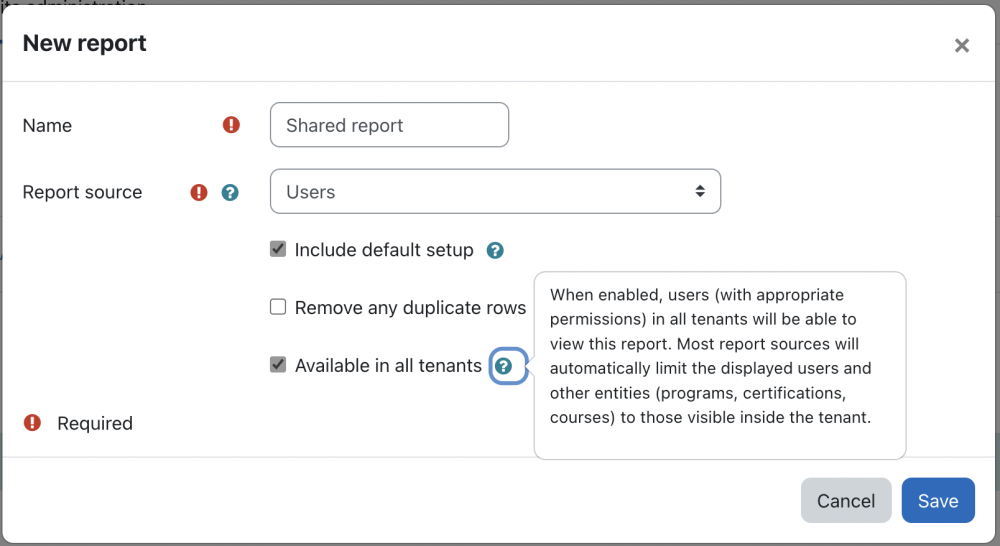
To create a shared report, switch to Shared space from the tenant switch dropdown in the navigation bar. When inside the Shared space, go to Report Builder in the Workplace launcher and create a new report as usual. | |||
There are two differences when working with reports in Shared space compared to standard tenant reports: | |||
*'''Available in all tenants''' settings. If enabled, the report will be made available to all tenants. If this is not set, the report will be available only in the shared space. | |||
*Since Audiences are not available (yet) for reports in Shared Space, you cannot define audiences for shared reports. | |||
==Data Store== | |||
The Workplace data store is a permanent record store used to keep track of course completions and badges awarded. | |||
The data store also supports course completions that were carried out outside Workplace but have to be tracked in Workplace. Any user who has the tool/datastore:uploadcoursecompletion capability can upload course completion data, which will be stored in the data store for users who belong to the same tenant as themselves. The [[Upload users|user upload]] feature has been extended with two new fields to support the course completion data: | |||
*'''coursecompleted''': The short name of the course that has been completed. The course has to exist before the upload is started. | |||
*'''coursecompleteddate''': The date that the course was completed. You need to use the YYYY-MM-DD ISO standard format, which will then be localized during the upload process. If this variable is omitted, the date of the day you are filling it out will be used. | |||
Both variables have to have a numeric postfix to support multiple courses, for example: | |||
<code>username,coursecompleted1,coursecompleteddate1</code> | |||
<code>user1,course1,2021-11-29</code> | |||
<code>user2,course1,2021-01-01</code> | |||
< | <code>user3,course2</code> | ||
==Limiting the number of custom reports== | |||
A site administrator can restrict the number of custom reports that can be created per site/tenant by adding the following line(s) to the [[Configuration_file|site configuration]]: | |||
<syntaxhighlight lang="php"> | |||
</ | $CFG->tool_reportbuilder_limitsenabled = true; | ||
$CFG->tool_reportbuilder_sitelimit = <VALUE>; | |||
$CFG->tool_reportbuilder_tenantlimit = <VALUE>; | |||
== | </syntaxhighlight> | ||
Omitting this configuration, or setting <tt>$CFG->tool_reportbuilder_limitsenabled = false;</tt> indicates that no limit should be applied to the number of custom reports that can be created. Enabling limits and setting the values to 0 will disable the creation of custom reports. Note that a tenant limit cannot exceed a site limit. | |||
[[ | ==Disabling live editing in reports== | ||
For performance reasons a site administrator may consider disabling live editing of reports, that being the constant updating of report data while editing report content (columns, filters, conditions) by adding the following to the [[Configuration_file|site configuration]]: | |||
<syntaxhighlight lang="php"> | |||
$CFG->tool_reportbuilder_liveediting = false; | |||
</syntaxhighlight> | |||
== | Omitting this configuration, or setting <tt>$CFG->tool_reportbuilder_liveediting = true;</tt> indicates that live editing is enabled. | ||
[[ | |||
Revision as of 18:53, 20 October 2021
Moodle Workplace provides a powerful custom reporting tool. Custom reports are built using the report builder interface, which provides advanced customisation options to administrators.
Overview
Moodle Workplace distinguishes between two types of reports:
- System reports: Embedded, pre-defined reports that are part of Moodle Workplace. Every time you see a table that can be interacted with (sorting columns, applying filters, or downloading data in various formats), you are most likely using a system report. System reports cannot be modified or removed, since various Workplace features rely on them. Examples are the list of custom reports or report schedules.
- Custom reports: User-generated reports made available to other users such as managers and trainers.
Moodle Workplace supports two types of reporting data sources: the Workplace database and the Workplace data store. The database is where all Workplace data is stored, excluding files. The data store is an alternative data source that keeps track of permanent records in Workplace as well as external sources. The following diagram illustrates the high-level elements of the reporting workflow:
Workplace offers a range of report sources to simplify the usage of the report builder. A record source contains a predefined set of fields that are available when building a report. Based on the selected report source, a certain amount of data will be available, which can be reduced by the following mechanisms:
- Configuring data fields lets you decide which columns are being made available, for example, user name, certification name, and completion status.
- Applying conditions lets you decide which rows will be made available, for instance, all records from a selected department.
- Access to reports is granted via audiences, for example, all members of a selected cohort.
- Filters, which have to be configured by the report creator, allow the viewer to select one or more criteria to reduce the amount of data further, for instance, by the level of progress.
Creating custom reports
You can access the management of custom reports via Site administration > Reports > Manage custom reports, or directly via the Report builder icon in the Workplace launcher.
To create a new report, select the +New report button.
A report contains two required settings: Report name (displayed whenever the report is being made available to users) and Report source (defines where the data for the report will come from). When the Add default configuration option remains enabled, the report will be populated with several predefined columns, conditions, and filters.
The following report sources are available in Moodle Workplace, grouped by report plugin:
- Appointment
- Appointments: Seminars, sessions and participants
- Certifications
- Certification users allocation and completion: Certification details, including users’ progress information
- Certifications: Certification details
- Program
- Programs: Program details
- Programs users allocation and completion: Program details, including users’ progress information
- Report Builder
- Course completion from datastore: Data in Workplace datastore
- Course participants: Course completion report
- Course enrolments: Course details, user enrolments, and course completion
- Certificate templates: Available certificate templates
- Certificate issues: Issued certificates to users
- Users list: Users and their job assignments
- Workplace
- Course reset for individual user: Course resetting data during recertification
Once you have created the report, you will be redirected to the actual report builder.
Report Builder
The interface of the report builder is divided into three panels:
- Columns sidebar (left): Shows the list of available data fields grouped by entities, including a live search option. The sidebar can be shown/hidden via the data field sidebar toggle next to the report name.
- Preview window (middle): Shows the data according to the current report configuration. Column headings and aggregation methods can be edited inline. To grasp a view of what the report will look like to users, select the Preview toggle.
- Settings sidebar (right): Lets you configure conditions, filters, sorting, and card view options. The accordion sidebar can be shown/hidden via the settings sidebar toggle.
Underneath the preview table, there is a Current query option that shows the underlying SQL query that is generated based on the configuration of your report:
- Selected data fields: SELECT ... FROM ...
- Conditions: WHERE
- Aggregation: GROUP BY
- Sorting: ORDER BY
Viewers also have the option to download the table data in various formats, namely CSV, XLSX, HTML, JSON, ODS, and PDF. You can reduce or rearrange the options in that list in Site administration > Plugins > Data formats > Manage data formats.
Configuring fields
In the left-hand side panel of the report generator, you will see all available fields for the selected report source, which have been grouped into entities. Each entity can be expanded or collapsed for better usability. You can also search for field entries to limit the number of displayed items.
To add columns to the report, click on the selected field in the list on the left. The column will be added automatically as the rightmost column in the table. You can then rearrange the column order via the standard Move handle. To remove a column, click on the standard delete icon.
The following field types are available to be added as columns to a report:
- Text fields: For example, full name, job, or program name. Some text fields are preprocessed by the report generator to support additional functionality:
- Hyperlinked text fields: Mainly to direct viewers directly to entries, for example, to a user profile or a program
- Highlighted text fields: To visualise a status, for example, status fields in programs and certifications
- Calculated text fields: To provide a numeric value, for example, the number of courses in a certification or the course progress for each user as a percentage
- Grouped text fields: To provide multiple data points as a single cell, for example, all users registered for an appointment. The values are available one per line or comma-separated.
- Image fields: For example, program icon or user picture
- Actions: For example, sending a message to a user or viewing a progress report
Custom fields, such as custom user profile fields or custom program fields, are fully supported by the report generator. They will appear in the list of available fields like any built-in variable.
Aggregation and Grouping
The Workplace report generator supports various aggregation and grouping operations at the column level. Depending on the data field selected, a set of possible aggregation methods is offered. Here is a full list of methods, along with their SQL function used internally:
- Average: Average of all (numeric) values / AVG()
- Count: Number of values in column / COUNT()
- Count unique: Number of unique values in column / COUNT DISTINCT()
- Comma separate values: List of data points, separated by comma / GROUP_CONCAT()
- Comma separate distinct values: List of unique data points, separated by comma / GROUP_CONCAT(DISTINCT)
- Maximum: Biggest (numeric) value in column / MAX()
- Minimum: Smallest (numeric) value in column / MIN()
- Percentage: Ratio of (boolean) values in percent / AVG()
- Sum: Sum of all (numeric) values in column / SUM()
- Unique values: Grouping operator / GROUP BY
An aggregate function calculates on a set of values and returns a single value. Because an aggregate function operates on a set of values, it is often used in combination with the grouping operator (Unique values), which divides the result set into groups of value, where the aggregate function returns a single value for each group.
Report settings
Clicking on the Settings icon will expand the right accordion panel to define conditions and filters, set the default sorting order, and configure card view options.
Conditions
Conditions let you limit the number of data that is being presented to the report viewer. They are a predefined set of criteria that are applied when viewing a report. Conditions cannot be changed in viewing mode. Depending on the selected report source, the available conditions might differ slightly from the list of available fields.
There is a special condition related to users called Relation to the report viewer, which specifies which users should be listed in a report relative to the person viewing it. Using this condition, it is possible to create a single report that shows different results to different users, depending on their department or managerial duties.
The first relation is called Themselves, which limits the report to information relating to the report viewer. The Customise... option provides the following two user relations:
- Reports to the report viewer: For users with a managerial position, this option will include users who report directly to the user viewing the report.
- In the same department as the report viewer: Includes users of the same department (optionally including sub-departments) as the user viewing the report.
If both options are selected, it is possible to combine them with the AND and OR Boolean operators to refine the report content further. According to the user who is viewing the report, both relations take effect, meaning it will return different results according to the report viewer and/or their own position within the organization.
Filters
Filters are a predefined set of criteria that are not applied automatically but are available for report viewers (via the Filters icon). Viewers of the report then have the ability to reduce the amount of data further via filters.
There is no limit to the number of filters in a report. Furthermore, the list of filters is not limited to the fields shown in the report - you might add a filter to narrow down the search by fields that are not shown in the report but available in the data.
Sorting
Sorting defines the initial order that fields are being ordered by.
The sorting order can be reversed by toggling the Up/Down icon. When in viewing mode, the order of all selected fields will initially be applied. Once a user has clicked on a column name, the data will be sorted by this field. When the same column is clicked again, the sort order will be reversed.
Card View
The card view feature supports responsive layout design in the report builder. Card View allows the configuration of the report layout for narrow views when the block is in the sidebar or a smaller device is used. A report will automatically switch to card view when displayed on small screens or in a narrow container via the report block in the sidebar, for instance, on the dashboard.
The following card view configuration options are available for every custom report:
- Number of columns always visible: indicates the number of columns that will be displayed expanded in the card view.
- Show the first column title: whether the first column title is shown or not.
In the screenshot below, the number of columns always visible has been set to 3 with the first column title hidden.
Report Audiences
Report audiences indicate which users have access to the report. They can also be used as recipients in scheduled reports. To access audiences, select the Audiences tab of a report.
In addition to selecting which position and department within an organisation should be included, it is also possible to manually select individual users and/or e-mail addresses. You can create the following audiences:
- Job assignments: Select a Department and a Position, and optionally include subdepartments and subpositions, respectively
- All users: Use this audience to give access to all users in the tenant to any report
- Assign system roles: Select at least one system role
- Manually added users: Select at least one user (via name or e-mail address)
- Member of cohort: Select at least one cohort
To confirm which users now have access to the report, switch to the Access tab.
Scheduling Reports
All reports are available as pull reports; that is, users have to select and view a report proactively. The report scheduler lets you configure the automatic delivery of reports to specific audiences, also known as push reports.
To access the scheduler, select the Schedules tab of a report and select the + New Schedule button at the top right.
Each schedule contains three parts:
- Basic information
- Schedule name is only used in the list of schedules
- Format: Any file format that has been allowed in Site administration > Plugins > Data formats > Manage data formats
- Date: Specifies when the report is to be sent for the first time
- Recurrence: Lets you specify whether the report should be sent once (Does not repeat) or sent frequently (Daily, Weekly, Monthly, Annually, Daily – Weekdays)
- View report data as: If a user is selected, the report data will be included as if viewed by the selected user; that is, all recipients will receive the same report.
- Recipients: To select which users will receive the scheduled report, you need to select at least one report audience. Scheduling a report will not be possible without any audiences, which have to be created first.
- Custom message: Standard elements of any email message, namely Subject and Message.
The cron process triggers the execution of the report. If you want to send a report straight away, select the Send option from the actions in the list of schedules.
To access the schedules of all reports, select the Schedules tab in the main Report builder menu.
Report Access
By default, all users with permission tool/reportbuilder:read or tool/reportbuilder:edit can view all custom reports defined in their tenant. Additional audiences can be specified to grant access to a report.
To see who can view the report, select the Access tab of a report. Users who can see all reports in the tenant are labelled "Can view all reports"
In addition to granting user access to reports, it is also possible to specify which users should be listed in any given report. To achieve this, the "Relation to the report viewer" condition should be added to the report. This allows a manager to create a single report for others to view information about themselves or users in their departments or reporting lines. The condition takes effect according to the user who is viewing the report, meaning it will return different results according to the report viewer and/or their own position within the organisation.
After enabling Shared space, users can create shared reports inside of it. These shared reports will be listed on the custom reports page in all tenants and marked with a "Shared space" label.
This feature enables users to use the same report definition site-wide without duplicating the same reports in all tenants. It also allows the creation of cross-tenant reports. When a shared report is viewed from inside the tenant, it only displays the users and entities from this tenant. When a shared report is viewed from Shared space, it shows information from all tenants.
Reports in the shared space can be shared with all tenants or be only accessible to users with access to the shared space.
To create a shared report, switch to Shared space from the tenant switch dropdown in the navigation bar. When inside the Shared space, go to Report Builder in the Workplace launcher and create a new report as usual.
There are two differences when working with reports in Shared space compared to standard tenant reports:
- Available in all tenants settings. If enabled, the report will be made available to all tenants. If this is not set, the report will be available only in the shared space.
- Since Audiences are not available (yet) for reports in Shared Space, you cannot define audiences for shared reports.
Data Store
The Workplace data store is a permanent record store used to keep track of course completions and badges awarded.
The data store also supports course completions that were carried out outside Workplace but have to be tracked in Workplace. Any user who has the tool/datastore:uploadcoursecompletion capability can upload course completion data, which will be stored in the data store for users who belong to the same tenant as themselves. The user upload feature has been extended with two new fields to support the course completion data:
- coursecompleted: The short name of the course that has been completed. The course has to exist before the upload is started.
- coursecompleteddate: The date that the course was completed. You need to use the YYYY-MM-DD ISO standard format, which will then be localized during the upload process. If this variable is omitted, the date of the day you are filling it out will be used.
Both variables have to have a numeric postfix to support multiple courses, for example:
username,coursecompleted1,coursecompleteddate1
user1,course1,2021-11-29
user2,course1,2021-01-01
user3,course2
Limiting the number of custom reports
A site administrator can restrict the number of custom reports that can be created per site/tenant by adding the following line(s) to the site configuration:
$CFG->tool_reportbuilder_limitsenabled = true;
$CFG->tool_reportbuilder_sitelimit = <VALUE>;
$CFG->tool_reportbuilder_tenantlimit = <VALUE>;
Omitting this configuration, or setting $CFG->tool_reportbuilder_limitsenabled = false; indicates that no limit should be applied to the number of custom reports that can be created. Enabling limits and setting the values to 0 will disable the creation of custom reports. Note that a tenant limit cannot exceed a site limit.
Disabling live editing in reports
For performance reasons a site administrator may consider disabling live editing of reports, that being the constant updating of report data while editing report content (columns, filters, conditions) by adding the following to the site configuration:
$CFG->tool_reportbuilder_liveediting = false;
Omitting this configuration, or setting $CFG->tool_reportbuilder_liveediting = true; indicates that live editing is enabled.
