Programs: Difference between revisions
(Details 1) |
(Programs v1) |
||
| Line 45: | Line 45: | ||
=== Program courses === | === Program courses === | ||
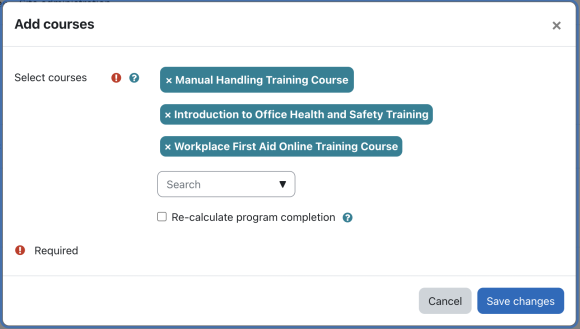
From the course drop-down menu, you can select as many courses as you wish. Each Moodle course will be treated as a separate program entry. | From the course drop-down menu, you can select as many courses as you wish. Each Moodle course will be treated as a separate program entry. | ||
[[File:Programs - Adding courses.png|border|center|frameless|580x580px]] | |||
=== Program sets === | |||
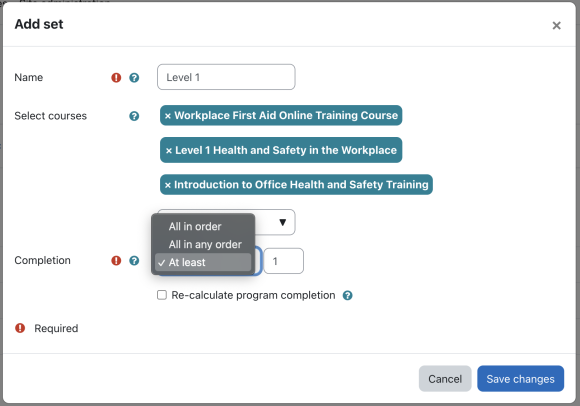
=== | A course set has the following three properties: | ||
* '''Name''': Provide the name of the course set | |||
* '''Courses''': Select one or many courses | |||
* [[completion criteria|Completion type]]: '''All in order, All in any order''', or '''At least''' | |||
[[File: | [[File:Programs - Adding sets.png|border|center|frameless|580x580px]] | ||
A set can also contain another set, an excellent vehicle for modelling recursive program structures, for instance, when creating hierarchical curricula. | |||
To remove any courses or sets, select the delete icon in the same row and confirm the warning shown. Note that removing a program set will remove all elements in the set, that is, courses and any subsets! | |||
=== Completion criteria === | |||
== | A powerful feature is the flexible way that the completion of all elements and completion within sets can be defined. There are three different criteria of completion you can choose from: | ||
A | |||
* '''All in order''': All courses must be completed in the order specified | |||
* '''All in any order''': All courses must be completed but in no particular order | |||
''' | |||
* '''At least #''': At least # courses must be completed, in no particular order | |||
[[File:Program - Content.png|border|center|frameless|1200x1200px| | |||
]] | |||
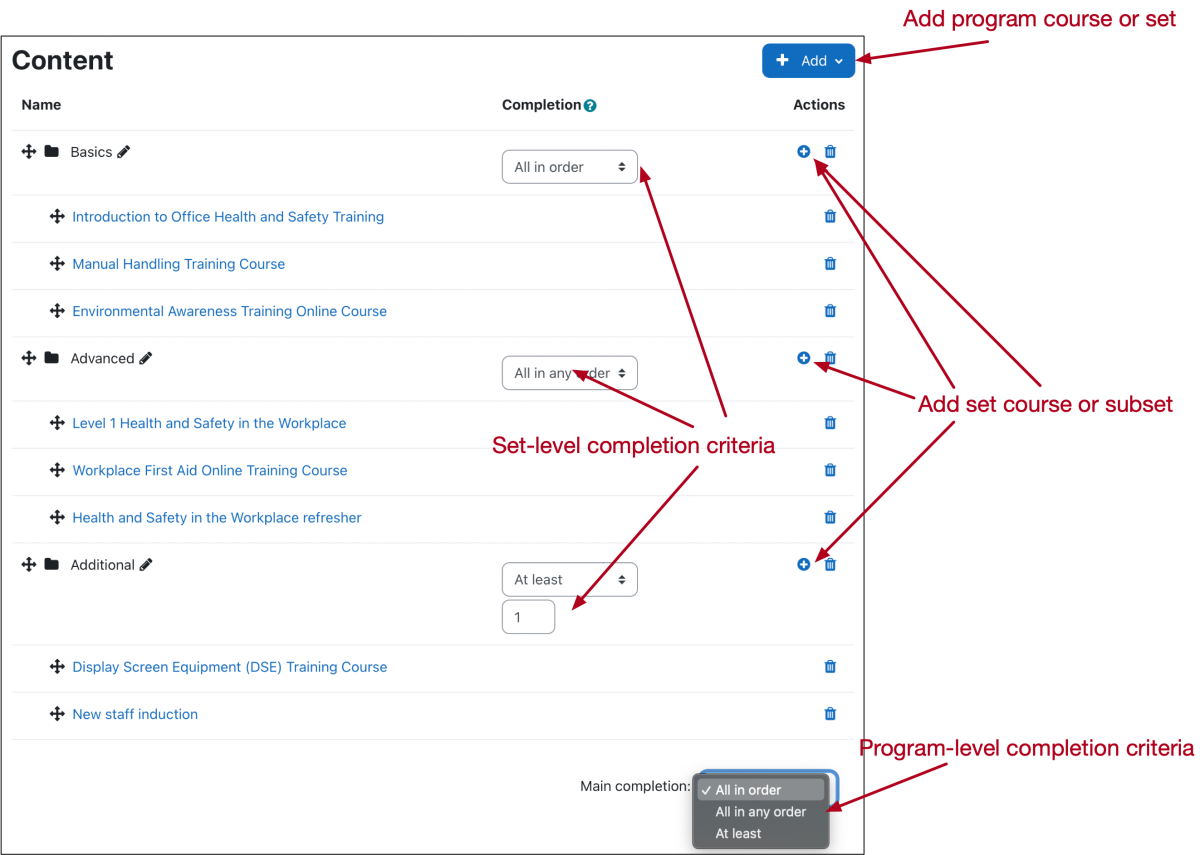
Completion criteria can be defined at set-level (or subset-level) and for the entire program ('''Main completion''' selector at the bottom right). | |||
Once the program structure has been completed, it is possible to reorder sets and courses, and move courses to different sets, all using the built-in drag & drop functionality. | |||
[[File: | [[Course completion]] forms the basis for program completion; that is, each element in a program must be completed as defined. | ||
=== | |||
== Program schedule== | |||
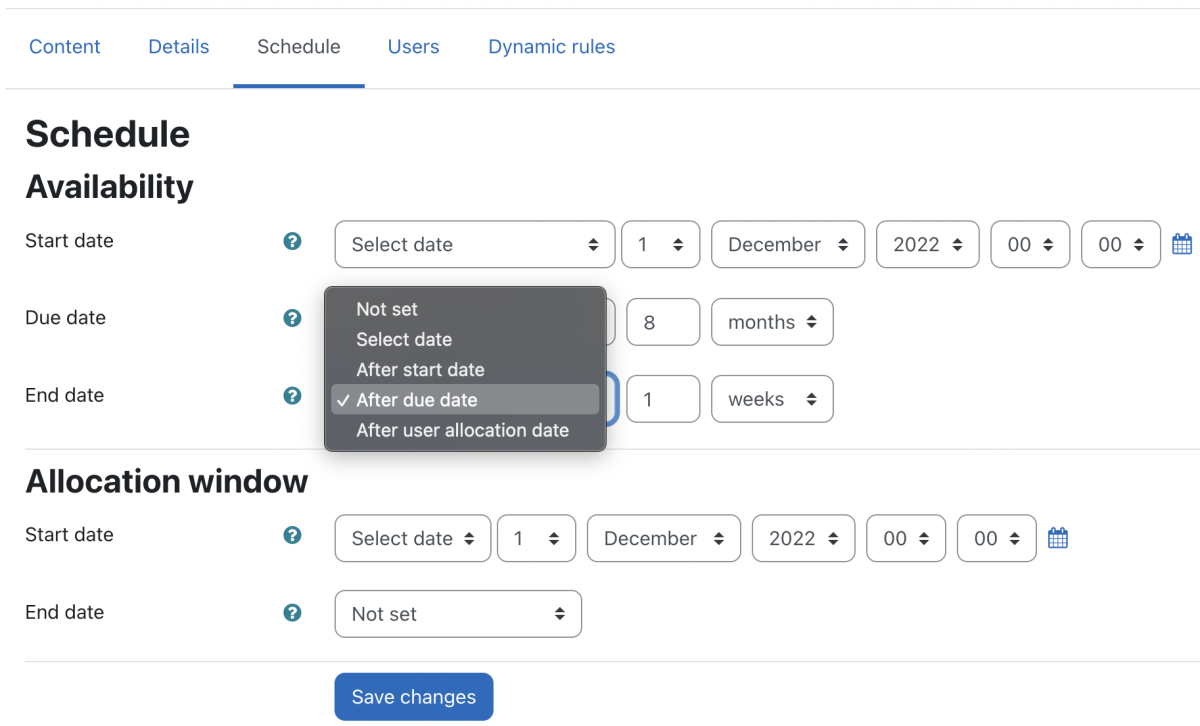
A program schedule lets you specify various dates relevant to the program’s availability and allocation times. The available options provide you with a high degree of flexibility to model all feasible scheduling options for your programs. These can be accessed under the program's '''Schedule''' tab. | |||
[[File:Programs - Schedule.png|border|center|frameless|1200x1200px]] | |||
All date values have at least the following two absolute options: | |||
# '''Not set''': No date has been specified yet (default) | |||
# '''Select date''': You explicitly provide a date | |||
Additional options are '''relative''' to another date and let you specify the number of '''days''', '''weeks''', '''months''', '''years''', and '''hours'''; for example, a user’s start date could be considered to be immediately after their allocation date with a due date one month later. | |||
The '''Availability''' section defines a start and end date, during which time a user can access the program. | |||
* '''Start date''': The first date that the user can start working on the program | |||
** '''Not set:''' The program can be started at any time | |||
** '''Select date''': The program can be started on or after the selected date | |||
** '''After user allocation date:''' The time that has to pass after a user has been allocated to the program. For example, if a user has been allocated on a Monday and this parameter is set to 1 day, the user’s program will start on Tuesday. | |||
* '''Due date''': The time that the user should have completed the program by | |||
** '''Not set''': No due date | |||
** '''Select date''': The date the program is due | |||
** '''After start date''': Time after the program’s Start date. For example, if the Start date is on a Monday, and the Due date is set to 1 day after start date, the Due date will be on Tuesday. Workplace does not check if the user actually started the program or not; it just calculates this date using the user start date. | |||
** '''After user allocation date''': Time after the user has been allocated to the program | |||
** '''Before end date''': Time before the program access ends | |||
* '''End date''': The last date that the user can access the program | |||
** '''Not set''': The program can be accessed all the time | |||
** '''Select date''': The program can be accessed until the selected date | |||
** '''After start date''': Time after the program has been started | |||
** '''After due date''': Time after the program has been due | |||
** '''After user allocation date''': Time after the user has been allocated to the program | |||
The '''Allocation window''' defines when a user can be allocated to a program. This time window only applies to manual allocations from within the program. Certifications use their own allocation date, and Dynamic rules ignore this time window. | |||
* '''Start date''': The first day that the allocation can take place | |||
** '''Not set''': There is no time limit from when the program can be allocated | |||
** '''Select date''': The program can be allocated on or after the selected date | |||
* '''End date''': The last day that the allocation can take place | |||
** '''Not set''': There is no time limit until when the program can be allocated | |||
** '''Select date''': The program can be allocated until the selected date | |||
** '''After allocation starts''': The time that has to pass after the allocation start date. To use this relative date option, the '''Allocation window Start date''' has to be set. | |||
== Program users== | |||
The information displayed on the Users tab shows all users who have been given access to the program. | |||
[[File:Program - Users.png|border|center|frameless|1200x1200px]] | |||
The list of users provides the following information: | |||
* '''Full name''': User’s first name and last name | |||
* '''Allocation date''': Date when the user has been allocated to the program | |||
* '''Due date''': Date when the user is expected to have completed the program, which is either '''Not set''' or a date. The date is either driven by the '''Due date''' in the '''Availability section''' of the [[Programs#program schedule|Schedule]], or it has been overridden by the manager. If the latter is the case, a warning symbol is displayed beside the date. | |||
* '''Allocation source''': Indication how the user has been allocated to the program | |||
** '''Manual''': manually, in [[Upload users in Moodle Workplace|batch mode]], or via web services | |||
** '''Dynamic''': via dynamic rules | |||
** '''Certification''': as part of a certification | |||
* '''Certification name''': If the program is linked to a [[Certifications|Certification]], its name will be displayed here | |||
* '''Certification status''': If the program is linked to a [[Certifications|Certification]], its status will be displayed here | |||
* '''Program status''': User’s progress of the program | |||
** The user has not completed the program yet and the '''Due date''' has not been reached | |||
** The user is running late in completing the program | |||
** The user has successfully finished the program | |||
** The user’s start date is set in the future | |||
** The user’s program allocation has been suspended. Its entry in the table will be greyed out. This is not related to a user’s account suspension. This is the only program status that can coexist with another status. | |||
The following actions are available for programs: | |||
* '''Edit''': Managers and other users with the '''capability tool/program:allocateuser''' capability can manually override the scheduling information, for example, due to long-term illness or maternity/paternity leave. You can set the Status to Default (Not set) or Suspended. Furthermore, you can change Start date, Due date and End date of the user for this program. This option is only available if Allocation source is set to manual. | |||
* '''Program reset''': Managers or users with the '''tool/program:coursereset''' capability can reset programs. Any completion data will be deleted; that is, any course completion data is reset in all courses of the program. This action cannot be undone! The execution of resetting a user’s program progress will take place during the next cron run and might take a few minutes to complete. This option is only available if '''Allocation source''' is set to '''manual'''. The reporting source called Course reset for individual user provides detailed information about program resets. | |||
* '''Progress report''': Provides advancement details for each user allocated to a program. The progress report offers a detailed breakdown of all the elements in the program, that is, sets and courses. The user progress report is of particular interest to managers when monitoring the step-by-step progression of each team member. A more detailed view of the same report can be accessed via the '''Report''' icon on the Program overview screen. When expanded, it presents the same data as shown on the Teams tab on the manager dashboard. You can also reach the same report(s) for individual participants from the Learning section on the user's profile. | |||
* '''Progress overview''': Opens a modal window, which is identical to the view of a program on a user's dashboard. | |||
* '''Delete''': Removes the user and all associated data from the program. This action cannot be undone! This option is only available if '''Allocation source''' is set to '''manual'''. Note that users who have been allocated via dynamic rules can only be deleted via dynamic rules; users who have been allocated as part of a certification can only be deleted as part of a certification. | |||
The actions '''Edit''', '''Reset''' and '''Delete''' can be applied in bulk to multiple users via the drop-down at the bottom. Bear in mind that this is only possible for users with the '''Allocation source''' set to '''manual'''. | |||
==Program dynamic rules == | |||
[[Dynamic rules]] support feature support for programs both in conditions and actions. Programs support local dynamic rules which only apply to the particular program. Local dynamic rules save you from creating lots of global rules and keeping everything in a single place, which improves the maintenance of programs. | |||
[[File:Programs - Dynamic rules.png|border|center|frameless|1199x1199px]] | |||
The available conditions are the same as the ones available in the '''Program''' section in [[Dynamic rules]]. They cannot be changed; that is, you can only configure the actions of each rule. Make sure you enable each dynamic rule that has been configured. Most dynamic rules have been set up as scheduled tasks; that is, the action will not be carried out immediately, but when the next cron run will be executed. | |||
==Sharing content across tenants== | |||
Moodle Workplace offers two ways to share content across tenants via programs: | |||
* Sharing courses across tenants in a single program | |||
* Placing programs in shared space | |||
=== Sharing courses across tenants === | |||
By default, neither the Tenant administrator nor the Programs Manager can see courses outside of their own tenant's course category when adding courses to programs. However, the site can be configured so that a '''Shared''' course category overrides permissions and allows users to browse courses, or a particular user can be set up who creates programs for different tenants and has access to all courses. That way, it will be possible to add the same course to different programs that belong to different tenants. | |||
To grant this permission (adding courses to a program that is outside their own tenant's course category) to tenant admins or program managers, you need to assign the '''moodle/category:viewcourselist''' capability at the category context. The handling of programs will be the same as before, so program managers need to be vigilant when arranging courses in programs from different tenants. | |||
If a course has been set up using separate groups, the attention icon will be shown. Users will be enrolled in the same course but won't have any visibility of each other. If the course has been configured using visible groups or no groups, the attention icon will be shown next to the courses that do not belong to the current tenant's course category. Users from one tenant will see users from other tenants, for instance, in the participants’ list or collaborative activities, such as forums. Therefore, it is highly recommended to have all shared courses in [[Groups#Group%20modes|Separate groups]] mode and force the group mode for all activities. | |||
The Programs enrolment method will always allocate users from different tenants into different groups. Groups will be created automatically based on the name of the tenant. They can be manually renamed later without affecting the allocation of future students. | |||
=== Programs in shared space === | |||
After enabling Shared space, administrators can create shared programs inside of it. These shared programs will be listed on the '''Programs''' main page in all tenants and marked with a '''Shared space''' label next to it. Users from these tenants with no access to the Shared space will be only able to allocate users to these programs. | |||
[[File:Programs - Shared space.png|border|center|frameless|799x799px]] | |||
The range of actions has been restricted to program duplication, user allocation, and accessing the program report. All other actions can only be performed when you manage the program from within the shared space. | |||
==Program Archive== | |||
A program is either Active or Archived. '''Active''' programs are currently in use; that is, learners are working through program courses. '''Archived''' programs are not in use, but their progress and completion data has to be available. Once a program is archived (using the Archive button in the Action column), it will no longer be available for managers or learners. It may only be viewed in historical reports. | |||
Archived programs are stored via the Archived tab, where you have three actions available: | |||
* '''Progress report''': This is the same progress report as shown on the Teams tab on the manager dashboard. | |||
* '''Restore''': The state of the program will be changed from Archived back to Active. | |||
* '''Delete''': This will remove the program permanently and delete all associated data. Note that this action cannot be undone. | |||
Revision as of 13:26, 20 October 2021
Programs allow you to establish learning pathways for your employees by adding a combination of courses or a hierarchical sequence of courses. A typical use case would be the onboarding of new employees.
Overview
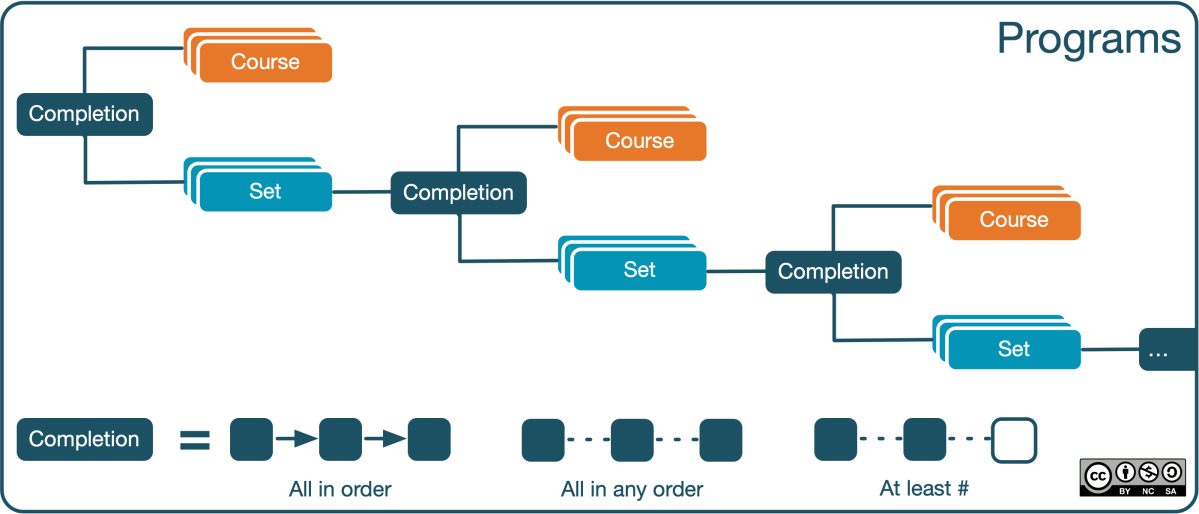
A program consists of courses and sets; both are optional and can be arranged in any order. A set contains one or more courses that have to be completed. Interestingly, a set can also contain another set — a great vehicle for creating hierarchical curricula. The recursive structure of programs is depicted in the following diagram:
Learners can see all programs they are allocated to on their Dashboard and self-enrol into the program courses by clicking on them. Some program courses may not be available until prerequisites have been met.
Programs are also the basis for certifications to model recurring programs, for example, in compliance setups.
Programs details
You can access the management of programs via Site administration > Learning > Programs or directly via the Programs icon in the Workplace launcher.
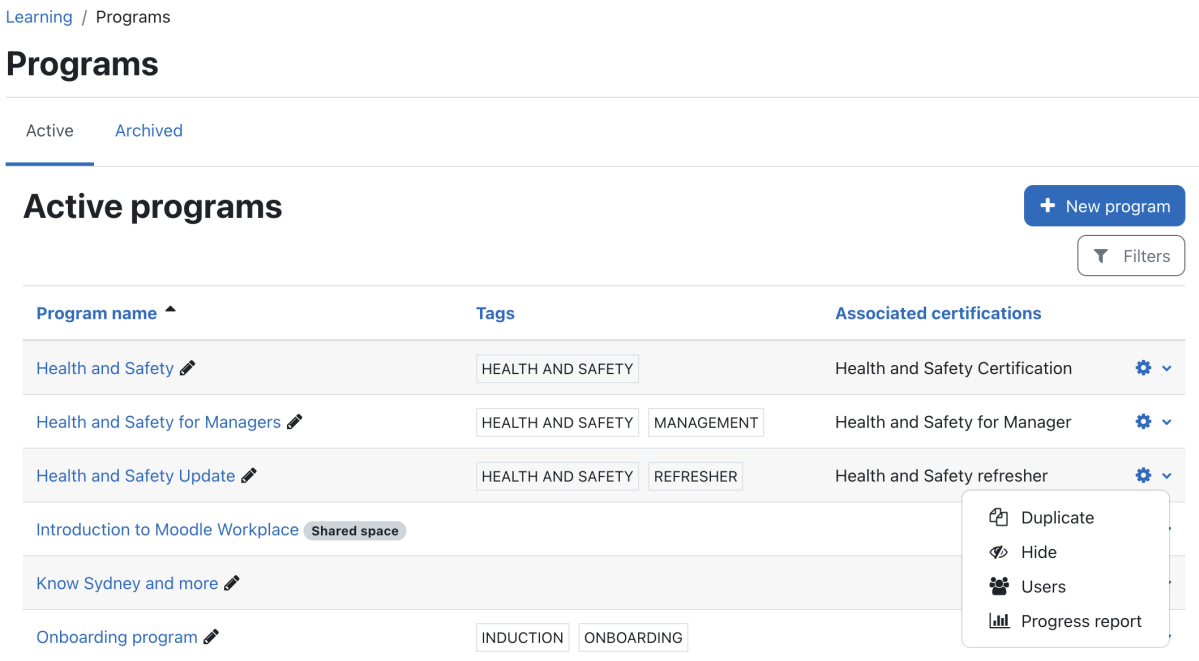
For each active program, you see the Program name, any given Tags, and Associated certifications. You will see the usual Workplace icons (Edit, Details, Duplicate, Show/Hide, Users, Report, and Archive) to the right of each program. You can filter the list of active programs by Program name and Associated certification.
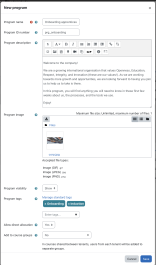
To create a new program, click on the +New program button. You will then see a pop-up screen and a range of program details.
- Program name (Required) The name of the program which is displayed in the list of active programs and the users’ dashboards
- Program ID number Unique ID number that is used by the Moodle upload user tool and web services
- Program description Summary of the program which is displayed on the users’ dashboard
- Program image Program picture, which is displayed on users’ dashboards. Supported formats are JPG, PNG, and GIF.
- Program visibility Toggle indicating whether the program is shown on the dashboard and if it can be accessed
- Program tags Tags to be shown on the active programs list
- Allow direct allocation If enabled, users can be allocated directly to this program.
- Add to course groups If enabled, users will be added to a course group when they get enrolled in the course. The group’s name is the same as the program; it will be created automatically when it doesn’t exist. See also sharing content across tenants.
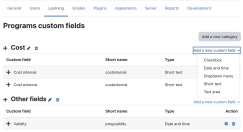
Programs support custom fields, which are user-defined properties to store extra program information, such as the program’s cost. They are managed in Site administration > Learning > Programs customs fields and they work in precisely the same way as course custom fields.
Note that program custom fields are defined globally; that is, they will be available across tenants.
Program custom fields appear at the bottom of the program details form.
Program content
The program content contains courses, sets, and completion types that make up the program. When you select the +Add icon at the top right, a drop-down menu will appear with two options:
Program courses
From the course drop-down menu, you can select as many courses as you wish. Each Moodle course will be treated as a separate program entry.
Program sets
A course set has the following three properties:
- Name: Provide the name of the course set
- Courses: Select one or many courses
- Completion type: All in order, All in any order, or At least
A set can also contain another set, an excellent vehicle for modelling recursive program structures, for instance, when creating hierarchical curricula.
To remove any courses or sets, select the delete icon in the same row and confirm the warning shown. Note that removing a program set will remove all elements in the set, that is, courses and any subsets!
Completion criteria
A powerful feature is the flexible way that the completion of all elements and completion within sets can be defined. There are three different criteria of completion you can choose from:
- All in order: All courses must be completed in the order specified
- All in any order: All courses must be completed but in no particular order
- At least #: At least # courses must be completed, in no particular order
Completion criteria can be defined at set-level (or subset-level) and for the entire program (Main completion selector at the bottom right).
Once the program structure has been completed, it is possible to reorder sets and courses, and move courses to different sets, all using the built-in drag & drop functionality.
Course completion forms the basis for program completion; that is, each element in a program must be completed as defined.
Program schedule
A program schedule lets you specify various dates relevant to the program’s availability and allocation times. The available options provide you with a high degree of flexibility to model all feasible scheduling options for your programs. These can be accessed under the program's Schedule tab.
All date values have at least the following two absolute options:
- Not set: No date has been specified yet (default)
- Select date: You explicitly provide a date
Additional options are relative to another date and let you specify the number of days, weeks, months, years, and hours; for example, a user’s start date could be considered to be immediately after their allocation date with a due date one month later.
The Availability section defines a start and end date, during which time a user can access the program.
- Start date: The first date that the user can start working on the program
- Not set: The program can be started at any time
- Select date: The program can be started on or after the selected date
- After user allocation date: The time that has to pass after a user has been allocated to the program. For example, if a user has been allocated on a Monday and this parameter is set to 1 day, the user’s program will start on Tuesday.
- Due date: The time that the user should have completed the program by
- Not set: No due date
- Select date: The date the program is due
- After start date: Time after the program’s Start date. For example, if the Start date is on a Monday, and the Due date is set to 1 day after start date, the Due date will be on Tuesday. Workplace does not check if the user actually started the program or not; it just calculates this date using the user start date.
- After user allocation date: Time after the user has been allocated to the program
- Before end date: Time before the program access ends
- End date: The last date that the user can access the program
- Not set: The program can be accessed all the time
- Select date: The program can be accessed until the selected date
- After start date: Time after the program has been started
- After due date: Time after the program has been due
- After user allocation date: Time after the user has been allocated to the program
The Allocation window defines when a user can be allocated to a program. This time window only applies to manual allocations from within the program. Certifications use their own allocation date, and Dynamic rules ignore this time window.
- Start date: The first day that the allocation can take place
- Not set: There is no time limit from when the program can be allocated
- Select date: The program can be allocated on or after the selected date
- End date: The last day that the allocation can take place
- Not set: There is no time limit until when the program can be allocated
- Select date: The program can be allocated until the selected date
- After allocation starts: The time that has to pass after the allocation start date. To use this relative date option, the Allocation window Start date has to be set.
Program users
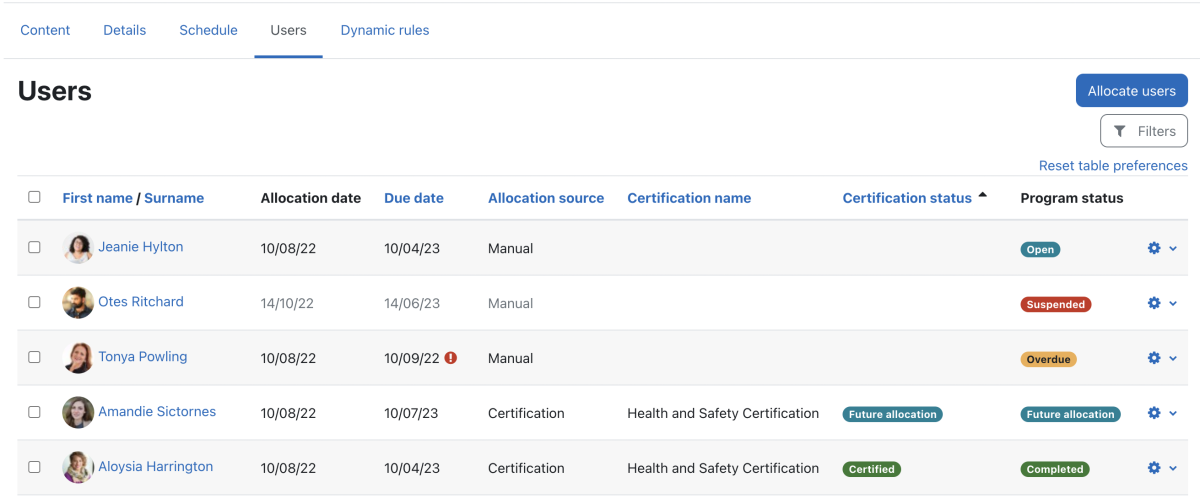
The information displayed on the Users tab shows all users who have been given access to the program.
The list of users provides the following information:
- Full name: User’s first name and last name
- Allocation date: Date when the user has been allocated to the program
- Due date: Date when the user is expected to have completed the program, which is either Not set or a date. The date is either driven by the Due date in the Availability section of the Schedule, or it has been overridden by the manager. If the latter is the case, a warning symbol is displayed beside the date.
- Allocation source: Indication how the user has been allocated to the program
- Manual: manually, in batch mode, or via web services
- Dynamic: via dynamic rules
- Certification: as part of a certification
- Certification name: If the program is linked to a Certification, its name will be displayed here
- Certification status: If the program is linked to a Certification, its status will be displayed here
- Program status: User’s progress of the program
- The user has not completed the program yet and the Due date has not been reached
- The user is running late in completing the program
- The user has successfully finished the program
- The user’s start date is set in the future
- The user’s program allocation has been suspended. Its entry in the table will be greyed out. This is not related to a user’s account suspension. This is the only program status that can coexist with another status.
The following actions are available for programs:
- Edit: Managers and other users with the capability tool/program:allocateuser capability can manually override the scheduling information, for example, due to long-term illness or maternity/paternity leave. You can set the Status to Default (Not set) or Suspended. Furthermore, you can change Start date, Due date and End date of the user for this program. This option is only available if Allocation source is set to manual.
- Program reset: Managers or users with the tool/program:coursereset capability can reset programs. Any completion data will be deleted; that is, any course completion data is reset in all courses of the program. This action cannot be undone! The execution of resetting a user’s program progress will take place during the next cron run and might take a few minutes to complete. This option is only available if Allocation source is set to manual. The reporting source called Course reset for individual user provides detailed information about program resets.
- Progress report: Provides advancement details for each user allocated to a program. The progress report offers a detailed breakdown of all the elements in the program, that is, sets and courses. The user progress report is of particular interest to managers when monitoring the step-by-step progression of each team member. A more detailed view of the same report can be accessed via the Report icon on the Program overview screen. When expanded, it presents the same data as shown on the Teams tab on the manager dashboard. You can also reach the same report(s) for individual participants from the Learning section on the user's profile.
- Progress overview: Opens a modal window, which is identical to the view of a program on a user's dashboard.
- Delete: Removes the user and all associated data from the program. This action cannot be undone! This option is only available if Allocation source is set to manual. Note that users who have been allocated via dynamic rules can only be deleted via dynamic rules; users who have been allocated as part of a certification can only be deleted as part of a certification.
The actions Edit, Reset and Delete can be applied in bulk to multiple users via the drop-down at the bottom. Bear in mind that this is only possible for users with the Allocation source set to manual.
Program dynamic rules
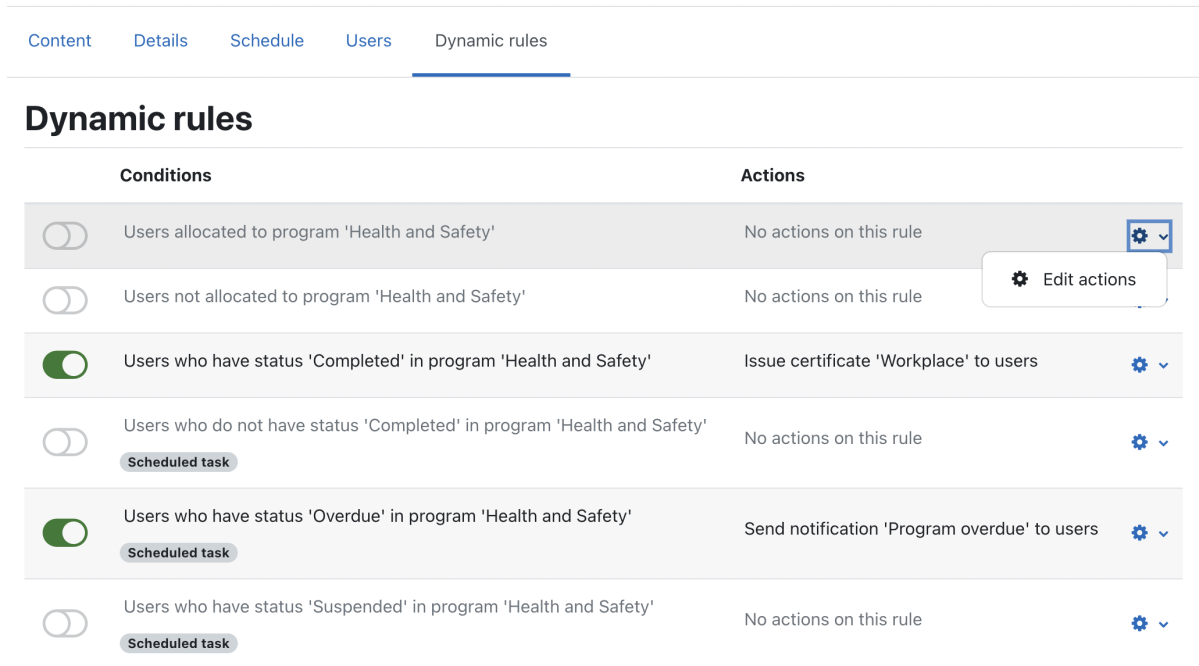
Dynamic rules support feature support for programs both in conditions and actions. Programs support local dynamic rules which only apply to the particular program. Local dynamic rules save you from creating lots of global rules and keeping everything in a single place, which improves the maintenance of programs.
The available conditions are the same as the ones available in the Program section in Dynamic rules. They cannot be changed; that is, you can only configure the actions of each rule. Make sure you enable each dynamic rule that has been configured. Most dynamic rules have been set up as scheduled tasks; that is, the action will not be carried out immediately, but when the next cron run will be executed.
Sharing content across tenants
Moodle Workplace offers two ways to share content across tenants via programs:
- Sharing courses across tenants in a single program
- Placing programs in shared space
Sharing courses across tenants
By default, neither the Tenant administrator nor the Programs Manager can see courses outside of their own tenant's course category when adding courses to programs. However, the site can be configured so that a Shared course category overrides permissions and allows users to browse courses, or a particular user can be set up who creates programs for different tenants and has access to all courses. That way, it will be possible to add the same course to different programs that belong to different tenants.
To grant this permission (adding courses to a program that is outside their own tenant's course category) to tenant admins or program managers, you need to assign the moodle/category:viewcourselist capability at the category context. The handling of programs will be the same as before, so program managers need to be vigilant when arranging courses in programs from different tenants.
If a course has been set up using separate groups, the attention icon will be shown. Users will be enrolled in the same course but won't have any visibility of each other. If the course has been configured using visible groups or no groups, the attention icon will be shown next to the courses that do not belong to the current tenant's course category. Users from one tenant will see users from other tenants, for instance, in the participants’ list or collaborative activities, such as forums. Therefore, it is highly recommended to have all shared courses in Separate groups mode and force the group mode for all activities.
The Programs enrolment method will always allocate users from different tenants into different groups. Groups will be created automatically based on the name of the tenant. They can be manually renamed later without affecting the allocation of future students.
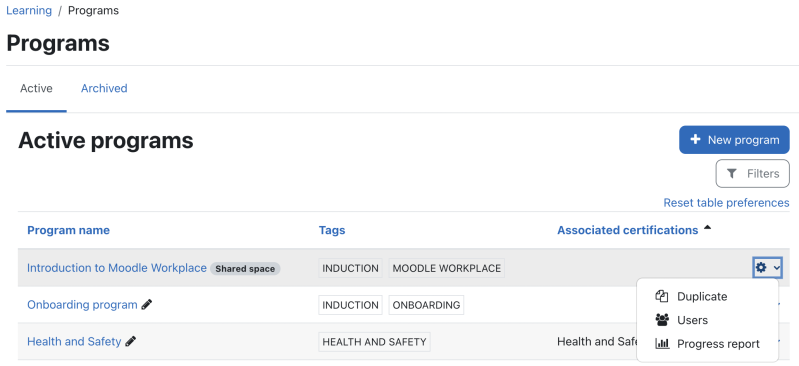
After enabling Shared space, administrators can create shared programs inside of it. These shared programs will be listed on the Programs main page in all tenants and marked with a Shared space label next to it. Users from these tenants with no access to the Shared space will be only able to allocate users to these programs.
The range of actions has been restricted to program duplication, user allocation, and accessing the program report. All other actions can only be performed when you manage the program from within the shared space.
Program Archive
A program is either Active or Archived. Active programs are currently in use; that is, learners are working through program courses. Archived programs are not in use, but their progress and completion data has to be available. Once a program is archived (using the Archive button in the Action column), it will no longer be available for managers or learners. It may only be viewed in historical reports.
Archived programs are stored via the Archived tab, where you have three actions available:
- Progress report: This is the same progress report as shown on the Teams tab on the manager dashboard.
- Restore: The state of the program will be changed from Archived back to Active.
- Delete: This will remove the program permanently and delete all associated data. Note that this action cannot be undone.
