Scheduler: Setting feedback: Difference between revisions
From MoodleDocs
No edit summary |
m (Minor clarification edits) |
||
| (3 intermediate revisions by 2 users not shown) | |||
| Line 1: | Line 1: | ||
[[Scheduler module| | [[Scheduler module|Return to Schedule module page]] | ||
When the appointment has | When the appointment has taken place, some feedback can be returned to the student. This is achieved by clicking on the student name in the slot list. A screen with a two tab choice will appear. The second tab (right tab) drives to the "comment" screen for the student: | ||
[[Image:student_top_choice_EN.jpg]] | [[Image:student_top_choice_EN.jpg]] | ||
| Line 10: | Line 10: | ||
# In the text editor can you write a feedback on the passed meeting. | # In the text editor can you write a feedback on the passed meeting. | ||
# | # Check that box if you want the comment being distributed to all the students who were signed up for this appointment. This may replace any old individual comments those student would have already received for that appointment. | ||
# Don't forget saving the comment clicking on that link. | # Don't forget saving the comment clicking on that link. | ||
If the student has | If the student has attended multiple appointments ("Students can register multiple appointments" mode in this scheduler), multiple comment boxes will appear stacked. | ||
==See also== | |||
[[Category:Scheduler]] | |||
[[es:Agendador: Configurar retroalimentación]] | |||
Latest revision as of 21:35, 9 October 2017
Return to Schedule module page
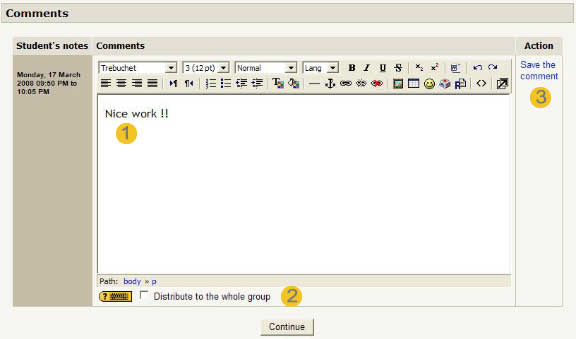
When the appointment has taken place, some feedback can be returned to the student. This is achieved by clicking on the student name in the slot list. A screen with a two tab choice will appear. The second tab (right tab) drives to the "comment" screen for the student:
All appointments instances for that student are shown in the form, along with comments.
- In the text editor can you write a feedback on the passed meeting.
- Check that box if you want the comment being distributed to all the students who were signed up for this appointment. This may replace any old individual comments those student would have already received for that appointment.
- Don't forget saving the comment clicking on that link.
If the student has attended multiple appointments ("Students can register multiple appointments" mode in this scheduler), multiple comment boxes will appear stacked.

