ThreeSixty module
| ThreeSixty module | |
|---|---|
| Type | Activity module |
| Set | N/A |
| Downloads | ... |
| Issues | ... |
| Discussion | ... |
| Maintainer(s) | Enovation Solutions |
Description
360 Feedback is the way to gather performance information about individual (employee) from much broader perspective than just his/hers line manager. This tool allows to define number of participants who will take part in givin feedback about particular person based on some pre-set criteria by “rating” this person and also leaving comments. Participants can be a coleague, customer, supervisor etc.
Feedback is only completed when all participants have reviewed and submitted the form.
Using 360 Module:
Download module 360:
https://moodle.org/plugins/view.php?plugin=mod_threesixty

or

https://github.com/enovation/moodle-mod-360
Copy and paste “threesixty” directory in {moodle_root}/mod/ In browser, go to url /admin/index.php to install new pluguin.
Take all defaults for now.
Go to Site Administration->Plugins->Activity Modules->360 Degree Diagnostics Tool
Here you can change those default settings.
To see how it works:
Go to any course, for this example I go to “Networks”, turn editing on.
Click on Add an activity or resource
Choose radio button next to “360 Degree Diagnostics Tool” and click “Add” button.
Once 360 feedback has been added to the course, it can be accessed by anyone who is enrolled in that course. For this example, we call it “New 360 Feedback”.
Once user clicks on “New 360 Feedback” he/she brought to the home page of the tool which displays following options:
- Activity
- Respondents
- Reports
- Administration
Activity:
When clicking on activity we see list of students enrolled in the course.
Each user has 2 profiles associated with him/her: “Self” and “Job Profile”.
“Date Completed” will show the date once profile has been completed.
There are also “Options” which is currently shows only option to view.
Respondents and Reports will show no information at this point, because activity is not completed yet.
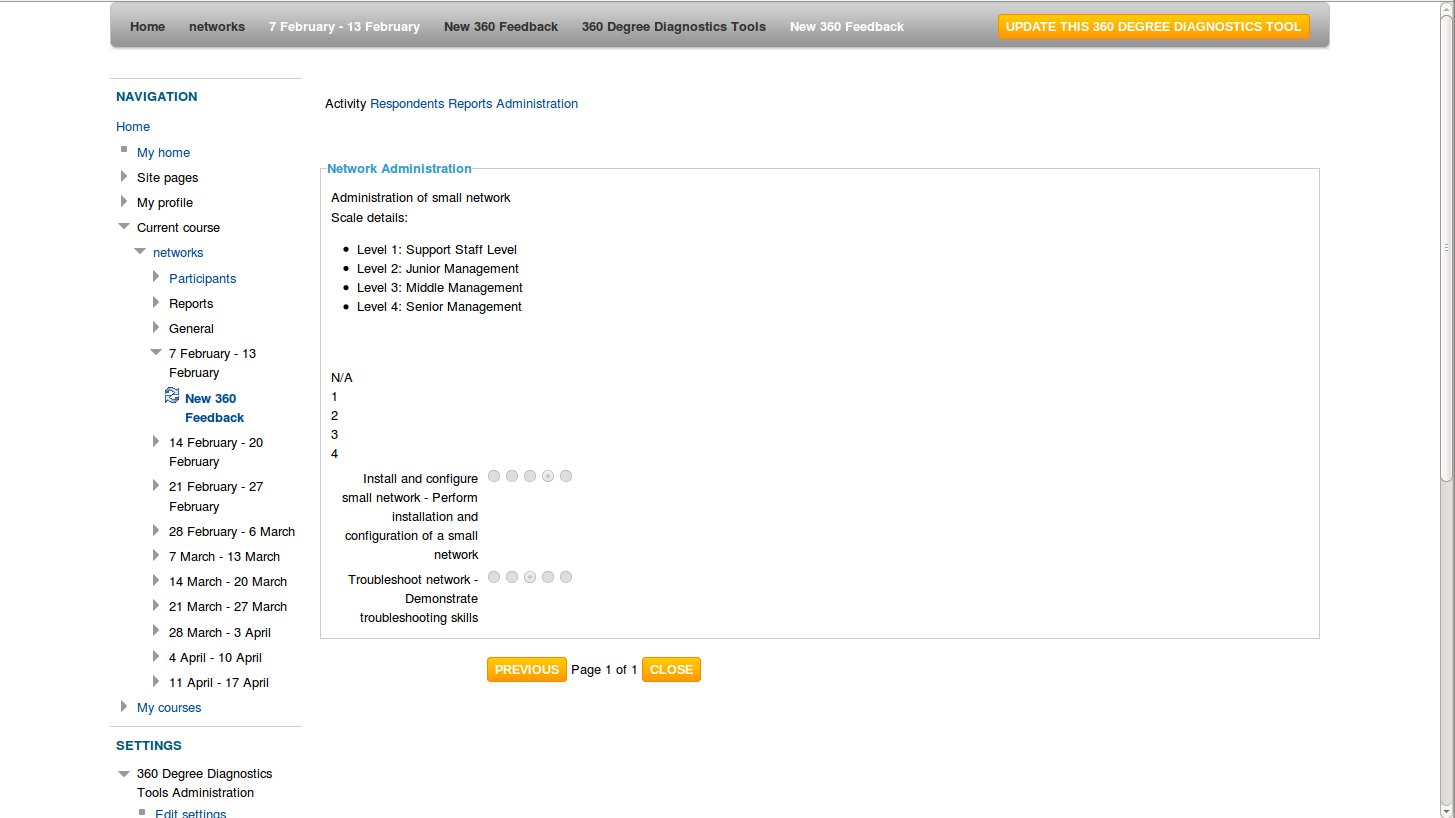
Administration:
This option allows to “Adds/Edit competencies” or “Carry over skills”.
As there is no competencies defined yet, we will add a new competency:
Click “Add a new competency”.
We will name this competency “Network Administration” and add a description.
Next we will add skills: “Install and configure small network” and “Troubleshoot network”, also adding a description to each of them.
Click “Save”.
Now we can see new competency displayed in the table in “Administration” section and showing name of competency, description, skills, feedback (yes/no) and option to edit or delete.
If we click “Edit” we will see the form that we just filled in where we can amend any information that we entered earlier. Currently there are space for 4 skills, but there is a button on the bottom of the form that allows to add 2 additional skills on each click (e.g. if clicked twice we will end up with space for 8 skills to enter).
Log out.
Log in as student who is enrolled in “Networks”.
Go to the course and click on “New 360 Feedback”.
This will bring user to the home page of the tool, which is “Activity”.
At this point clicking on “Respondents” or “Reports” will display no information as nothing is completed yet.
In the “Activity” section, student can see only his/her own profile.
There is “Self” and “Job Profile” with option to “View” against each of them.
First, we click “View” for “Self” profile.
This will bring form with label “Network Administration” (which is the name of competency we have created earlier).
Inside the form we can see skills that we entered earlier listed with 5 radio buttons beside each of them.
These buttons allows to supply rating on scale 1-5.
So, let's mark “Install and configure small network” as 5 and “Troubleshoot Network” as 4.
Click “Finish”.
At the “Activity” section we can see that table now displaying “Date Completed”.
Clicking “View” will bring us back to the evaluation page, but we will not be able to amend any information on it, only view.
Next, click on “Respondents”. It will bring form which allows to invite respondents by entering respondent's e-mail address and specifying the type of respondent.
For this example, we invite 2 respondents:
tania.roche.tr@gmail.com as “peer”
tania.roche@enovation.ie as “peer”
Next, we check e-mail address tania.roche@enovation.ie, open the message and click on the link inside the message. It will bring us to review form. On the top of the form we can see greeting message, which is confirming identity of respondent by displaying e-mail address and also states who's review it is.
For this example, we will mark “Install and configure small network” as 4 and “Troubleshoot Network” as 3. This is a bit lower than student rated herself.
Click “Finish”.
We should see confirmation message:
“Thank you for assessing this user.
You may now close this window.”
Next we check e-mail address tania.roche.tr@gmail.com and perform all the same steps, but we will mark “Install and configure small network” as 3 and “Troubleshoot Network” as 2. Even lower than previous 2 reviews (this is just to give some range for testing purposes).
Now if we go to “Respondents” section and choose this student, we will see the “Completion Date” in the table showing the date when respondents completed the review.
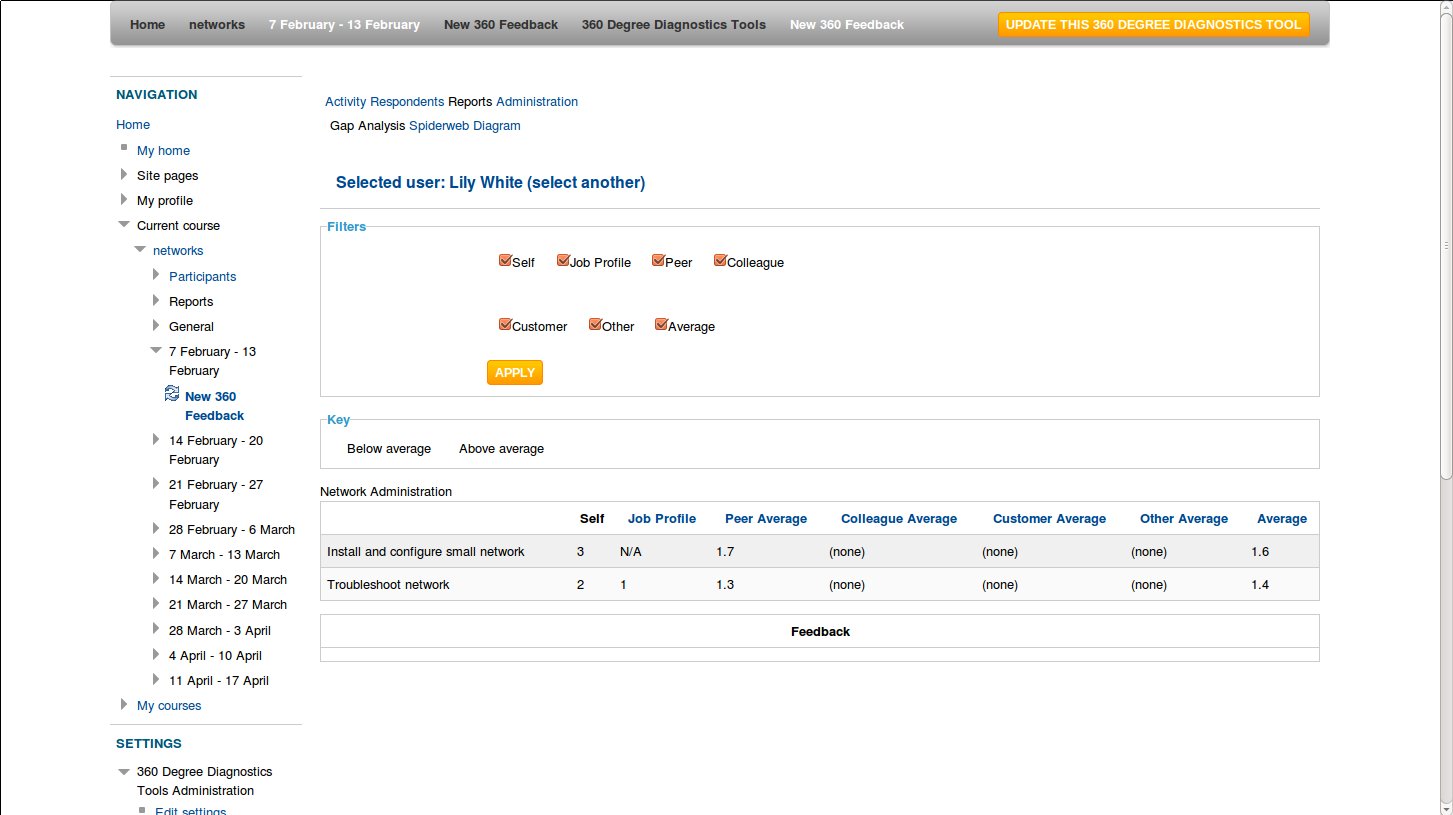
Reports:
This section is displaying reports based on the evaluation data.
It is possible to configure report using filters. To do so, just select tick-boxes that correspond to the options you wish to display in the table/chart.
Click "Apply" and report will be generated displaying evaluation information about selected user.
Settings:
When logged in as admin, we can see settings block showing.
- Edit settings
- Locally assigned roles
- Permissions
- Check permissions
- Filters
- Logs
- Backup
- Restore
Edit settings:
Clicking on this option allows to edit the following settings of 360 Feedback tool: Name, Competencies carried, number of required respondents, group mode (No Groups, Separate Groups, Visible Groups), visibility (show/hide) and ID number.
Note: ID number is only needed if this 360 Feedback will be used in grading.
Locally assigned roles:
Allows to assign following roles locally (teacher, non-editing teacher and student).
When clicking on any of those options, list of users enrolled in this course is displayed. We can then assign roles as needed.
Permissions:
This option lists all the capabilities associated with this 360 Feedback tool. Each capability has roles associated with it. For example, “Delete external respondents from a user's list” has Non-editing teacher, Teacher and Manager associated with it. It means that anyone who has one of those roles, can delete external respondents from user's list.
There is also option to define role or roles that is prohibited to perform the action.
Important: there is column called “Risks” which is displaying icons representing various security risks associated with changing default permissions.
Check permissions:
This option allows to see what kind of permissions any particular user has in this 360 Feedback module.
Filters:
Currently there are two filters “Activity names atuo-linking” and “Multimedia Plugins”. Both filters are “On” by default.
Logs:
This option allows to view report of activities performed on this 360 Feedback module.
It is highly configurable with the following options present:
Course name – allows to choose the course
Participants – allows to choose “All” or specify particular participant.
Date - “All days” or choose other date available.
Module – can choose any, for example, forum or 360 Feedback module.
Actions – can choose “All actions”, “View”, “Add”, “Update”, “Delete”, “All changes”.
Format of displaying - “Display on page”, “Download in text format”, “Download in ODT format”, “Download in Excel format”.
Backup:
This option allows to backup 360 Feedback module and information associated with it. However, it is possible to choose which information to backup and which not.
Restore:
This option allows to restore previously saved 360 Feedback module and information associated with it.
Screenshots: