Theme settings
An administrator can change theme settings in Administration > Site administration > Appearance > Themes > Theme settings.
Theme list
This lists the themes available for course and user themes. Leave this blank to allow any valid theme to be used. If you want to shorten the theme menu, you may specify a comma-separated list of names, though don't use spaces (e.g. standard,orangewhite).
You can preview the available themes in Administration > Site Administration > Appearance > Themes > Themes selector.
Theme designer mode
Turn this on if you are designing and testing themes as it will stop the themes being cached and enable you to see theme changes quickly. (You can also do this with the Clear theme cache button on the theme selector page.)
Allow user themes
If the option allowuserthemes is enabled, each user may select their preferred theme on the edit profile page. All Moodle pages will be displayed in the user's theme, apart from courses where a course theme has been set.
NOTE: the user's theme will not be available in mobile and tablet devices unless the option enabledevicedetection is unchecked.
Allow course themes
If you enable this, then teachers will be able to set their own course themes. Course themes override all other theme choices (site, user, or session themes).
- If the option allowcoursethemes is enabled, each editing teacher may select their course theme via the Force theme option on the Course settings page. The course will always be displayed in the theme specified in the course setting, with user and the site themes being overwritten.
NOTE: the course theme will not be available in mobile and tablet devices unless the option enabledevicedetection is unchecked.
Allow category themes
When enabled, themes can be set at the category level. This will affect all child categories and courses unless they have specifically set their own theme. WARNING: Enabling category themes may affect performance, as it will result in a few extra DB queries on each page, so only turn this on if you need it!
NOTE: the category theme will not be available in mobile and tablet devices unless the option enabledevicedetection is unchecked.
Allow theme changes in the URL
- If this is checked then the theme may be changed by adding
?theme=theme_name(or&theme=theme_nameif there are other URL parameters) to the URL in the browser.
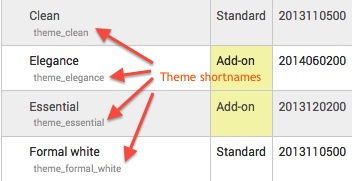
Theme names used as the URL parameter should be the shortname of the theme, which you can see in Site administration > Plugins > Plugins overview and scroll down to the Themes section near the bottom. Remove the "theme_" prefix to find the proper shortname. Theme shortnames are usually the same as the main theme name, eg. Clean is 'clean', so your URL parameter for it will be: ?theme=clean. Shortnames are always lower case. Themes with multiple words are usually the same but spaces are replaced by underscores, for example the theme "Formal white" should be entered as ?theme=formal_white.
Tip: You can turn this on to aid in troubleshooting problems that may be theme related. This will allow you to switch to a standard or different theme for your own session without affecting other users or the site theme.
Allow users to hide blocks
Allows users to display and hide blocks
Allow blocks to use the docks
- If the theme allows it, then checking this will allow the user to move blocks to the side dock.
| Note: The Boost theme does not support submenus in the custom menu setting. |
The custommenuitems setting allows you to create a drop down menu that can be displayed by themes that support it.
You are able to create the custom menu by entering custom menu items one per line into the setting. Each item is preceded by a number of hyphens (-), the number of hyphens determines the depth of the item. So items that are NOT preceded by a hyphen appear on the top level of the menu (always visible), items with a single hyphen appear on a drop down menu below the previous top level item, and items with two hyphens appear on a drop down menu below the previous first level item and so on - if the theme allows submenus.
The content of each item is constructed of up to three bits, each separated by a | (Shift + \) character. The bits are label | url | tooltip.
- label
- This is the text that will be shown within the menu item. You must specify a label for every item on the menu.
- url
- This is the URL that the user will be taken to it they click the menu item. This is optional, if not provided then the item will not link anywhere.
- tooltip
- If you provide a URL you can also choose to provide a tooltip for the link that is created with the URL. This is optional and if not set the label is used as the tooltip for the menu item.
The following is an example of how you would create a custom menu:
Moodle community|http://moodle.org
-Moodle free support|http://moodle.org/support
-Moodle development|http://moodle.org/development
--Moodle Tracker|http://tracker.moodle.org
--Moodle Docs|https://docs.moodle.org
-Moodle News|http://moodle.org/news
Moodle company
-Moodle commercial hosting|http://moodle.com/hosting
-Moodle commercial support|http://moodle.com/support
Note: The custom menu does not escape characters within the label. If you want to use a special HTML character such as an ampersand you must escape it yourself within the label. e.g. use & instead of &.
Multilanguage support
You can add a language code (or a comma separated list of codes) as the 4th item of the line. The line will be then printed if and only if the user has currently selected the listed language. For example:
 English only|http://moodle.com|English only item|en
 German only|http://moodle.de|Deutsch|de,de_du,de_kids
Adding other attributes to the HTML
Other attributes, such as target can be added:
Moodle Homepage|http://moodle.org" target="_blank
The first quote closes the href attribute, allowing other attributes to be added. Do not add the closing quotation mark on the final attribute, it is added automatically by Moodle.
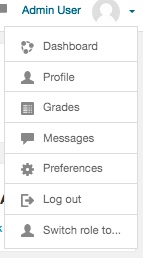
The customusermenuitems setting allows you to add or remove items from the user menu.
Three items, Dashboard, Profile and Log out are automatically created and can not be changed.
Other user menu items can be set in this area by removing them, reordering them, or adding custom ones. There are three default items:
grades,grades|/grade/report/mygrades.php|grades
messages,message|/message/index.php|message
preferences,moodle|/user/preferences.php|preferences
The format for each is the | "pipe" character delineating three parts:
- a string in "langstringname, componentname" form or as plain text
- a path to a file to run
- an icon either as a pix icon or as a path to a file URL
Notes:
1) You can refer to a language string in the users language pack by its string name. For example, in the third line above for the default settings, "preferences" is the name of the language string, and "moodle" is the language file it is located in. See Language customisation for more information. If you put a text here instead of a reference to a language string, that text will always show up and not be language specific.
2) The examples are to php files inside the Moodle site, so "/message/index.php" is the path on the current Moodle instance. You could also put a path or URL here to files outside of Moodle as well.
3) The example defaults of icons point to files in the /pix/t/ directory on the Moodle server. You can use any of the pre-existing icon names there (without a file extension). You can add your images to that directory to expand the icon list, or you can prefix the icon name with ../ if you want to use icons from other pix folders. Alternatively, you can use a URL to point to a file elsewhere. "Icon" files are in both png and svg format.
Tip: If you do not specify an icon, the Moodle will supply the gear icon that is used by "Preferences" next to the entry.
Custom item example:
Help Center|/course/view.php?id=2|check
This will add item called "Help Center" which links to a course on the same site with id=2 which has been set up as a help center for all users, and it will show using the standard check mark icon.
Enable device detection
If a tablet or mobile theme is set, AND the user is using a tablet or mobile, theme associated with the device is used, always overriding the course, category or user theme.
If no tablet or mobile theme is set, course, category or user themes will be used.
Device detection regular expressions
This will allow you to customize the theme selector options. For example, you can add a custom theme for IE6 and another for Windows CE by entering the identifying expressions the browser sends and the "Return value" you want to display as the theme selectors "Device type".
Special themes
Session themes
Moodle offers an additional way to set a theme - the session theme. This is set with the URL and lasts until you log out. When you next login, the site/course/user themes are active again. This option is great for theme testing and works perfectly when you want to enable different themes for different situations.
For example you can offer a special link for PDA users and integrate the session theme orangewhitepda in that link. Nobody needs to change any settings, you just click on that link. The session theme is called by the URL parameter &theme=orangewhitepda. The whole URL without the session theme could look like http://mymoodlesite.org/course/view.php?id=18 and with the parameter for the PDA theme like "http://mymoodlesite.org/course/view.php?id=18&theme=orangewhitepda".
In a standard Moodle installation, session themes are not active. To activate them the administrator must add the parameter $CFG->allowthemechangeonurl = true; to the Moodle config.php file in the Moodle base directory.
Page theme
A page theme is for special page-only themes set by code, use $PAGE->force_theme().
Theme hierarchy
Here is the usual order that themes are considered by the Moodle interface.
| Theme type | Overwrites | Display | Setting type |
|---|---|---|---|
| Site | - | all pages* | saved in theme profile |
| User | Site theme | all pages* | saved in user profile |
| Course | Site, user and session themes | one course | saved in course profile |
| Session | Site and user themes | all pages* | temporary until logout |
(* except courses with the course theme set)
Change default hierarchy
The priority of themes can be set via the /moodle/config.php file. The order defines which theme wins when there are several set at different levels. You can set a variable called $CFG->themeorder (see config-dist.php for more details). By default it is set to:
$CFG->themeorder = array('course', 'category', 'session', 'user', 'site');
Particular theme settings
Logo, tagline, link colour, column width, custom CSS and other settings for a particular theme may be set by an administrator in Administration > Site administration > Appearance > Themes > Theme name.
See also
- Moodle Theme Settings Page MoodleBites video on YouTube


