Course homepage: Difference between revisions
Helen Foster (talk | contribs) m (removing course appearance template) |
Helen Foster (talk | contribs) (Creating a course, update templates) |
||
| Line 1: | Line 1: | ||
{{ | {{Creating a course}} | ||
{{Update}} | |||
== Standard view of a blank course== | == Standard view of a blank course== | ||
Our examples will be for a course homepage that is the standard default for a new install on a site. There are many course options that determine a course's appearance and make it look very different from our examples. The example course has a header, a footer (both content largely determined by a theme) and 3 columns in the middle. | Our examples will be for a course homepage that is the standard default for a new install on a site. There are many course options that determine a course's appearance and make it look very different from our examples. The example course has a header, a footer (both content largely determined by a theme) and 3 columns in the middle. | ||
| Line 12: | Line 11: | ||
{| style="width:75%; height:200px" border="1" | {| style="width:75%; height:200px" border="1" | ||
|- | |- | ||
| Column left || | | Column left || Course sections - Center || Column right | ||
|- | |- | ||
|- | |- | ||
| *1 [[Course_settings#Full_name|Course full name]] || *7 Section header & [[News forum|News topic]] || *10 | | *1 [[Course_settings#Full_name|Course full name]] || *7 Section header & [[News forum|News topic]] || *10 Login information | ||
|- | |- | ||
| *2 [[Course_settings#Short_name|Navigation bar]] ||*8 Current week - First section || *11 | | *2 [[Course_settings#Short_name|Navigation bar]] ||*8 Current week - First section || *11 Turn editing on button | ||
|- | |- | ||
| *3 [[Course_settings#Summary|Course description]]|| *9 Future week - Second section|| *12 [[Latest News block|Latest news]] | | *3 [[Course_settings#Summary|Course description]]|| *9 Future week - Second section|| *12 [[Latest News block|Latest news]] | ||
|- | |- | ||
| *4 | | *4 Participant list|| || *13 [[Upcoming Events block|Upcoming events]] | ||
|- | |- | ||
| *5 [[Forum module|Forum list]]|| || *14 [[Recent Activity block|Recent activity]] | | *5 [[Forum module|Forum list]]|| || *14 [[Recent Activity block|Recent activity]] | ||
|- | |- | ||
| *6 | | *6 Course administration block || || | ||
|} | |} | ||
==Moving elements on your course's homepage== | ==Moving elements on your course's homepage== | ||
| Line 65: | Line 41: | ||
#turn editing on | #turn editing on | ||
#click the up or down arrow to move the section | #click the up or down arrow to move the section | ||
===To move a Resource or Activity=== | ===To move a Resource or Activity=== | ||
| Line 74: | Line 49: | ||
==Moving by dragging and dropping== | ==Moving by dragging and dropping== | ||
If the administrator has enabled Ajax for the site and course editing in ''Settings>Site Administration>Appearance>Ajax and Javascript'' then the icon will appear as a crosshair which may be dragged and dropped to wherever you want to move the section or individual item to. | If the administrator has enabled Ajax for the site and course editing in ''Settings > Site Administration > Appearance > Ajax and Javascript'' then the icon will appear as a crosshair which may be dragged and dropped to wherever you want to move the section or individual item to. | ||
==Tips and tricks== | ==Tips and tricks== | ||
| Line 114: | Line 89: | ||
Note: The method in Moodle 2.0 will be slightly different. See MDL-24316 for details. | Note: The method in Moodle 2.0 will be slightly different. See MDL-24316 for details. | ||
[[es:course/view]] | [[es:course/view]] | ||
Revision as of 14:10, 21 October 2011
This page requires updating. Please do so and remove this template when finished.
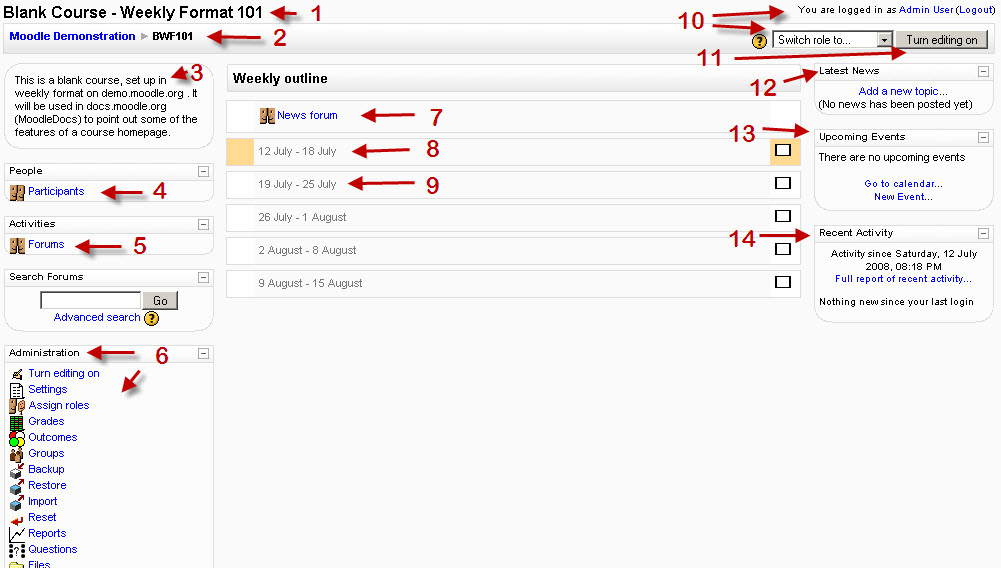
Standard view of a blank course
Our examples will be for a course homepage that is the standard default for a new install on a site. There are many course options that determine a course's appearance and make it look very different from our examples. The example course has a header, a footer (both content largely determined by a theme) and 3 columns in the middle.
Here are basic elements of a course page and links to Moodle documentation.

Parts of a course homepage
Using the above image, here are the parts of a course homepage. It is possible to move and hide parts of the page, so not all courses will look like this.
| Column left | Course sections - Center | Column right |
| *1 Course full name | *7 Section header & News topic | *10 Login information |
| *2 Navigation bar | *8 Current week - First section | *11 Turn editing on button |
| *3 Course description | *9 Future week - Second section | *12 Latest news |
| *4 Participant list | *13 Upcoming events | |
| *5 Forum list | *14 Recent activity | |
| *6 Course administration block |
Moving elements on your course's homepage
There are some variations in how you move things around on your course's homepage. Moving whole Blocks (the regions to the side(s) of the screen) is different from moving Sections (the central stack of regions in Topic or Weekly format where the main content is displayed) or their individual resources and activities.
To move a Block
Blocks appear at the side(s) of your course area. To move one,
- Turn Editing On and *click and release* the Block's crossed arrows icon. Place holders - zones with a dashed border - appear on the screen indicating the possible areas where your Block can appear.
- Click the placeholder where you want the Block appear. On course area homepages, you can move Blocks from one side to the other, but not into the middle.
- The block should now appear in the location you chose.
To move a Section
To move a Topic or Week section:
- turn editing on
- click the up or down arrow to move the section
To move a Resource or Activity
To move an individual Resource or Activity within or between sections:
- click the up/down arrow
- Empty boxes will appear and your chosen item will temporarily disappear from view.
- Click into an empty box where you want your item to be moved to and it will reappear in its new location.
Moving by dragging and dropping
If the administrator has enabled Ajax for the site and course editing in Settings > Site Administration > Appearance > Ajax and Javascript then the icon will appear as a crosshair which may be dragged and dropped to wherever you want to move the section or individual item to.
Tips and tricks
Make your course home page look more like a regular webpage
Often when a course has a lot of content, students and teachers find the long scrolling tedious and would prefer a 'neater' appearance with hyperlinks to sections in a similar way to the way pages on websites work.
- Anchors/section links can help. But the course page can still be long.
- Hiding the activities shortens the list for students, but then they can not be selected by students.
One method which might be useful is to put the activities into sections which are then made 'unseen' to the student.
Basic Example
- Set the number of topics in the course setting to 1 more than students will see.
- For example, you plan on the students being able to see 6 topics, set it for 7.
- Add activities in topic 7, such as a quiz (in our example)
- Get the url of your quiz
- Copy it and keep it somewhere (such as notepad) for later use
- Go back to course admin>settings and change your topic/weeks to 6
- Or one fewer than you had before
- The section with your quiz will no longer be on the page that the student sees
- In another section, make a hyperlink to the quiz using its url
- You can also put it in a topic summary, label or
- as a resource (link to a file or website)
You will find that the quiz is accessible to students even though the section does not physically appear on the course page for the students. You have shortened the page.
More advanced example
- There is a youtube video that gives an example of how to do this here
- You can actually set up your whole course using this method.
- Set your course to have two topics (or more if you wish)
- Ignore topic 1 - do not place anything in it.
- In topic 2, use the resource: Compose a webpage to make webpages relating to your units of work/topics
- Add all your resources to topic 2
- Copy the resources urls into the relevant webpage as hyperlinks
- In topic 0, the course summary make hyperlinks -or better- images hyperlinked - to each webpage which contains the activities of that unit/topic
- Go back to course settings and set the number of visible topics to 1.
The student will only see the top of the page. When they click on a link in the header, they are taken to the hidden webpage resources, where they select the resource or activity they wish. This creates a very short visual page but keeps all the course material within the course.
Note: The method in Moodle 2.0 will be slightly different. See MDL-24316 for details.