Overview
Tenants are isolated entities with their look and feel, structure, users, and learning entities. They are critical for when you wish to represent multiple self-contained business entities in your organisation.
Multi-tenancy has been implemented as a single instance of Moodle Workplace that serves multiple client organisations (tenants), where its data and configuration are virtually partitioned, and each client organisation works with a customized virtual application instance.
Multi-tenancy is the ability to enable the configuration for multiple tenants with different themes and permissions, keeping them separated so that users in one tenant cannot see the users in another. Each tenant has its own users, hierarchies, roles, dynamic rules, theme settings, reports, and learning entities (courses, programs, and certifications).
All Moodle Workplace tools are multi-tenant-aware - depending on the features, different levels of multi-tenancy are supported.
Managing tenants
The main administrator or a user with the capability tool/tenant:manage can access the management of tenants via Site administration > Users > Organisation > Manage tenants or directly via the All tenants icon in the Workplace launcher.
For each active tenant, you see the Tenant name, the number of assigned Users, Category, and up to two Login URLs. You will see the usual Workplace icons (Manage, Edit, and Archive) to the right of each tenant.
A default tenant has been created during installation, and at least one user has already been assigned to it (the site admin account). After upgrading from Moodle LMS to Moodle Workplace, all users will belong to the default tenant.
Each tenant can have a top-level course category attached to it. Note that a course category can only be attached to a single tenant.
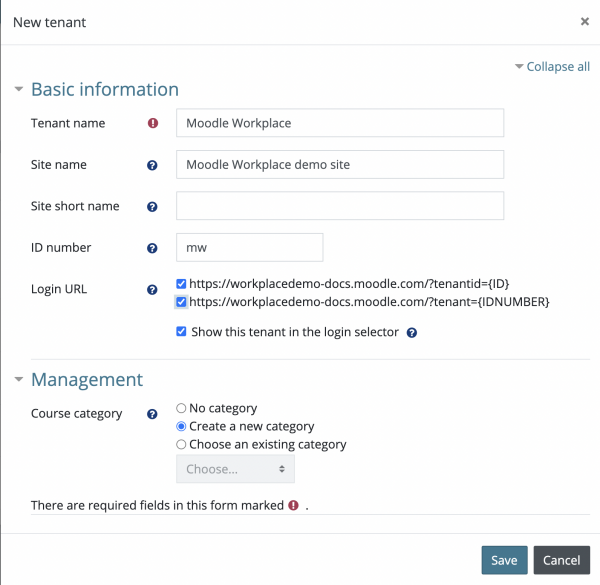
To create a new tenant, click on the +New tenant button. You will then see a pop-up screen and a range of tenant details.
- Tenant name (Required) Name of the tenant. While multiple tenants can have the same name, it is recommended that you use different names for different tenants.
- Site name and Site short name Site name and Site short name are effectively the same as the full site name and the short name for the site settings used for the front page in Site administration > Front page settings. Once a tenant is active (either by selecting it via the tenant switcher or when a user belongs to a tenant), the tenant settings will override the site settings.
- ID number A unique identifier for your tenant. It is used when uploading users via the upload user tool or connecting to external systems via web services or as a parameter in the login URL.
- Login URL There are two selections available to access the login directly: one containing the ID number and the other an internal numeric tenant ID (the default tenant always has ID=1 and cannot be changed). The internal tenant ID is not available during tenant creation. As a consequence, the login URLs are displayed as tenantid={ID} and tenant={IDNUMBER}, respectively
- Course category Courses that belong to a particular tenant have to be located in a tenant category. There are three options for the Course category choice:
- No category: No tenant category is selected (default).
- Create a new category: A top-level course category with the same name as the tenant name is created.
- Choose an existing category: All top-level categories that are not already assigned to any other tenants are available for selection.
Moodle Workplace also supports courses that are shared across tenants.
Three roles are created automatically during the Workplace installation and are assigned automatically to the following users:
- Tenant administrator: Assigned to the tenant administrator (in the system context).
- Tenant administrator in the course category: Assigned to the tenant administrator (in the context of the course category of the tenant). Also known as tenant manager.
- Tenant user: Assigned to all tenant users (in the context of the course category of the tenant). By default, this role only has the capability 'moodle/category:viewcourselist'
You cannot delete these three roles, nor can you change their assignments. However, as a site administrator, you can modify these roles if necessary. For example, the "Tenant administrator" role by default contains the capability tool/tenant:managetheme that allows the tenant administrator to change the look of their tenant (logo and colours). The main administrator may decide that theme customisation should only be done centrally and prohibit this capability in the "Tenant administrator" role. The same can be done for the tool/tenant:manageusers capability.
Once you have added a tenant, you will be redirected to the Users tab, where you should add a tenant admin.
Tenant Users
When dealing with tenant users, two fundamental rules apply:
- A user is always assigned to a tenant; that is, an account cannot be tenantless.
- A user cannot be assigned to more than one tenant; an account always belongs to a single tenant and a single tenant only.
When a new user account is created, whether by self-registration, manual entry, batch upload, or via web services, it is always attached to the default tenant, unless specified otherwise. The following diagram illustrates how users are assigned to tenants:
Each user belongs to precisely one tenant. Each tenant can have zero, one, or many tenant administrators. By default, a tenant admin has permission to manage tenant users, manage tenant roles, configure authentication settings, and adjust the tenant branding.
You can manage all tenant users and also add new users to the tenant in the Users tab. The required capability is tool/tenant:manageusers.
To add a new tenant user manually, select the +New User button. The screen contains the same information as the standard user form, plus an extra Tenant administration section at the bottom where you can assign the user tenant administration rights.
If a course category has been assigned to the tenant, the tenant administrator is automatically assigned the tenant manager role in this category; this means they have permission to create courses, assign roles, etc. Access to the course management is done through Workplace launcher > Courses.
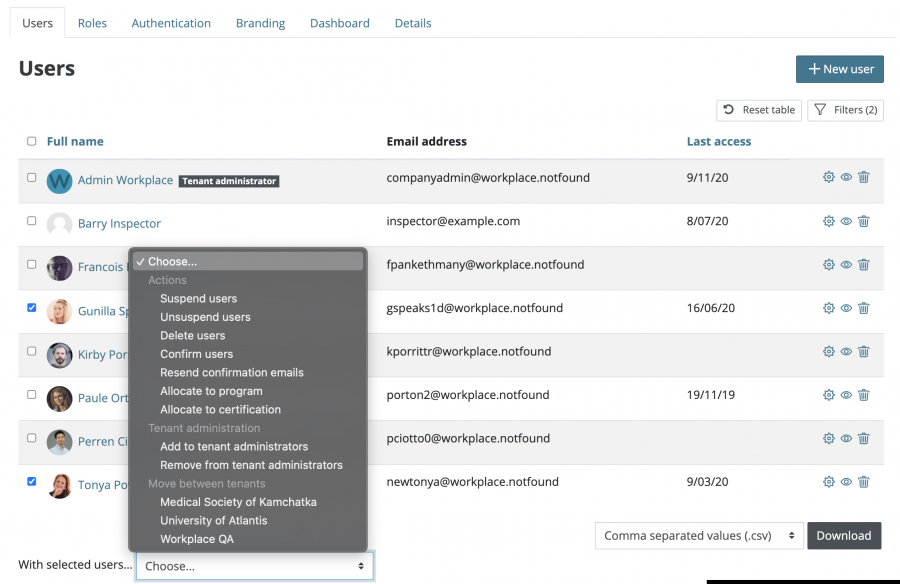
Using the drop-down menu at the bottom, a tenant administrator has the following options:
- Suspend or unsuspend users
- Delete users
- Confirm users
- Resend confirmation emails
- Allocate to program or certification
The site administrator is presented with the ability to perform the following additional actions:
- Add or remove to tenant administrators (role)
- Move to another tenant (tool/tenant:allocate capability required). None of the user data, such as courses or certification completion, will be affected by this.
As a tenant administrator, you can also batch upload users via the Upload users tool. A tenant is matched by its tenant ID number.
If the user also has the tool/tenant:allocate capability, they will be able to specify a tenant when uploading users (both when creating new users and updating existing ones). If the user does not have this capability, users can only be created and updated in their own tenant.
Since a user cannot be tenantless, it is impossible to remove tenant allocation. However, you can move a user from one tenant to another by replacing the old tenant in the CSV file with the new value.
Multi-tenant support for user profile fields
Moodle's user profile fields have been extended to allow the definition of different user profile fields per each tenant. When creating or editing a user profile category in Site administration > Users > User profile fields, the following three self-explanatory options are available:
- This category is available to all tenants (including future ones)
- This category is available to the following tenants...
- This category is available to all tenants except the following...
When profile fields belong to tenant-specific categories they will only appear in the profile for users in those tenants; this also includes sign-up and edit forms.
User profile fields can be defined as identity fields (Site administration > Users > User permissions), which means that various user reports across Moodle Workplace will display the fields relevant to the current tenant.
Tenant Roles
The Roles tab is where the available roles and their assignment to users in the current tenant are displayed and managed.
By default, the Tenant administrator role has the capability tool/tenant:manageusers. Unless this capability has been removed from the role by the main administrator, the tenant administrator can create and edit users inside their tenant.
The tenant administrator can also assign other roles to their users, for example, "Program manager" or "Organisation structure manager" in the system context.
Suppose the tenant has its own course category. In that case, the tenant administrator also has a role "Tenant administrator in course category" in this course category and can assign roles in the context of this course category, for instance, "Course creator". For easier management, a single page lists all the roles that the tenant administrator can assign in both the System and Category context, which can be accessed via Workplace launcher > Users > Roles.
Each tenant user is automatically assigned the role Tenant user in the context of their tenant category. Even a site administrator cannot edit this role or assign it to any users manually to avoid confusion.
Tenant Authentication
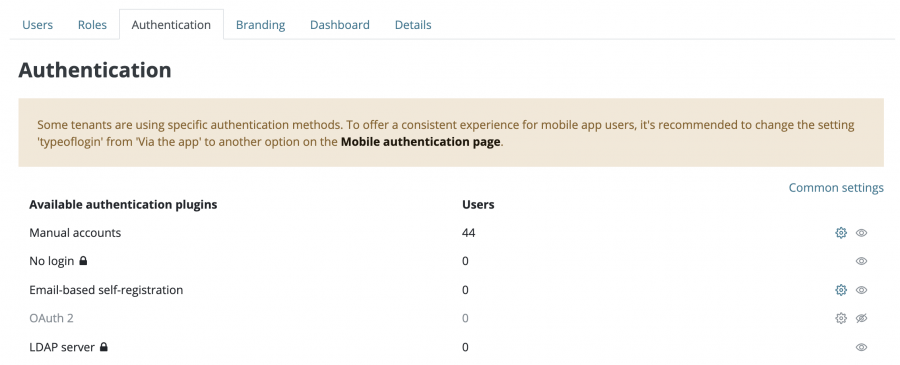
Moodle Workplace supports multi-tenancy for authentication; that is, you can configure different authentication options for different tenants. On the Authentication tab, all authentication plugins which have been enabled in Site administration > Plugins > Authentication > Manage authentication are shown.
Authentication methods that fully support multi-tenancy can be individually configured via the cogwheel icon. Authentication plugins that don't (yet) support multi-tenancy (indicated by the lock symbol) cannot be configured at the tenant level. It is further possible to deactivate individual authentication plugins via the Hide icon.
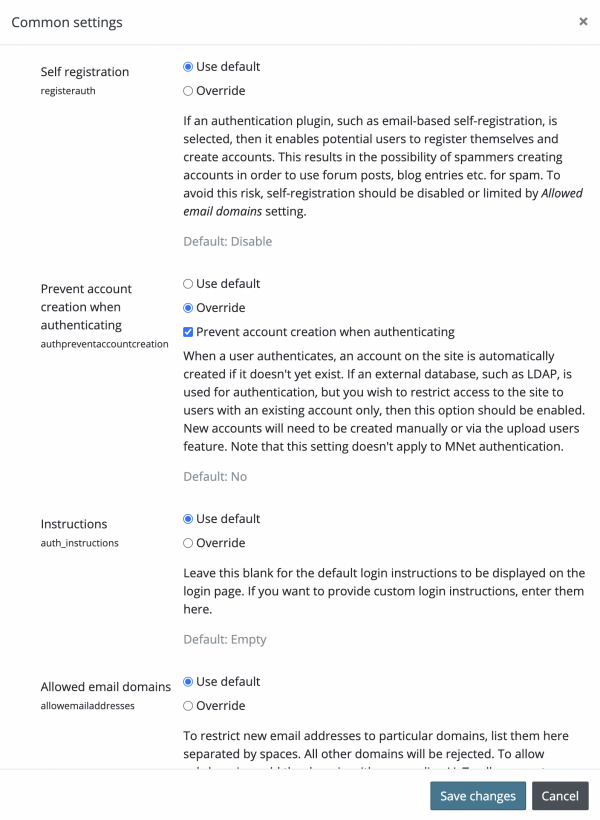
To override selected authentication settings such as authentication instructions and allowed domains, select the Common settings link. Here, you can modify general authentication settings for each tenant.
Site administrators can force some settings for all tenants via the Force for all tenants settings in the Common settings section in Site administration > Plugins > Authentication > Manage authentication.
Tenant admins can override common settings or settings for multi-tenant auth plugins using the Authentication tab. This feature requires the tool/tenant:authconfig capability, which is enabled by default for the Tenant admin role.
Details on configuring authentication plugins in a multi-tenancy setup can be found on the Multi-tenancy authentication page.
Tenant Dashboard
By default all tenants' dashboards are linked to the content defined in 'Default site dashboard page' and any modifications to the site default dashboard will appear for the new users in any tenant. Any user with the tool/tenant:managedashboard capability (Site admin and Tenant admin by default) can define a tenant-specific dashboard with the same editing capabilities as the core Dashboard. Tenant administrators are able to manage their tenant's dashboard and reset the configuration for tenant users.
Once the button "Create personalised dashboard..." is clicked, the tenant dashboard will no longer be linked to the content defined in 'Default site dashboard page'. Instead, it will become an independent dashboard page that can be configured individually via the Edit Dashboard button.
The Dashboard status will change from Linked to Un-linked. When the Remove personalised dashboard, use site default dashboard... button is clicked, the tenant dashboard will be linked back to the content defined in 'Default site dashboard page'.
The dashboard of new tenant users will be created from the default dashboard. Existing users will not be affected by changes to the linked or un-linked dashboard, respectively. However, they can be manually reset by clicking the Reset dashboard for all users... button.
Tenant Branding
The Branding tab lets you customise the look and feel of the tenant (the required capability is tool/tenant:managetheme). The available categories are Images, Colours, Advanced, and Reset. The tenant branding settings make use of the Workplace theme, where details about all appearance-related options are provided.
Tenant Details
In the Details tab, the meta-information about the tenant is displayed. Tenant administrators do not have access to the main tenant list, so this is the place where they can view data about the following fields: ID number, Site name, Site short name, Login URL, Administrators, and Course category.
Limiting the number of tenants
A site administrator can restrict the number of tenants that can be created on the site from Site administration > Advanced features > Enable tenant limit. Enabling this setting and configuring the Tenant limit to a specific value will prevent more than this number of tenants from being created.
It is also possible to add the following lines to your site configuration to hardcode this configuration:
$CFG->tool_tenant_tenantlimitenabled = true;
$CFG->tool_tenant_tenantlimit = <VALUE>;
Note that archived tenants, as well as Shared space, also counted towards this limit.
Limiting number of users
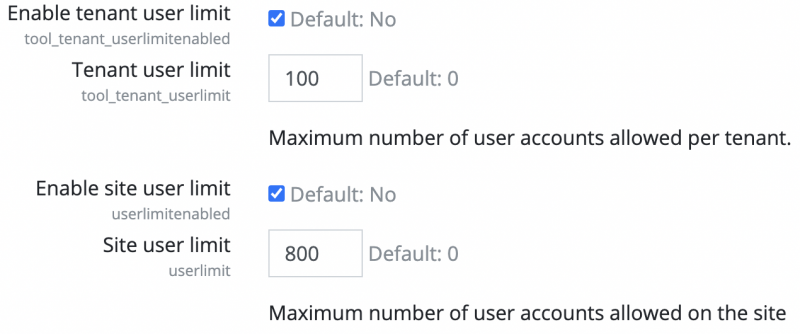
A site administrator can restrict the number of users per tenant and/or site-wide:
- Site-wide: the maximum number of users that can exist on the site
- Per-tenant: the maximum number of users that can exist in any tenant
These settings are available from Site administration > Advanced features. Suspended users count towards the limits.
When the site limit is lower than the number of current users on the site, no new users can be created. When the number of users reaches the tenant limit, no new users can be created in or moved to the tenant.
It is also possible to add the following lines to your site configuration to hardcode this configuration:
// Site limit.
$CFG->userlimitenabled = true;
$CFG->userlimit = <VALUE>;

// Tenant limit.
$CFG->tool_tenant_userlimitenabled = true;
$CFG->tool_tenant_userlimit = <VALUE>;
Archiving and Deleting Tenants
Moodle Workplace supports the archiving of tenants via the corresponding icon. Archiving a tenant performs the following two actions:
- All users are moved to the default tenant.
- The tenant is made unavailable throughout the site.
Note that the default tenant cannot be archived.
The Archived tenants tab gives you access to all non-active tenants. Here, you can either Restore or irrevocably Delete a tenant. A restored tenant keeps all its settings, roles, and theme variables. It also moves users back from the default tenant to the restored tenant. This reallocation does not apply to users who have already been moved out of the default tenant.
Sharing Entities
There are two ways that sharing across tenants can be facilitated:
- Shared Content: sharing of courses and certificates
- Shared Space: sharing of Moodle Workplace data such as programs or organisation structure
Typically each tenant has its own course category and hence its own courses. The manual enrolment method has been modified, so the user picker only displays users from the current tenant. However, there are scenarios where a business might want to have courses shared among tenants.
To provide courses across tenants, you need to create a course category and adjust the permissions as follows:
- In Site administration > Learning > Course and category management select Permissions from the options drop-down of the category that will contain the shared courses
- Filter by or search for the capability moodle/category:viewcourselist
- Grant permission to the Authenticated user role
Any courses that will be placed in the 'shared courses" category will be seen across tenants. The reason for this work-around is the moodle/category:viewcourselist capability is removed from the 'Authenticated users' role during the installation of Moodle Workplace to implicitly support multi-tenancy without breaking the compatibility with Moodle LMS.
Please note that multi-tenancy does not apply to the course content. This means that if a user (either a learner or a trainer) is enrolled in a course, they will see users from other tenants while browsing the course. This could be forum posts, the list of course participants, gradebook, reports, or any other module that displays course participants.
There are various reasons for this behaviour:
- Suppose the organisation wants to have shared courses. In that case, they may expect this behaviour since they want the learners to study together and/or the trainer from one tenant to be a trainer for all learners regardless of their tenant.
- It is simply impossible to modify all activity modules and reports to add multi-tenancy restrictions, especially considering that there can be third-party plugins.
- The same functionality can be achieved by using separate group mode if needed.
If you share courses between different tenants and you want users from each tenant to learn independently, they must belong to different groups, and the course has to be in separate group mode (preferably forced). Please review the "Trainer" and "Non-editing trainer" roles in the course and ensure that they do not have the accessallgroups capability. The trainers are also allocated to the relevant groups.
Allocation to separate groups is done automatically when a shared course is part of a program. See also how to share content across tenants via programs.
You can also share Certificate templates across tenants by selecting 'None' in the Course category selector (do not uncheck the "Available in sub-categories and courses").
Shared space enables the sharing of entities across all tenants. It works like a special tenant where users can create supported entities to be available in other tenants. The following Workplace tools are supported in Shared space:
Shared space is a special tenant to share Moodle Workplace entities among all tenants.
The site administrator has to enable the Shared space feature once using one of these two options:
- Choose Shared space from the tenant switcher and select Enable Shared space. If you select the Not now button, the option will be removed from the tenant switcher, and enabling the feature will only be possible from the tenant menu.
- Go to the tenant menu (via the Workplace launcher) and select Enable Shared space. The shared space will be created as before, and the option will reappear in the tenant switcher.
Note, enabling the Shared space feature cannot be undone. Once enabled, always enabled!
When you are in the Shared space, any supported entities created are available in all tenants. You can think of them as site-wide entities. Shared entities are labelled with a Shared space indicator.
Privacy considerations
All user information from each tenant is stored in the same database and the same table. However, by default, no personal data is shared from one tenant to the other, and they can remain unaware of any other tenants. This is to comply with Moodle's commitment to the GDPR requirement to implement data protection by default and by design. It is still open to the administrator to enable sharing for users from different tenants to see users from other tenants, including forum posts, list of course participants, gradebook, reports or any other modules that display course participants.
Certain professional or institutional bodies may require that data is not stored together with other entities. If you are required to physically separate tenants, unfortunately, you may not benefit from multi-tenancy and may need to set up separate sites.

