theme/custom theme/settings
The following information relates to Moodle 1.9 and NOT 2.4 as suggested by the icon at the top of this page.
The Custom Theme Settings page allows you to configure the appearance of your site when you are using custom_theme theme. Note that the changes you make in this page will be visible only when you have selected custom_theme from Site Administration > Appearance > Themes > Theme Selector.
Configuring the Custom Theme
The settings page provides you with the following options to customize your site:-
- Use a parent theme
- See note below
- Allows to use a parent theme on top of the Standard Moodle Theme.
- Upload your own CSS
- This will allow you to upload and use a CSS of your own choice. This uploaded style sheet will be applied after the Standard Moodle Theme and the parent theme (if selected any).
- If you have uploaded a CSS previously and want to make other changes without having to upload the CSS again, just uncheck the checkbox Use my own CSS.
- If you have uploaded a CSS previously and don't want to use it anymore, check the checkbox Use my own CSS and leave the Upload CSS field empty. This will delete your CSS file from the server.
- Upload your own Favicon
- This will allow you to upload and use a Favicon of your own choice. The Favicon is the small icon shown in the browsers in front of the URL. Note that you can upload only a .ico file as favicon.
- If you have uploaded a Favicon previously and want to make other changes without having to upload the favicon again, just uncheck the checkbox Use my own favicon.
- If you have uploaded a Favicon previously and don't want to use it anymore, check the checkbox Use my own Favicon and leave the Upload Favicon field empty. This will delete your favicon file from the server.
- Upload your own Moodle logo
- This will allow you to upload and use a Moodle logo of your own choice. Note that you can upload only a .jpg file as logo.
- If you have uploaded a Moodle logo previously and want to make other changes without having to upload the Moodle logo again, just uncheck the checkbox Use my own Moodle Logo.
- If you have uploaded a Moodle logo previously and don't want to use it anymore, check the checkbox Use my own Moodle Logo and leave the Upload Logo field empty. This will delete your Moodle logo file from the server.
- Other CSS elements
- You can also supply the values of various page elements that you want your site to use. These values can be added in hexadecimal or selected from the palette next to each element. If you don't want your site to use these values for the page elements, just uncheck the checkbox Also use following value.
Note - The parent theme feature has been included. It relies on Moodle cookies to work as it needs information about the currently logged user to extract the parent theme specified by him/her from the database. However, currently all Moodle Themes block cookies by setting $nomoodlecookie as true. Therefore, for the parent theme feature to work, the following line in styles.php of the theme that we have selected as parent must be commented out.
$nomoodlecookie = true;
When this line is commented out in the style.php the parent theme, the feature works. This is a one-time task and I suggest this line be left out in future theme releases to account for usability of parent theme feature of custom_theme.
What are these page elements
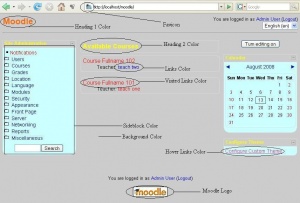
The various page elements that you can customize are shown in the image on the side.
The Final Appearance of Page
The way the final page looks after applying the custom_theme is decided by the following hierarchy:
- 1) Standard Theme.
- 2) Parent theme selected by the user (if any).
- 3) CSS file uploaded by the user (if any).
- 4) Favicon upload supersedes that of parent theme (if any).
- 5) Moodle logo uploaded supersedes that of parent theme (if any).
- 6) CSS element values entered by the user (if the user selects to use them).
