Using Assignment: Difference between revisions
Mira Vogel (talk | contribs) (Added section on offline marking with bulk upload of grades and feedback) |
|||
| (25 intermediate revisions by 5 users not shown) | |||
| Line 6: | Line 6: | ||
* Online text (students can type their responses directly in Moodle) | * Online text (students can type their responses directly in Moodle) | ||
* Submission comments | * Submission comments | ||
Notes: | |||
# It is also possible to use the assignment module for grading an "offline assignment", ie, one where work is done outside of Moodle. This is done by simply unchecking the above three options.}} | |||
# If you're not sure which assignment type best suits your needs, look at the section below [[#Which submission type suits you best?]]. | |||
==How do students submit their assignments?== | ==How do students submit their assignments?== | ||
| Line 91: | Line 92: | ||
== | ==Grading and feedback== | ||
When students have submitted their assignments, they can be accessed by clicking on the assignment activity. This will bring up the Grading Summary page. | When students have submitted their assignments, they can be accessed by clicking on the assignment activity. This will bring up the Grading Summary page. | ||
| Line 100: | Line 101: | ||
The Grading Table contains columns of information about the student, the status of their submission, a link to grade their submission, a link to each submission and feedback comments and files (if enabled). | The Grading Table contains columns of information about the student, the status of their submission, a link to grade their submission, a link to each submission and feedback comments and files (if enabled). | ||
===Filtering submissions=== | ===Filtering submissions=== | ||
A dropdown menu accessed from the 'Options' section allows you to filter submissions so you can for example quickly see which students have not submitted yet. | A dropdown menu accessed from the 'Options' section allows you to filter submissions so you can for example quickly see which students have not submitted yet. | ||
[[File:assignmentfilter.png]] | [[File:assignmentfilter.png]] | ||
===Allocating submissions to markers=== | |||
If you need to divide submissions between you can apply Groups to the Assignment and let markers know which Group(s) to mark. Note that because Group membership is not itself anonymised, this may make anonymised submissions that bit less anonymous, though as long as the Groups aren't very small this should be acceptable. | |||
An alternative is to use Marking Allocation - this allows anyone with a Tutor role to allocate one marker to each submission. This works particularly well if marking is allocated by subject specialism. | |||
===Submission status=== | ===Submission status=== | ||
| Line 151: | Line 156: | ||
#A confirmation displays. | #A confirmation displays. | ||
=== | ===Grading individual submissions=== | ||
If you have enabled File Feedback in the [[Assignment settings]] and wish to upload either the marked student assignment, a completed text based feedback document or audio feedback, click on the green tick in the Grade column (or use the icon in the Edit column and select Grade). | If you have enabled File Feedback in the [[Assignment settings]] and wish to upload either the marked student assignment, a completed text based feedback document or audio feedback, click on the green tick in the Grade column (or use the icon in the Edit column and select Grade). | ||
This brings you to the Student Grading Page where you can give grades, feedback comments and feedback files (if enabled in the [[Assignment settings]]). You can use drag and drop to upload feedback files. | |||
{| | {| | ||
| Line 163: | Line 168: | ||
====Annotating submissions==== | ====Annotating submissions==== | ||
{{New features}} | {{New features}}If the student has uploaded a PDF, docx or odt file, or if you set 'Comment inline' for an online text submission, then their submission will be displayed on the grading screen, allowing you to annotate it, using a variety of tools, stamps (if uploaded by the admin) and comments which may be saved to a comments bank. When the annotations are complete, clicking to save the changes will result in it being displayed to the student as part of their feedback. | ||
If the student has uploaded a PDF, docx or odt file, or if you set 'Comment inline' for an online text submission, then their submission will be displayed on the grading screen, allowing you to annotate it, using a variety of tools, stamps (if uploaded by the admin) and comments which may be saved to a comments bank. When the annotations are complete, clicking to save the changes will result in it being displayed to the student as part of their feedback. | |||
'' | '' | ||
[[File:Annotatingsubmissions1.png|thumb|500px|center|Annotating a student's submission]] | [[File:Annotatingsubmissions1.png|thumb|500px|center|Annotating a student's submission]] | ||
Comments may be added and then saved in a quick list for future use ''(1)'' Click the paper/magnifying glass icon to the right of the page selector to | Comments may be added and then saved in a quick list for future use ''(1)'' Click the paper/magnifying glass icon to the right of the page selector to filter comments you have already added to the work''(2)'': | ||
*In the '''Search comments''' pop-up window, enter the term you would like to search for in the '''Filter comments...''' box. | |||
*Clicking on the comment will take you to the part of the paper where that comment has been added. | |||
{| | {| | ||
|[[File:NFaddcomment.png|thumb|400px|1.Saving and re-using comments]] | |[[File:NFaddcomment.png|thumb|400px|1.Saving and re-using comments]] | ||
|[[File:NFcommentsearch.png|thumb|400px|2. Accessing comments]] | |[[File:NFcommentsearch.png|thumb|400px|2. Accessing comments]] | ||
|} | |} | ||
Note: To ensure that comments display to students as the marker intends, do instruct students to download the annotated PDF rather than just previewing it. Preview sometimes displays comments in a way which obscures the original text. | |||
Note: If you are unable to annotate student submissions, check with your administrator that [http://www.ghostscript.com/ Ghostscript] and [https://github.com/dagwieers/unoconv unoconv]] are installed. Make sure that unoconv is at least version 0.7 | |||
In Moodle 3.1.1 onwards, the review panel and / or the grading panel may be collapsed by clicking the icons at the bottom right of the screen. | |||
[[File:CollapseReviewPanel.png|center]] | |||
===Controlling when to notify students of graded work=== | ===Controlling when to notify students of graded work=== | ||
====Notifying as you mark==== | |||
If you need to notify individual students, one by one, as you mark, the '''Notify students''' checkbox is available when grading individual submissions. Choose Yes to notify the student immediately or No to grade without notifying the student. Assuming you are not hiding grades in the ways outlined below, then Moodle will send a notification. | If you need to notify individual students, one by one, as you mark, the '''Notify students''' checkbox is available when grading individual submissions. Choose Yes to notify the student immediately or No to grade without notifying the student. Assuming you are not hiding grades in the ways outlined below, then Moodle will send a notification. | ||
{{Note|How students receive Moodle notifications depends on your local default settings, and any changes students have made to those.}} | {{Note|How students receive Moodle notifications depends on your local default settings, and any changes students have made to those.}} | ||
| Line 188: | Line 198: | ||
[[File:notifystudents.png|center|thumb|500px]] | [[File:notifystudents.png|center|thumb|500px]] | ||
====Keeping grades hidden until a release date==== | |||
If you need to keep your grades and feedback hidden from students until marking is finalised, and then release them to all students at the same time, there are two alternatives. | |||
The first is to hide the item in the Gradebook. This | The first is to hide the item in the Gradebook. This approach may be best if there is only one marker. Do the following: | ||
#In your Moodle course '''Settings''', click on '''Grades'''; the | #In your Moodle course '''Administration''' or '''Settings''' block, click on '''Grades'''; and typically the '''Grader report''' page displays. (If not, click the '''View''' tab, then '''Grader report'''; a grid of participants and "gradeable" items displays). | ||
#Click on '''Setup''' beside the '''View''' tab. | |||
#Find | #Find the assignment (or '''Grade item''') whose grades you wish to hide, then click on the '''Edit''' drop-down menu and select '''Hide'''. The Eye icon in the menu will now display with a strikethrough that means the grades are hidden from students. | ||
#To reveal the grades to students, you can either: | #To reveal the grades to students, you can either: | ||
##Remind yourself to | ##Remind yourself to repeat steps 1-3 above but select '''Show''' beside the Eye icon. When the Eye displays without the strikethrough the grades will be shown to students. With this option you need to remember to change this setting when you want the students to see their grades. | ||
##Or if you prefer to set a time for the grades to be automatically revealed, click on the Cog | ##Or if you prefer to set a time for the grades to be automatically revealed, click on the '''Edit''' drop-down menu and select '''Edit settings''' by the Cog icon. This displays the settings for that grade item. Then click the '''Show more...''' link to display additional settings. Locate '''Hidden until''' and click its '''Enable''' checkbox and set the date and time when you want the grades to be revealed. With this option you need to get your marking done in time (or remember to change the date to give yourself more time). | ||
#To notify students that marks and feedback are available, use | #To notify students that marks and feedback are available, use the '''Announcements''' forum (formerly known as the '''News forum'''). | ||
{{Note|If you use this approach do communicate with any colleagues and remember to reveal the grades ultimately, since if grades remain hidden they can confuse the final grade calculations.}} | {{Note|If you use this approach do communicate with any colleagues and remember to reveal the grades ultimately, since if grades remain hidden they can confuse the final grade calculations.}} | ||
| Line 211: | Line 224: | ||
#Finally '''Save changes'''. | #Finally '''Save changes'''. | ||
===Offline marking - | If you would like the Moodle Assignment to have a setting for releasing grades and feedback to students please vote for this enhancement in the Moodle Tracker: https://tracker.moodle.org/browse/MDL-18722 | ||
===Offline marking - downloading and uploading multiple grades and feedback files=== | |||
If you don't have an internet connection or prefer to grade outside Moodle, you can do so (including with anonymous submissions). | If you don't have an internet connection or prefer to grade outside Moodle, you can do so (including with anonymous submissions). | ||
These easy stages explained below: | These easy stages explained below: | ||
| Line 220: | Line 235: | ||
#Upload the annotated submissions (if applicable). | #Upload the annotated submissions (if applicable). | ||
{{Note|You cannot upload marks and feedback to Moodle if you have enabled Rubrics or Marking Guides.}} | {{Note|You cannot upload marks and feedback to Moodle if you have enabled Rubrics or Marking Guides.}} | ||
====Before you start, enable the multiple file upload settings==== | |||
====Before you start, enable the | |||
Go to the settings of that assignment. | Go to the settings of that assignment. | ||
For Feedback types, ensure that the Moodle Assignment settings, Feedback comments, Feedback files, and Offline grading worksheet are ticked. | For Feedback types, ensure that the Moodle Assignment settings, Feedback comments, Feedback files, and Offline grading worksheet are ticked. | ||
====Download the submitted work==== | ====Download the submitted work==== | ||
#Click on the assignment name on the Moodle course homepage to access the summary page and click View all submissions; a page with the Grading Table displays. | #Click on the assignment name on the Moodle course homepage to access the summary page and click View all submissions; a page with the Grading Table displays. | ||
| Line 230: | Line 243: | ||
#In your file management software go to the place you saved the zip file. | #In your file management software go to the place you saved the zip file. | ||
#Extract the contents of the zip file, usually by double-clicking and following the prompts. Extract to a new folder so all the feedback files can easily be zipped back together later if you need to upload them with feedback. | #Extract the contents of the zip file, usually by double-clicking and following the prompts. Extract to a new folder so all the feedback files can easily be zipped back together later if you need to upload them with feedback. | ||
====Download the Grading Worksheet to record grades ==== | |||
====Download the | |||
#Next, to download the spreadsheet in which you'll enter the grades and brief comments, return to the Moodle Assignment page and from its Grading action drop-down menu choose Download grading worksheet and save that file (keep its csv file format). | #Next, to download the spreadsheet in which you'll enter the grades and brief comments, return to the Moodle Assignment page and from its Grading action drop-down menu choose Download grading worksheet and save that file (keep its csv file format). | ||
{{Note|Helpfully that downloaded worksheet will contain any existing grades and summary comments which have already been given for that assignment i.e. if marking has already started. However, to see pre-existing comments fully you may need to set your spreadsheet to 'wrap text' within cells.}} | {{Note|Helpfully that downloaded worksheet will contain any existing grades and summary comments which have already been given for that assignment i.e. if marking has already started. However, to see pre-existing comments fully you may need to set your spreadsheet to 'wrap text' within cells.}} | ||
====Grade and annotate (if applicable) the submitted work==== | ====Grade and annotate (if applicable) the submitted work==== | ||
After downloading the submissions and the grading worksheet: | After downloading the submissions and the grading worksheet: | ||
| Line 251: | Line 262: | ||
If you have separate feedback files to upload to students: | If you have separate feedback files to upload to students: | ||
#Save these within that student's folder. | #Save these within that student's folder. | ||
#You can give students multiple feedback files in this way e.g. annotations on their work along with a separate pro forma. | |||
{{Note|Don't change the name or location of the folder - Moodle needs this information to allocate the files correctly.}} | |||
Compress (zip) all the feedback files: | |||
#Locate the folder containing the feedback files in Moodle, select them all (Ctrl+A within the folder), then zip them: | |||
##Windows: Right click one of the selected files and Send to > Compressed (zipped) folder. | |||
##Mac: Right Click (or Ctrl+click) one of the selected files and click Compress. | |||
#They are now ready for upload (see below). | |||
====Upload the completed grading worksheet==== | ====Upload the completed grading worksheet==== | ||
When you are ready to upload grades and summary feedback: | When you are ready to upload grades and summary feedback: | ||
#Click on the assignment name on the Moodle course homepage to access the summary page and click View/grade all submissions. | #Click on the assignment name on the Moodle course homepage to access the summary page and click '''View/grade all submissions'''. | ||
#From the Grading action drop-down menu choose | #From the Grading action drop-down menu choose '''Upload grading worksheet'''. | ||
#Click Choose a file... and upload the grading worksheet to Moodle, or drag the csv file to the arrow and wait for the file name to appear in the box. | #Click '''Choose a file...''' and upload the grading worksheet to Moodle, or drag the csv file to the arrow and wait for the file name to appear in the box. | ||
#There is a checkbox to overwrite records that have been modified more recently in Moodle than in the spreadsheet - only check this if you want to spreadsheet to overwrite all Moodle records, including ones made more recently than the spreadsheet. | #There is a checkbox to '''overwrite records that have been modified more recently in Moodle than in the spreadsheet''' - only check this if you want to spreadsheet to overwrite all Moodle records, including ones made more recently than the spreadsheet. | ||
#Click Upload grading worksheet; a Confirmation box displays the students grades and feedback that will be imported - check this carefully. | #Click '''Upload grading worksheet'''; a Confirmation box displays the students grades and feedback that will be imported - check this carefully. | ||
#If you are | #If you are ready to proceed, click '''Confirm'''; a summary of updates displays. | ||
#Click Continue. | #Click '''Continue'''. | ||
====Upload feedback files (if applicable)==== | ====Upload feedback files (if applicable)==== | ||
( | #Click on the assignment name on the Moodle course homepage to access the summary page and click '''View/grade all submissions'''. | ||
#From the Grading action drop-down menu choose '''Upload multiple feedback files in a zip'''. | |||
#Click '''Choose a file...''' and upload the zipped assignments file to Moodle, or drag the compressed/zipped file to the arrow and wait for the file name to appear in the box. | |||
#Click '''Import feedback file(s)'''. | |||
#The Confirmation box will list all the feedback files and student names that will be imported. | |||
#Click '''Confirm'''; the next screen summarises the changes. | |||
#Click '''Continue'''. | |||
#From the page containing the Grading Table, you can check your feedback files by enabling Quick grading (see Options at the bottom of that page) and scrolling horizontally, if needed. | |||
For an assignment with no file submissions, see the discussion [https://moodle.org/mod/forum/discuss.php?d=336438 upload feedback files without student file submissions] for details of what to do. | |||
===Give the same feedback file to multiple students=== | |||
If you have high level feedback you want to give to an entire cohort, it is generally a good idea to give this feedback in the context of the assignment, rather than e.g. separately via a Forum. Moodle allows you to select some or all students and attach a single, common feedback file to their assignment feedback. This common feedback will appear to each student along with any other individual feedback files you have prepared for each. | |||
#Prepare the single file of feedback. | |||
#Click on the link to the Assignment; its summary page displays. | |||
#Click '''View all submissions'''; the assignment's Grading Table displays. | |||
#Use the checkboxes to select all or some students to receive the feedback (you may first prefer to configure the Grading Table to show as many students as possible on a single page). | |||
#Underneath the Grading Table click the '''With selected...''' menu, choose '''Send feedback files''', then click '''Go'''; a page displays a list of selected students above a file upload area. | |||
#Upload the file of feedback you prepapred, or drag it to the arrow and wait for the file name to appear in the box. | |||
#Click '''Send feedback files'''; the Grading Table displays again. | |||
#Check your file is in place by scrolling horizontally to the '''Feedback files''' column. | |||
===Downloading student submissions=== | ===Downloading student submissions=== | ||
File submissions will be downloaded in the format uploaded by the student. Online text submissions will be downloaded as html files. | You can download a zip file containing all of the assignment submissions by selecting ‘Download all submissions’ from the 'Grading actions' menu at the top of the grading table, or in the settings menu. | ||
File submissions will be downloaded in the format uploaded by the student. Online text submissions will be downloaded as html files. Each file in the zip will be named with the student first and last name followed by a unique identifier (not the user ID number). | |||
{{New features}}If each submission is more than a single file, then submissions may be downloaded in folders by ticking the option 'Download submissions in folders' (below the grading table in Moodle 3.1.3 onwards). Each submission is put in a separate folder, with the folder structure kept for any subfolders, and files are not renamed. Each folder will be named with the student first and last name followed by a unique identifier (not the user ID number). | |||
{{New features}}You can also download selected assignment submissions (rather than all of them) by selecting the ones you want and then choosing 'With selected....Download selected submissions'. | {{New features}}You can also download selected assignment submissions (rather than all of them) by selecting the ones you want and then choosing 'With selected....Download selected submissions'. | ||
Latest revision as of 17:34, 17 January 2018
What options are there for submitting work in Moodle?
The standard ways students can submit assignments are:
- File submissions (students submit a file for assessment)
- Online text (students can type their responses directly in Moodle)
- Submission comments
Notes:
- It is also possible to use the assignment module for grading an "offline assignment", ie, one where work is done outside of Moodle. This is done by simply unchecking the above three options.}}
- If you're not sure which assignment type best suits your needs, look at the section below #Which submission type suits you best?.
How do students submit their assignments?
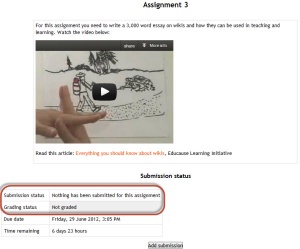
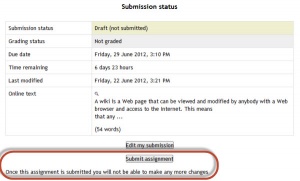
The first page students will see when they click on the assignment activity link from the course page will display the assignment name, description and the submission status. The first time a student views the assignment it will look like this:
The submission status section includes:
- Submission status
- Grading status
- Due date
- Time remaining
- Last modified
- Submission details
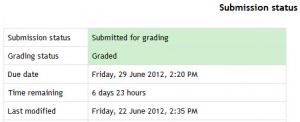
As they progress through the assignment the Submission status and Grading status will update and the Last modified date will appear.
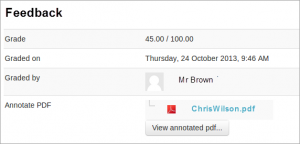
If the student uploaded a file which the teacher has annotated, this will be made available in the feedback section. The student can search through the document and filter specific comments.
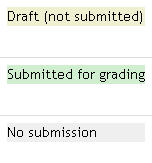
Submission statuses include:
- Nothing submitted for this assignment
- Draft (not submitted)
- Submitted for grading
Grading statuses include:
- Not graded
- Graded
File submission
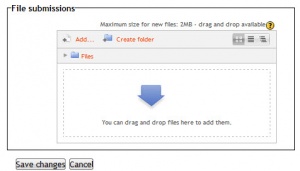
To submit a file submission, students complete the following steps:
- Click the ‘Add submission’ button to bring up the file upload page.
- Upload the relevant file into the submission. They are able to ‘drag and drop’ the file into the submission box.
- Click ‘Save Changes’.
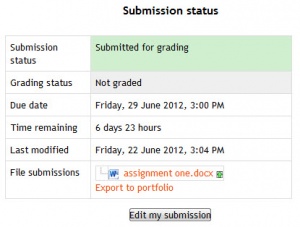
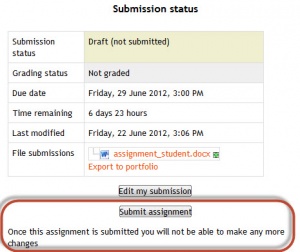
There should now be a Last modified date and the file(s) uploaded will also be displayed. Depending on how the assignment is setup the status will either read ‘Submitted for grading’ - in which case no further action is need, or ‘Draft (not submitted)’.
- If changes are required, click on ‘Edit my submission’.
- Once ready to submit, click ‘Submit assignment’.
Note that once the assignment is 'submitted’ no further changes are allowed.
Note: Depending on how the assignment is setup students may see both a file submission page and an online text editor.
Online text
To submit online text, students complete the following steps:
- Click the ‘Add submission’ button to bring up the online text editor page.
- Type the relevant text into the text editor, or paste from a previously written file.
- Click ‘Save Changes’.
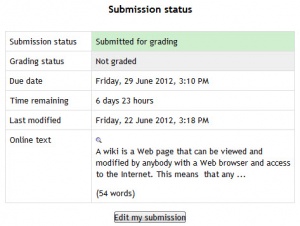
There should now be a Last modified date and the first 100 characters entered will also be displayed. Depending on how the assignment is setup the status will either read ‘Submitted for grading’ - in which case no further action is need, or ‘Draft (not submitted)’.
- If changes are required, click on ‘Edit my submission’.
- Once ready to submit, click ‘Submit assignment’.
Note that once the assignment is 'submitted’ no further changes are allowed.
Submission comments
Depending on how the assignment has been setup, there may be a section where students can leave submission comments.
Grading and feedback
When students have submitted their assignments, they can be accessed by clicking on the assignment activity. This will bring up the Grading Summary page.
The Grading Summary page displays a summary of the assignment, including; number of participants, number of drafts, number of submitted assignments, due date and time remaining.
Clicking 'Grade' will take you to the first student in the list so you can start grading individually. Clicking 'View all submissions' will take you to the grading table where you see all students.
The Grading Table contains columns of information about the student, the status of their submission, a link to grade their submission, a link to each submission and feedback comments and files (if enabled).
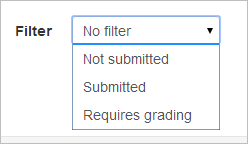
Filtering submissions
A dropdown menu accessed from the 'Options' section allows you to filter submissions so you can for example quickly see which students have not submitted yet.
Allocating submissions to markers
If you need to divide submissions between you can apply Groups to the Assignment and let markers know which Group(s) to mark. Note that because Group membership is not itself anonymised, this may make anonymised submissions that bit less anonymous, though as long as the Groups aren't very small this should be acceptable.
An alternative is to use Marking Allocation - this allows anyone with a Tutor role to allocate one marker to each submission. This works particularly well if marking is allocated by subject specialism.
Submission status
If you will be assigning grades to student work, you may want to take note of the submission status before you begin the marking process. If you have required students click the Submit button, you may find that some submissions are still marked as Draft (not submitted), meaning the student has either uploaded a file(s) or entered some text, but has not clicked ‘Submit assignment’.
If it's after the due date and you are about to commencing marking that you use ‘Prevent submission changes’ to stop students from making changes to their assignment. You can do this one by one by using the icon in the Edit column.
Or you can select two or more students by putting a tick in the select column and going to 'Lock submissions’ from the With selected menu under the grading table.
Likewise you can also revert a student's submission to draft if they have uploaded the incorrect file. Instead of selecting ‘Prevent submission changes’ select ‘Revert the submission to draft’, or place ticks against selected students and choose 'Revert the submission to draft status' from the With selected menu under the grading table.
If the submission setting 'Attempts reopened' is set to 'Automatically until pass' and a submission is graded below the grade to pass, then then submission is automatically unlocked when the grade is saved. Similarly, if the submission setting 'Attempts reopened' is set to Manually, and a teacher selects 'Allow another attempt, then the submission is automatically unlocked. (Prior to 3.0.3, the submission need to be manually unlocked.)
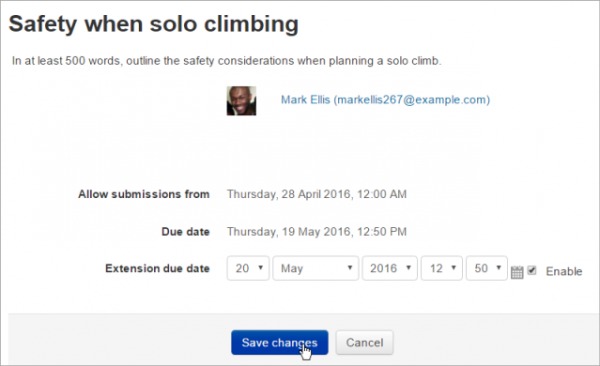
Granting extensions
If an assignment has a deadline, a teacher can grant individual or group assignment extensions by selecting the Edit link next to a particular student or group....
... and then clicking 'Grant extension' and setting the new deadline.
New in 3.1: The student's or group's name is also shown on this screen.
Quick grading
Quick grading allows you to enter numeric grades directly into the grading table, bypassing the more detailed grading interface. Please note:
- if you want to give feedback, you need to use the more detailed Grade interface.
- Quick grading is incompatible with advanced grading e.g. Rubrics, and is not recommended when there are multiple markers.
- Submission comments are a two-way private conversation between a student and staff and are visible to students immediately i.e. markers use the grading interface to give feedback, not the submission comments.
To access the Quick Grading interface, from the Grading Summary page click 'View all assignments'; the Grading Table displays. Scroll to bottom of the page to configure Options, and check the box for 'Quick grading'. While you're down there, you can also set the number of assignments to display per page, filter the assignments e.g. to see who has not submitted, unmarked assignments, etc.
When you are ready to Quick Grade:
- You can enter grades directly into the grading table.
- Scroll to the bottom of the grading table and click 'Save all quick grading changes'
- A confirmation displays.
Grading individual submissions
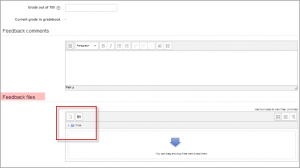
If you have enabled File Feedback in the Assignment settings and wish to upload either the marked student assignment, a completed text based feedback document or audio feedback, click on the green tick in the Grade column (or use the icon in the Edit column and select Grade).
This brings you to the Student Grading Page where you can give grades, feedback comments and feedback files (if enabled in the Assignment settings). You can use drag and drop to upload feedback files.
Annotating submissions
New feature
in Moodle 3.1!
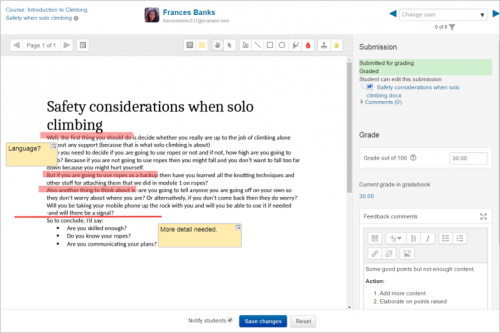
If the student has uploaded a PDF, docx or odt file, or if you set 'Comment inline' for an online text submission, then their submission will be displayed on the grading screen, allowing you to annotate it, using a variety of tools, stamps (if uploaded by the admin) and comments which may be saved to a comments bank. When the annotations are complete, clicking to save the changes will result in it being displayed to the student as part of their feedback.
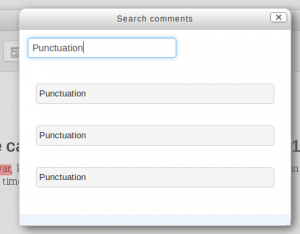
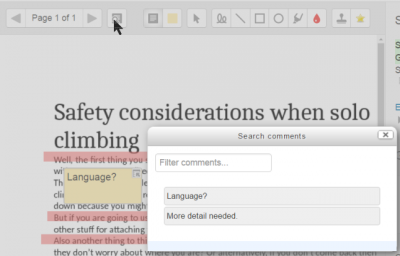
Comments may be added and then saved in a quick list for future use (1) Click the paper/magnifying glass icon to the right of the page selector to filter comments you have already added to the work(2):
- In the Search comments pop-up window, enter the term you would like to search for in the Filter comments... box.
- Clicking on the comment will take you to the part of the paper where that comment has been added.
Note: To ensure that comments display to students as the marker intends, do instruct students to download the annotated PDF rather than just previewing it. Preview sometimes displays comments in a way which obscures the original text.
Note: If you are unable to annotate student submissions, check with your administrator that Ghostscript and unoconv] are installed. Make sure that unoconv is at least version 0.7
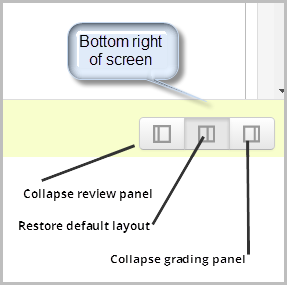
In Moodle 3.1.1 onwards, the review panel and / or the grading panel may be collapsed by clicking the icons at the bottom right of the screen.
Controlling when to notify students of graded work
Notifying as you mark
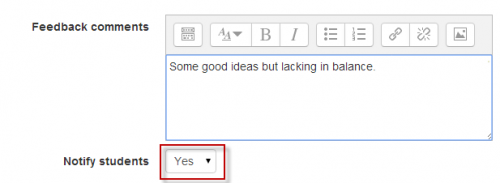
If you need to notify individual students, one by one, as you mark, the Notify students checkbox is available when grading individual submissions. Choose Yes to notify the student immediately or No to grade without notifying the student. Assuming you are not hiding grades in the ways outlined below, then Moodle will send a notification.
| Note: How students receive Moodle notifications depends on your local default settings, and any changes students have made to those. |
If you need to keep your grades and feedback hidden from students until marking is finalised, and then release them to all students at the same time, there are two alternatives.
The first is to hide the item in the Gradebook. This approach may be best if there is only one marker. Do the following:
- In your Moodle course Administration or Settings block, click on Grades; and typically the Grader report page displays. (If not, click the View tab, then Grader report; a grid of participants and "gradeable" items displays).
- Click on Setup beside the View tab.
- Find the assignment (or Grade item) whose grades you wish to hide, then click on the Edit drop-down menu and select Hide. The Eye icon in the menu will now display with a strikethrough that means the grades are hidden from students.
- To reveal the grades to students, you can either:
- Remind yourself to repeat steps 1-3 above but select Show beside the Eye icon. When the Eye displays without the strikethrough the grades will be shown to students. With this option you need to remember to change this setting when you want the students to see their grades.
- Or if you prefer to set a time for the grades to be automatically revealed, click on the Edit drop-down menu and select Edit settings by the Cog icon. This displays the settings for that grade item. Then click the Show more... link to display additional settings. Locate Hidden until and click its Enable checkbox and set the date and time when you want the grades to be revealed. With this option you need to get your marking done in time (or remember to change the date to give yourself more time).
- To notify students that marks and feedback are available, use the Announcements forum (formerly known as the News forum).
| Note: If you use this approach do communicate with any colleagues and remember to reveal the grades ultimately, since if grades remain hidden they can confuse the final grade calculations. |
The alternative approach to releasing marks to all students at the same time is to enable Use marking workflow in the Assignment's settings. This way is best where there are multiple markers and/or exceptional circumstances causing you to withhold some marks. Use it as follows:
- Set up your assignment with Marking Workflow enabled (avoid enabling it after marking has started).
- When ready to release marks, click on a link to your Assignment and from its summary page click View all submissions; a page with the Grading Table displays.
- Scroll down to Options and ensure Quick grading is enabled by clicking its checkbox; the page reloads with some extra options.
- Also in Options, configure Assignments per page to display all your assignments, or as many as possible.
- Scroll back up again and click the checkbox in the column heading Select; all records display selected (and you can deselect any individual records you may need to keep hidden).
- From the With selected... menu choose Set marking workflow state, then click Go, and confirm if prompted; the Marking workflow state menu displays on a page.
- From the Marking workflow state menu, choose Released.
- To have Moodle send students a notification that grades and feedback are available, set Notify students to Yes.
- Finally Save changes.
If you would like the Moodle Assignment to have a setting for releasing grades and feedback to students please vote for this enhancement in the Moodle Tracker: https://tracker.moodle.org/browse/MDL-18722
Offline marking - downloading and uploading multiple grades and feedback files
If you don't have an internet connection or prefer to grade outside Moodle, you can do so (including with anonymous submissions). These easy stages explained below:
- Download the submitted work.
- Download the spreadsheet (grading worksheet) to record grades.
- Grade and annotate (if applicable) the submitted work .
- Upload the completed grading worksheet.
- Upload the annotated submissions (if applicable).
| Note: You cannot upload marks and feedback to Moodle if you have enabled Rubrics or Marking Guides. |
Before you start, enable the multiple file upload settings
Go to the settings of that assignment. For Feedback types, ensure that the Moodle Assignment settings, Feedback comments, Feedback files, and Offline grading worksheet are ticked.
Download the submitted work
- Click on the assignment name on the Moodle course homepage to access the summary page and click View all submissions; a page with the Grading Table displays.
- From the Grading action drop-down menu choose Download all submissions; save the zip file (i.e. the compressed and bundled submissions).
- In your file management software go to the place you saved the zip file.
- Extract the contents of the zip file, usually by double-clicking and following the prompts. Extract to a new folder so all the feedback files can easily be zipped back together later if you need to upload them with feedback.
Download the Grading Worksheet to record grades
- Next, to download the spreadsheet in which you'll enter the grades and brief comments, return to the Moodle Assignment page and from its Grading action drop-down menu choose Download grading worksheet and save that file (keep its csv file format).
| Note: Helpfully that downloaded worksheet will contain any existing grades and summary comments which have already been given for that assignment i.e. if marking has already started. However, to see pre-existing comments fully you may need to set your spreadsheet to 'wrap text' within cells. |
Grade and annotate (if applicable) the submitted work
After downloading the submissions and the grading worksheet:
- Open a downloaded assignment file to assess it.
- Open the csv file in a spreadsheet editor e.g. Excel.
- For that student's record (if anonymous, a number corresponding to the submission file name will display), enter grades in the Grade column and summary comments in the Feedback comments column for each student.
- Leave the other data untouched unless you know exactly what you're doing.
- Repeat as needed.
- Save the csv file.
| Note: Take care to enter data in the correct column of the spreadsheet. |
If you are annotating the submissions to return to students as feedback:
- Open a downloaded submission.
- Carry out your annotations.
- Save it in its original place i.e. the folder corresponding to that student.
- Repeat as needed.
If you have separate feedback files to upload to students:
- Save these within that student's folder.
- You can give students multiple feedback files in this way e.g. annotations on their work along with a separate pro forma.
| Note: Don't change the name or location of the folder - Moodle needs this information to allocate the files correctly. |
Compress (zip) all the feedback files:
- Locate the folder containing the feedback files in Moodle, select them all (Ctrl+A within the folder), then zip them:
- Windows: Right click one of the selected files and Send to > Compressed (zipped) folder.
- Mac: Right Click (or Ctrl+click) one of the selected files and click Compress.
- They are now ready for upload (see below).
Upload the completed grading worksheet
When you are ready to upload grades and summary feedback:
- Click on the assignment name on the Moodle course homepage to access the summary page and click View/grade all submissions.
- From the Grading action drop-down menu choose Upload grading worksheet.
- Click Choose a file... and upload the grading worksheet to Moodle, or drag the csv file to the arrow and wait for the file name to appear in the box.
- There is a checkbox to overwrite records that have been modified more recently in Moodle than in the spreadsheet - only check this if you want to spreadsheet to overwrite all Moodle records, including ones made more recently than the spreadsheet.
- Click Upload grading worksheet; a Confirmation box displays the students grades and feedback that will be imported - check this carefully.
- If you are ready to proceed, click Confirm; a summary of updates displays.
- Click Continue.
Upload feedback files (if applicable)
- Click on the assignment name on the Moodle course homepage to access the summary page and click View/grade all submissions.
- From the Grading action drop-down menu choose Upload multiple feedback files in a zip.
- Click Choose a file... and upload the zipped assignments file to Moodle, or drag the compressed/zipped file to the arrow and wait for the file name to appear in the box.
- Click Import feedback file(s).
- The Confirmation box will list all the feedback files and student names that will be imported.
- Click Confirm; the next screen summarises the changes.
- Click Continue.
- From the page containing the Grading Table, you can check your feedback files by enabling Quick grading (see Options at the bottom of that page) and scrolling horizontally, if needed.
For an assignment with no file submissions, see the discussion upload feedback files without student file submissions for details of what to do.
Give the same feedback file to multiple students
If you have high level feedback you want to give to an entire cohort, it is generally a good idea to give this feedback in the context of the assignment, rather than e.g. separately via a Forum. Moodle allows you to select some or all students and attach a single, common feedback file to their assignment feedback. This common feedback will appear to each student along with any other individual feedback files you have prepared for each.
- Prepare the single file of feedback.
- Click on the link to the Assignment; its summary page displays.
- Click View all submissions; the assignment's Grading Table displays.
- Use the checkboxes to select all or some students to receive the feedback (you may first prefer to configure the Grading Table to show as many students as possible on a single page).
- Underneath the Grading Table click the With selected... menu, choose Send feedback files, then click Go; a page displays a list of selected students above a file upload area.
- Upload the file of feedback you prepapred, or drag it to the arrow and wait for the file name to appear in the box.
- Click Send feedback files; the Grading Table displays again.
- Check your file is in place by scrolling horizontally to the Feedback files column.
Downloading student submissions
You can download a zip file containing all of the assignment submissions by selecting ‘Download all submissions’ from the 'Grading actions' menu at the top of the grading table, or in the settings menu.
File submissions will be downloaded in the format uploaded by the student. Online text submissions will be downloaded as html files. Each file in the zip will be named with the student first and last name followed by a unique identifier (not the user ID number).
New feature
in Moodle 3.1!
If each submission is more than a single file, then submissions may be downloaded in folders by ticking the option 'Download submissions in folders' (below the grading table in Moodle 3.1.3 onwards). Each submission is put in a separate folder, with the folder structure kept for any subfolders, and files are not renamed. Each folder will be named with the student first and last name followed by a unique identifier (not the user ID number).
New feature
in Moodle 3.1!
You can also download selected assignment submissions (rather than all of them) by selecting the ones you want and then choosing 'With selected....Download selected submissions'.
Which type of assignment submission suits you best?
You want students to type shorter or longer responses directly online
- Set Online text to Yes. This works well for younger children who will only manage a sentence or two and works just as well for higher education students who write more.
- Advantage - quick for the student to get started; no need to use a word-processing program and upload the file. The text is saved on a regular basis so it will be preserved if the student loses the page for some reason.
- Disadvantage: if the word count is expected to be large, setting Online text to No and File submission to Yes might be a better option.
You want students to submit work you can download in a specified program
- Set File submission to Yes, set the number of files you will allow using the Maximum number of uploaded files setting and the file sizes by using the Maximum submission size setting.
- Advantage - better than students emailing work as the whole class's work is collated in one space on your course. Markers can provide comments directly on the student work.
- Advantage - with "Attempts reopened" enabled, teachers can see the progression through various drafts of a student's work.
- Disadvantage - assignments must downloaded to be viewed (but they can be downloaded in bulk) and the teacher needs the appropriate program to open them.
You want students to submit files at different times for a project
- Set File submission to Yes, and use Maximum number of uploaded files to set the maximum number of separate files they can upload
- Advantage - all project files are in one assignment area for grading so they get a single grade.
- Disadvantage - all project files are in one assignment area for grading - so they can only have a single grade!
You want students to write a response to a video/sound file/image
- Set up an assignment allowing online text submission and get students to use the Moodle media icon to add video/sound/image files.
You want students to answer a series of questions on a video/sound file/image
- Investigate the Quiz module. Assignments are really just for a single question.
You want to grade work students have done offline
- Uncheck the submission types when setting up the assignment. Students won't be required to do anything but you can use the assignment to grade them for work done outside of Moodle.
You want to view, comment on and send back students' assignments
- Set up an assignment allowing file submissions.
- Advantage: useful for teachers who like using the "comment" options in word-processing programs for example. If you have Ghostscript enabled on your server and the students upload PDF files, you can annotate them inline. See the section Annotating PDF files below.
- Disadvantage: if students upload other file types, you have to download them, comment and then re-upload them.
You want students to send you a comment or note along with their uploaded work
- Although previous versions of Moodle allowed the Submission comments submission plugin to be toggled, this is no longer the case. If comments are enabled site-wide, students will be able to add submission comments; if comments are disabled site-wide, students will not be given the option to add submission comments.
You want to allow students to redraft and decide when to submit the work
- In the settings set Require students click submit button to Yes. Students can then control when their draft work is submitted to the teacher.
You want students to keep an ongoing journal or do an iterative assignment
- In the settings set Require students click submit button to No. Students can continue to make changes to their assignment and at no point do they 'submit'. If the work will be graded at some point it is recommended that either Prevent late submissions is set to Yes to ensure that no changes can be made after the due date, or all submissions are locked when grading commences to ensure that the work is not altered during grading.
- Advantage: the work remains in one place and is constantly improved, graded (if needed) and improved again.
- Disadvantage: there is no record/history of previous attempts (such as with the Wiki). The online text assignment does not replicate the display of a journal or blog where each new entry is additional to the previous ones.
You want students to submit work in groups
- In the settings, set "Students submit in groups" to Yes. If you just do this, then once one student has submitted, the assignment will be flagged as submitted even if the others haven't contributed. If you want to ensure everyone has an input, set "Require students click submit button" to Yes and then change "Require all group members to submit" to Yes. The assignment will only be classed as submitted when each member has contributed, and once one student has submitted, the remaining members's names will be displayed for the group to see who still needs to add their input.
You want to grade students' work anonymously
- In the settings, choose "Blind marking". When students submit assignments, their names will be replaced by randomly-generated participant numbers so you will not know who is who. Note that this is not totally blind marking because you can reveal their identities in the assignment settings and you can work out identities from the logs - so this might not be suitable if your establishment has very precise privacy requirements.
You want to read and grade student assignments offline
- In the settings, choose "Offline grading worksheet". When students have submitted, click "View/grade all submissions" and you can download their assignments from the link "Download all submissions" and download the grading sheet from the link "Download grading worksheet". You can then edit grades and re-upload the grading worksheet. You can also upload multiple feedback files in a zip from this drop down menu. See Assignment settings for an explanation of how to use the "upload multiple feedback files as zip" feature.
You want to hide students' grades until a time of your choosing.
Use 'marking workflow' as explained in Assignment settings
You want to moderate other colleagues' marking or allocate certain teachers to certain students
Use 'marking allocation' as explained in Assignment settings
Keeping records (archiving, exporting, backing up)
When students unenrol from a Moodle area, their records become invisible through the Gradebook interface. In order to have the information to hand, departments or course teaching teams may need systems in place to keep their own records for the data retention period required in their particular context. There are two separate procedures for exporting student submissions and marks.
To export marks (with or without feedback):
- Go to your course administration block and click Grades.
- From the Grader Report Settings block, select Export; a menu displays.
- From the menu, if you need easy viewing and running calculations you probably want to select one of the spreadsheet formats; a page of export settings loads
- Use the Visible Groups pulldown menu to limit the export to specific groups, as required
- In Options, you indicate whether feedback comments are included
- In Grade Items To Be Included lists you can, if required, omit particular Activities from the report
- When you've finished with the settings, click on Submit; a preview of your export displays
- Click on Download to export to the format you chose, and save the file.
To download the original student submissions:
- In your course area, click the link to the Assignment whose submissions you want to download.
- Click on the link to View/Grade all submissions; the Grading Table will load.
- Click the link to 'Download all submissions' and save the file.
Tips and Tricks
- Want to use an Assignment activity again in another Moodle site? Use the backup and restore options.
- Want to use an Assignment activity in another course you teach? Use the Import function in the course administration block.
- Moodle will sometimes appear not to be uploading a resubmitted assignment - you seem to be downloading the original assignment. This is a cache issue, in short, go to "Tools > Clear Recent History" in Firefox or "Tools > Delete Browsing History > Delete Temporary Files" in Windows Explorer. The newer file will then appear.
See also
Examples from School demo site
- Teacher view of a PDF assignment which can be annotated inline.Log in with username 'teacher' and password 'moodle'
- Teacher view of allocated markers and marking workflow status. Log in with username 'teacher' and password 'moodle'
- Student view of an assignment. Log in with username 'student' and password 'moodle'. Scroll down to see the rubric and feedback.
- Student view of a student submission statement Log in with username 'student' and password 'moodle'
- Student view of group assignment grading screen Log in with username 'student' and password 'moodle'
- Teacher view of a group assignment grading screen Log in with username 'teacher' and password 'moodle'.
- Teacher view of blind marking grading screen Log in with username 'teacher' and password 'moodle'
Other
- One approach to group project grading blog post by Gavin Henrick
- Advantages of using Assignment upload over emailing a document forum discussion
