ELIS Reports Admin
ELIS Reports Admin
ELIS provides program administrators a method to manage who can view and schedule reports by the context in which a role is assigned.
ELIS enables ELIS Administrators to setup roles that give the user the ability to view or view/schedule report data filtered by the context of where the role is assigned. For example, the capability to view reports can be added to a "user set supervisor-type" role that is assigned at the user set context. The supervisor can then filter reports by his/her user sets only.
To create a new role go to the Administration block > Site Administration > Users > Permissions > Define roles. Scroll to the bottom of the page and select the "Add a new role" button and follow the steps below:
- Enter a name: View Reports
- Enter a shortname: viewreports
- Enter the context types where the role may be assigned: User Set
- In the Capabilities section, scroll to the ELIS Report capabilities and allow "View ELIS reports - local/elisreports:view".
- Scroll to the bottom of the page a select the "Create this role" button.
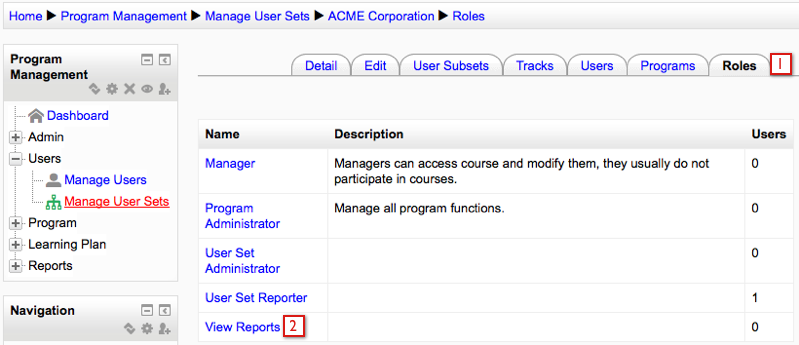
In the image below, we are assigning the role called "View Reports" in the ACME Corporation user set. The user who is assigned this role will be able to view reports for users in his/her user set. This process can be followed in any ELIS context (program, course, class, track, user set).
Go to the Program Management block > Users > Manage User Sets. Choose the name of the user set where the role should be assigned. Select the (1) Roles tab. Select the (2) role (e.g., View Reports) that should be assigned. Select a user and assign the role.
The following is a table that provides details on a role capability and what that capability will allow in each context.
|
Role Capability |
Context Assigned |
Result -- User can view and/or schedule the following reports |
|
local/elisreports:view |
program |
1. Course Completion Gas Gauge - user can filter report by courses in assigned program only. 2. Individual Course Progress Report - user can generate report for self only 3. Sitewide Course Completion Report - user can filter for courses in the assigned program only. 4. Class Completion Gas Gauge - user can filter by courses/classes in the assigned program only. 5. Class Roster Report – user can filter for course/class within assigned program only. 6. Individual User Report — user can generate report for self-only. 7. Course progress Summary Report — user can filter for assigned program only. Choosing "All programs or no filter" generates a report for assigned program data only. 8. New Registrants by Course - user can filter for assigned program only. Choosing "All program" generates a report for assigned program data only. |
| local/elisreports:schedule |
program |
User can schedule all reports with filters as outlined above, except for the Individual Course Progress Report and Individual User Report. To schedule the "Individual" reports you must be assigned schedule permission in a user, user set, or site context. The Report Usage Report can not be scheduled. |
|
local/elisreports:view |
course |
1. Course Completion Gas Gauge - user can filter for only assigned course. If “any value” is selected, report is generated for assigned course only. 2. Individual course Progress Report — user can generate report for self only. 3. Sitewide Course Completion Report — user can filter for assigned courses or all courses. When choosing “all” report generates data for for assigned course only. 4. Class Completion report— user can filter for assigned course/class only. 5. Class Roster Report — user can filter for assigned course/class only. 6. Individual User Report - user can generate report for self only. 7. Course Progress Summary Report - user can filter for assigned course only. If "no filtering" or "All programs" is selected the reported is generated for assigned course(s) only. 8. New Registrant by Course Report - user can generate this report for assigned course(s) only. |
| local/elisreports:schedule |
course |
User can schedule all reports with filters as outlined above, except for the Individual Course Progress Report and Individual User Report. To schedule the "Individual" reports you must be assigned schedule permission in a user, user set, or site context. |
|
local/elisreports:view |
track |
1. Individual Course Progress Report - user can generate report for self only. 2. Class Completion Gas Gauge — user can filter report for class within assigned track only. 3. Class Roster Report — user can filter report for class within assigned track only. 4. Individual User Report — user can generate report for self only. |
| local/elisreports:schedule | track |
User can schedule all reports with filters as outlined above, except for the Individual Course Progress Report and Individual User Report. To schedule the "Individual" reports you must be assigned schedule permission in a user, user set, or site context. |
|
local/elisreports:view |
class |
1. Class Completion Gas Gauge — user can filter for assigned class only. 2. Class Roster Report — user can filter for assigned class only. |
| local/elisreports:schedule | class |
User can schedule all reports with filters as outlined above. |
|
local/elisreports:view |
user set |
1. Programs Report — user can filter by assigned user set or users within assigned user set. If no filter is used, report generates data for user set members of assigned user set only. 2. Course Completion by User Set Report -- user can filter by assigned user set only. 3. Individual Course Progress Report — user can filter the report for users in assigned program only. 4. Individual User Report – user can filter the report for users in the assigned program only. 5. New Registrants by Student Report — user can filter by assigned user set. If no user set is chosen, the report generates data for users in the assigned user set only. 6. Sitewide Time Summary — user can filter by name of user or by assigned user set. If no user set is chosen, data is generated for assigned user set members only. If a name is entered, only user set members with that name will appear in report. 7. Sitewide Transcript Report -- user can filter by name of user or by assigned user set. If no user set is chosen, data is generated for assigned user set members only. If a name is entered, only user set members with that name will appear in report. |
| local/elisreports:schedule | user set |
User can schedule all reports with filters as outlined above. |
|
local/elisreports:view |
site |
1. Programs Report — user can generate report for any or all programs. 2. Course Completion by User Set Report -- user can filter by assigned user set only. 3. Course Completion by User Set Report - user may select any user set or no user sets for this report. If no user set is selected, a report is generated for Course completion data for all user sets, by user set. 4. Individual Course Progress Report — user can filter for any user on the site. 5. Sitewide Course Completion Report — user can filter for all courses or any one course on the site. All enrolled users on the site are included in the reports. 6. Class Completion Gas Gauge — user can select any course/class on the site. 7. Class Roster Report - user can select any course/class on the site. 8. Individual User Report - user may select any user on the site for this report. 9. User Class Completion Report - . 10. Absence Report - . 11. Course Progress Summary Report — user can filter by any or all programs and any or all user sets on site. 12. New Registrants by Course Report — user can filter by any or all programs on the site. 13. New Registrants by Student Report — user can filter for all or one user set on the site. 14. Site Usage Summary Report - . 15. Sitewide Time Summary Report - user can filter by name or by any user set on the site. 16. Sitewide Transcript Report - user can filter by name or run the report for all users on the site. |
| local/elisreports:schedule | site |
User can schedule all reports with filters as outlined above, except for the Site Usage. The Report Usage Report can not be scheduled. |
To give a user permission to view reports only, is only necessary to set the "local/elisreports:view" capability to allow. However, if a user should be able to schedule reports both the "local/elisreports:view" and "local/elisreports:schedule" capabilities should be set to allow. The "local/elisreports: schedule" capability does not function when set to allow without the "view" capability as well.
In the table above the word "assigned" refers to the specific program, course, class, track, or user set in which the user has been assigned the role which includes the "view" and/or "schedule" capability. The role is assigned via the Roles tab of that program, course, etc.
ELIS Report Scheduling
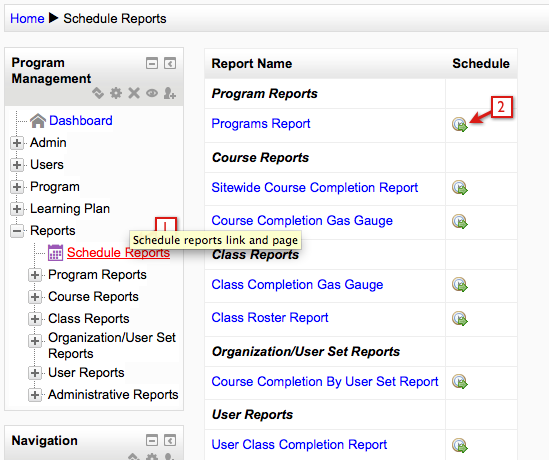
ELIS reports can be scheduled to run at future dates and intervals and automatically emailed to selected users. To schedule ELIS reports navigate to the Program Management block > Reports > Schedule Reports. A screen appears with all of the ELIS reports grouped by type. Each report name is linked so users can click on on the report to view the report. To the right of each report is a schedule icon that links to the jobs (schedule) screen for each report.
Scheduling Reports screens can be reached via the report itself and via the Program Management block as well.
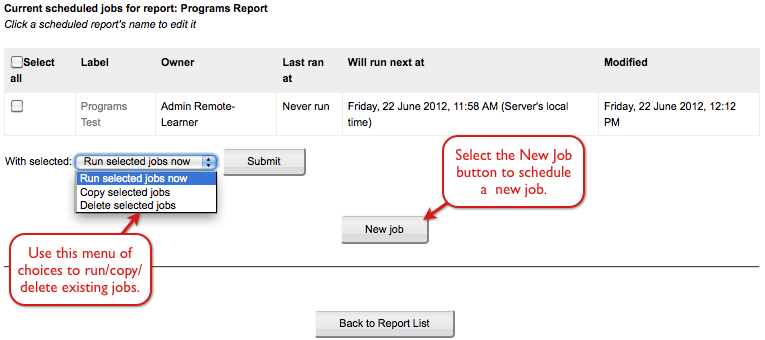
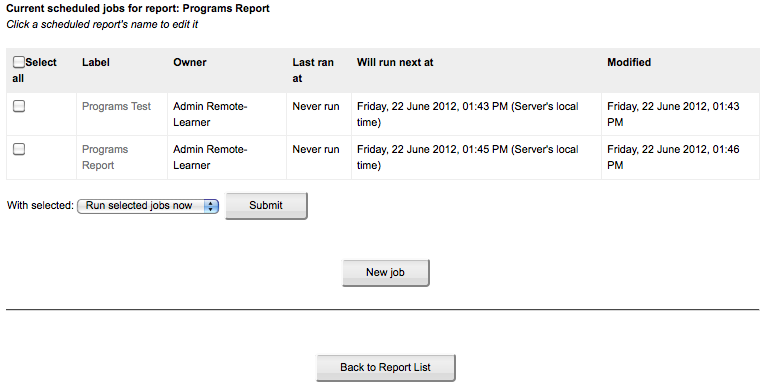
The next image shows the scheduling screen for the programs report. From this screen you can select existing jobs (scheduled reports) and run/copy/delete the jobs with the options in the drop down menu. Select the New job button to schedule new jobs.
Explanation of Schedule Report table and actions:
- Current scheduled jobs –
- Label: User can select the job name to edit the job parameters.
- Owner: The user who created the scheduled job.
- Last Run at: Displays the time the job last ran.
- Will run next at: Displays the next scheduled time for the job.
- Modified: Displays when job was created or last edited.
- With selected: enables users to select a job or jobs and perform one of the following actions:
- Run selected job(s) now: runs the job at the current time.
- Copy selected job(s): makes an exact copy of a selected job and names it "Current Name -- Copy 1".
- Delete selected job(s): deletes the jobs that are selected. A confirmation screen will be displayed.
- Back to the report list: Select this button to return to the report list to scheduled a job for a different report.
- New job button: Select this button to open the scheduling interface to schedule a new job. This opens the schedule wizard, with six steps to complete the setup.
Step 1: Label and describe the job. The label field is the only required entry for this step.
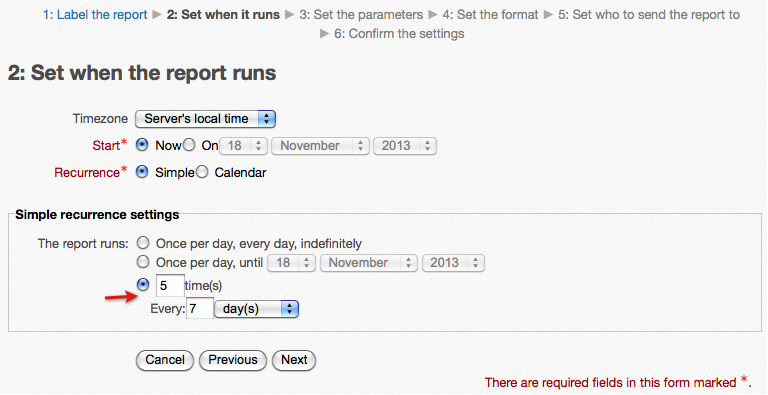
Step 2: Set the time when the report will run. The Recurrence field for this step has two options. The first option is simple recurrence, it has been selected in the following image. The Simple recurrence settings provide three options for setting when the report will run. Only one can be used per job.
Explanation of settings:
Time Zone: Select the time zone to be used for scheduling this report.
Start: Select whether the report job starts now (when the report setup is complete) or on a particular date.
Recurrence: Select either Simple Recurrence or Calendar Recurrence, both types of recurrence cannot be selected together.
Simple recurrence:
- Once per day, every day, indefinitely (until options are changed or report is deleted) OR
- Once per day, until a particular date OR
- A set number of times
- Enter how many times the report will run.
- Enter how often each run occurs in hours, days, or months.
- In the image below the report is set to run 5 times, every 7 days. So a report would be generated once a week for 5 weeks.
Simple Recurrence:
Calendar recurrence:
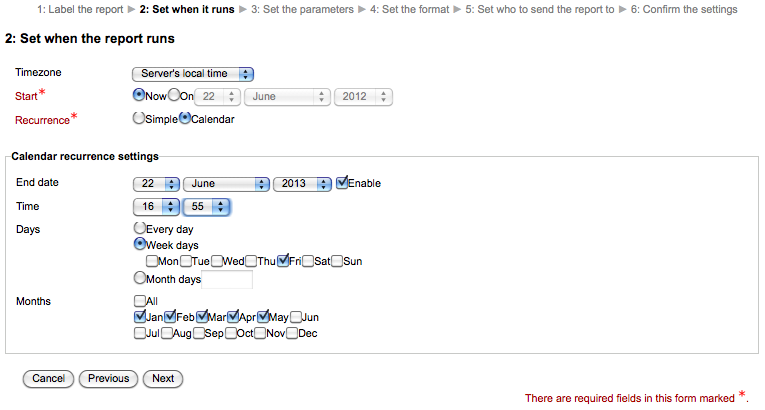
- End date: select the date when the report should stop running. Select the Enable checkbox to enter an end date.
- Time: Use the drop downs to enter the time. The hours drop down uses a 24 hour format. For example, in the following image the time setting is 16:55 or 04:55 PM.
- Days: select whether the report runs every day, only on specific week days, or specific month days.
- If week days is selected, select which days.
- If Month days is selected, enter a number for the day of the month the report should run. For example, 15 for the 15th.. If the report should run on more than one month day, enter day numbers separated by commas. For example, "1, 15" would run on the first and fifteenth day of each month.
- Months: Select the months in which the report runs. For example, if the report is scheduled to run on January and July only, and the Month days is set to 15, then it runs on Jan 15 and July 15. If the report was set to run every Friday (in the Week Days) then it would run every Friday in July and January.
Calendar Recurrence:
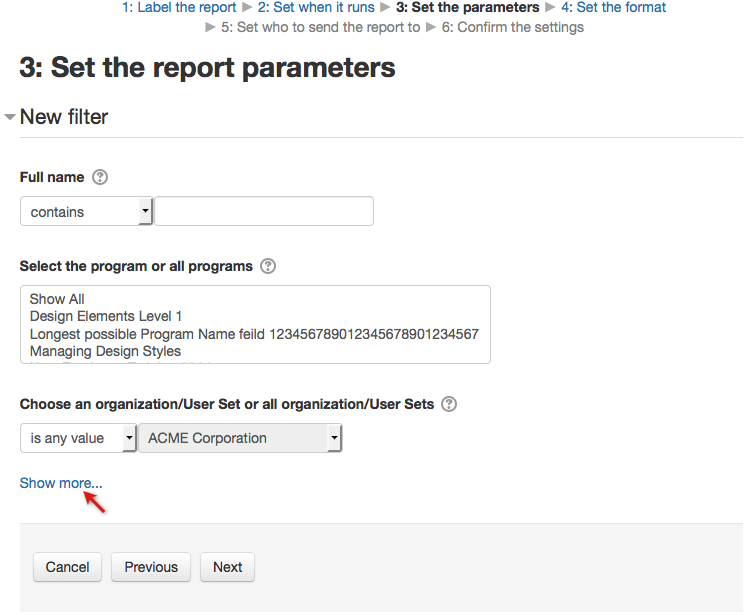
Step 3: Set the report Parameters. The filters used for scheduling the report are the same as the filters used to manually run the report. The filter shown in the following image is for the Programs Report, which has three fields in the standard filter and a Show more link that will open additional fields.
Each report requires different parameters. For reports with several parameters you might want to test the parameters before scheduling the report.
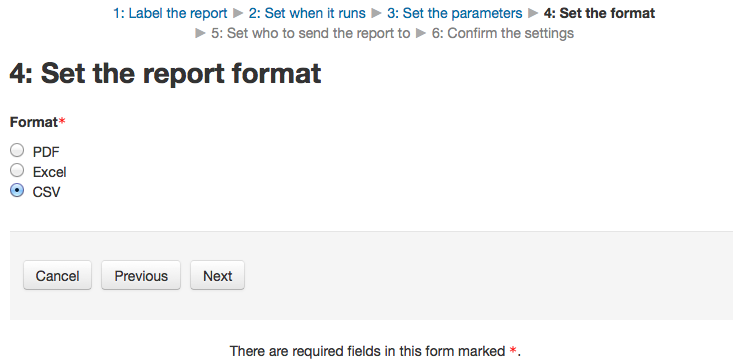
Step 4: Set the report output format. There are three options - PDF, Excel, or CSV format. One choice is required.
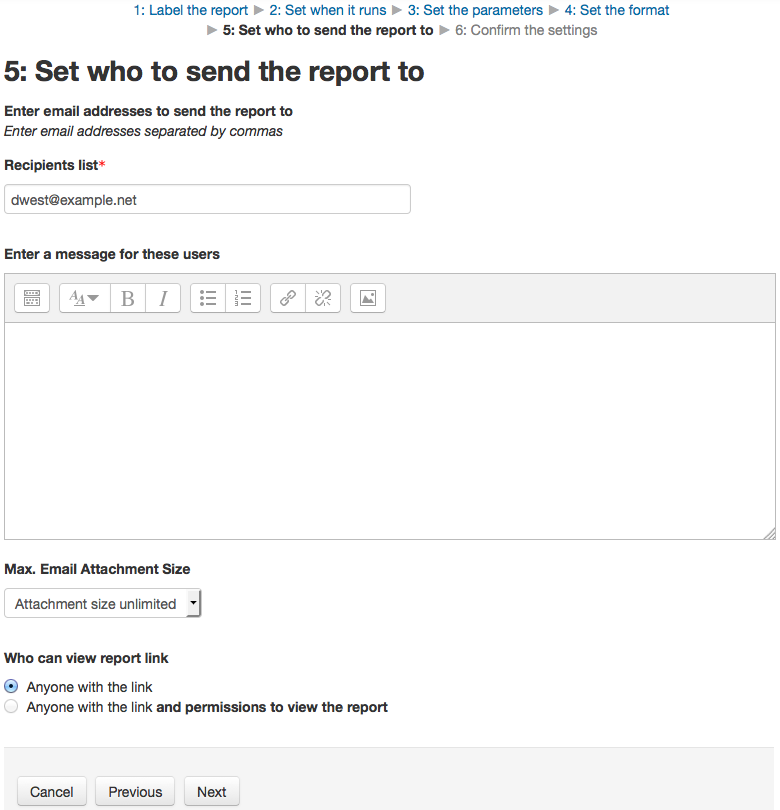
Step 5: Enter the email address of the user(s) that will receive the report. This field is required and a valid email address must be entered to continue. Separate multiple email addresses with a comma. An optional email message can also be entered. Other settings include the maximum email attachment size and who can view the link sent in the email. Scheduled reports over the attachment limit are saved and can be accessed with the link sent in the email.
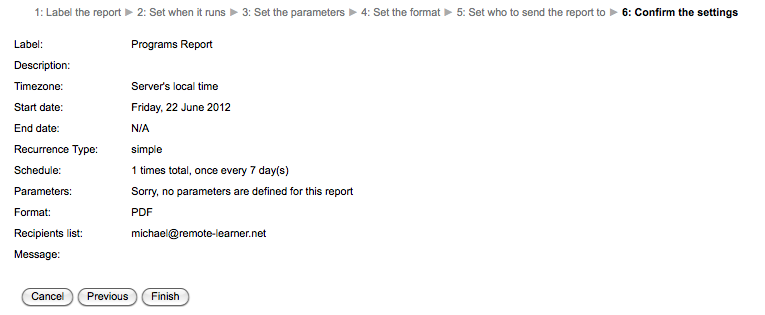
Step 6: Confirm the settings from the previous steps. This page produces a summary of the information entered in the previous five steps. Review the summary and then select the Finish button to complete the report schedule. If changes need to be made, select the Previous button.
A report schedule confirmation is displayed after selecting the Finish button on the Confirmation screen.
The Return to scheduled jobs link, shown in previous image, will reopen the jobs screen for the programs report. This screen shows all the scheduled jobs for this report, the job just added above is the second job in the list below. Select the report label (name) in the list to edit the report schedule.
When the report is run the designated user(s) receives the report via email.
