ELIS Data Hub
ELIS Data Hub
ELIS Data Hub overview:
ELIS' Program Management component is a powerful system for managing student data, program information, transcripts, learning paths and progress reports, however there are often times when users need to integrate with information from other systems such as SIS, EPR, HR, and Financial Record keeping systems and/or migrate data into ELIS from legacy systems. To facilitate this, Remote-Learner has built the Data Hub, a tool for 2 way communication of information between ELIS-Moodle, and other systems.
Note: ELIS Data Hub also provides a way to quickly setup and edit programs, courses, tracks, and classes by uploading a formatted CSV file.
Data format(s):
The current version of ELIS Data Hub provides for import of CSV (comma separated values) files - a common format that can be easily created and/or edited in most data management tools (including Excel, OpenOffice, Access, etc.).
If you are using Excel with a MacOS you may encounter errors when processing files with Data Hub. We recommend using OpenOffice with a MacOS if you encounter errors when processing files.
Now Web Services can also be used with Data Hub versions 2.3.2.2+ and 2.4.2.3+.
Data Categories:
User data- this is data about the user, that includes some or all of the information that goes in the user profiles in Moodle and ELIS. See below for a detailed description of the user data handling in ELIS Data Hub.
Course data- this is data about programs, course, track, and class properties that may be set by the data import. See below for a detailed description of these properties.
Enrollment properties- this is data about the enrollment status of a user - which classes the user is enrolled in, what their status is, what their role in the class is, the completion status for their courses, etc. See below for a detailed description of these properties.
Automating Data Import/Export:
ELIS Data Hub can be scheduled to automatically import files placed in it’s import folder and load any new files that are placed there into ELIS. If your source data system (SIS/ERP/HRMS, etc.) can be setup to automatically export files, it can send them to the Data Hub target folder in various ways – for instance via SCP, shell scripts, etc.
Since source systems are all different, we can’t guarantee that a particular client system can be automated, but if it can be set to automatically export CSV files, then it is generally a simple matter for the system's administrator to set it to automatically export those files to the ELIS Data Hub target folder. Once that is done, ELIS will load the files as scheduled.
We work with clients to help their system administrators setup their systems on an hourly basis, if necessary (cost will depend on the specific system, how well documented it’s export functions are, etc).
ELIS Data Hub New Features
- The identifying fields for users (idnumber, username, and email) can now be disabled or enabled in the ELIS Data Hub settings. Go to the Administration block > Site Administration > Plugins > Local plugins > Data Hub plugins > Version 1 ELIS import.
- All user fields except idnumber can be updated now.
- The location of Data Hub has changed in ELIS 2.6. Go to the Administration block > Site Administration > Plugins > Local plugins > Data Hub plugins. For the Logs report go to the Administration block > Site Administration > Reports > Data Hub logs link. All Data Hub blocks will be converted to HTML blocks during upgrade to new version.
- Now Web Services can be used with Data Hub versions 2.3.2.2+ and 2.4.2.3+.
- User Sets/Clusters can be created, updated, and deleted.
- Enrollments files now allow:
- User Set/Cluster assignment
- Program/Curriculum assignment
- Updating class enrollments.
- Create or update: This is a new import setting, located on the Administration block > Site Administration > Plugins > Local plugins > Data Hub plugins > Version 1 ELIS import. If enabled, all create or update actions on users are converted to create actions if the entity does not already exist, or update actions if the entity exists.
- There is now support for multivalued custom fields. For example, if there is a dropdown menu profile field you can select multiple options. Each option is separated by a /. The format looks like this, option1/option2/option3.
Accessing Data Hub
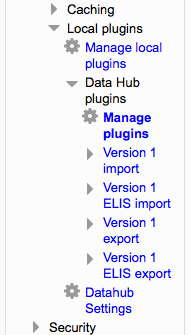
ELIS Data Hub can be accessed by going to the Administration block > Site Administration > Plugins > Local plugins > Data Hub plugins. Under the Data Hub plugins heading is a list of links to different areas of Data Hub.
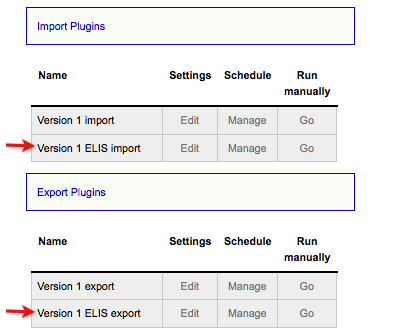
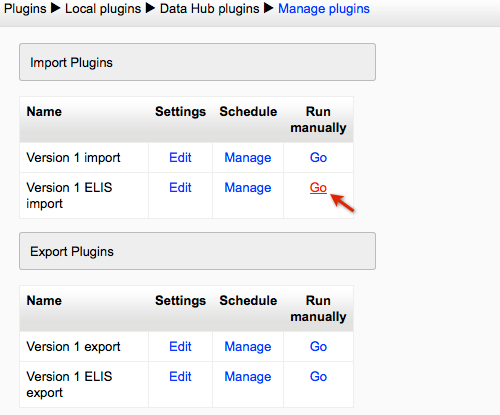
On the Manage Plugins page use the Edit, Manage, and Go links to access ELIS Data Hub:
- Edit: Links to the settings screen.
- Manage: Links to the schedule wizard, for scheduling Data Hub jobs.
- Go: Links to a screen where files can be uploaded and run manually.
Version 1 import and export are for Data Hub Basic for Moodle. For ELIS Data Hub be sure to use the Version 1 ELIS import and export.
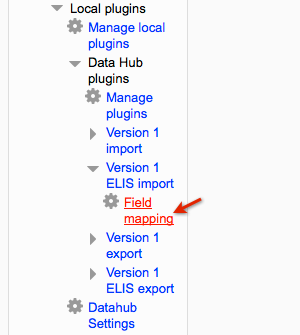
To access the field mapping screens go to the Administration block > Site Administration > Plugins > Local plugins > Data Hub plugins and select the arrow next to Version 1 ELIS import. After selecting the arrow a Field mapping link is shown, select it to open the Field mapping screen. Selecting the Version 1 ELIS import link will take you to the edit settings page.
Data Hub Settings
The are two settings screens for ELIS Data Hub, one for import and one for export. These screens can be accessed by going to the Administration block > Site Administration > Plugins > Local plugins > Data Hub plugins > Version 1 ELIS import link or Version 1 ELIS export link or the Manage plugins link (shown in next image).
Version 1 ELIS Import Settings
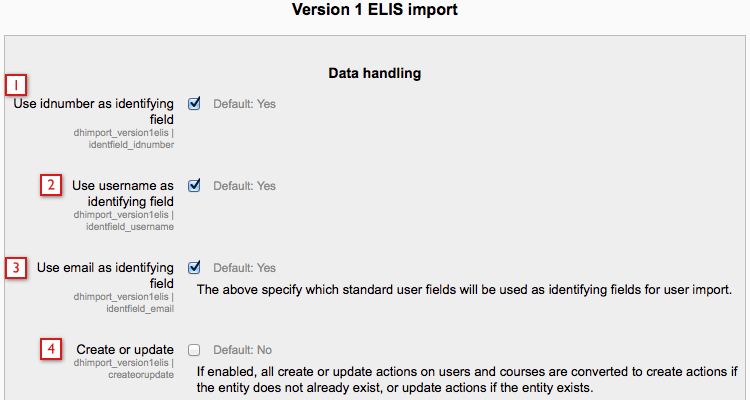
Data Handling
- Use idnumber as an identifying field: This setting is available in the next release.
- Use username as identifying field: This setting is available in the next release.
- Use email as identifying field: This setting is available in the next release.
- Create or update: If enabled, all create or update actions on users are converted to create actions if the entity does not already exist, or update actions if the entity exists.
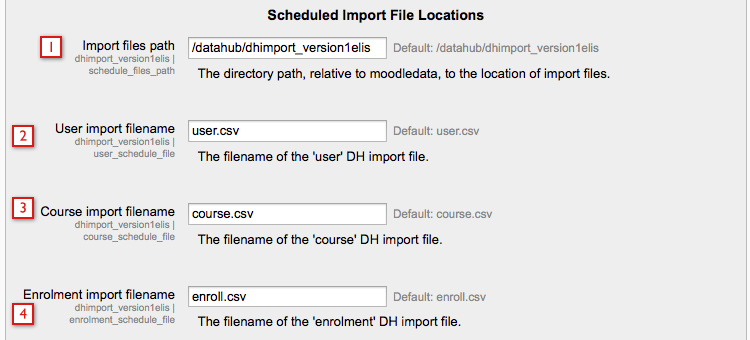
Scheduled Import File Locations
- Import files path: This is where files will be placed to be processed by Data Hub. Files can be uploaded here via SFTP, a username and password will be provided by Remote-Learner staff for SFTP access. The files placed here must be scheduled to run. Manually run files can be uploaded directly through the Data Hub UI.
- User import filename: This is configurable, for example if your record system's user export process produces a file called users.csv, or people.csv, you can type that name in the File name (1) field and save changes.
- Course import filename: This is configurable. Data Hub will look for this file name in the import file location when running a scheduled job. The name of the file and the name entered here in the settings must match or the file will not be processed.
- Enrollment import filename: This is configurable.
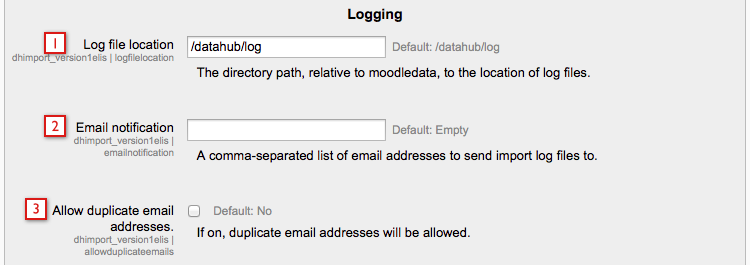
Logging
- Log file location: This is where log files are stored. Use SFTP to access the file location.
- Email notification: Enter the email addresses of users that should receive import log files.
- Allow duplicate email addresses: Allows duplicate email addresses.
The file locations/paths will be setup by Remote-Learner during the installation process. You will need to know these file locations to access them on your server. The Data Hub folder locations can be accessed via SFTP or SCP from your source server. These folders can not be accessed with a web browser.
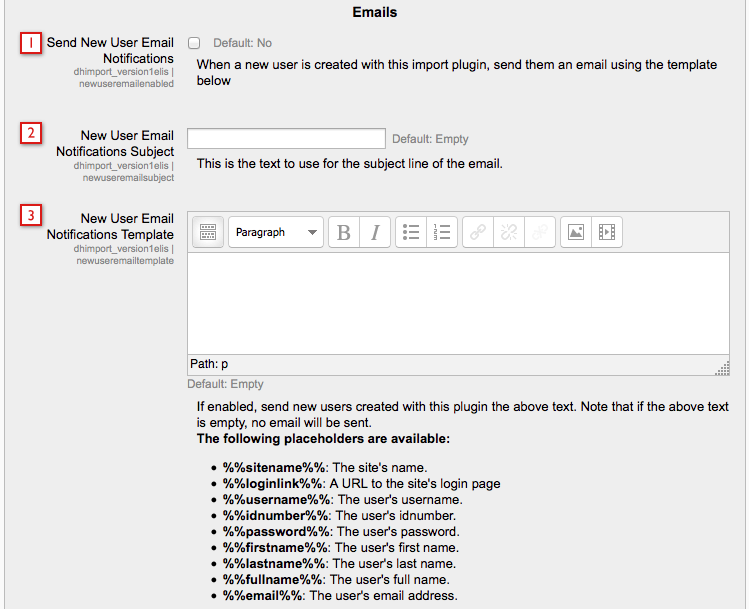
Emails
- Send New User Email Notifications: Send new users email notifications.
- New User Email Notifications Subject: The subject of the email.
- New User Email Notifications Template: Enter the content for the email. For example: %%firstname%% %%lastname%% an account has been created for you at %%sitename%%. Your username is %%username%% and your password is %%password%%. %%loginlink%%.
- Send New Enrollment Email Notifications:
- Send Enrollment Email from:
- New Enrollment Email Notifications Subject:
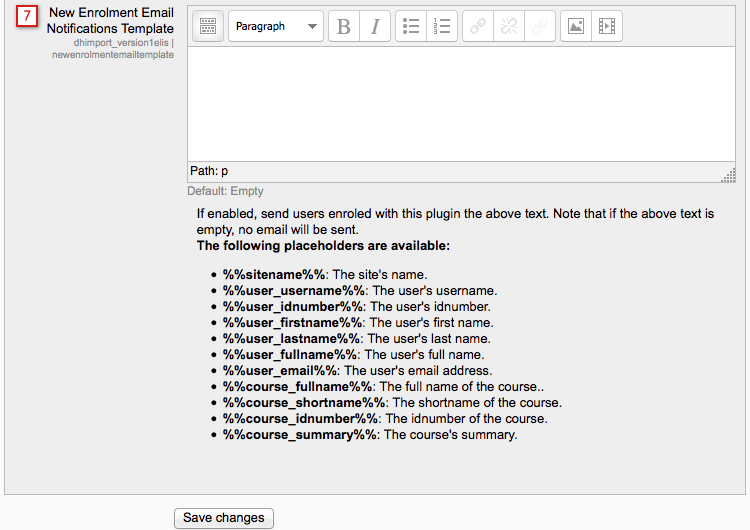
- New Enrollment Email Notifications Template:
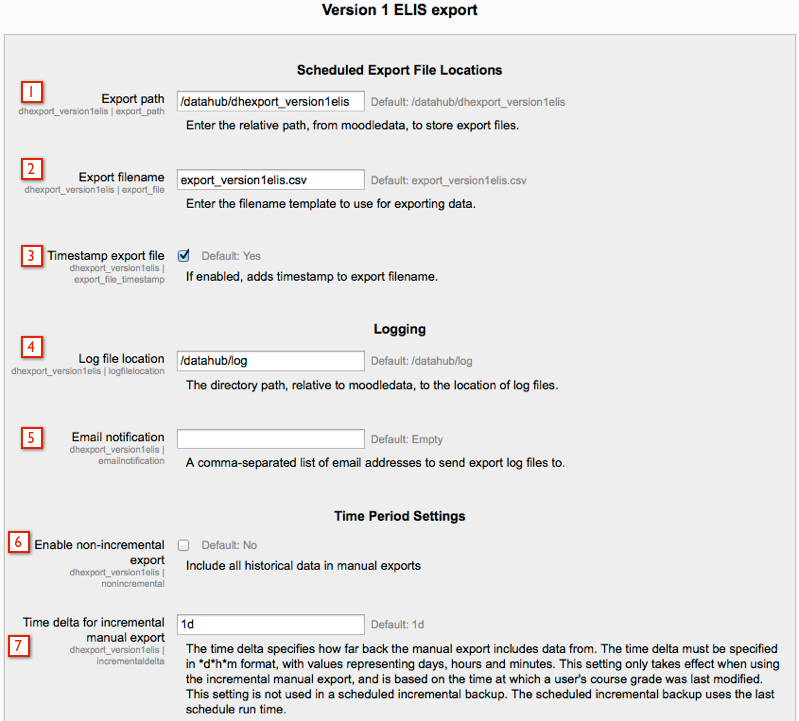
Version 1 ELIS Export Settings
- Export path: This is the file location where scheduled exports are stored.
- Export filename: The name of the export file, enable timestamp to make it unique.
- Timestamp export file: This gives each export file a unique time stamp. If this isn't selected then the previous export file will be replaced when a new export file is processed.
- Log file location: This is where log files are stored. Use SFTP to access the file location.
- Email notification: Enter the email addresses of users that should receive export log files.
- Enable non-incremental export: Include all historical data in manual exports.
- Time delta for incremental manual export: The time delta specifies how far back the manual export includes data from.
Accessing import, export, and log folders via SFTP
This page will demonstrate how to access the Data Hub import, export, and log folders via SFTP. There are two examples, one for Windows and one for MacOS.
Windows Access
WinSCP will be used to access the folders via SFTP in this example. The following link has a free WinSCP download, http://winscp.net/eng/index.php.
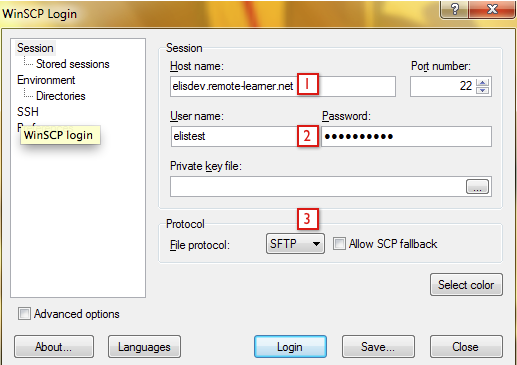
The WinSCP login screen is shown in the next image. To login and access the Data Hub file locations you will need to:
- Enter the host name or server address.
- Enter a username and password for accessing the Data Hub folders via SFTP. Remote-Learner will setup the username and password.
- Make sure SFTP is selected from the file protocol drop down menu.
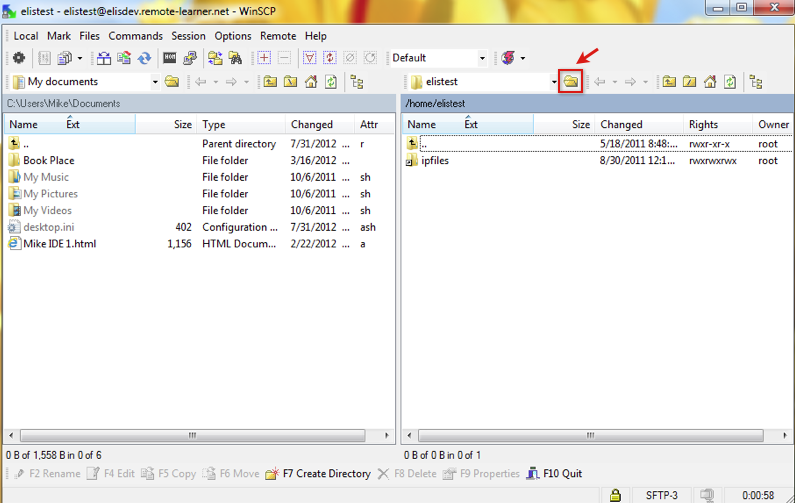
Once logged in the Data Hub folders must be located. Select the folder icon as shown in the following image to enter the file path in the Open Directory window.
The file paths are located on the Data Hub settings screen. Go to Administration block > Site Administration > Plugins > Local plugins > Data Hub plugins > Version 1 ELIS import or Version 1 ELIS export. The file paths are setup by Remote-Learner.
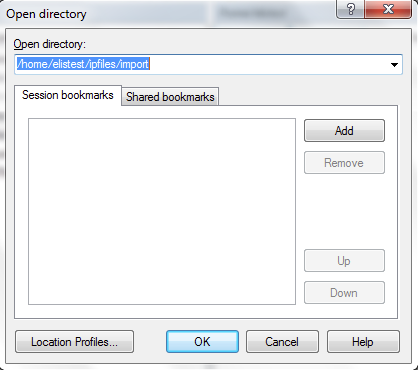
Enter the file path in the open directory window.
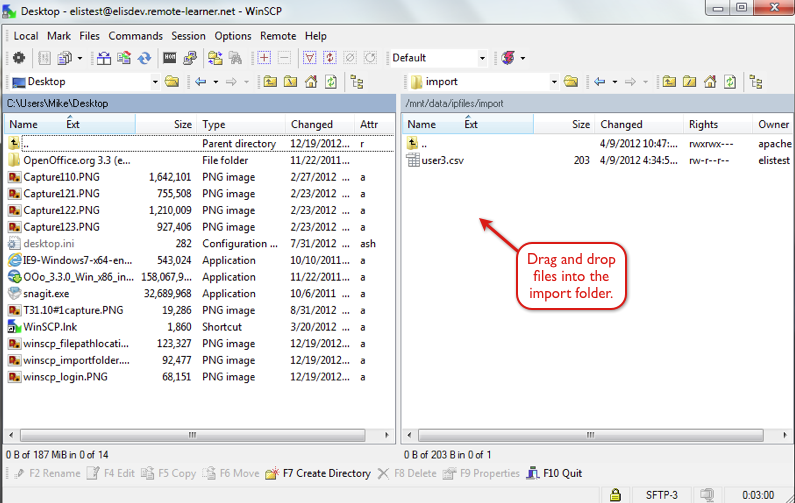
The next screen is showing the import folder on the right hand side of the image. From this screen you can drag and drop files into the import folder. When files are dragged and dropped into the folder or out of the folder they will be copied to the new location.
MacOS Access
Cyberduck will be used to access the folders via SFTP in this example. The following link has a free Cyberduck download, http://cyberduck.ch/.
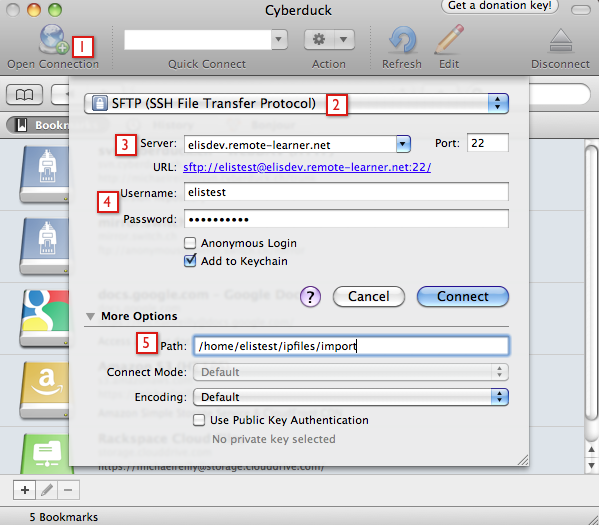
The Cyberduck login screen is shown in the next image. To login and access the Data Hub file locations you will need to:
- Select the open connection plus (+) symbol.
- Make sure SFTP is selected from the file protocol drop down menu. This can be configured as the default setting.
- Enter the server address.
- Enter the username and password for accessing the Data Hub folders via SFTP. Remote-Learner staff will setup the username and password.
- Enter the file path. The file paths are located on the Data Hub settings screen. Go to Site Administration block > Plugins > Blocks > Data Hub plugins > Version 1 ELIS import or Version 1 ELIS export. These file paths are setup by Remote-Learner staff.
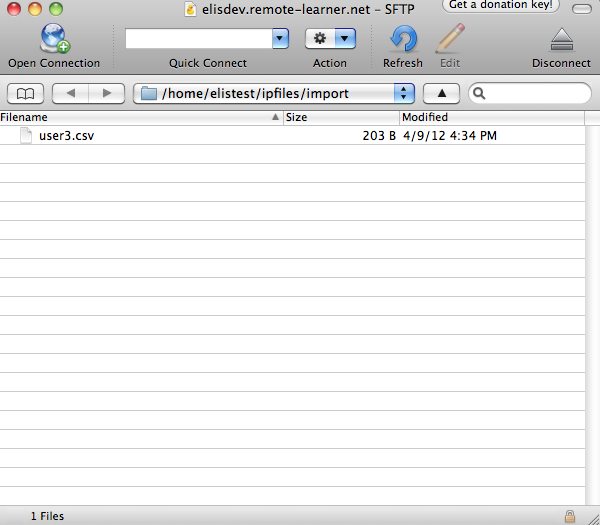
Once the correct folder is opened files can copied to the folder location by dragging and dropping them into the folder. When files are dragged and dropped into the folder or out of the folder they will be copied to the new location. Files in the folders can also be copied to your local system by double clicking a file.
Importing and Processing Files
Data Hub import files can be scheduled to process or can be manually processed. Import files should be scheduled to process in most instances. Manual processing should be used for testing only. Manual processing is currently limited to 28 seconds of processing time in our standard Data Hub installs. Scheduled processing will continue imports on subsequent cron runs when processing takes to long, manual processing does not do this.
Scheduling Import Times
Scheduled imports process files uploaded to the the import files path, which is also referred to as the import file location in some areas of the documentation. The files can be uploaded to the import files path via SFTP, ELIS Accessing import, export, and log folders via SFTP. The import files path is listed in the Administration block > Site Administration > Plugins > Local plugins > Data Hub plugins > Version 1 ELIS import settings.
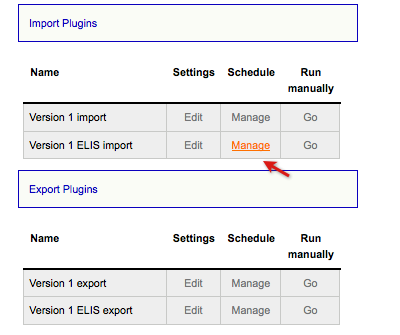
To schedule your imports, click the Manage link under the Schedule heading.
This will open up the scheduling wizard. Select the New Job button to schedule an import job. A single site can run more than one scheduled import/export job.
Note: The schedule defines the earliest time a job can run, but the jobs themselves may run a few minutes later than the scheduled times.
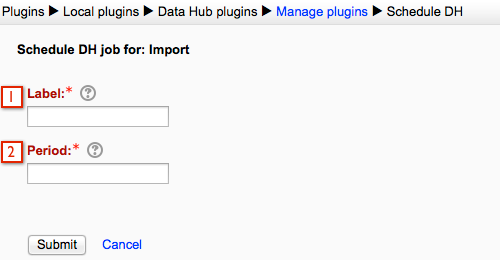
- First we'll need to give our job a label - this lets us tell what the different jobs we have scheduled do, so it's ideal to use a label that will make it easy for you to tell what the job is for.
- Period - this is the frequency the job will run. Import date format: The are 3 import date formats, whichever format is selected here must be used in the import files. This value should be set in the format *d*h*m with 1d = once per day. 1 h= once per hour, and 5m = every 5 minutes. For example, you set your schedule to 2d the this job would run every two days from the time you set the schedule up. If you set it at 2h, then the job would run every two hours from the time you set the schedule up. If you set it to 30m, the import will run every 30 minutes starting from the time you set the schedule up.
Note: if you need to have the import run at a specific time, RL Support can setup a custom serverside cron job to support that for Enterprise and Premiere support levels.
Once the schedule has been set, your job will begin running based on the time period. For example if you create a schedule at 12PM on Monday, and set it to run every day (1d), it will run the next day, the first time the cron tasks run after 12PM on Tuesday.
Manually Run Imports
To run Data Hub manually, select the Go link under the Run Manually heading.
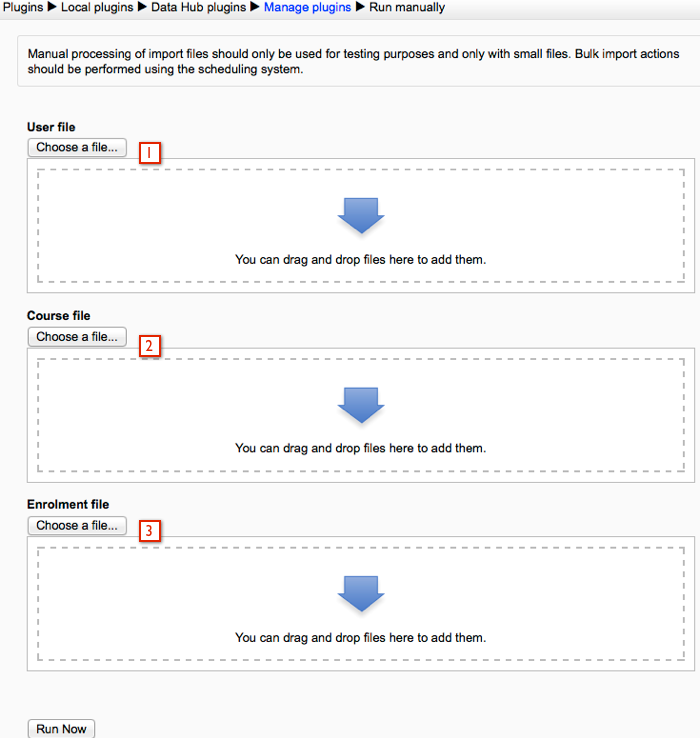
This will open a screen where files can be uploaded and run manually.
- Choose a file with user information in it to import manually.
- Choose a file with course information in it to import manually.
- Choose a file with enrollment information in it to import manually.
Select the Run Now button when you have finished uploading files.
Data Hub Logs
Data Hub for Moodle 2 now includes a log page where you can view the logs from your imports and exports. Go to the Administration block > Site Administration > Reports > Data hub logs.
The log viewing screen provides the ability to filter what logs you see, to view summary information about success and failure of import and exports, and the ability to download and view the full logs. Logs can also be viewed via SFTP if you have setup the SFTP folder.
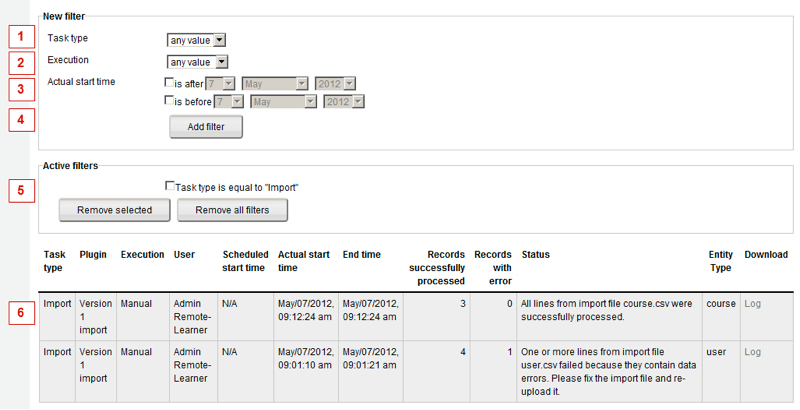
- The filter settings enables you to hide or show logs with certain parameters.
- The Task Type filter lets you show only import or only export logs.
- The Execution filter lets you choose between showing automatic imports only, or manual imports only.
- The start time filter lets you show logs for actions that occurred on specific dates.
- Active filters will show you what filters are currently being used to filter the logs you see.
- The log list shows you summary information about logs for import and/or export events.
- The first row shows the type of task - Import or Export.
- This shows the plug-in type.
- This shows whether the file was run automatically, or manually.
- This shows which user ran the file - this may vary when tasks are run manually.
- This shows when the file was scheduled to run - for the manual files in this example, this is not applicable as the files were run manually and not scheduled.
- This shows when the file began processing.
- This shows when the file completed processing - very large files (10,000 lines or more) may take some time to run - running such files manually can help you plan how long a large file is likely to take.
- This will show how many records were processed - for example if there were 3 courses in a course creation/update file, this shows that they were all processed. Note that in the import file that ran at 09:01 AM above, 4 records processed ok, and one had an error.
- This shows how many records had an error and could not be processed. Note that a file with 100 records and 50 errors, 50 records are processed (courses created, users created, etc.) and 50 were not. The log show this in detail what happened.
- The Status message presents a summary of the Data Hub run.
- The Entity type column shows what kind of file was run - user, course, enrollment, etc.
- This is the link to the full log file. Since export files just export completion information, there is no detailed log of these files.
Viewing the logs online:
Click the Log link to view the complete, line by line log of the import action.
The detailed log is a text file, when you view it in a text editor you can see the line by line log and identify why errors occurred. For example in the above file you can see that the 3rd line a user with test4 for a user name was created, and then in the 4th line the same user name was rejected as there is already a user with that user name in the system (in this case the user created on line 3).
