Note: You are currently viewing documentation for Moodle 3.1. Up-to-date documentation for the latest stable version of Moodle is probably available here: Datalynx create.
This page will show you how to create a simple datalynx activity. It is a step by step guide how to setup an activity for collecting and discussing photos in a course. This is the most basic setup for a datalynx activity. There are far more complex usages of the module like certification workflows, or course programme catalogues.
Activity goals of this example activity
Students should upload photos with a shallow depth of field using manual settings of their digital camera. By chosing the right combination of aperture and shutter speed, the object in the foreground should be completely sharp, whereas the background should be blurred.
Teachers should rate the activity and comment on the photo quality.
In order to achieve that we need the following:
Views
A view for creating an entry
A view for seeing all entries with thumbnail images
A detailed view with large images ("more view")
Fields
A field of type Image. And user profile fields such as Username in order to identify who has made the entry
Other components
Comments tag
Notifications for comments and ratings
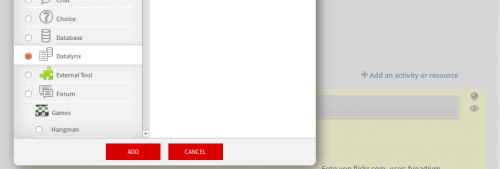
Step 1: Add a new datalynx instance to the course
Click on Add an activity or resource Add a datalynx instance
Fill out the settings
Name: The name of the acivity
Introduction: Contrary to other activities, the introduction is not used to be displayed within the activity. You can use it to display additional information on the course page by checking the box "Display description on course pageHelp with Display description on course page"
Timing: For this activity not applicable, you can set availability options if you want that the activity can only be acces within a certain timeframe
Rating: Define how to rate the activity: Points or stars, etc.
Entry settings: If it is required, that student must make one entry and not more than one entry, you can set "Required entries" and "Maximum entries" to 1.
Required entries
Entries required before viewing
Maximum entries
Common module setings: Leave default values
Click on "Save and display"
Step 2: Define fields
After clicking on "Save and display", there are 2 possibilities to continue.
1st possibility: Click directly on the page on "Add fields"
2nd possibility: In the tabular menu click on "Manage -> Fields"
Go to "Datalynx -> Manage -> Field"
You are then in the manage area of the datalynx activity. In the field section (field tab), there is the possibility to choose a field from a dropdown menu.
Select the field of the type "Picture".
Add picture field
General settings
For the general settings, you can use these settings:
Name: Give the name an understandable name, what kind of picture users should upload
Description: Optional, not really used
Visible to: This defines who can view the picture. In some cases other students should not see some fields, but in this case "Everyone" is the correct choice
Editable: Yes
Field label: The field label is a "conditional text", that only appears when a the field is present in a view. For mor information see the documentation of fields
Display dimensions: Choose a size, that would fit in a screen. Example: 400px. Only define the width, if you want, that the height as scaled in the right proportoin.
Max dimensions: Set this, if you want to limit the max dimension instead of a fixed dimension as on the previous setting
Size of the thumbnail view.
Picture: General settings
Field attributes
Total size of uploaded files: Define a file limit. You can tell users to optimize photos in order to fulfill the file size limit.
Max number of uploaded files: Choose 1 in our case, but you can also tell users to upload to variations of one photo activity.
Picture: field attributes
Step 3: Define default view
After creating the field(s), it is time to create the views. Let us begin with the default view. The default view is shown after clicking on the Datalynx-link in the course. In our case, the default view will be the list of all entries of the students. We want to have an overview of all the added pictures, so that is the best choice for the default view. In order to create the view follow these steps.
Go to "Manage -> Views"
From the dropdown select "Grid view". Grid view is the standard view. Unless there is a special reason for using another view, grid view is the best choice.
View settings
General view settings
Name: Choose a name for the view. For this example: Photos overview
Description: Leave empty
Visible to: Choose roles who can see the view
Filter: Leave empty. This will display max. 50 entries per page
Redirect on submit option: This setting is only for editing views. Leave default value.
View template: This setting defines the general layout of the view. Usually you have a header section with a paging bar, and a link to add a new entry. The header is followed by the repeated entries. In this case each student will add an entry with a photo. The tag ##entries## is a placeholder for the entries made by the users. The ##entries## tag will be replaced with the list of the photos. Just before the ##entries## tag you can add the instructions for the students. Example "With your digital camera in manual mode, set the aperture to the lowest value possible. Select an object such as an egg, a candle,... as foreground. Focus that object and make sure, that the background has enough depth. Focus the chosen object. Post the photo by clicking on "Add new entry" in this activity. Comment on photos of the other students."
Grid settings: leave default. This will generate a list of photos with one column.
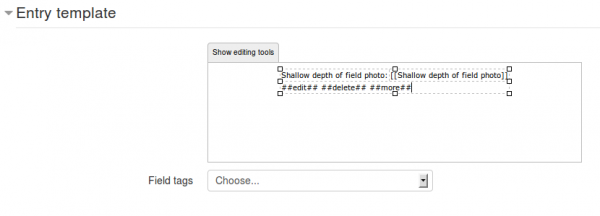
View setting: Entry template Entry template: This defines the layout of a single entry. All the fields and other information such as the the name of the user can be defined in this area. In our case we only need the name of the user, the photo and the link to the "more view". In the "more view" tags for commenting and rating a single entry are added. In order to display the name of the user, we use the following tag: ##author:name##. This tag can be chosen from the dropdown menu "Field tags" and inserted instead of the marked text, or at the curser position. The tags ##edit## and ##delete## allow the users to edit their own entries. We select the tag ##more## from the dropdown "Field tags" as placeholder for the link to the "more view".
Save the view with clicking on "Save changes". You will be redirected to the overview of all views. Currently there is only one view: The one just created.
Manage -> Views
Click in the column "D" on the icon in order to make the view the Default view. Result should look like that:
Step 4: Define "New entry view"
Add another view by choosing "Grid view" from the dropdown "Add a view".
Save with default settings, except the name: Add new photo.
Save changes and choose the view as "Edit View": Activate the checkbox in the column "E"
Step 5: Define "More view"
This view will be the view, where the teacher can add comments and rate the entry. In order to create the view, instead of adding a new view, this time, you duplicate the "Add a photo" view and then edit this view by clicking on the "Edit" symbol.
Duplicate the view Manage: Duplicate View
Edit the view: Click on the edit symbol
Add the tags for commenting and rating using the appropriate choices in Entry template "Field tags"
The "Entry template" section of the "More view" should look similar to that:
Manage: More View
After saving the more view, activate the checkbox in the column "M" in order to make the view the "More view".
Customize the "More view"
In the "More view" or "Single entry view" we want to achieve the following:
Add possibitlity to add comments
Show only one entry per page
Comments
In order make it possible to add comments, we have to add the appropriate tag in the setting "Entry template". Just put the cursor in where you want to have the comments and add the tag via the dropdown "Field tags".


