ELIS Admin
Administrator Dashboard
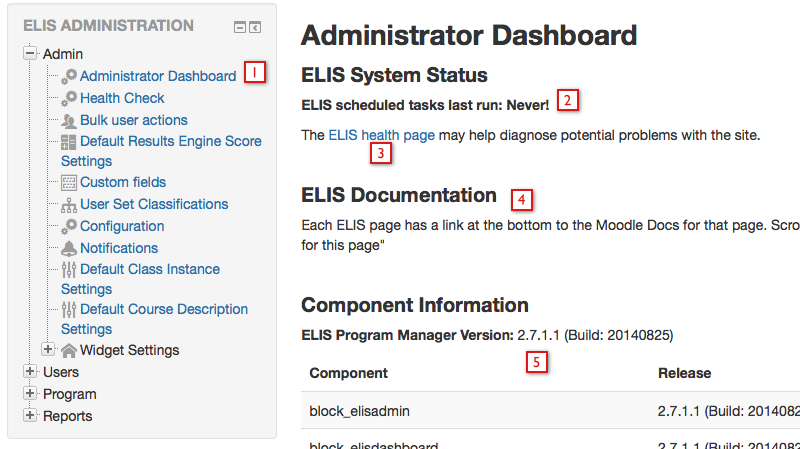
The Administrator Dashboard page provides some useful information about your site.
- The link to the Dashboard in the Program Management block. The Program Management block is renamed the ELIS Administration block in ELIS 2.6.
- ELIS scheduled tasks - Cron last run time.
- The "ELIS health page" link shows if there are any known issues with your ELIS site (cron not running, etc.). If you are having any problems with your ELIS site, the health page is the first place to check.
- A link to this ELIS Support course - this is changed in ELIS 2.7. There is not a link to the support course but at the bottom of each page in Moodle there is a link to Moodle Docs where the ELIS documentation is located.
- Your ELIS Version, you can check the Release Notes in the support course to see what bugs/improvements/new features are in which version of ELIS. If you are on an older version, you can enter a ticket in the Customer Portal or contact your Sales Manager and request a free upgrade.
Health Check
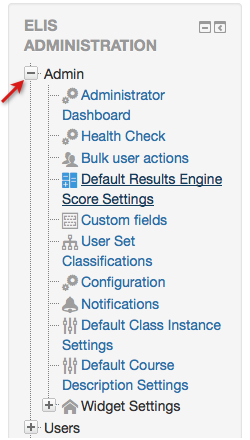
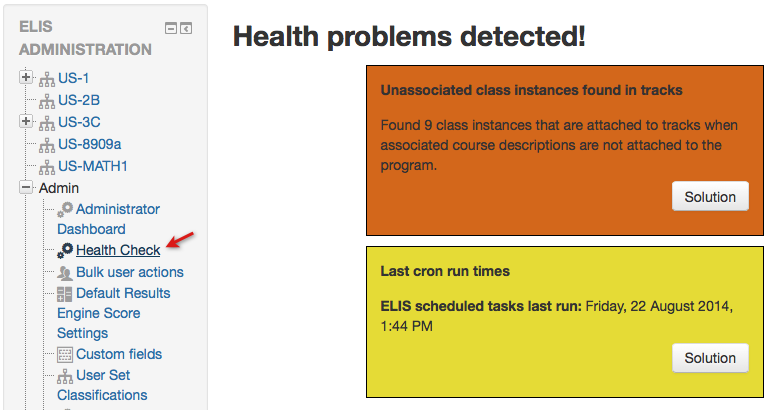
ELIS has an internal system for monitoring itself for problems known as the the Health Check. Problems are reported here, and in many cases solutions as well. The Health Check is accessed from the ELIS Administrator block > Admin > Health Check.
When inputting a support ticket or call, it helps us help you more rapidly if you can include your ELIS version and if there are any Problems indicated on the the ELIS health page.
For example. the Health page below indicates that there is an issue with this ELIS site, and suggests a solution as well.
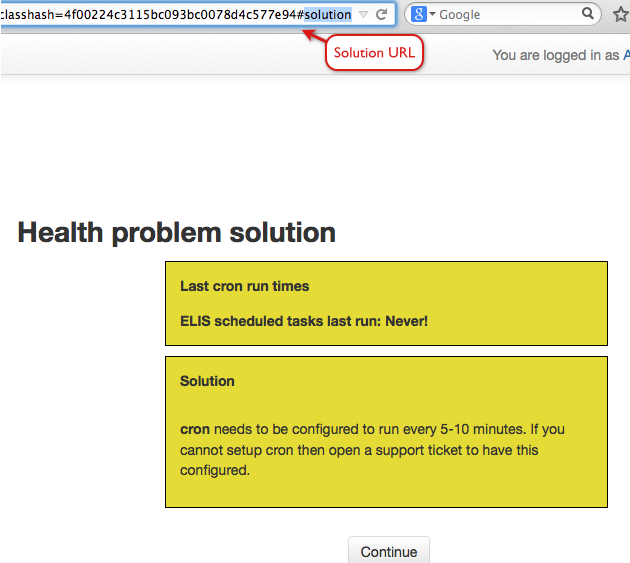
Severe ELIS problems are displayed in Red, less severe ones in Yellow. Clicking the "Solution" button will show you the solution. Some of the Solutions you may be able to perform yourself, others will require you to enter a support ticket. Solutions have a unique URL, Remote-Learner support will be able to respond more quickly if you include this URL in your support ticket.
Bulk user actions
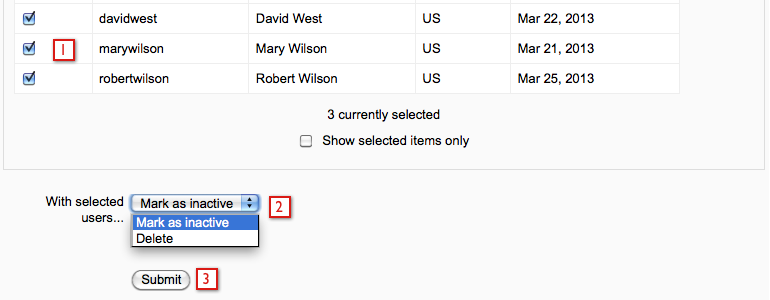
Bulk user actions lets you delete users or mark users as inactive in ELIS. To access the bulk user actions feature go to the ELIS Administration block > Admin > Bulk user actions.
You can select the users being edited from all ELIS users or filter the users then select the users to be edited from that list. There is a "Select all" button and a "Deselect all" button at the top left hand corner of the user list. Clicking the Select all button selects all the users on the page, it doesn't select all users from all pages.
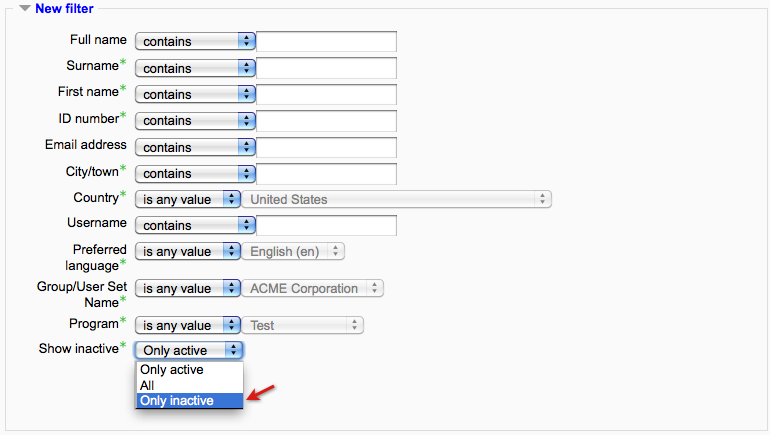
To use a more advanced filter select the Show more link in the filter section for more filter options. The advanced filter lets you filter users by group, user set, program, active/inactive, and other parameters.
- Select the users to be edited
- Go to the bottom of the page and use the drop down menu to select the bulk edit action
- Select the Submit button when everything is set correctly.
Note: you can mark students as inactive in bulk, but changing them back to active must currently be done one student at a time as described below.
Changing Inactive Users to Active
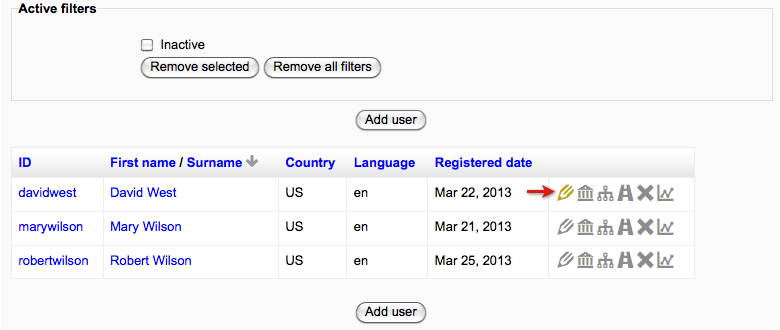
If you want to change users marked as inactive back to active, go to the ELIS Administration block and select Users > Manage Users. By default, only active users are shown in the manage users screen - to find inactive users, use the advanced filter to search for inactive users.
Advanced filter options:
The following image is showing the inactive users. Then go to the user(s) edit screen in ELIS and deselect the Inactive checkbox for the user(s). It is the last setting before the custom fields section.
Custom fields
ELIS Custom fields. Use the Custom Fields screen to create custom fields for programs, tracks, courses, classes, ELIS users, and user sets.
Default Results Engine Score Settings
Set default scores for the Results Engine.
User Set Classification
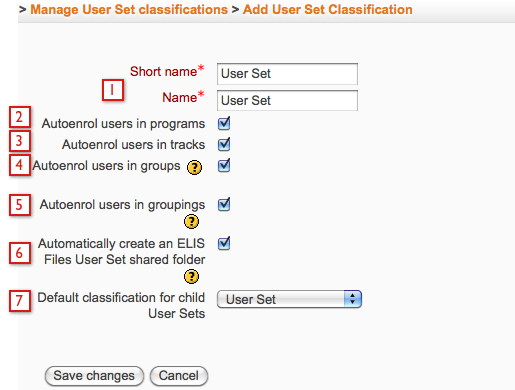
Use the User Set Classification screen to create different types of user sets. A User Set Classification is assigned to a user set when the user set is created. This gives the user set the settings for that classification. To add a user set classification go to the Program Management block > Admin > User Set Classifications and then select the Add User Set Classification button.
- Enter a Short name and Name.
- Auto-enroll users in programs - This should be checked if users from the user set will be enrolling themselves in classes. Enrolling users in a program gives them access to the courses of the program, and the user could then enroll themselves in a class instance.
- Auto-enroll users in tracks - This should be selected if users will be auto-enrolled in tracks/classes by an admin user. By assigning the user set to a track, the users can be auto-enrolled in classes, if the classes are set to auto-enroll for the track.
- Auto-enroll users in groups - This should be selected if users should be auto-enrolled in groups.
- Auto-enroll users in groupings - This should be selected if users should be auto-enrolled in groupings.
- Not available in first couple ELIS 2.0 releases. Automatically create an Alfresco shared organizational folder - This feature should only be enabled if the user sets being assigned the classification should have Alfresco share folders created.
- Default classification for child user sets - Select the default classification that will be assigned to child user sets or user sub-sets.
Example
In some instances you may only need one user set classification for a site, for other instances you may need several. For example, a site is offering training courses to several companies, with each company having several divisions. In this instance we want to create at least two user set classifications:
- Organizational user set classification - this will be the classification assigned to companies. Each company will have one organizational user set.
- Regular user set classification - this will be the classification assigned to the divisions of the companies. These user sets will have users assigned to them and be used for auto-enrolling users. Each one of these user sets will be a user sub-set of an organizational user set.
Configuration
ELIS Admin Settings. Use the Configuration screen to adjust certain track, course catalog, certificate, interface, and user settings.
Notifications
ELIS NotificationsUse the Notifications screen to manage user notifications. You can select which notifications will be sent to users and with some notifications the time of notification can be set.
Default Class Instance settings
Use this link to set default class settings.
Default Course Description settings
Use this link to set default course settings.
Widget Settings
Programs Widget Settings
To edit the Programs block settings go to the ELIS Administration block > Admin > Widgets > Programs Widget. There are two sections to the settings, Progress Bar and Visible Fields.
The Progress Bar is displayed next to programs in the Program Widget to give learners a visual display of their progress in a program. Visible Fields are the fields shown/available to users for searching course descriptions, course sets, and class instances.
Progress Bar
- Programs Widget link opens the settings page for the widget.
- Enable or disable the program progress bar here.
- Edit the colors of the bar using color grid or enter the # directly. The progress bar has three color settings.
Visible Fields
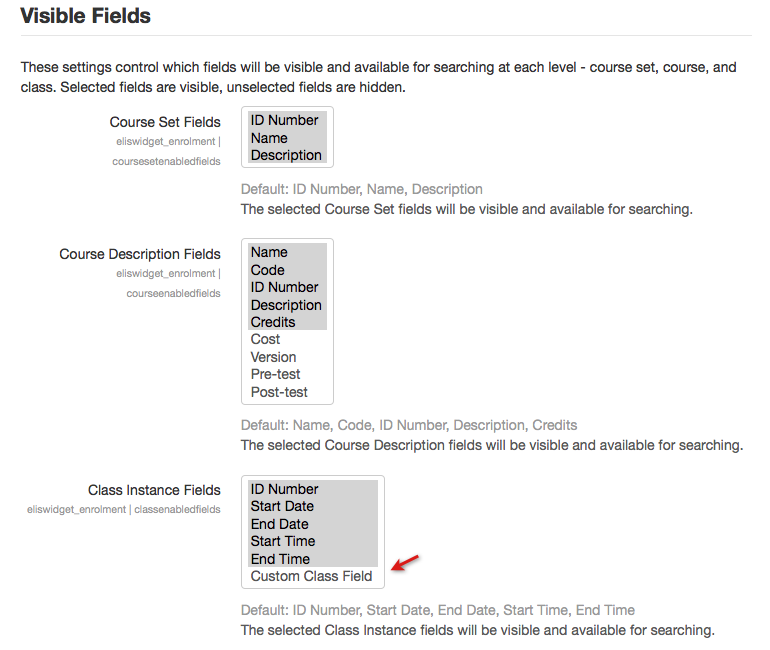
In the Visible Fields section highlighted fields will be available for users to search/filter with. Course descriptions, course sets, and class instances can all be filtered. To highlight a field in the settings, select it. To highlight multiple fields, select and hold on the top field then scroll down to include the fields you want, or use Shift + select.
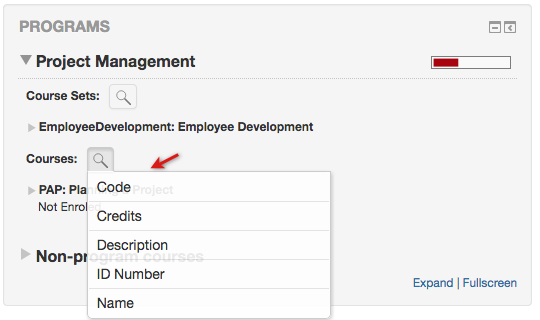
In the Program Widget each user can customize the filters to show just the fields they want to filter with. Their filter changes do not get saved.
Custom fields are included in the lists. In the following example a custom class instance field has been added to the site and is listed at the bottom of the Class Instance Fields section. It has not been highlighted yet so it would not be available for filtering at this point.
A view of the Programs Widget is shown below. The Progress Bar is to the right. The search icon next to courses has been selected and any of the fields can be added to the screen.
