ELIS Tracks
Once you have setup courses and added them to a program, the next step in using ELIS is to setup tracks. A track is an instance of a program, each track must be associated to a program. The class instances of a track, in most cases, will be the same as the program's course descriptions.
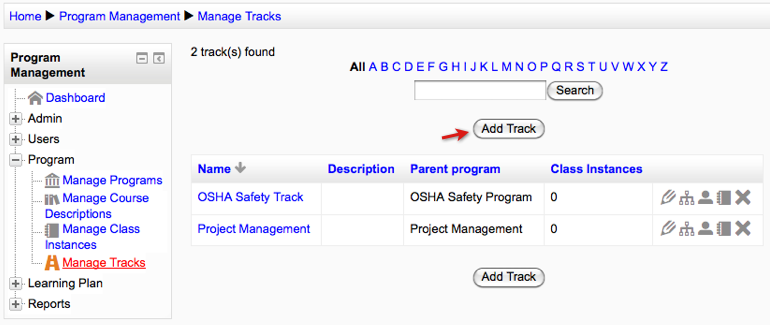
To setup tracks go to the Program Management block > Program > Manage Tracks > "Add track" button.
Adding a track:
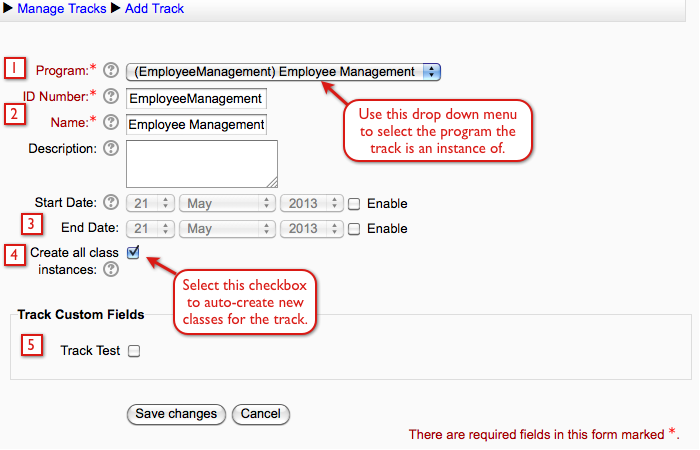
- Select what program the track is an instance of, this is a required field. The program the track is an instance of can not be changed once the track is created. If a program is deleted then the tracks associated to it will also be deleted.
- Enter an id number and name for the track. Auto-created class instances in the track will use the track id number as part of the class id number.
- Track start and end dates are for informational purposes only, they don't affect the start or end dates of the classes.
- Select the auto-create checkbox to automatically create an ELIS class instance for each course description of the program the track is an instance of. If you don't use the auto-create class instances feature when creating the track, the option will still be available after the track is created. There will be an "Auto-create class instances" button when viewing the Class Instances tab of a track.
- Custom track fields - These are added/edited in the Program Management block > Admin > Custom Fields > Tracks tab.
Notes for auto-created classes:
- The start and end dates for auto-created classes will be disabled. For users to be able to manually enroll themselves in class instances, the end date needs to be a date later than the current date, or it needs to be disabled.
- Auto-creating an ELIS class instance will automatically create a Moodle course, if one is linked to the course description the class is an instance of. If you want to link multiple ELIS class instances to one Moodle course you should not use the auto-create feature. You should create the ELIS class instances, link each class instance to the appropriate Moodle course, then add the ELIS class instances to the track.
- Auto-created class instances are assigned an id number that is a combination of the course and track id numbers.
Managing Tracks
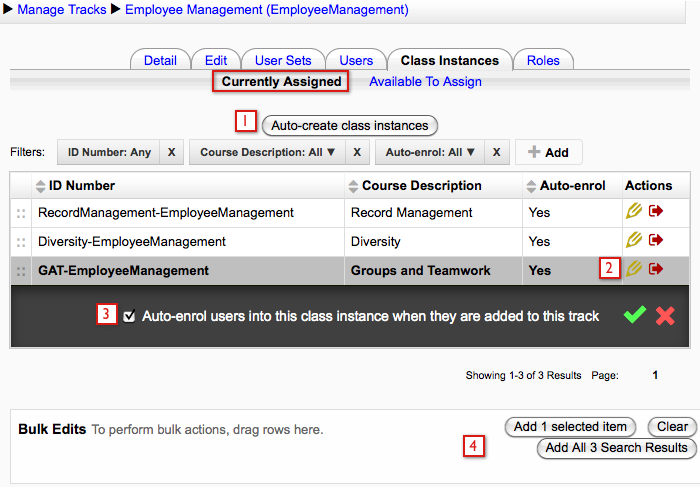
Once the track has been created, we recommend setting up the class instances before adding users to the track. If auto-create was used for class instances of the track, be sure to set the maximum number of students for each class if there is a class enrollment limit. Auto-created class instances have the maximum number of students set to zero by default, if set to zero there will be no class enrollment limit. Also check the auto-enroll setting for each class instance. The next image shows where to locate those settings.
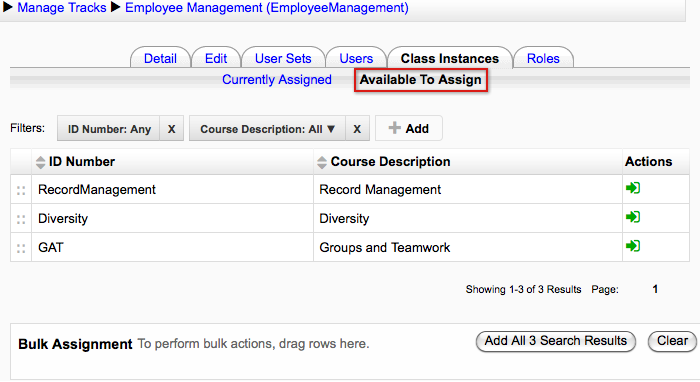
If you're not using the auto-create feature, create the class instances and then add the class instances to the track before adding users. Go to the Class Instances tab > Available to Assign screen. Only classes that are instances of course descriptions in the program the track is an instance of can be added here.
The next image shows the Class Instances tab currently assigned screen of the track we created above. The class instances listed here are auto-created. The track is an instance of a 3 course program so 3 class instances were created. From this screen you can:
- Select the "Auto-create class instances" button if you did not already do so when creating the track.
- Select the Edit icon to open a window for editing the auto-enroll settings for the class.
- Edit the auto-enroll settings, select the green check icon when finished.
- Drag and drop all three classes into to the bulk edit box to edit the auto-enroll settings for all 3 classes at once.
User/users that have not completed a prerequisite course description for the class instance will not be added to the class instance or waitlist until the prerequisite has been completed.
Once the class instances are setup properly it's time to add users to the track. Users can be added to the track by user sets or individually.
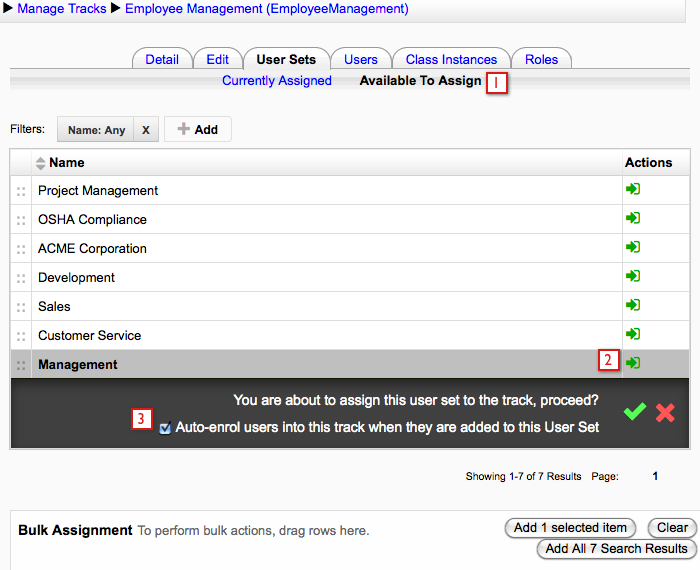
The next image is showing the User Sets tab of the track. To add a user set:
- Select the Available To Assign link
- Select assign icon in the user set row to assign it to the track
- After selecting the assign icon a confirmation window with auto-enroll settings appears
Adding user sets to a track:
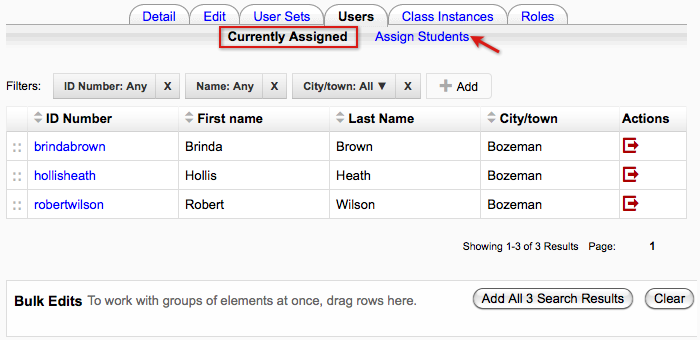
The next image shows the Users tab of the track. The users here were added by the Management user set above. When the Users tab is selected the screen opens on the Currently Assigned link, select the Assign Students link to manually assign new users.
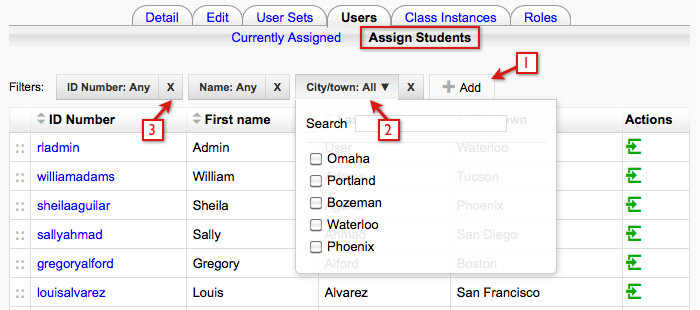
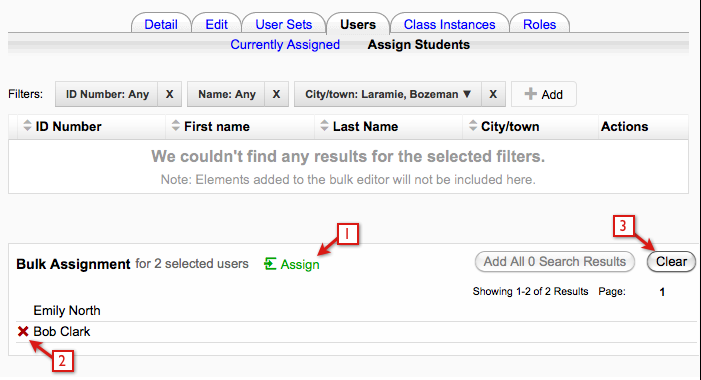
The Assign Students screen lists the users that can be assigned to the track. Above the list of users are the filters. The filters are configurable, so you can add just the filters you will use.
- To add a filter select the Add button and select the filter you want added to the list. ELIS custom user fields are added to the list of filters that can be selected.
- To use a filter just click on the filter, then you can enter text or in some cases there will be a drop down menu that can be used as well.
- To delete a filter select the X on the right hand side of the filter box.
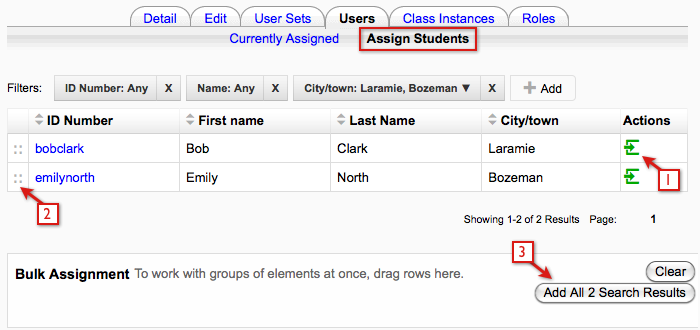
In the following example I selected the City/town filter and selected Bozeman checkbox then searched for Laramie and selected that checkbox as well. As soon as I selected a city checkbox the user list automatically filters users that match the criteria. When using a filter that uses text, as soon as you start typing text the filter starts filtering.
To assign users:
- Select the Assign icon located on the right hand side of the user row. Selecting the Assign icon opens a confirmation message, select the green check icon to confirm the assignment and proceed.
- Drag and drop users into the Bulk Assignment box at the bottom of the screen. Multiple users can be selected at once by using Shift + Select or Control + Select.
- If you want all users shown added to the Bulk Assignment box select the Add All Search Results button.
Once users are added to the Bulk Assignment box:
- The users can all be assigned at the same time by selecting the Assign link. Selecting the Assign link opens a confirmation message, select the green check icon to confirm the assignment and proceed.
- Individual users can be removed from the list by selecting the X icon next to their name. You have to hover over the user's row before the X icon will appear.
- All users can be removed from the bulk assignment list by selecting the Clear button.
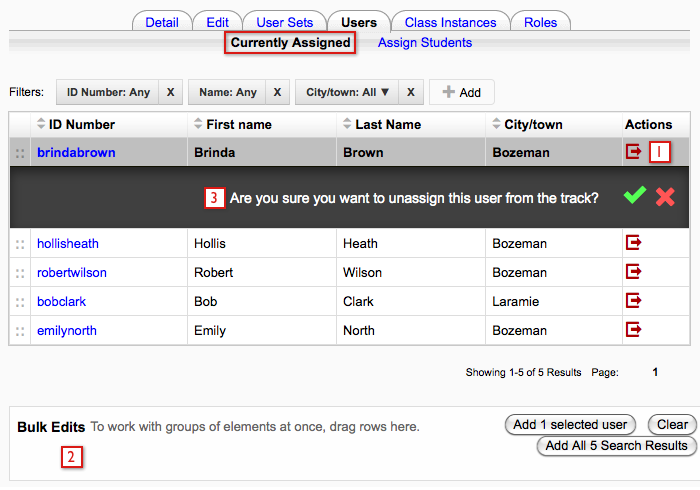
After assigning users they are added to the Currently Assigned screen. From this screen users can be removed from the track in the same way they were added. Select the (1) Unassign icon at the right hand side of the user row or use the (2) Bulk Edits box to unassign users. There will always be a (3) confirmation message before users are assigned or unassigned.
When the user set and the manually assigned users were assigned to the track, the users were automatically enrolled in all the class instances of the track.
If users are added to a track, they are added to the program that the track is an instance of.
If users are added to a class instance only, they must be added to the track (or program) manually.
Waitlisting - If more users are added to the class instance then seats are available in the class, then the users will be added to the waitlist. Users being added to the waitlist in a group are added in alphabetical order. Users are added to the class instance from the waitlist in the order they were added to the waitlist. If you want to auto-enroll users in the class instance from the waitlist as enrolled users, select the 'Auto-enroll users from waitlist' checkbox. The checkbox is located on the bottom of the creating/editing class instances screens.
Prerequisites - If users have not completed a prerequisite course description for a class instance, then they will have to complete the prerequisite before being added to a class instance or waitlist for a class instance.
