ELIS Data Hub using custom fields
ELIS custom fields can be set via ELIS Data Hub user and course files. For user files ELIS custom user fields can be included. For course files ELIS custom fields for classes, courses, programs, tracks, and user sets can be included. Only ELIS custom course fields work with course imports, only ELIS custom class fields work with class imports, etc.
ELIS Data Hub will only update ELIS custom fields. To update Moodle profile fields use Data Hub Basic for Moodle or synchronize the ELIS custom user field to update the Moodle profile field.
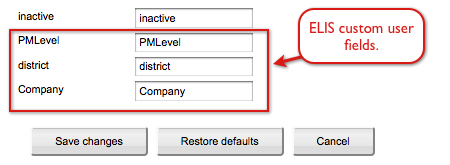
On the Administration block > Site Administration > Plugins > Local plugins > Data Hub plugins > Version 1 ELIS import > Field mapping, the User fields tab and Course fields tab have the custom fields listed below the standard fields. The following image is showing the User fields tab, one standard field and three custom user fields are shown. The property that should be entered in the user csv file is shown on the user property map, it can also be edited on this page. By default the ELIS custom field shortname is used.
The property shown on the field mapping interface is entered in the header of the csv file and the value to be assigned for this field will go in the user row. The following example shows two ELIS custom user fields in the csv file. The shortname for each custom field (shown in the field mapping interface above) has been entered in the file header, PMLevel and Company. The values for those custom fields are entered in the user rows below the header. PMLevel custom field is a menu of choices field, so the values entered have to be one of the existing menu options for the custom field. Company custom field is a text input field, so any text can be entered for a value.
The value entered will depend on the profile field:
- menu of choices: For this custom field assign one of the menu options to the user. For multivalued fields more than one option can be added. Add a / to separate the options, e.g., option1/option2/option3.
- boolean: For the checkbox profile fields enter "0" to keep the checkbox unchecked, and enter "1" to select the checkbox.
- text input: For text input, just add text.
- date/time: Use the format MMM/DD/YYYY or MMM/DD/YYYY:HH:MM. For example, Jan/01/2013.

