Import course data: diferència entre les revisions
(edited this page) |
|||
| Línia 1: | Línia 1: | ||
{{Re-using courses and activities}} | {{Re-using courses and activities}} | ||
Course activities and resources may be imported from any other course that the teacher has editing permissions. This will allow teachers to re-use instead of re-creating one or more [[ | Course activities and resources may be imported from any other course that the teacher has editing permissions. This will allow teachers to re-use instead of re-creating one or more [[Activities|activities]] or [[Resources|resources]]. | ||
Import course data is similar to a backup and restore process | Import course data is similar to a backup and restore process and does not include any user data. | ||
==How to use import== | ==How to use import== | ||
Import is a 6 step process. | Import is a 6 step process. | ||
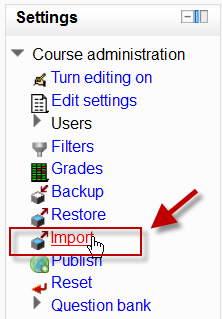
*In ''Course Administration>Settings'', click on the Import link: | |||
[[File:Importactivities.png]] | |||
*Select the course you wish to import from and click ''Continue''. | |||
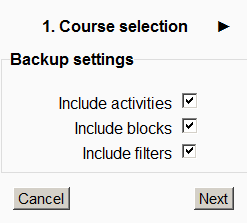
*You will be presented with the "backup settings" page. Use the check boxes for import activities, blocks and or filters as types of items which will show on the next screen. | |||
[[File:Importsettings.png]] | |||
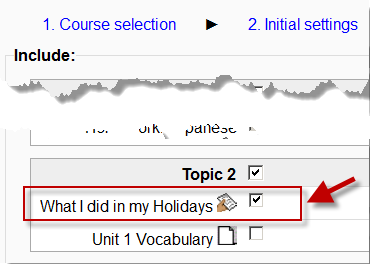
*Select the elements you want to include in the import in the Schema settings step. | |||
[[File:Includeforimport.png]] | |||
*Review and click ''Preform import'' or click the cancel or previous buttons. The confirmation page will place green check marks and red marks next to the backup settings and include item list for you to review. | |||
[[File:Includeforimport2.png]] | |||
# You should see the "Import complete. Click continue to return to the course." message, or an error message indicating that the import process did not take place. | # You should see the "Import complete. Click continue to return to the course." message, or an error message indicating that the import process did not take place. | ||
==Examples and tips== | ==Examples and tips== | ||
Revisió del 18:28, 12 oct 2011
Plantilla:Re-using courses and activities
Course activities and resources may be imported from any other course that the teacher has editing permissions. This will allow teachers to re-use instead of re-creating one or more activities or resources.
Import course data is similar to a backup and restore process and does not include any user data.
How to use import
Import is a 6 step process.
- In Course Administration>Settings, click on the Import link:
- Select the course you wish to import from and click Continue.
- You will be presented with the "backup settings" page. Use the check boxes for import activities, blocks and or filters as types of items which will show on the next screen.
- Select the elements you want to include in the import in the Schema settings step.
- Review and click Preform import or click the cancel or previous buttons. The confirmation page will place green check marks and red marks next to the backup settings and include item list for you to review.
- You should see the "Import complete. Click continue to return to the course." message, or an error message indicating that the import process did not take place.
Examples and tips
Importing a quiz from course A to course B, will bring in the questions.
- Tip: Groups can also be imported as a batch from a file.
See also
Course backup & Course restore - for a similar process


