Installing plugins
Why install additional plugins?
Plugins enable you to add additional features and functionality to Moodle, such as new activities, new quiz question types, new reports, integrations with other systems and many more.
Note: Certain hosting solutions, such as MoodleCloud, prevent plugins being installed from within Moodle.
Considerations for production sites (skip if you're just moodling)
VERY IMPORTANT Warning: Please be aware that some plugins have not been reviewed, and the quality and/or suitability for your Moodle site has not been checked. Please be careful. It may not do what you expect, it may have serious security issues or it may even not work at all. This is however improving over time with the evolving new plugins directory system.
- If you have a large site for production purposes consider if you really need the plugin? More functionality means more things to support, more things to (potentially) go wrong and more things to worry about at upgrade time.
- Is the plugin supported and maintained? If something goes wrong can you get support? Will bugs be fixed?
- If the plugin does not work in a future version of Moodle, what will you do about it?
- Beware of patches (Moodle Plugins Directory Other category) ! If a plugin modifies or replaces core files then be very careful. It can only be guaranteed to work with the exact build (version) of Moodle it was created for and is highly unlikely to survive a Moodle upgrade.
Installing a plugin
To install a plugin, its source code must be put (deployed) into the appropriate location inside the Moodle installation directory and the main administration page Administration > Site administration > Notifications must be visited. There are three ways how the plugin code can be deployed into Moodle.
Plugin code may be deployed from within Moodle, either directly from the Moodle plugins directory or by uploading a ZIP file. The web server process has to have write access to the plugin type folder where the new plugin is to be installed in order to use either of these methods.
Alternatively, a plugin may be deployed manually at the server.
Installing directly from the Moodle plugins directory
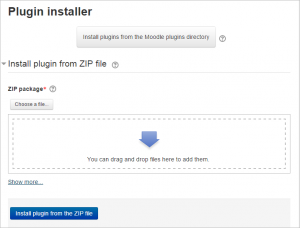
- Login as an admin and go to Administration > Site administration > Plugins > Install plugins.
- Click the button 'Install plugins from Moodle plugins directory'.
- Search for a plugin with an Install button, click the Install button then click Continue.
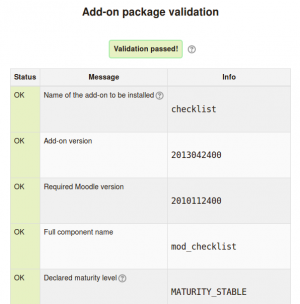
- Check that you obtain a 'Validation passed!' message, then click the button 'Install plugin'.
Installing via uploaded ZIP file
- Go to the Moodle plugins directory, select your current Moodle version, then choose a plugin with a Download button and download the ZIP file.
- Login to your Moodle site as an admin and go to Administration > Site administration > Plugins > Install plugins.
- New in 2.9: Upload the ZIP file. You should only be prompted to add extra details (in the Show more section) if your plugin is not automatically detected.
- If your target directory is not writeable, you will see a warning message.
- On the next screen you will then see an acknowledgement message that you are take responsibility for installing the plugin.
Installing manually at the server
If you can't deploy the plugin code via the administration web interface, you have to copy it to the server file system manually (e.g. if the web server process does not have write access to the Moodle installation tree to do this for you).
First, establish the correct place in the Moodle code tree for the plugin type. Common locations are:
- /path/to/moodle/theme/ - themes
- /path/to/moodle/mod/ - activity modules and resources
- /path/to/moodle/blocks/ - sidebar blocks
- /path/to/moodle/question/type/ - question types
- /path/to/moodle/course/format/ - course formats
- /path/to/moodle/admin/report/ - admin reports
See dev:Plugins for the full list of all plugin types and their locations within the Moodle tree.
- Go to the [https://moodle.org/plugins Moodle plugins directory; select your current Moodle version, then choose a plugin with a Download button and download the ZIP file.
- Upload or copy it to your Moodle server.
- Unzip it in the right place for the plugin type (or follow the plugin instructions).
- In your Moodle site (as admin) go to Settings > Site administration > Notifications (you should, for most plugin types, get a message saying the plugin is installed).
Note: The plugin may contain language files. They'll be found by your Moodle automatically. These language strings can be customized using the standard Settings > Site administration > Language editing interface. If you get a "Database error" when you try to edit your language files, there is a strong chance that the language files included within the downloaded ZIP file of this plugin have a coding problem. If you delete the plugin_name/lang/other_language_different_to_English/ folder with the new language strings and the database error disappears, this is indeed the case. Please notify the plugin maintainer, so that it can be fixed in future releases.
Troubleshooting
Errors
If you obtain an error, please turn debugging on to obtain additional information about the cause of the error.
- tool_installaddon/err_curl_exec - cURL error 60
- This suggests problems with the validation of the SSL certificate of the remote (moodle.org) site. This is also a known problem in Moodle Windows 7 servers running the Moodle package for Windows. See SSL certificate for moodle.org for more info and possible solutions.
A file permissions error has occurred
A common error after installing plugins is that when you create an instance of the module and then save and display it, it reports the error, "A file permissions error has occurred. Please check the permissions on the script and the directory it is in and try again." If you get this, the file permissions of the package are mostl likely set to 711 preventing them from running correctly. With your preferred FTP client or via your web hosts control panel, set the file permissions of all the files and directories in the installed module, e.g. /moodle/mod/[myplugin]/ to 755 and then see if you can successfully view the module instance.
Default exception handler: Error writing to database Debug: Duplicate entry 'en_us-...
- These errors are usually caused by a third party plugin.
- To find the involved plugin, go to http://lang.moodle.org and use the AMOS tool to find all the strings with the given string identifier.
- Remove the suspected plugin and check if the error has disappeared. If so, please contact the plugin maintainer and report this issue.
- Please see this forum thread for known causes and fixes.
When installing manually
- Check the file permissions. The web server needs to be able to read the plugin files. If the the rest of Moodle works then try to make the plugin permissions and ownership match.
- Did you definitely unzip or install the plugin in the correct place?
- Because Moodle scans plugin folders for new plugins you cannot have any other files or folders there. Make sure you deleted the zip file and don't try to rename (for example) an old version of the plugin to some other name - it will break.
- Make sure the directory name for the plugin is correct. All the names have to match. If you change the name then it won't work.
Obtaining help
Ask in the appropriate forum in Using Moodle. Make sure you describe your system (including versions of MySQL, PHP etc.), what you tried and what happened. Copy and paste error messages exactly. Provide the link to the version of the plugin you downloaded (some have very similar names).
Uninstalling a plugin
To uninstall a plugin
- Go to Administration> Site Administration > Plugins > Plugins overview and click the Uninstall link opposite the plugin you wish to remove
- Use a file manager to remove/delete the actual plugin directory as instructed, otherwise Moodle will reinstall it next time you access the site administration
Plugins overview
The Plugins overview page in Administration > Site Administration > Plugins > Plugins overview lists all installed plugins, together with the version number,release (new in 2.7), availability (enabled or disabled) and settings link (if applicable).
A 'Check for available updates' button enables admins to quickly check for any updates available for plugins installed on the site (from the plugins directory). Any updates available are highlighted, with further information and a download link in the notes column opposite the plugin.
Plugin updating from within Moodle
An administrator can enable updates deployment in Administration > Site Administration > Server > Update notifications. Then when updates are available, 'Install this update' buttons are shown on the Plugins overview page. See Automatic updates deployment for more details.
Preventing installing plugins from within Moodle
If required, installing and updating from within Moodle can be prevented by copying the following lines of code from config-dist.php and pasting them in config.php.
// Use the following flag to completely disable the On-click plugin installation
// feature and hide it from the server administration UI.
//
//      $CFG->disableonclickaddoninstall = true;
See also
- list of (year 2015) favorite plugins by Gavin Henrick
- Notifications for further details of update notifications
- Plugin Review Criteria
- Plugins FAQ
- Moodle in English General plugins forum
- Installing a contributed extension from its Git repository
- Managing add-ons in Moodle 2.5 blog post by Gavin Henrick
- Moodle 2 Plugins Administration MoodleBites video on YouTube
- Install a New Theme MoodleBites video on YouTube
For developers:


