Building Quiz: Difference between revisions
Tomaz Lasic (talk | contribs) No edit summary |
|||
| (101 intermediate revisions by 9 users not shown) | |||
| Line 1: | Line 1: | ||
{{Quiz}} | {{Quiz}} | ||
==How a Moodle quiz works== | |||
The word “quiz” might conjure up for some images of TV game shows, but a Moodle quiz is basically a set of questions presented to the learner which may be automatically marked by Moodle or graded later by the teacher. The questions may be in sentence or number form or contain various media such as video or sound. They do not all need to be the same type of questions: a quiz may contain multiple choice, matching, essays (teacher-graded) and calculated. Feedback may be given at any or all stages of the process. | |||
Once a quiz is made, that’s not the end of it. A Moodle quiz is environmentally friendly: its questions are saved in a [[Question bank]] and may be recycled for use elsewhere. Thus, Mr Brown could create a Physics Quiz with 20 questions for his class, Class Brown, and his colleague Mr Smith sharing the course could save himself valuable time by resusing 5 of Mr Brown’s questions in his own General Science quiz for Class Smith. (See also [[How to let teachers share questions between courses|Question Sharer role]] for sharing questions across the site) | |||
If you think of a quiz as a book, the [[Quiz settings]] are equivalent to the front cover; the quiz itself is contained within when the questions are created. (Be careful : once you have chosen the Quiz Settings, it will be “live” on your course page, unless you hide it, so your learners could potentially see a quiz with no questions, like a front cover with no content.) | |||
Note that it is possible to create questions directly in the [[Question bank]] without first creating a quiz. These questions may then be used later. | |||
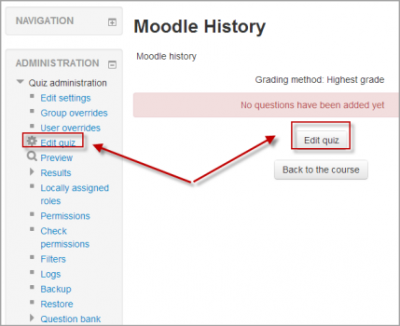
Once a quiz has been added to the course and the [[Quiz settings]] established,the teacher can start to build the quiz. The teacher can access the quiz to edit the questions by clicking directly on the Quiz name on the course home page or by clicking "Edit quiz" in ''Administration>Quiz administration.'' | |||
{| | |||
| [[File:editquiz.png|thumb|400px|Accessing the quiz to add or edit questions]] | |||
|} | |||
== | ==Adding questions== | ||
{{New features}} | |||
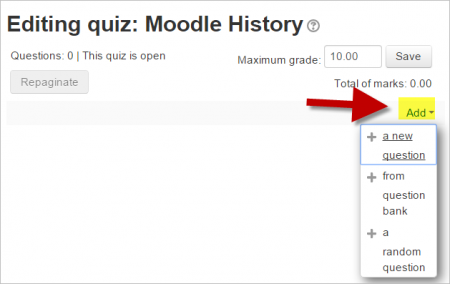
Once you have accessed the quiz editing screen as above, you can add questions from a number of locations: | |||
#Click the 'Add' link as in the screenshot below. (''Note that in the US, the term 'marks' is replaced by 'points'.'') | |||
#When it opens up, choose either to add a new question, to select a question from the question bank or to add a random question. | |||
{| | |||
| [[File:newaddquestion.png|thumb|450px|Adding a question]] | |||
|} | |||
=== | ===Creating a new question=== | ||
1. To make a brand new question, click 'Add' and then '+ a new question'. | |||
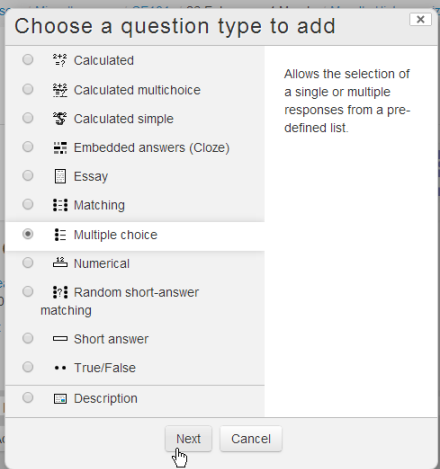
2. From the next screen, choose the question type you want to add and click "Next" | |||
'''NOTE:''' ''When you click on a question type on the left, helpful information appears on the right''. | |||
: | {| | ||
| [[File:questionpicker.png|thumb|440px|Selecting a question type]] | |||
|} | |||
3. Fill in the question form, making sure to give a grade to the correct answer. | |||
4. Click "Save changes". | |||
The same question will never appear twice in a quiz. If you include several random questions then different questions will always be chosen for each of them. If you mix random questions with non-random questions then the random questions will be chosen so that they do not duplicate one of the non-random questions. This does imply that you need to provide enough questions in the category from which the random questions are chosen, otherwise the student will be shown a friendly error message. The more questions you provide the more likely it will be that students get different questions on each attempt. | {| | ||
| [[File:newlycreatedquestion.png|thumb|430px|A question when it has been created]] | |||
|} | |||
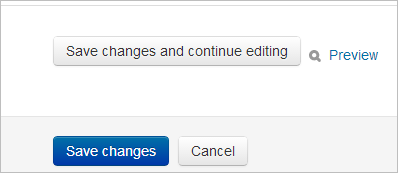
'''Note:''' If you have a very complex question, and you want to check it as you go along, you can preview it and then click "Save changes and continue editing". | |||
{| | |||
| [[File:savechangesandcontinuediting.png|thumb|398px|Save changes and continue editing]] | |||
|} | |||
Note that when a question has been created, an icon and words display its type (eg multiple choice). It can be modified by clicking the edit icon (eg [[File:editicon.png]]) and previewed or deleted by clicking the magnifying glass or X icons:(eg [[File:previewdelete1.png]]) | |||
====Adding responses and feedback==== | |||
When you add responses and feedback you can display one or more toolbars in the editor: | |||
{| | |||
| [[File:quizform1.png|thumb|350px|With one toolbar]] | |||
| [[File:quizform2.png|thumb|350px|With three toolbars]] | |||
|} | |||
You can continue adding questions this way, clicking 'Add' and '+ a new question' each time. | |||
Since Moodle offers many types of questions, there are slightly different methods for adding feedback to a question. Generally however, you can add: | |||
* General feedback that appears after a question, regardless of which answer a student chooses. | |||
* Feedback for any correct or incorrect answers, regardless of which answers the student chooses. | |||
* Specific feedback for each answer. | |||
* Feedback that appears during a quiz, after a quiz, after a quiz and while it is still open, or after a quiz is closed. | |||
You can view details of how to add feedback for each Moodle question type when you create a specific quiz question, by clicking the question mark icons that appear. | |||
===Choosing a pre-made question=== | |||
*If other teachers in the course have made questions, or if a teacher made questions in an earlier quiz, these can be added to the current quiz by clicking 'Add' and '+ from question bank' . | |||
* Click the + sign next to one question you want to add it (1 in screenshot below) | |||
* If you have several questions, or you want to add all the questions, tick the box of each question or the top box (2 in screenshot below) and then click 'Add selected questions to the quiz' (3 in the screenshot below). | |||
* To sort the questions, click the column headings. The default sort order (T) is short for question type. (2 in the screenshot below) | |||
* To ensure all previously made questions are available, make sure to tick the boxes "also show questions from sub-categories/old questions". | |||
{| | |||
| [[File:addfromqbank1.png|thumb|350px|Using a previously made question]] | |||
|} | |||
'''Note:''' It is also possible to import pre-made questions into your quiz, from ''Quiz administration>Question bank>Import.'' See [[Import questions]] for more information. Sample questions are available from the [http://moodle.net/mod/data/view.php?d=1&mode=list&perpage=40&search=&sort=0&order=DESC&advanced=0&filter=1&advanced=1&f_2=Quiz+questions&f_11=&f_13=&f_12=&f_9=&f_8= Moodle.net content database.] | |||
===Adding a random question=== | |||
As long as you have questions in the question bank, you can add random questions to your quiz by clicking 'Add' and then '+ a random question'. This might be useful if you have students in a class taking a quiz at the same time, because they are unlikely to get the same questions at the same time. The same question will never appear twice in a quiz. If you include several random questions then different questions will always be chosen for each of them. If you mix random questions with non-random questions then the random questions will be chosen so that they do not duplicate one of the non-random questions. This does imply that you need to provide enough questions in the category from which the random questions are chosen, otherwise the student will be shown a friendly error message. The more questions you provide the more likely it will be that students get different questions on each attempt. | |||
The grade for the randomly chosen question will be rescaled so that the maximum grade is what you have chosen as the grade for the random question. | The grade for the randomly chosen question will be rescaled so that the maximum grade is what you have chosen as the grade for the random question. | ||
You can add one or more random questions by choosing the number and category in the question bank. Note the die icon to highlight random question selection. | |||
{| | |||
| [[File:addrandomq.png|thumb|400px|Adding a random question]] | |||
| [[File:newrandom.png|thumb|400px|Random question selected for quiz]] | |||
|} | |||
=== | ====Quiz question tags==== | ||
Note that although it is possible to tag questions, the feature does not currently work. See forum discussion: https://moodle.org/mod/forum/discuss.php?d=194119 | |||
===Question categories=== | |||
Questions can be stored and retrieved from categories in the Question bank. When you make a new question it defaults to the category with the course name. So if you make a quiz in the Senior Physics course, questions will automatically be added to "Default for Senior Physics". You can opt to have your quiz questions in a category of their own ("Quizname") or to add a subcategory. | |||
To add a subcategory, go to ''Administration>Quiz administration>Question bank>Categories'' For more information on question contexts and categories, see [[Question bank]] | |||
Users will have access to different categories according to their permissions. For example, a regular teacher might only have access to question categories in his own Physics course whereas his Faculty Head of Science with permissions in all science courses might have access to question categories in Biology and Chemistry as well. | |||
== | ==Quiz layout== | ||
{{New features}} | |||
*You can choose in '' Administration>Quiz administration>Edit settings>Layout'' whether to have a new page for every question or after a certain number of questions. | |||
* You can add a page break between questions by clicking the arrow icon (where the arrows are pointing away from each other) (1 in the screenshot below) A new page will be created. (2 in the screenshot below) | |||
*You can remove pages by clicking the arrow icon (where the arrows are pointing towards each other). (3 in the screenshot below) | |||
[[File:addpagebreak.png|thumb|500px|center]] | |||
*You can also change the layout of the whole quiz by clicking the 'Repaginate' button: | |||
[[File:repaginate.png|thumb|center|500px]] | |||
*Questions may be moved by dragging and dropping using the crosshairs icon: [[File:crosshairsicon.png]] | |||
==Assigning points to questions == | |||
''Administration > Quiz administration > Edit quiz > Editing quiz'' | |||
You can set how many points each question is worth by changing the number in the box to the right of each question and you can change the maximum grade by changing the number in the box top right at the top of the quiz. The default is one point per question and 100.00 maximum grade. | |||
{| | |||
| [[File:allquizgrades.png|thumb|450px|Points per question and max grade]] | |||
| [[File:editmaxmark.png|thumb|450px|Edit individual marks]] | |||
|} | |||
The quiz module will do any maths, so for example, a 2 point question will be worth 2 times more when the Quiz module determines how many point out of 10 to award the student. | |||
==Previewing the quiz== | |||
*You can preview individual questions by clicking the magnifying glass icon. | |||
*You can preview the whole quiz by clicking the "Preview" link in ''Administration>Quiz administration>Preview'' | |||
*The quiz works like a real quiz so you can see your grades and any feedback for correct/incorrect answers just as a student would see them. | |||
'''NOTE''': ''To get a more accurate view of how a student would view your quiz, it is advised to log in with a "dummy" student account created by the admin for testing activities. This is more reliable than the 'switch role to student' feature. | |||
*See also the question: 'How can a teacher '-dry run a quiz..?' in [[Quiz FAQ]]'' | |||
{| | |||
| [[File:singleqp.png|thumb|300px|Previewing a single question]] | |||
| [[File:previewquiz.png|thumb|200px|Click to preview the whole quiz]] | |||
| [[File:quizpreviewed.png|thumb|200px|Quiz in preview mode]] | |||
|} | |||
==After quiz has been attempted== | ==After quiz has been attempted== | ||
If one or more students have taken the quiz, you will see a list of all the questions in the quiz and a notice saying that you cannot add or remove questions. | If one or more students have taken the quiz, you will see a list of all the questions in the quiz and a notice saying that you cannot add or remove questions. | ||
You can change the order of questions, regrade them, preview an individual question and click on an question edit link that will allow you to directly edit the question stored in the question bank. | |||
'''NOTE:''' You can delete all quiz attempts by students and then edit the quiz as if no students had attempted it. To do this,click the quiz name and then the Results link in the Navigation block. This will present a list of students and their scores. Click "Select all" and then "Delete selected attempts". | |||
===Dealing with faulty questions=== | |||
There are several ways to deal with "bad" questions in a quiz. | |||
::*Change the grade for the bad question to 0 in the quiz. | ::*Change the grade for the bad question to 0 in the quiz. | ||
::*Edit the question, changing what you will accept as a correct answer, then regrading the exam. Remember when changing a question that the next time it is used it will be as it was in the last edit. Also, regrading will only | ::*Edit the question, changing what you will accept as a correct answer, then regrading the exam. Remember when changing a question that the next time it is used it will be as it was in the last edit. Also, regrading will only affect one quiz at a time. | ||
::*You can edit the question to explain the situation to the student and then you can set the grade for the question to zero. After you make such changes you should regrade the quiz by clicking on the '''Results''' tab and then the '''Regrade''' tab. This will change the grade for all students who have taken the quiz so far. Remember, if the question is used by another quiz, your "explanation" will appear as part of that quiz. | ::*You can edit the question to explain the situation to the student and then you can set the grade for the question to zero. After you make such changes you should regrade the quiz by clicking on the '''Results''' tab and then the '''Regrade''' tab. This will change the grade for all students who have taken the quiz so far. Remember, if the question is used by another quiz, your "explanation" will appear as part of that quiz. | ||
::*You can change the grade for the bad question and then move or delete the question from your question category. The question will still appear on the quiz. Some places do not like to delete any question, but will move them to a "dead" or "bad" question category. | ::*You can change the grade for the bad question and then move or delete the question from your question category. The question will still appear on the quiz. Some places do not like to delete any question, but will move them to a "dead" or "bad" question category. | ||
::*When you discover a bad question in your quiz, it may | ::*When you discover a bad question in your quiz, it may affect the question bank. Remember that a final might be made up of a certain number of random questions drawn from different question categories, the same categories used in a smaller subject quiz. It can be very important do something about bad or invalid questions in a question category when the categories are use in other places. | ||
==See also== | ==See also== | ||
*[[ | *[[Questions]] in [[Managing a Moodle course]] | ||
[[Category:Questions]] | |||
[[de:Test | [[de:Test erstellen]] | ||
[[es:Construyendo un examen]] | |||
Latest revision as of 16:25, 22 September 2015
How a Moodle quiz works
The word “quiz” might conjure up for some images of TV game shows, but a Moodle quiz is basically a set of questions presented to the learner which may be automatically marked by Moodle or graded later by the teacher. The questions may be in sentence or number form or contain various media such as video or sound. They do not all need to be the same type of questions: a quiz may contain multiple choice, matching, essays (teacher-graded) and calculated. Feedback may be given at any or all stages of the process.
Once a quiz is made, that’s not the end of it. A Moodle quiz is environmentally friendly: its questions are saved in a Question bank and may be recycled for use elsewhere. Thus, Mr Brown could create a Physics Quiz with 20 questions for his class, Class Brown, and his colleague Mr Smith sharing the course could save himself valuable time by resusing 5 of Mr Brown’s questions in his own General Science quiz for Class Smith. (See also Question Sharer role for sharing questions across the site)
If you think of a quiz as a book, the Quiz settings are equivalent to the front cover; the quiz itself is contained within when the questions are created. (Be careful : once you have chosen the Quiz Settings, it will be “live” on your course page, unless you hide it, so your learners could potentially see a quiz with no questions, like a front cover with no content.)
Note that it is possible to create questions directly in the Question bank without first creating a quiz. These questions may then be used later.
Once a quiz has been added to the course and the Quiz settings established,the teacher can start to build the quiz. The teacher can access the quiz to edit the questions by clicking directly on the Quiz name on the course home page or by clicking "Edit quiz" in Administration>Quiz administration.
Adding questions
New feature
in Moodle 2.8!
Once you have accessed the quiz editing screen as above, you can add questions from a number of locations:
- Click the 'Add' link as in the screenshot below. (Note that in the US, the term 'marks' is replaced by 'points'.)
- When it opens up, choose either to add a new question, to select a question from the question bank or to add a random question.
Creating a new question
1. To make a brand new question, click 'Add' and then '+ a new question'.
2. From the next screen, choose the question type you want to add and click "Next"
NOTE: When you click on a question type on the left, helpful information appears on the right.
3. Fill in the question form, making sure to give a grade to the correct answer.
4. Click "Save changes".
Note: If you have a very complex question, and you want to check it as you go along, you can preview it and then click "Save changes and continue editing".
Note that when a question has been created, an icon and words display its type (eg multiple choice). It can be modified by clicking the edit icon (eg ![]() ) and previewed or deleted by clicking the magnifying glass or X icons:(eg
) and previewed or deleted by clicking the magnifying glass or X icons:(eg ![]() )
)
Adding responses and feedback
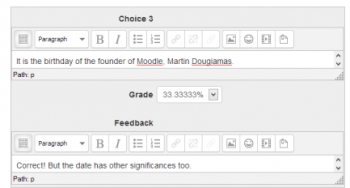
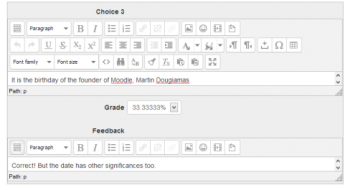
When you add responses and feedback you can display one or more toolbars in the editor:
You can continue adding questions this way, clicking 'Add' and '+ a new question' each time.
Since Moodle offers many types of questions, there are slightly different methods for adding feedback to a question. Generally however, you can add:
- General feedback that appears after a question, regardless of which answer a student chooses.
- Feedback for any correct or incorrect answers, regardless of which answers the student chooses.
- Specific feedback for each answer.
- Feedback that appears during a quiz, after a quiz, after a quiz and while it is still open, or after a quiz is closed.
You can view details of how to add feedback for each Moodle question type when you create a specific quiz question, by clicking the question mark icons that appear.
Choosing a pre-made question
- If other teachers in the course have made questions, or if a teacher made questions in an earlier quiz, these can be added to the current quiz by clicking 'Add' and '+ from question bank' .
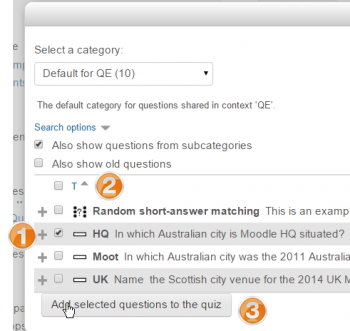
- Click the + sign next to one question you want to add it (1 in screenshot below)
- If you have several questions, or you want to add all the questions, tick the box of each question or the top box (2 in screenshot below) and then click 'Add selected questions to the quiz' (3 in the screenshot below).
- To sort the questions, click the column headings. The default sort order (T) is short for question type. (2 in the screenshot below)
- To ensure all previously made questions are available, make sure to tick the boxes "also show questions from sub-categories/old questions".
Note: It is also possible to import pre-made questions into your quiz, from Quiz administration>Question bank>Import. See Import questions for more information. Sample questions are available from the Moodle.net content database.
Adding a random question
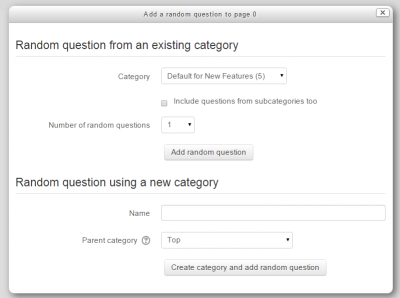
As long as you have questions in the question bank, you can add random questions to your quiz by clicking 'Add' and then '+ a random question'. This might be useful if you have students in a class taking a quiz at the same time, because they are unlikely to get the same questions at the same time. The same question will never appear twice in a quiz. If you include several random questions then different questions will always be chosen for each of them. If you mix random questions with non-random questions then the random questions will be chosen so that they do not duplicate one of the non-random questions. This does imply that you need to provide enough questions in the category from which the random questions are chosen, otherwise the student will be shown a friendly error message. The more questions you provide the more likely it will be that students get different questions on each attempt.
The grade for the randomly chosen question will be rescaled so that the maximum grade is what you have chosen as the grade for the random question.
You can add one or more random questions by choosing the number and category in the question bank. Note the die icon to highlight random question selection.
Quiz question tags
Note that although it is possible to tag questions, the feature does not currently work. See forum discussion: https://moodle.org/mod/forum/discuss.php?d=194119
Question categories
Questions can be stored and retrieved from categories in the Question bank. When you make a new question it defaults to the category with the course name. So if you make a quiz in the Senior Physics course, questions will automatically be added to "Default for Senior Physics". You can opt to have your quiz questions in a category of their own ("Quizname") or to add a subcategory.
To add a subcategory, go to Administration>Quiz administration>Question bank>Categories For more information on question contexts and categories, see Question bank
Users will have access to different categories according to their permissions. For example, a regular teacher might only have access to question categories in his own Physics course whereas his Faculty Head of Science with permissions in all science courses might have access to question categories in Biology and Chemistry as well.
Quiz layout
New feature
in Moodle 2.8!
- You can choose in Administration>Quiz administration>Edit settings>Layout whether to have a new page for every question or after a certain number of questions.
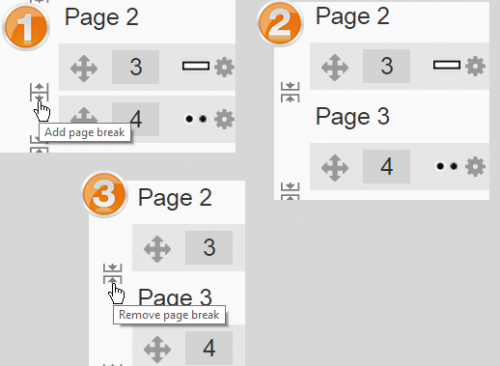
- You can add a page break between questions by clicking the arrow icon (where the arrows are pointing away from each other) (1 in the screenshot below) A new page will be created. (2 in the screenshot below)
- You can remove pages by clicking the arrow icon (where the arrows are pointing towards each other). (3 in the screenshot below)
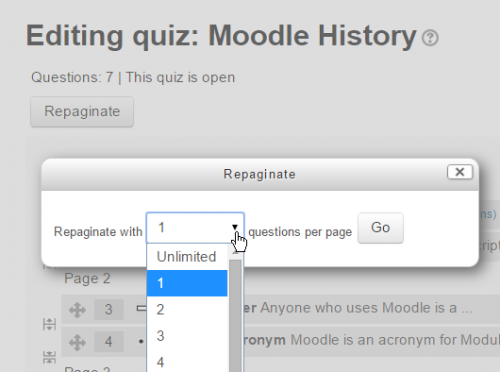
- You can also change the layout of the whole quiz by clicking the 'Repaginate' button:
Assigning points to questions
Administration > Quiz administration > Edit quiz > Editing quiz
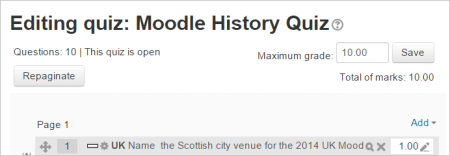
You can set how many points each question is worth by changing the number in the box to the right of each question and you can change the maximum grade by changing the number in the box top right at the top of the quiz. The default is one point per question and 100.00 maximum grade.
The quiz module will do any maths, so for example, a 2 point question will be worth 2 times more when the Quiz module determines how many point out of 10 to award the student.
Previewing the quiz
- You can preview individual questions by clicking the magnifying glass icon.
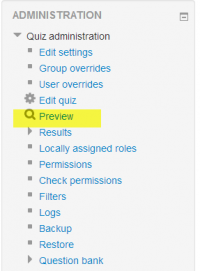
- You can preview the whole quiz by clicking the "Preview" link in Administration>Quiz administration>Preview
- The quiz works like a real quiz so you can see your grades and any feedback for correct/incorrect answers just as a student would see them.
NOTE: To get a more accurate view of how a student would view your quiz, it is advised to log in with a "dummy" student account created by the admin for testing activities. This is more reliable than the 'switch role to student' feature.
- See also the question: 'How can a teacher '-dry run a quiz..?' in Quiz FAQ
After quiz has been attempted
If one or more students have taken the quiz, you will see a list of all the questions in the quiz and a notice saying that you cannot add or remove questions.
You can change the order of questions, regrade them, preview an individual question and click on an question edit link that will allow you to directly edit the question stored in the question bank.
NOTE: You can delete all quiz attempts by students and then edit the quiz as if no students had attempted it. To do this,click the quiz name and then the Results link in the Navigation block. This will present a list of students and their scores. Click "Select all" and then "Delete selected attempts".
Dealing with faulty questions
There are several ways to deal with "bad" questions in a quiz.
- Change the grade for the bad question to 0 in the quiz.
- Edit the question, changing what you will accept as a correct answer, then regrading the exam. Remember when changing a question that the next time it is used it will be as it was in the last edit. Also, regrading will only affect one quiz at a time.
- You can edit the question to explain the situation to the student and then you can set the grade for the question to zero. After you make such changes you should regrade the quiz by clicking on the Results tab and then the Regrade tab. This will change the grade for all students who have taken the quiz so far. Remember, if the question is used by another quiz, your "explanation" will appear as part of that quiz.
- You can change the grade for the bad question and then move or delete the question from your question category. The question will still appear on the quiz. Some places do not like to delete any question, but will move them to a "dead" or "bad" question category.
- When you discover a bad question in your quiz, it may affect the question bank. Remember that a final might be made up of a certain number of random questions drawn from different question categories, the same categories used in a smaller subject quiz. It can be very important do something about bad or invalid questions in a question category when the categories are use in other places.
