ELIS Programs
ELIS Programs
Program Examples
Programs in ELIS enable you to group Course Descriptions in various ways. Often, a group of Course Descriptions may lead to a certificate or other validation that a learner has acheived a particular level of mastery of the subject(s) covered in the Course Descriptions of a Program. Programs are also used to set pre-requisite and co-requisite Course Descriptions, as well as to build tracks of Class Instances that run at a given time or sequence.
While there are many ways to use and setup Programs, below are a few examples:
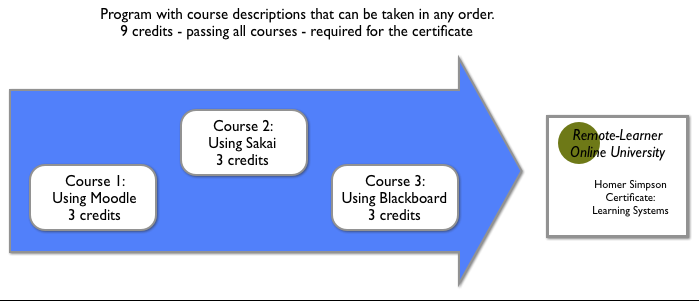
In the example above, the Program contains 3 Course Descriptions which may be taken in any order. Completion of the Program requires 9 credits, and each course is 3 credits, so all must be completed in order to earn the certificate.
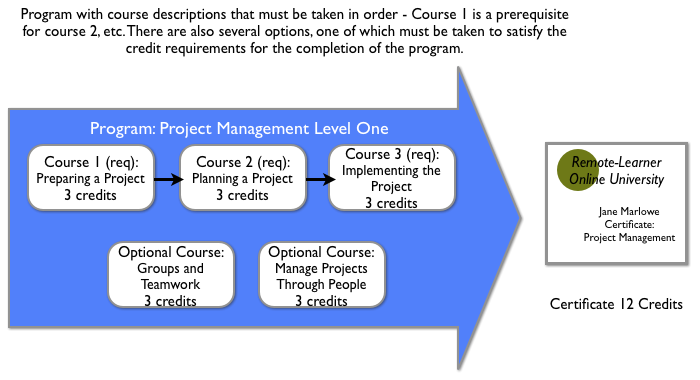
In the example above, there are 3 required Course Descriptions that must be taken in order and two optional Course Descriptions. The certificate requires 12 credits, so one of the optional Course Descriptions must be taken to earn it.
These are just a few examples of the way Programs can be used to organize learning plans for your learners. The certificates are optional.
Creating/Editing Programs
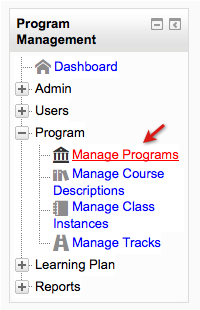
Click on the Manage Programs link to create a new Program and or to edit the Programs you have already created.
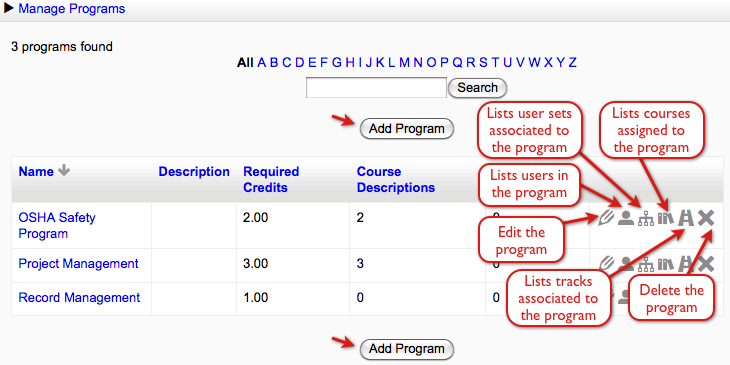
If you have already defined Programs in your site, you will see the Programs listed here. The following image shows the manage Programs screen, the Programs names are listed in the left hand column. The icons will link to specific screens of each Program. Select one of the Add Program buttons to add a new Program, the buttons are located directly above and below the Programs list.
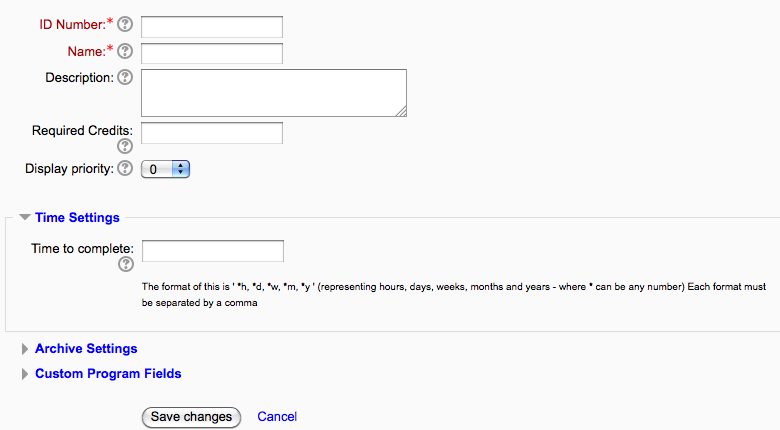
When you click the Add Program button above, you will see the Add Program screen:
The following settings can be entered on the add Program screen:
- ID Number - This field is required. The id number will display in reports.
- Name - This field is required.
- Long Description - A complete and thorough description will help administrators, teachers and students know if this Program is correct for them.
- Required Credits - The number of credits the learner must receive before the Program is complete.
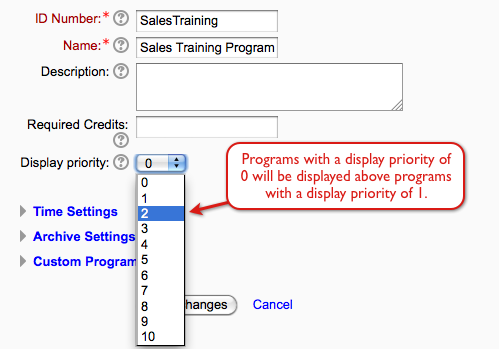
- Display Priority - The lower the priority number, the higher the Program will display in the user's Learning Plan folder.
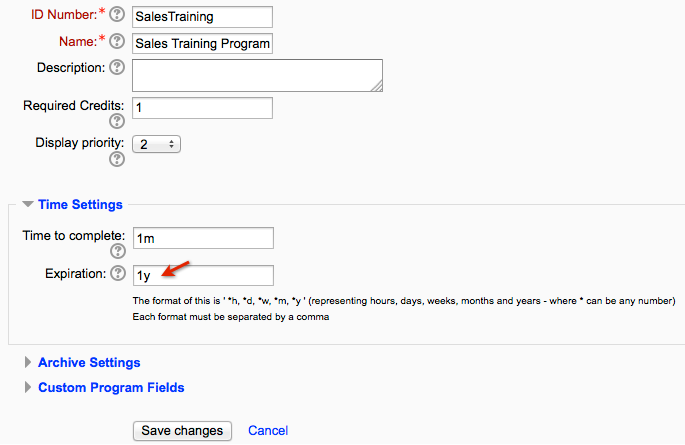
- Time to complete - The amount of time a user has to complete a Program once assigned to it. For example, enter 18m for 18 months.
- Expiration (not shown--must be enabled by administrator (Program Administration > Admin > Configuration)) - The frequency the Program must be completed, if necessary. For example, enter 4y for 4 years. The format for entries in the last two fields is described below them, shown in the image above.
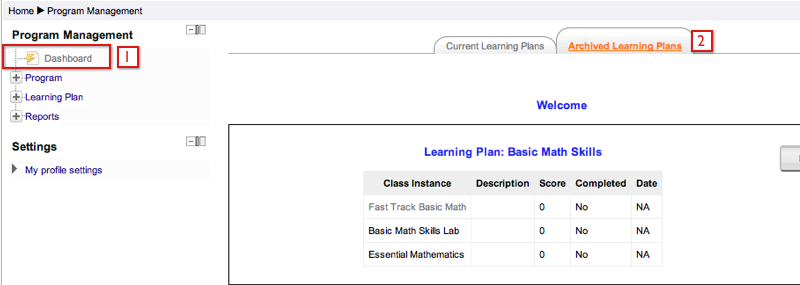
- Archive Settings - Set to no, this Program will appear in the Learner Dashboard under the Current Learning Plans tab. Set to yes, this Program will appear in the Learner Dashboard under the Archived Learning Plans tab. The image below shows that the Program "Product Support Technician" has been marked as "Archived" and now appears in the Archived Learning Plans in the Learner Dashboard. This setting was created to alleviate confusion for users who had years of Learning Plan to navigate through. When a Program is no longer in use, the Program administrator can simply mark it as archived.
- Program Fields - Custom Categories and fields can be created and added to Program when organizations need more information to be added to configuration screen. Custom fields can be added at Program Management > Admin > Custom Fields > Programs tab.
The help icons link to a pop-up window with information about each field.
Learner Dashboard: Archived Learning Plans tab selected:
Bulk User Enrollment and Removal for Programs
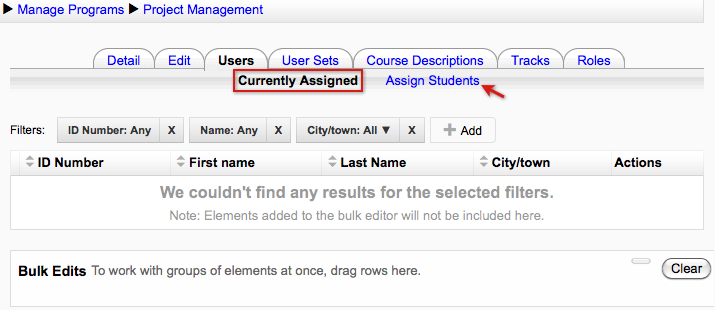
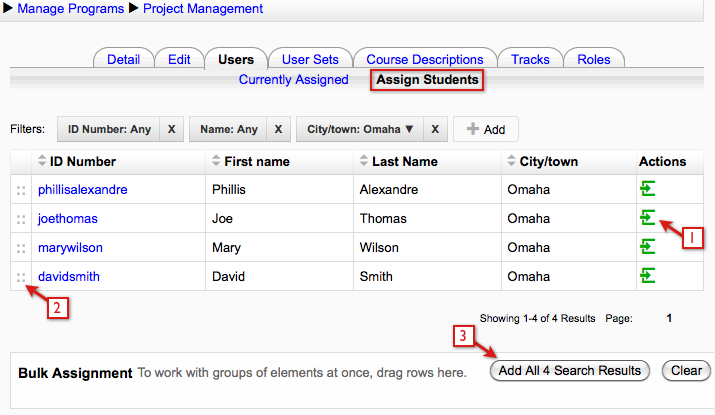
The following image is showing the Users tab of the Project Management program. When selecting the Users tab it opens on the Currently Assigned screen, which shows users assigned to the program already. To assign users to the program select the Assign Students link.
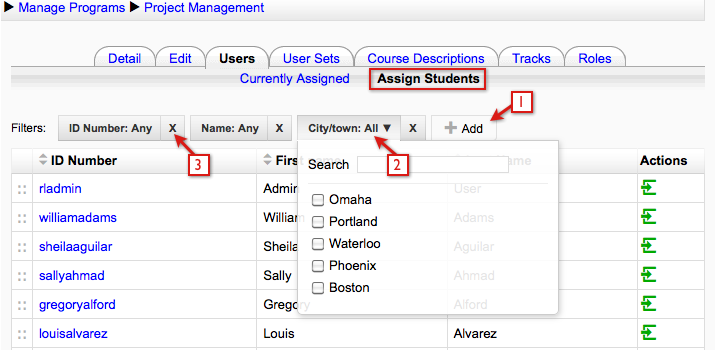
On the Assign Students screen there is a list of users that can be assigned to the program. Above the list of users are the filters. The filters are configurable, so you can add just the filters you will use.
- To add a filter select the Add button and select the filter you want added to the list. ELIS custom user fields are added to the list of filters that can be selected.
- To use a filter just click on the filter, then you can enter text or in some instances there will be a drop down menu that can be used as well.
- To delete a filter select the X on the right hand side of the filter box.
In the following example I selected the City/town filter and selected Omaha from the drop down menu. As soon as I select the Omaha checkbox the user list automatically filters to users in Omaha. If I was entering text, the filter would start filtering users as soon as I type a letter.
To assign users:
- Select the Assign icon located on the right hand side of the user row. Selecting the Assign icon opens a confirmation message, select the green check icon to confirm the assignment and proceed.
- Drag and drop users into the Bulk Assignment box on the bottom of the screen. Multiple users can be selected at once by using Shift + Select or Control + Select.
- If you want all the users shown added to the Bulk Assignment box select the Add All Search Results button.
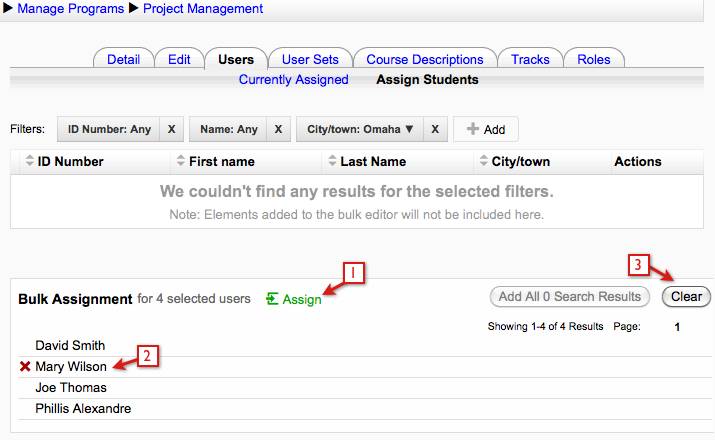
Once users are added to the Bulk Assignment box:
- The users can all be assigned at the same time by selecting the Assign link. Selecting the Assign link opens a confirmation message, select the green check icon to confirm the assignment and proceed.
- Individual users can be removed from the list by selecting the X icon next to their name. You have to hover over the user's row before the X icon will appear.
- All users can be removed from the bulk assignment list by selecting the Clear button.
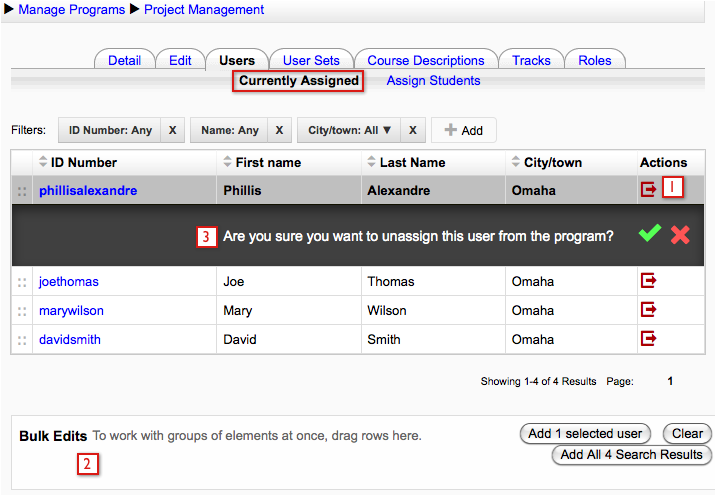
After assigning users they are added to the Currently Assigned screen. From this screen users can be removed from the program in the same way they were added. Select the (1) Unassign icon at the right hand side of the user row or use the (2) Bulk Edits box to unassign users. There will always be a (3) confirmation message before users are assigned or unassigned.
Adding Courses to Programs
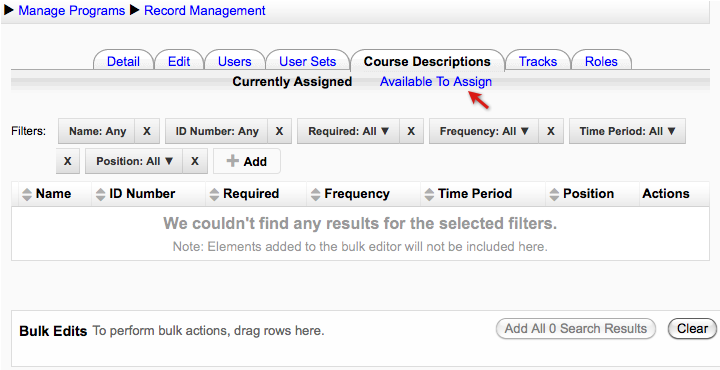
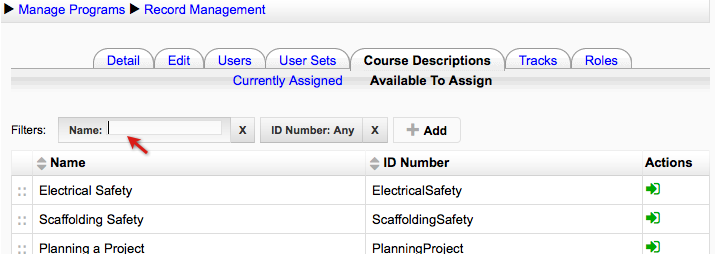
Once you have set up a program, you will need to add course descriptions to it. To do this, select the Course Descriptions tab for the program. The screen below shows the Course Descriptions tab of a new program with no courses assigned. To assign a course select the Available To Assign link.
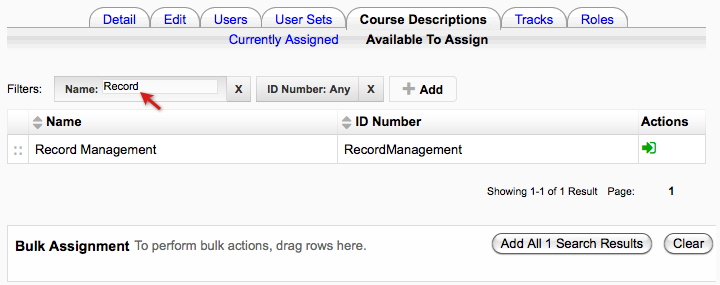
That opens a screen where you can assign courses to the program. There is a filter above the list of course descriptions. New filters can be added by selecting the Add box, Custom course fields will be included in the list of filters that can be added. In the example below I selected the Name filter which opens a text edit box, some filters will use a checkbox format.
The filter starts working once text is typed in the text box.
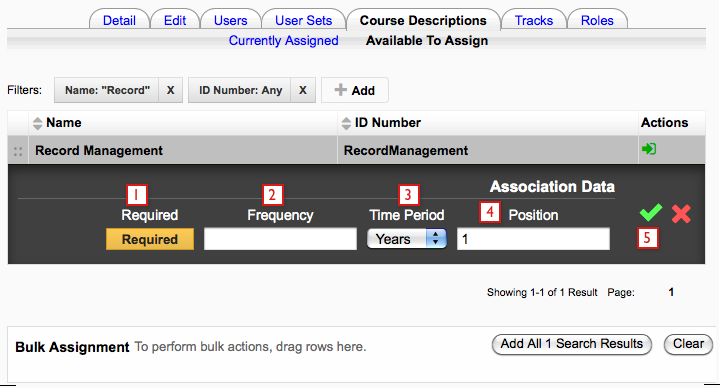
To assign a course to the program select the green icon on the right hand side of the course row. A confirmation window opens with additional information that is added with the course assignment:
- Required - Select the box to change the course to required or not required. If a course description is required in a program, then users will not be able to complete a program until they have completed the required course(s) in the program.
- Frequency - Enter the frequency the course must be repeated. The is an informational setting only, it will not enable notifications.
- Time Period - The units used to specify the course frequency, e.g., months, weeks, etc.
- Position - Enter the course position in the program. This controls the order of the courses in the program, lower numbers are displayed first.
- Select the green check icon to complete the course assignment to the program.
Notes:
The frequency setting is currently just informational - to inform the learner they need to take a new course, and to inform a site admin that a learner needs a new course to take (via the Notifications system.
At this time there is not any automatic way to expire credit for a course a user has finished, or to prevent a user from taking a refresher course before a set number of days have passed.
For recurring courses, where users need to renew their credit, currently you need to create a new program/courses/Moodle courses - ELIS can do this in one step as described here ELIS Copy program to user set.
We are working on a more automated procedure for the courses that need to be taken over again - for compliance, etc. that will be in an upcoming release of ELIS.
Prerequisite Courses
ELIS course descriptions can have prerequisites or corequisites. If a course has a prerequisite, the prerequisite must be completed before the course can be enrolled in.
Course descriptions must be part of a program to add prerequisites and corequisites. To add a prerequisite, go to the Course Descriptions tab of a program. In the course list for the program click the Key icon to set prerequisites.
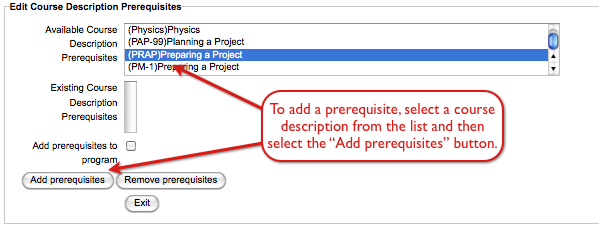
The prerequisites screen shows you a list of courses that can be added as prerequisites. You can add course descriptions from both inside and outside the current program. If you add a course description from outside the program, the course can be added to the program so that students can find it.
To add a prerequisite to your course, select the course and click "Add prerequisite" - you can select multiple courses here by control-clicking.
To remove a prerequisite from your course, click a course or control-click courses in the the "Existing Course Description Prerequisites" list and click "Remove prerequisites".
Select the "Add prerequisites to program" checkbox to add courses outside the program to the program.
When you are done, click Exit to return to the previous screen.
Display Priority
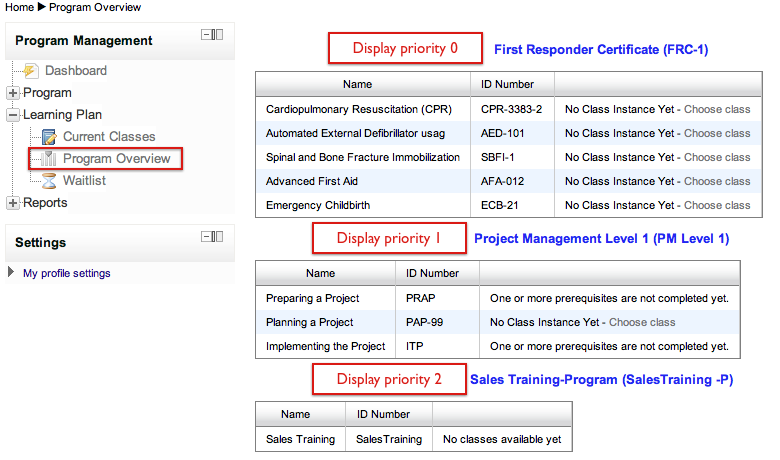
When you create or edit a program, you will see the program display priority setting. You can use this setting to control how programs are displayed to students in the Program Overview, Current Classes, and Waitlist screens. A lower setting makes the program show above programs with higher settings.
The next image shows a user's Program Overview and the display priority setting for each program.
If the display priority setting is not changed, each program will have a setting of 0 and will be displayed in alphabetical order.
Program Expiration
Programs can be set to have an expiration date, this date is printed on the Programs Report, the Individual User report, and on the Certificates. The expiration simply prints the date the Program creator sets for the program to expire. This is useful for programs that lead to licensure, where the license is only good for a set term, for example.
Step 1: Activate Admin Configuration Setting for program expiration:
Program expiration is turned off by default, so the first thing to do if you plan to use Program expiration is to turn it on in the ELIS Configuration settings. If it is not turned on, then expiration notifications will not be printed on reports.
To edit the Program Expiration settings go to the Program Management block > Admin > Configuration > Learning Plan > Enable program expiration:
- First, activate program expiration.
- Next, decide whether expiration will be calculated from the start of the student's enrollment in a class of a program, or the date they complete the program.
Example: if the expiration date is based on the date a student enrolls, then a program is set (in the program settings) to expire in 1 year, then the student will have 1 year from the time of their enrollment before the program expires.
If the date is set to 1 year from the time the student completes the program, and a program is set (in the program settings) to expire in 1 year, then the student will have 1 year from the time they complete the program before the program expires.
Step 2: Set Program Expiration Settings
For each program you can set a different expiration date. For example if the program administrator chooses 1y, 3m here, then 1 year and 3 months after the student enrolls or completes a program (based on the setting in step 1), the program expires.
Step 3: Set Program Expiration Notification Settings.
If you setup Program Expiration Notifications then students and optionally site administrators can be notified when when a student's program is due to expire.
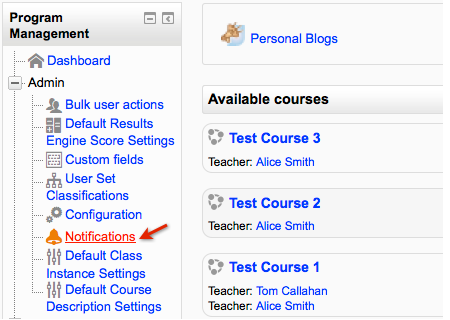
To set this up, click the Notifications link:
Scroll down to the Program Expiration Notification settings:
- Select "User" to notify the user who's program is expiring. Select "Role with "Receive program expiration notifications" capability to notify users who's site level role has this capability when a student's program is expiring.
- You can edit the notice here.
- Finally, you can set the number of days before the program expires to send the notice. It's a good idea to tell students what they can do to renew their program before it expires.
Program Expiration on ELIS Reports:
Viewing Expiration on ELIS Reports:
Currently the Program Expiration date is printed on three ELIS reports:
- The Programs report
- The Individual User report
- and on the Program Certificates (if you have Certificates enabled on your site)
When Program Expiration is activated, then an "Expires" column is printed in the programs report. To see this, run the Programs Report:
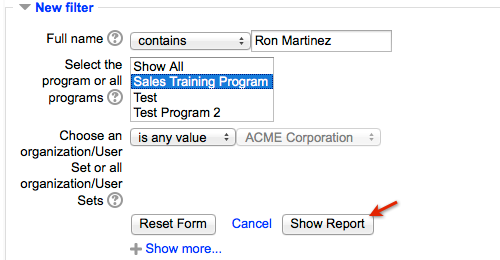
Above I've chosen a user set to filter the results on, of course this is optional.
When the report is run, an "Expires" column is printed:
This shows when the program will expire for all programs that have an expiration date.
Individual User Report:
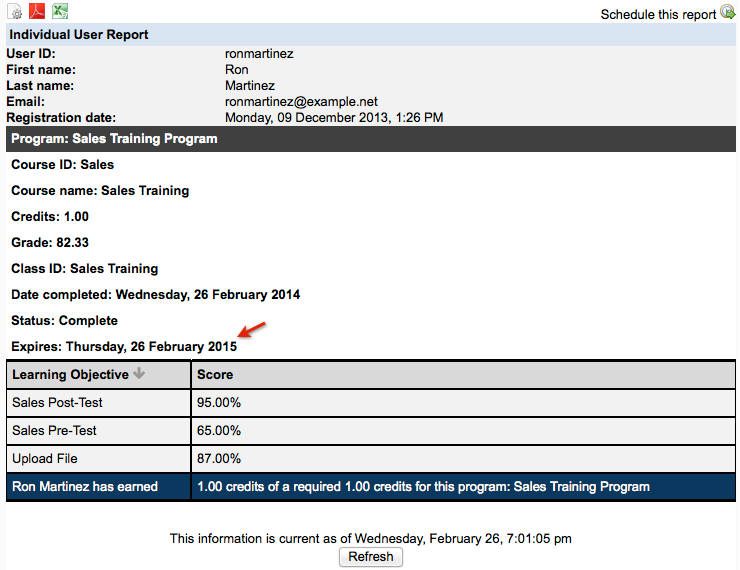
On the Individual Users Report, the expiration is also printed.
When a student views their user report, they can see the expiration dates for programs they are enrolled in.
On this report, the user can see that their program expires on February 26, 2015.
Certificate:
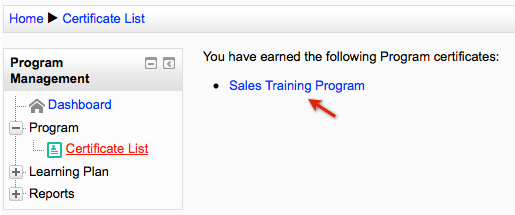
When a user views a certificate for a program with an expiration date:
They can view the expiration date on their Certificate:
Program Certificates
The following steps will demonstrate how to setup a program where users can receive a certificate:
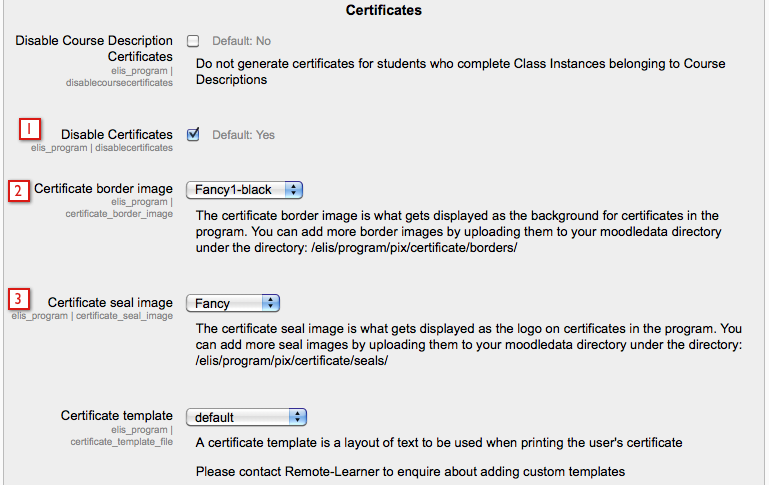
1. Make sure certificates are enabled on the configuration screen. Go to the Program Management block > Admin > Configuration > Certificates (see below).
2. The program will need a course description assigned to it.
3. When users complete the credit and/or course descriptions for a program, the certificate will become available to the student. If a program does not have required credits, then students can complete it simply by completing the courses assigned to the program.
Certificate Configuration:
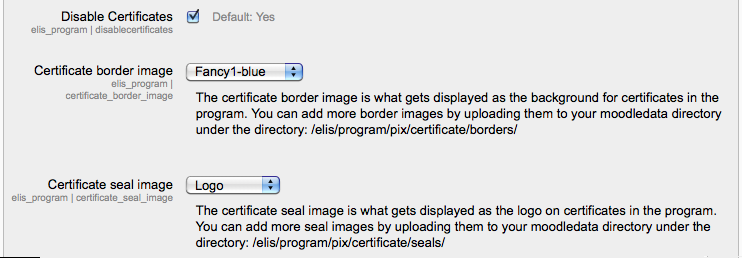
Certificates need to be enabled at the site level for them to be available to your users. Go to the Program Management block > Admin > Configuration > Certificates.
- Make sure "Disable Certificates" is unchecked.
- As of ELIS 1.9, site admins can configure the certificate image - you can choose from a set of standard images, or create your own and upload them.
- You can also add a custom seal image - choose from the default list or create and upload your own.
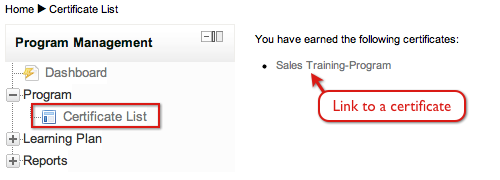
The student can access the program certificate by going to the Program Management block > Program > Certificate List and then link to certificates that are available.
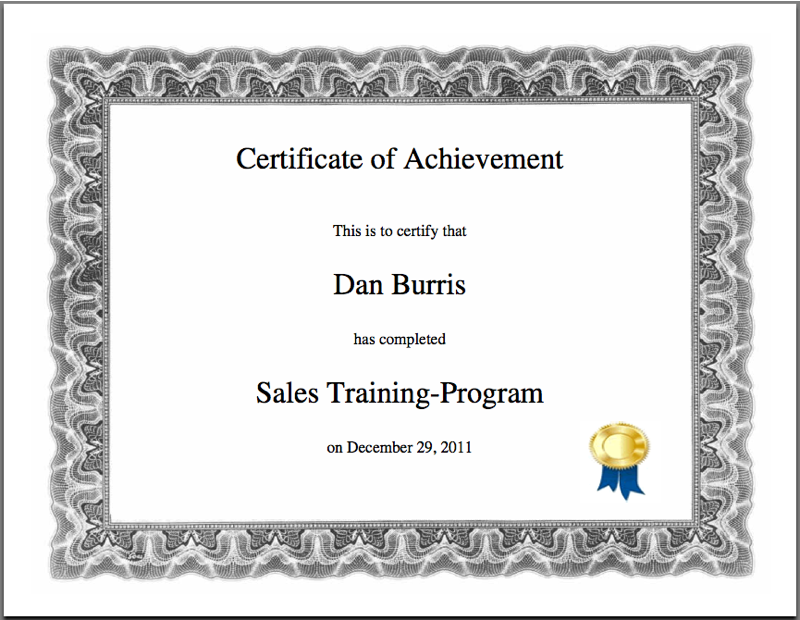
The certificate will be printed out with the user's name, program name, and date of completion. If Program Expiration is used, the expiration date for the certificate will also be displayed.
Default custom images:
In the example above, the site admin has chosen the "Fancy1-black-copy" border and the "Fancy-copy" seal image. The first image on this page is displaying the certificate settings.
When making changes to the certificate settings the changes are immediate, if you select new files in the Certificate Configuration, all students who view their certificates online from that point forward will see the new images.
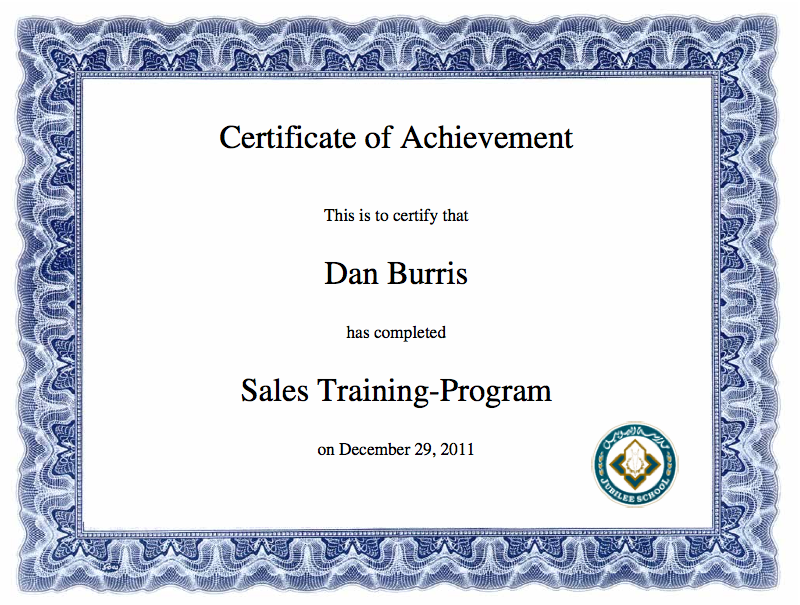
When the student views their certificate with these settings they will see the selected border and logo.
Adding your own images:
The certificate functionality in ELIS enables you to customize your certificate by adding your own images for borders and seals. You can add more border images by uploading them to your moodledata directory under the directory curriculum/pix/certificate/borders/, and add seal images by uploading them to your moodledata directory under the directory curriculum/pix/certificate/seals/.
The images need to be same size as the default images to render correctly in the pdf, so it is a good idea to download an existing image for border or seal, and then use that as a template.
