Dataform setup: Difference between revisions
- Building an activity
- Activity settings
- Activity administration
- Activating RSS
- Activity workflow
- Applications
No edit summary |
Keren Akiva (talk | contribs) (→Views) |
||
| (50 intermediate revisions by 2 users not shown) | |||
| Line 1: | Line 1: | ||
{{Dataform}} | {{Dataform}} | ||
== | ==Settings== | ||
[[ | * [[Dataform activity settings|Activity settings]] | ||
== | ==Presets== | ||
Image | [[Image:preset.png|frame|500px|right|The Dataform preset tab]]<br clear="left" /> | ||
Dataform presets are predefined Dataform instances that can be use to create new Dataform instances with the same structure and data (if included) in the same course, in other courses in the site, or in other sites. Dataform presets are created from within a Dataform instance and applied to a new instance from within the new instance. | |||
=== | ===Make a preset=== | ||
The | Once you have your Dataform activity set up with or without user content, you can make a preset of it. The preset can be created in one of the following ways: | ||
*'''Without user data''' - Only the Dataform structure - fields, views, filters, etc. - are included in the preset. | |||
*'''With user data''' - Dataforom structure and all entries and their content are included with user information. | |||
*'''With user data anonymized''' - Similar to 'With user data' but user information is anonymized. | |||
The newly created/uploaded preset will be displayed in the list of course presets on the page. | |||
===Upload preset from file=== | |||
You can upload a single preset (.mbz file) or a zip archive of more than one preset from your desktop. The presets will be added to the course presets list from which they can be applied or shared. | |||
===Presets list=== | |||
The presets list is divided to course and site presets. Presets are added to the course list from which they can be shared to the site list. Course presets are visible only within the course to the course managers. Site presets are available to users with capability viewallpresets. | |||
===Apply a preset=== | |||
You can apply any presets in the list to the current Dataform instance. To apply a preset to a new instance simply create the new instance, go to its Presets tab and click on the apply button of the desired presets in the list. | |||
===Download presets=== | |||
Presets can be downloaded as mbz (moodle backup zip) archives. You can also download several presets in one go by ticking the checkboxes of the desired presets and clicking the download button in the list header. The mbz archives of the selected presets will be archived and downloaded in one zip file. | |||
=== | ===Share presets=== | ||
You can click the share button of a preset to make it available throughout the site. Use the checkboxes and share button in the list header to share more than one preset in one go. | |||
=== | ===Delete presets=== | ||
You can click the delete button of a preset to delete the preset. Use the checkboxes and delete button in the list header to delete more than one preset in one go. | |||
==Fields== | |||
Each entry in a dataform activity consists of a set of information elements of one or more types depending on the nature of the activity. These information elements are called fields and they are the means for adding and viewing content in the activity. | |||
[[Dataform fields]] | |||
[[Dataform: Field tags]] | |||
== | ==Views== | ||
[[Image:dataformviews.png|frame|right|Dataform views]]<br clear="left" /> | |||
Dataform views allow you to control the way information is presented in the Dataform activity. In order for a Dataform activity to be active, a default view must be defined. By default, there is no limit to the number of views you can apply to a single Dataform activity (although your administrator can limit the max number of views). | |||
== | ===Add a view=== | ||
'''Editon'''<br /> | |||
'''Extended Matrix'''<br/> | |||
'''Import'''<br/> | |||
'''Interval'''<br/> | |||
'''Matrix'''<br/> | |||
'''Tabular'''<br/> | |||
===View settings=== | |||
Visible <br/> | |||
D <br/> | |||
E <br/> | |||
M <br/> | |||
Filter <br/> | |||
Edit <br/> | |||
Duplicate <br/> | |||
Reset <br/> | |||
==Filters== | |||
== | ==Import== | ||
==Export== | |||
==RSS== | |||
==Javascript== | |||
==CSS== | |||
==Backup/restore== | |||
==Notifications== | |||
==Permissions== | |||
* [[Dataform permissions]] | * [[Dataform permissions]] | ||
Latest revision as of 22:31, 30 September 2012
Settings
Presets
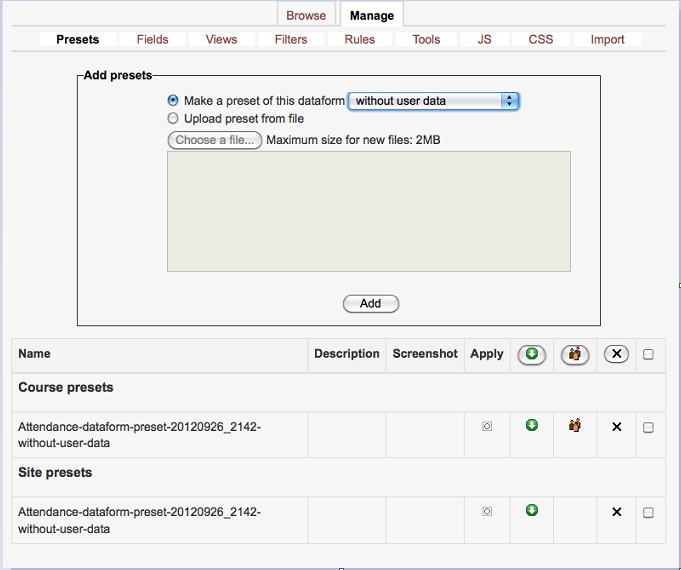
Dataform presets are predefined Dataform instances that can be use to create new Dataform instances with the same structure and data (if included) in the same course, in other courses in the site, or in other sites. Dataform presets are created from within a Dataform instance and applied to a new instance from within the new instance.
Make a preset
Once you have your Dataform activity set up with or without user content, you can make a preset of it. The preset can be created in one of the following ways:
- Without user data - Only the Dataform structure - fields, views, filters, etc. - are included in the preset.
- With user data - Dataforom structure and all entries and their content are included with user information.
- With user data anonymized - Similar to 'With user data' but user information is anonymized.
The newly created/uploaded preset will be displayed in the list of course presets on the page.
Upload preset from file
You can upload a single preset (.mbz file) or a zip archive of more than one preset from your desktop. The presets will be added to the course presets list from which they can be applied or shared.
Presets list
The presets list is divided to course and site presets. Presets are added to the course list from which they can be shared to the site list. Course presets are visible only within the course to the course managers. Site presets are available to users with capability viewallpresets.
Apply a preset
You can apply any presets in the list to the current Dataform instance. To apply a preset to a new instance simply create the new instance, go to its Presets tab and click on the apply button of the desired presets in the list.
Download presets
Presets can be downloaded as mbz (moodle backup zip) archives. You can also download several presets in one go by ticking the checkboxes of the desired presets and clicking the download button in the list header. The mbz archives of the selected presets will be archived and downloaded in one zip file.
You can click the share button of a preset to make it available throughout the site. Use the checkboxes and share button in the list header to share more than one preset in one go.
Delete presets
You can click the delete button of a preset to delete the preset. Use the checkboxes and delete button in the list header to delete more than one preset in one go.
Fields
Each entry in a dataform activity consists of a set of information elements of one or more types depending on the nature of the activity. These information elements are called fields and they are the means for adding and viewing content in the activity.
Views
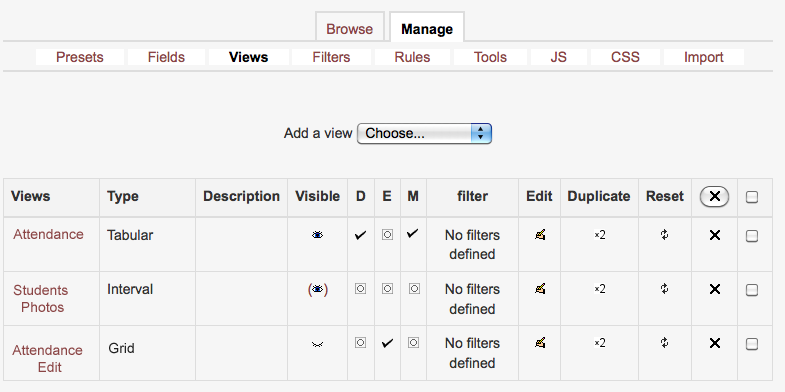
Dataform views allow you to control the way information is presented in the Dataform activity. In order for a Dataform activity to be active, a default view must be defined. By default, there is no limit to the number of views you can apply to a single Dataform activity (although your administrator can limit the max number of views).
Add a view
Editon
Extended Matrix
Import
Interval
Matrix
Tabular
View settings
Visible
D
E
M
Filter
Edit
Duplicate
Reset

