Dataform Activity administration
- Building an activity
- Activity settings
- Activity administration
- Activating RSS
- Activity workflow
- Applications
Administration options
Edit settings
Locally assigned roles
Assign roles for the activity. See Assign roles.
Permissions
Manage role permissions for the activity.
Check permissions
Filters
Logs
Backup
Restore
Advanced grading
Renew activity
Clean up everything from the activity to make it a blank Dataform.
Delete activity
Delete the Dataform activity.
Index
Go the Dataform index page of the course.
Views
Dataform views allow you to control the way entries and other information is displayed in the activity. Views management is done under the Manage | Views tab and requires Manage Dataform templates capability.
Views index
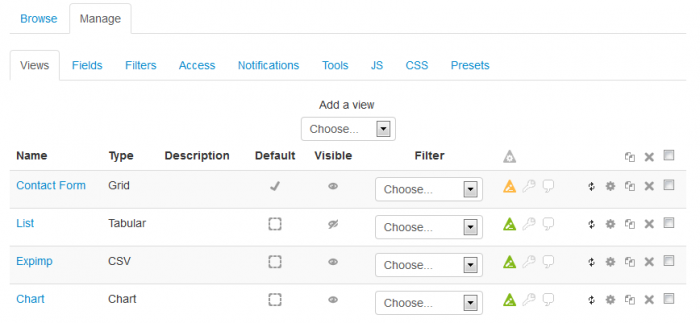

Adding a view
To add a view select the view type from the 'Add a view' dropdown. This will open the view configuration form where you can configure the view templates and behaviour. Typically, views have default configuration and if this default configuration serves your purpose you can simply enter a name for the view and save.
Setting the default view
The Dataform activity must have a default view to fall back on to when the activity is accessed without specifying the target view (for instance, when you access the activity from the activity link on the course page).
A Dataform activity without a default view is not ready and a message will be displayed on its front page and in the view list advising you to set a default view.
You can select the default view by clicking the 'Default' box in the view list. The selected default view is marked by a check sign. You can change the default view at any time. Since the default view must be visible, if you set a hidden view to default, this view will automatically become visible and you will not be able to hide it as long as it is the default view.
Setting view visibility
A view can be either visible or hidden. Visible views can be accessed by users with capability mod/dataform:viewaccess that is granted by default to all roles. Hidden views can be accessed by users with capability mod/dataform:viewaccesshidden that is granted by default only to the teacher role. Users without the required capability will not see views with the respective visibility setting in the standard views navigation menu (##viewsmenu##). Setting the view visibility can be done from the views index by clicking the eye icon of the designated view or from the visibility setting in the view configuration form. The default view must be visible and setting a hidden view as the default view will automatically change its visibility to visible.
Forcing a view filter
When filters are defined for the activity you can force a filter on a view by selecting the filter either from the index list or in the view configuration form. When the view forces a filter, users without capability mod/dataform:viewfilteroverride cannot apply other activity filters (the activity filters menu will not be displayed) and user advanced filters (if the option is added to the view) will be appended to the forced filter.
Resetting a view
Each view type has default templates which are generated and automatically added to the configuration form when adding a new view. The default View template typically consists of navigation menus, quick filters, add new entry link and entries display. The default Entry template (where applicable) typically adds the base pattern for each field and the edit and delete action buttons. As you build the activity you may change the templates of a view and in some cases you may wish to reset the templates to their defaults. This can be done by clicking the reset icon of the designated view in the views index or in the view configuration form.
Updating a view
You can click on the edit icon of the view to open the configuration form for updating.
Note: Clicking on the view name will open the view in browse mode rather than the configuration form.
Duplicating one or more views
You can duplicate a view by clicking the duplicate icon of the view. This will create an exact copy of the duplicated view with a different name. You can then proceed to update the view settings. This may be particularly useful if you need to create several very similar views. For example, you can create a complex view and then duplicate it, and assign to each of the instances a different filter so as to have a designated view for certain subsets of the entries.
You can duplicate more than one view in one go by selecting the designated views and clicking the bulk-duplicate icon (in the list's header).
Deleting one or more views
You can delete a view by clicking the delete icon of the view.
You can delete more than one view in one go by selecting the designated views and clicking and bulk-delete icon (in the list's header).
Access and Notifications info
Patterns validation and replacement
Fields
Dataform fields are used to enter, edit and store unit of information in an entry.


Adding a field
To add a field select the field type from the 'Add a field' dropdown. This will open the field configuration form where you can name the field instance and configure other settings as required.
Setting visibility
You can set the field visibility either in the field configuration form or by clicking the field's eye icon in the Visible column. The field can be visible to everyone (default), entry-author and managers, or only managers (where managers are users with manageentries capability in the context).
Setting editability
You can set the field editability either in the field configuration form or by clicking the field's lock icon in the Editable column. The field can be editable by the entry-author and managers (default) or only by managers (where managers are users with manageentries capability in the context).
Updating a field
You can click on the field's name or the edit icon of the field to open the configuration form for updating.
Duplicating one or more fields
You can duplicate a field by clicking the duplicate icon of the field. This will create an exact copy of the duplicated fiel with a different name. You can then proceed to update the field settings.
You can duplicate more than one field in one go by selecting the designated fields and clicking the bulk-duplicate icon (in the list's header).
Deleting one or more fields
You can delete a field by clicking the delete icon of the field.
You can delete more than one field in one go by selecting the designated fields and clicking and bulk-delete icon (in the list's header).
Access and Notifications info
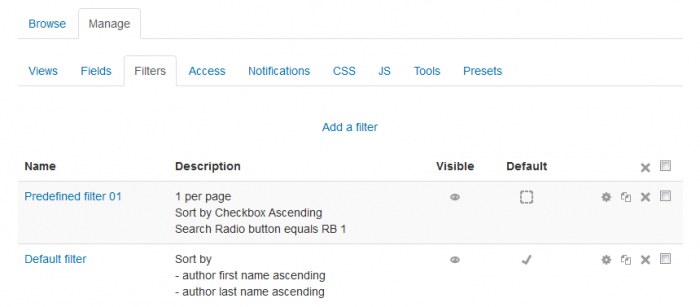
Filters
Dataform filters are used for sorting and filtering the activity entries in browse mode.

Adding a filter
To add a filter follow the 'Add a field' link. This will open the filter configuration form where you can name the filter instance and set filtering criteria.
The filter form allows you to add sort and search criteria on the view fields. In most cases you search/sort the field content. Some fields may have more than one search/sort element.
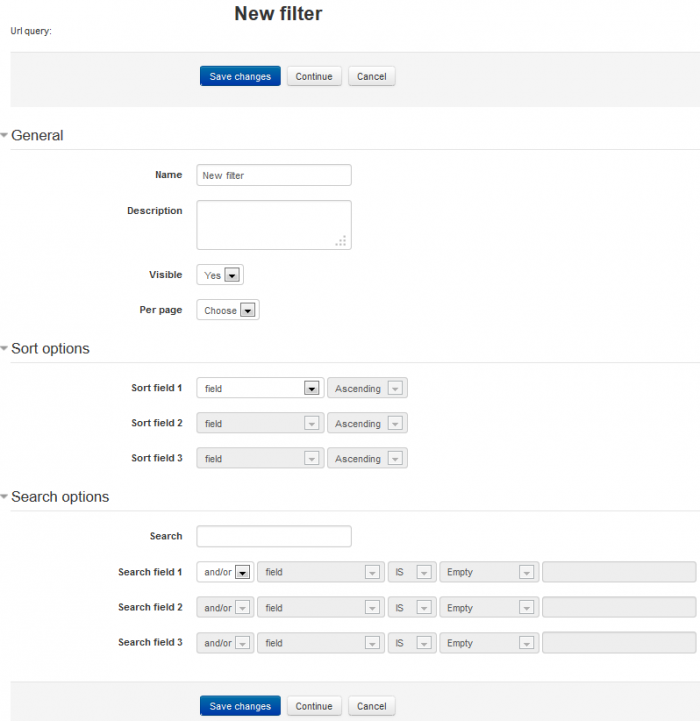

Name
Description
Visible
Per page
Sort field N
To define a sort criterion select the field element and the sort order (ascending|descending). The sort order dropdown of the criterion is disabled until to select the element. You can define multiple criteria and input fields for further criteria will be added to the form after filling the displayed ones and saving changes.
Search
Enter search string – See list below for special search string formats in some fields.
Search field N
To define a search criterion:
- select AND|OR – Retrieved entries will match all AND criteria and at least one of the the OR criteria.
- select field – Field element.
- select IS|NOT – With NOT only entries that do not match the criterion will be retrieved.
- select operator
- Empty
- Equal
- Greater than
- Less than
- Greater or equal
- Less or equal
- Between
- Contains
- In
Url query
Setting visibility
You can set the filter visibility either in the filter configuration form or by clicking the filter's eye icon in the Visible column.
Setting a default filter for the activity
You can designate a filter to be the default filter for the activity by clicking the set/unset icon in the Default column. The activity default filter is applied to any view if no filter is specified when browsing that view.
Updating a filter
You can click on the filter's name or it's edit icon to open the configuration form for updating. After making changes in the configuration form, click 'Save changes' to save and return the index.
Duplicating one or more filters
You can duplicate a filter by clicking it's duplicate icon of the field. This will create an exact copy of the duplicated filter with a different name. You can then proceed to update the filter configuration.
You can duplicate more than one filter in one go by selecting the designated filters and clicking the bulk-duplicate icon (in the list's header).
Deleting one or more filters
You can delete a filter by clicking it's delete icon.
You can delete more than one filter in one go by selecting the designated filters and clicking and bulk-delete icon (in the list's header).
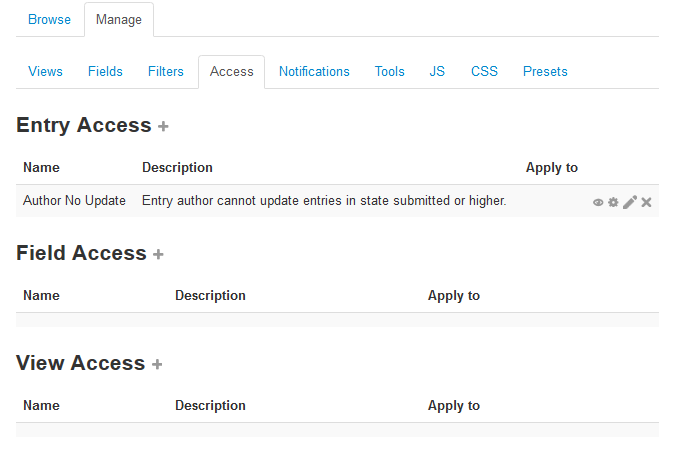
Access rules
Dataform access rules can be used for controlling access to various areas/components of a Dataform activity.

Notification rules
Dataform notification rules can used for defining and sending custom notifications to the activity participants.
File:df-notifiction-rules-index.png
CSS
You can use CSS to manipulate the layout and styles of entries and content in any of the Dataform views. Any html element in the designated view, that has an id or a CSS class can be assigned specialized styles by including the style definitions in the CSS tab.
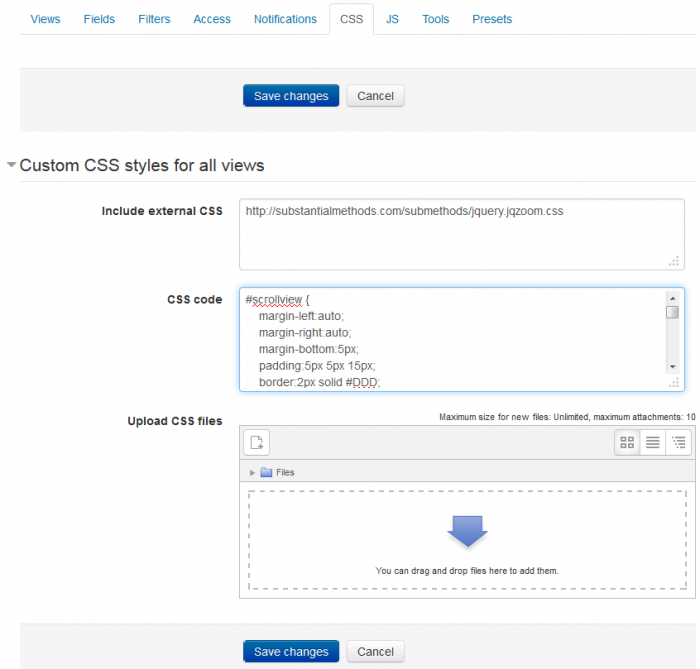

Include external CSS
You can specify a list of urls to external CSS files and these files will be loaded to the Dataform view page.
Enter CSS code
You can enter CSS definitions directly.
Upload CSS files
You can upload CSS files into the Dataform files area in Moodle's file system. These files become part of the Dataform instance to which they are uploaded and are included in Dataform presets and backups.
Javascript
You can use javascript to manipulate the way entries are displayed and behave in any of the Dataform views. Any html element in the designated view, that has an id or a css class can be accessed and manipulated by javascript.
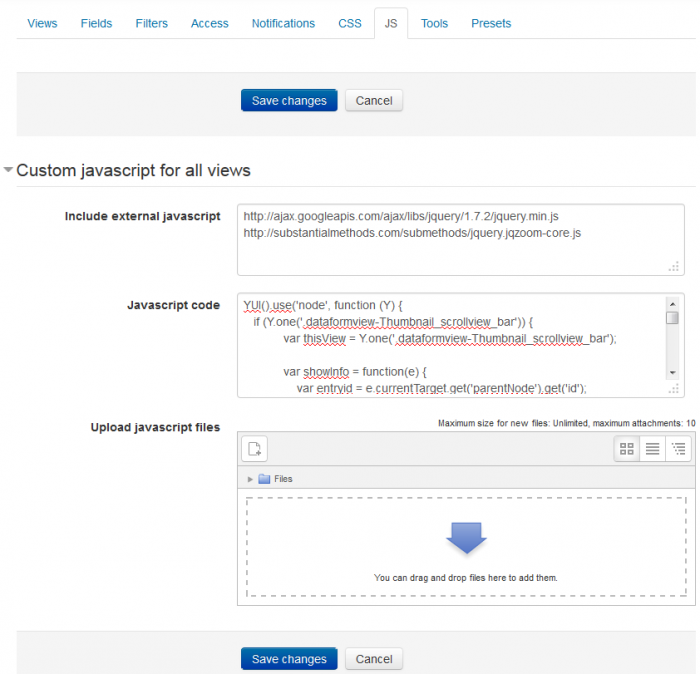

Include external javascript
You can specify a list of urls to external javascript files and these files will be loaded to the Dataform view page.
Enter javascript code
You can enter javascript code directly. This is usually required in addition to including javascript files so as to apply the desired effects to particular views or particular items in views.
Upload javascript files
You can upload javascript files into the Dataform files area in Moodle's file system. These files become part of the Dataform instance to which they are uploaded and are included in Dataform presets and backups.
Tools
TBC
File:df-tools-index.png
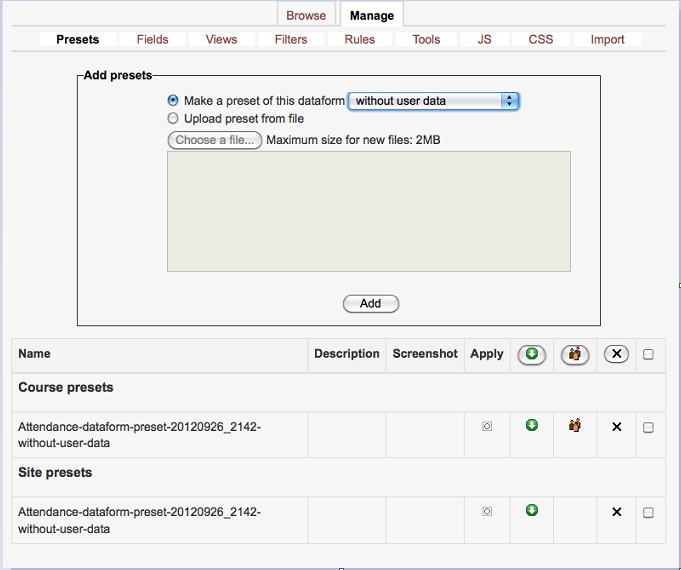
Presets
Dataform presets are predefined Dataform instances that can be use to create new Dataform instances with the same structure and data (if included) in the same course, in other courses in the site, or in other sites. Dataform presets are created from within a Dataform instance and applied to a new instance from within the new instance.

Make a preset
Once you have your Dataform activity set up with or without user content, you can make a preset of it. The preset can be created in one of the following ways:
- Without user data - Only the Dataform structure - fields, views, filters, etc. - are included in the preset.
- With user data - Dataforom structure and all entries and their content are included with user information.
- With user data anonymized - Similar to 'With user data' but user information is anonymized.
The newly created/uploaded preset will be displayed in the list of course presets on the page.
Upload preset from file
You can upload a single preset (.mbz file) or a zip archive of more than one preset from your desktop. The presets will be added to the course presets list from which they can be applied or shared.
Presets list
The presets list is divided to course and site presets. Presets are added to the course list from which they can be shared to the site list. Course presets are visible only within the course to the course managers. Site presets are available to users with capability viewallpresets.
Apply a preset
You can apply any presets in the list to the current Dataform instance. To apply a preset to a new instance simply create the new instance, go to its Presets tab and click on the apply button of the desired presets in the list.
Download presets
Presets can be downloaded as mbz (moodle backup zip) archives. You can also download several presets in one go by ticking the checkboxes of the desired presets and clicking the download button in the list header. The mbz archives of the selected presets will be archived and downloaded in one zip file.
You can click the share button of a preset to make it available throughout the site. Use the checkboxes and share button in the list header to share more than one preset in one go.
Delete presets
You can click the delete button of a preset to delete the preset. Use the checkboxes and delete button in the list header to delete more than one preset in one go.