ELIS Data Hub Files
ELIS Data Hub Files
Importing Users
Setting Up User Import Fields
The fields that can be imported and exported are listed in the Field Mappings link.
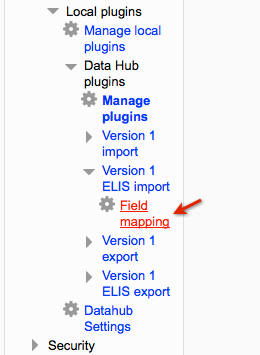
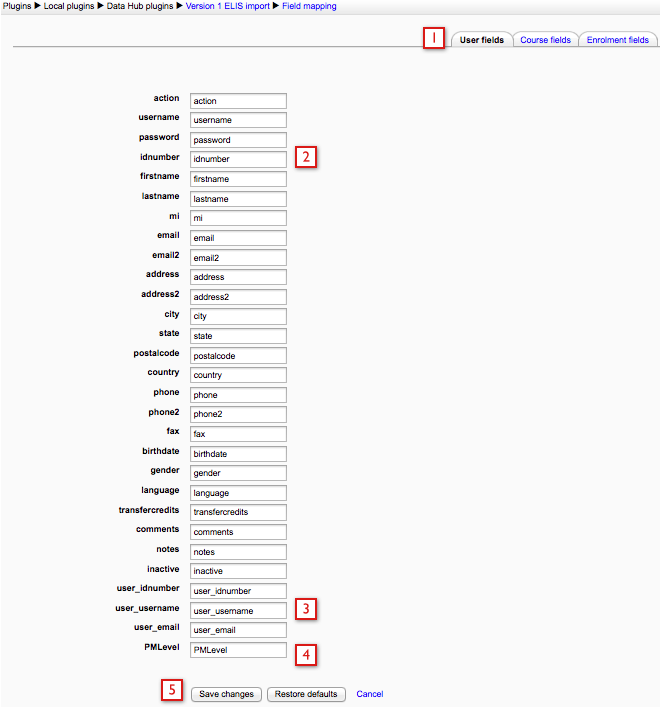
The user properties mapping table enables you to map the names of user properties from your export file to properties in ELIS Data Hub. You only need to remap data entered here if your export file has different names in it. Go to the Administration block > Site Administration > Plugins > Local plugins > Data Hub plugins > Version 1 ELIS import > Field mapping > User fields tab.
- The tabs at the top indicate which fields we are editing - in this example the User Fields.
- Data Hub enables you to enter new values for these fields to match the values in your export file. For example if your backend system calls the username the uname, you can map the Moodle field username to uname here. The most common use here is to remap profile field values.
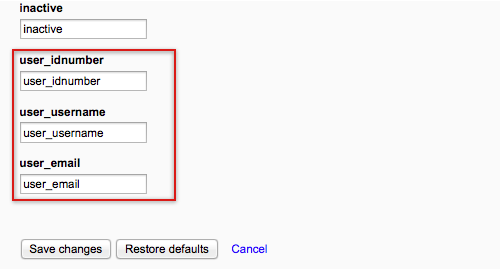
- New fields added with the ELIS 2.6.1.1 release. These fields can be used as identifying fields, their main use is for updating identifying fields. For more info go to ELIS Data Hub updating identifying fields.
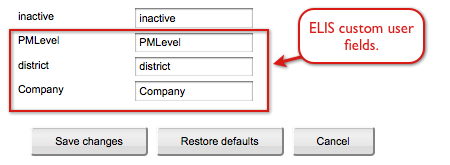
- ELIS custom user fields are included in the User properties mapping table. New values can be entered for custom fields the same way as standard fields.
- Save changes to save your changes and put them into effect.
Any of these parameters can be set or updated via the Data Hub import file. If you make changes to any property values, be sure to select the Save changes button.
The following tables contains the standard fields from the property map above with a brief explanation of each field. Required fields for user creation are in red.
| action: |
The action field is always required. Enter create, update, or delete. The actions from Data Hub 1 will work with Data Hub 2, "add" can be used instead of "create" and "disable" can be used instead of "delete". |
| username: |
This is a required field for user creation. This is also an identifying field, optional. Identifying fields are used to identify users for updates/deletion. |
| password: |
This will create or update the user's password |
| idnumber: |
The user's id number is a required field for user creation. This is also an identifying field, optional. Identifying fields are used to identify users for updates/deletion. |
| firstname: |
This is a required field for user creation. |
| lastname: |
This is a required field for user creation. |
| mi: |
The user's middle initial |
| email: |
This is a required field for user creation. This is also an identifying field, optional. Identifying fields are used to identify users for updates/deletion. |
| email2: | A second email if the user has one |
| address: |
The user's address |
| address2: |
The rest of a user's address |
| city: |
The user's city |
| state: |
The user's state |
| postalcode |
The user's postal code |
| country: |
This is a required field for user creation. |
| phone: |
The user's phone # |
| phone2: |
The user's second phone # |
| fax |
The user's fax |
| birthdate: |
The user's birthdate |
| gender: |
The user's gender |
| language: |
Currently the site default is used for this entry. |
| transfercredits: |
Credits the user has earned in another system |
| comments: |
Any comments about the user |
| notes: |
Notes on the user |
| inactive |
Enter 1 for inactive. Enter 0 for active. The default value for new users is active. |
| user_idnumber |
The idnumber of an existing ELIS user. This can be used as an identifying field. If this field and the idnumber field are in the file, both values have to be the same because the idnumber can not be changed once set. |
| user_username |
The username of an existing ELIS user. This can be used as an identifying field. If this field and the username field are present in the file, this will be the identifying field and the username field can then be used for updating. |
| user_email |
The email of an existing ELIS user. This can be used as an identifying field. If this field and the email field are present in the file, this will be the identifying field and the email field can then be used for updating. |
The required fields for creating users with ELIS Data Hub import files are:
- action
- idnumber
- username
- firstname
- lastname
- country
The required fields for updating and deleting users with ELIS Data Hub import files are:
- action
- idnumber or username or email
Data Hub Actions:
ELIS Data Hub tells ELIS what needs to be done with imported data via the Actions column. The sample csv file below illustrates this function:
In the image of the user file above:
- Mary is being added to the site. Only the required fields for user creation are included in the file.
- James is being added to the site.
- Patricia's city is being updated using her idnumber as the identifying field.
- Jennifer is being deleted using her email as the identifying field. She will be deleted from ELIS and Moodle records.
If the 'disable' action is used instead of 'delete', the user is still deleted from ELIS and Moodle records.
For the file pictured above to process successfully the users in rows 4 and 5 must be added to the site before running the file.
Importing/Processing Data Hub Files
ELIS Data Hub import files can be scheduled to automatically process or can be manually processed. Import files should be scheduled to process in most instances, docs for scheduling imports are here, ELIS Importing and processing files. Manual processing should be used for testing small files only. Manual processing is currently limited to 28 seconds of processing time in our standard Data Hub installs. Scheduled processing will continue imports on subsequent cron runs when processing takes to long, manual processing does not do this.
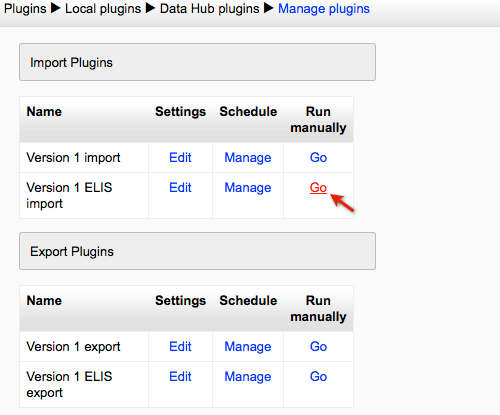
The sample file being used here is simple enough to process manually. To manually process files go to the Administration block > Site Administration > Plugins > Local Plugins > Data Hub plugins > Manage Plugins. Under the Import Plugins section go to the Version 1 ELIS import row and select the "Go" link in the Run manually column.
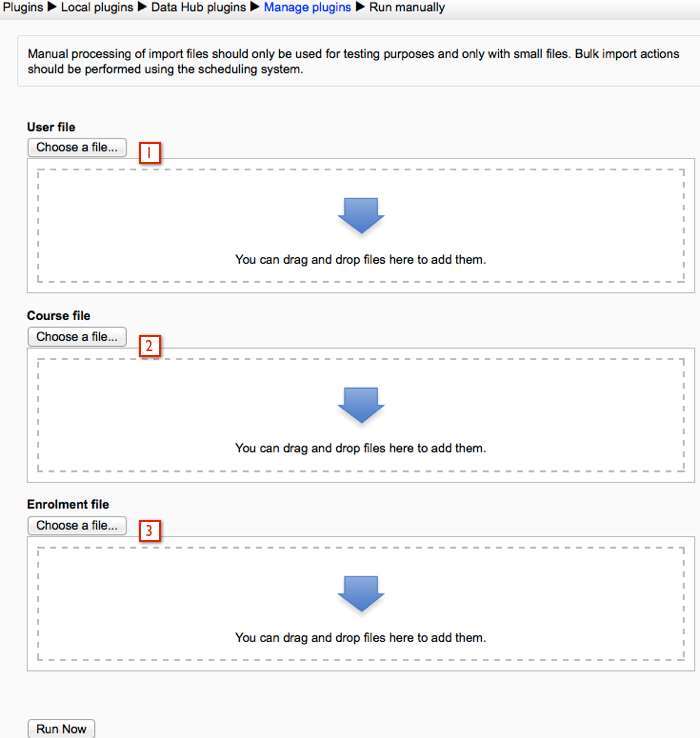
Select the "Choose a file" button. Select a file to process and then select the Run Now button.
Once the file is processed there will be a brief log message stating whether or not the file import was successful.
A complete log of all actions is kept in the logs file, as well as (optionally) emailed to an address or addresses each time the Data Hub script runs. Logs can be accessed from the Administration block > Site Administration > Reports > Data Hub logs link.
For information about scheduling imports to automatically process go to this page, ELIS Importing and processing files.
Updating Identifying Fields
The ELIS 2.6.1.1 release has some improvements for updating the identifying user fields. There are a couple ways to update these fields. To demonstrate I will update a users email address in a couple different use cases.
Use Case 1
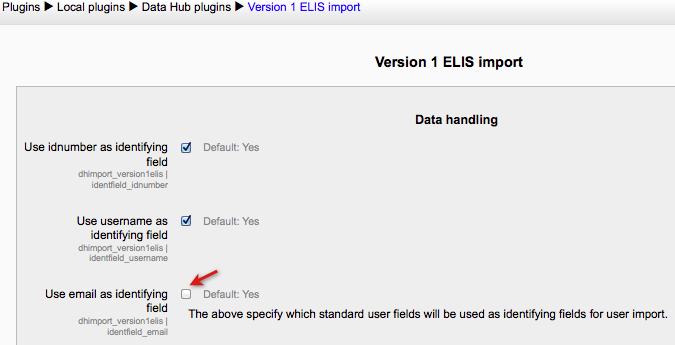
For this use case we will use the new Data Hub settings. Go to the Administration block > Site Administration > Plugins > Local plugins > Data Hub plugins > Version 1 ELIS import. The following image shows the screen that will open. Deselect the checkbox that controls whether the email address is used as an identifying field.
Now email addresses can be updated in user import files, but the email address can no longer be used as an identifying field. The following image shows an example of a user import file for updating a user's email. The 'idnumber' field is the identifying field and the 'email' field is being updated.
It is possible to keep the email field as an identifying field and update the email field, that is demonstrated in Use Case 2.
Use Case 2
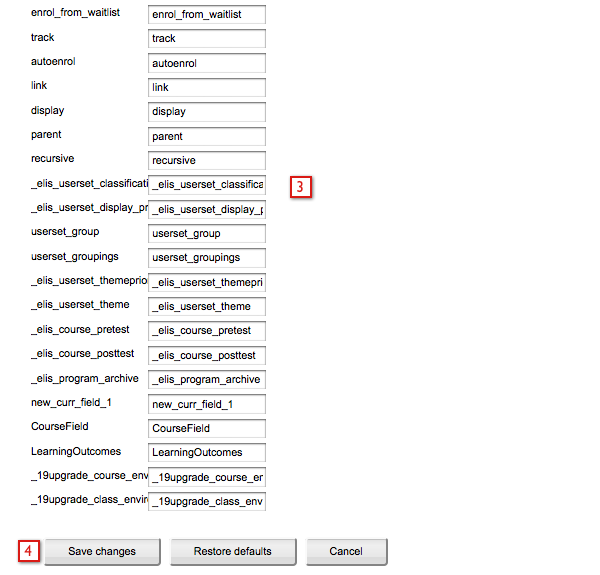
For this second use case we will use the new fields added to the Version 1 ELIS import user field map. In this use case we do not need to edit the Data Hub settings for identifying fields, all three identifying fields are active in this use case. The following image shows the bottom of the User field map located in the Administration block > Site Administration > Plugins > Local plugins > Data Hub plugins > Version 1 ELIS import > Field mapping > User tab.
When these new fields are added to the file they become the default identifying fields and the standard identifying fields can then be used for updating. Here are two example files that demonstrate how to set this up.
The first one will use the 'user_idnumber' field as the identifying field and the 'email' field is being updated.
The second file will use the 'user_email' field as the identifying field and the 'email' field is being updated.
Note: The 'idnumber' field can not be updated once it has been set. If a file has the 'user_idnumber' field and the 'idnumber' field both values have to be the same.
Using Custom Fields
ELIS custom fields can be set via ELIS Data Hub user and course files. For user files ELIS custom user fields can be included. For course files ELIS custom fields for classes, courses, programs, tracks, and user sets can be included. Only ELIS custom course fields work with course imports, only ELIS custom class fields work with class imports, etc.
ELIS Data Hub will only update ELIS custom fields. To update Moodle profile fields use Data Hub Basic for Moodle or synchronize the ELIS custom user field to update the Moodle profile field.
On the Administration block > Site Administration > Plugins > Local plugins > Data Hub plugins > Version 1 ELIS import > Field mapping, the User fields tab and Course fields tab have the custom fields listed below the standard fields. The following image is showing the User fields tab, one standard field and three custom user fields are shown. The property that should be entered in the user csv file is shown on the user property map, it can also be edited on this page. By default the ELIS custom field shortname is used.
The property shown on the field mapping interface is entered in the header of the csv file and the value to be assigned for this field will go in the user row. The following example shows two ELIS custom user fields in the csv file. The shortname for each custom field (shown in the field mapping interface above) has been entered in the file header, PMLevel and Company. The values for those custom fields are entered in the user rows below the header. PMLevel custom field is a menu of choices field, so the values entered have to be one of the existing menu options for the custom field. Company custom field is a text input field, so any text can be entered for a value.
The value entered will depend on the profile field:
- menu of choices: For this custom field assign one of the menu options to the user. For multivalued fields more than one option can be added. Add a / to separate the options, e.g., option1/option2/option3.
- boolean: For the checkbox profile fields enter "0" to keep the checkbox unchecked, and enter "1" to select the checkbox.
- text input: For text input, just add text.
- date/time: Use the format MMM/DD/YYYY or MMM/DD/YYYY:HH:MM. For example, Jan/01/2013.
Importing ELIS Courses
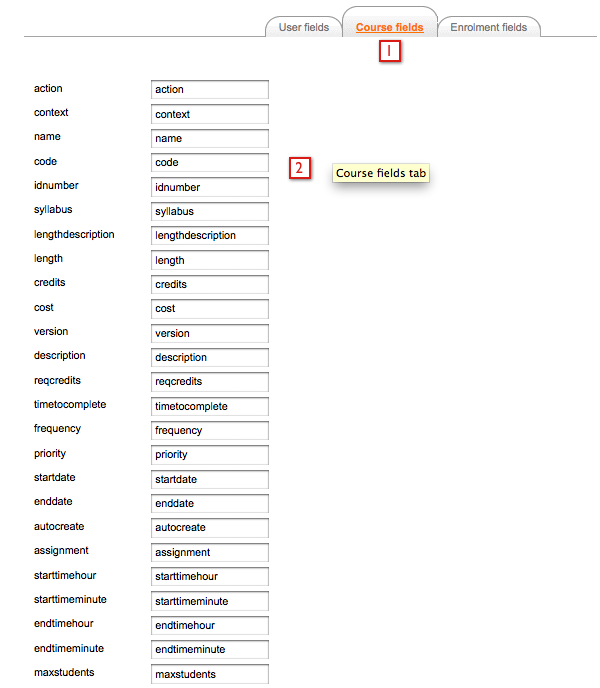
The Course fields tab is where you can edit the import parameters for Program, Track, Class Instance, Course description, and User Set properties. All five of these items can be processed on the same csv file, but to help explain these items each one will be explained individually in the docs. To access the field mapping go to the Administration block > Site Administration > Plugins > Local plugins > Data Hub plugins > Version 1 ELIS import > Field mapping > Course fields tab.
On the course properties mapping table, we can map the key names in Data Hub to the names of values in the import file. The following properties can currently be set for ELIS course information on the Course properties mapping table. You only need to remap data entered here if your export file has different names in it, for instance if your legacy system used a field named 'courseid' instead of 'idnumber', then the correct field name would need to be entered in the properties map.
The course field mapping table includes fields for programs, tracks, class instances, course descriptions, and user sets. On this page we will just be covering course information. The following pages cover the other instances.
- The tabs at the top indicate which fields we are editing - in this example the Course Fields.
- IP enables you to enter new values for these fields to match the values in your export file. For example if your backend system calls the username the uname, you can map the Moodle field username to uname here. The most common use here is to remap profile field values.
- All ELIS custom fields are included in the User and Course properties mapping tables. New values can be entered for custom fields the same way as standard fields.
- Save changes to save your changes and put them into effect.
If you make changes to any property values, be sure to select the Save changes button.
The following table has the standard course fields that can be included in course import files. ELIS custom fields can be included as well.
| action: | The action field is always required. The available actions are create, update, and delete. |
| context: |
This is always a required field. Enter 'course' in the context field when importing course information. The context field is telling the system what is being added. The other available entries are class, track, curriculum, and cluster. |
| idnumber: | The course idnumber is a required field for course creation. |
| name: | The course name is a required field for course creation. |
| code: | The course code. |
| syllabus: | Enter a course description. |
| lengthdescription: | Enter a length description. For example, days, weeks, months, semesters, etc. |
| length: | The course duration. |
| credits: | The credits for completing the course. |
| completion_grade: | Enter a number from 0 to 100. |
| cost: | The cost of the course. |
| version: | The course version. |
| assignment: |
This assigns the course to a program/curriculum. A course may be assigned to more than one program/curriculum by entering it in more than one row. |
| link: |
This is the shortname of the Moodle course that should be used as a template for classes created off of the ELIS course. |
The required fields for courses are:
- action
- context
- idnumber
- name
Note: The Action column should always be first in the file.
The required fields for updating or deleting courses are:
- action
- context
- idnumber
Data Hub Actions
ELIS Data Hub tells ELIS what needs to be done with imported data via the Actions column. The sample csv file below illustrates this function:
In the image of the course file above:
- The course with name Scaffolding Safety is being created. It is linked to the Moodle course with shortname scaffoldingsafety, meaning that is the Moodle course template attached to this course. The course has also been assigned to the OSHA Program.
- The course Electrical Safety is being created.
- The course with idnumber electricalsafety is being updated with a version number.
- The course is being deleted.
In the example above the course in row 5 has to be created, and so do the program and the two Moodle template courses before the file will be processed successfully.
*csv files can be created in many systems and by automated processes.
The following example is a course file with all 5 course contexts being added. We have only covered the course context so far - the next couple of pages cover the other 4 contexts that can be included in the course file.
Note: The two Moodle template courses identified in the course "link" field have to be added to the site before the file will run successfully. To run the file without adding Moodle template courses delete the four values in the "link" column.
Importing Classes
On the Course fields tab you can set the class properties for your import. Because the course.csv file can create five different ELIS items - courses, classes, programs, tracks, and user sets, the file mapping contains more information. Go to the Administration > Site Administration > Plugins > Local plugins > Data Hub plugins > Version 1 ELIS import > Field mapping > Course fields tab. Refer to the course field map images in the Importing ELIS Courses section of this page. If you make changes to any property values, be sure to select the Save changes button.
The following table has the standard course fields that can be included in the class import files. ELIS custom fields can also be included.
| action: | The action field is always required. Enter create, update or delete. |
| context: |
The context is always a required field. Enter class. |
| idnumber: |
The class idnumber is a required field. |
| startdate: |
The start date of the class if it has one. The new date format is MMM/DD/YYYY, e.g., Jan/01/2013. Formats used in 1.9 will work as well. |
| enddate: |
The end date of the class if it has one. The new date format is MMM/DD/YYYY. Formats used in 1.9 will work as well. |
| starttimehour: |
The start time hour. The format uses the minute drop down menu. Enter a number between 0 and 23. |
| starttimeminute: |
The minute the class starts. Enter a number in multiples of 5 between 0 and 55. |
| endtimehour: |
The hour the class stops. Enter a number between 0 and 23. |
| endtimeminute: | The minute the class stops. Enter a number in multiples of 5 between 0 and 55. |
| maxstudent: |
The seat limit/maximum number of students. Enter a number. Default is 0 which is unlimited. |
| enrol_from_waitlist: |
Enroll users from the waitlist. Enter 1 for yes or 0 for no, or just enter yes or no. |
| assignment: |
This is a required field. ID number of the ELIS course the class is an instance of. |
| track: |
The idnumber of the track the class is on. For this to work the course description the class is an instance of has to be part of the program/curriculum the track is an instance of. |
| autoenrol: |
Sets the class to auto-enroll if it is part of a track. Enter 1 for yes and 0 for no, or just enter yes or no. |
| link: |
Enter shortname of Moodle course to link to, or "auto" to auto-create a new Moodle course from template. |
The required fields for class creation are:
- action
- context
- idnumber
- assignment
The required fields for updating or deleting classes are:
- action
- context
- idnumber
Data Hub Actions
ELIS Data Hub tells ELIS what needs to be done with imported data via the Actions column. The sample csv file below illustrates this function. The following example is a course file with all 5 course contexts being added. Row 6 and 7 in the csv file are creating classes. The two classes are instances of the courses created in row 3 and 4. The link column is auto-creating two new Moodle courses from template and linking them to the new ELIS classes. The two classes have also been assigned to the track created in row 5.
Note: The two Moodle template courses identified in the course "link" field have to be added to the site before the file will run successfully. To run the file without adding Moodle template courses delete the four values in the "link" column.
Using Template Courses
ELIS Data Hub enables the creation of courses using Moodle courses as templates. A course template is an existing Moodle course - this course will be automatically backed up (without user data) and restored into each course that calls it as a template. A common use for this functionality is automatic course rollover - when a site administrator wants to create copies of a previous semester's courses for faculty to use in a new semester.
There are 3 requirements for creating a Moodle course from a template course using ELIS Data Hub:
- An existing Moodle course must be on the site
- An ELIS Data Hub course file
- Uploading and processing the file.
Creating an ELIS Course File
The course and class can be created from the same course file. Be sure that the course is listed before the class in the file.
The course file will create a new ELIS course and link it to a Moodle template course. Then create an ELIS class auto-creating a new Moodle course using the template course.
The required fields for creating the ELIS course are:
- action - Enter create.
- context - Enter course.
- name - Enter the name of the new ELIS course.
- idnumber - Enter the idnumber of the new ELIS course.
- link - Enter the shortname of the Moodle course that will be used as a template.
The required fields for creating the ELIS class are:
- action - Enter create.
- context - Enter class.
- idnumber - Enter the idnumber of the new ELIS class.
- assignment - Enter the id number of the ELIS course this class is an instance of.
- link - Enter auto to auto-create a new Moodle course from template.
The name of the class will be a combination of the ELIS course name and the class id number.
The next image is showing the file.
This file will create a new ELIS course , ELIS class, and Moodle course. The ELIS class and auto created Moodle course will be linked. For the file to process successfully a Moodle course with the shortname "electricalsafety" must be created.
Importing Programs
On the Course fields tab you can set the program properties for your import. Because the course.csv file can create five different ELIS items - courses, classes, programs, tracks, and user sets, the file mapping contains more information. Go to the Administration block > Site Administration > Plugins > Local plugins > Data Hub plugins > Version 1 ELIS import > Field mapping > Course fields tab. Refer to the course field map images in the Importing ELIS Courses section of this page. If you make changes to any property values, be sure to select the Save changes button.
The following table has the standard course fields that can be included in the program import files. ELIS custom fields can also be included.
| action: | This is a required field. Enter create, update, or delete. |
| context: | This is a required field. Enter curriculum. We use curriculum for the context field even though curricula are now called programs in ELIS 2.0. |
| idnumber: | This is a required field.Enter the program id number. |
| name: |
This is a required field for program creation. Enter the name of the program. |
| description: |
The description of the program if it has one. |
| reqcredits: | The credits required to complete the program. |
| timetocomplete: |
The amount of time the user has to complete the program. |
| frequency: |
How often the program is run. |
| priority: | When a student is in more than one program, the priority controls which is displayed first. |
The required fields for creating programs are:
- action
- context
- idnumber
- name
The required fields for updating or deleting programs are:
- action
- context
- idnumber
ELIS Data Hub tells ELIS what needs to be done with imported data via the Actions column. The sample csv file below illustrates this function. The following example is a course file with all 5 course contexts being added. Row 2 is creating a program/curriculum with 2 required credits.
Note: The two Moodle template courses identified in the course "link" field have to be added to the site before the file will run successfully. To run the file without adding Moodle template courses delete the four values in the "link" column.
Importing Tracks
On the Course fields tab you can set the track properties for your import. Because the course.csv file can create five different ELIS items - courses, classes, programs, tracks, and user sets, the file mapping contains more information. Go to the Administration block > Site Administration > Plugins > Local plugins > Data Hub plugins > Version 1 ELIS import > Field mapping > Course fields tab. Refer to the course field map images in the Importing ELIS Courses section of this page. If you make changes to any property values, be sure to select the Save changes button.
The following table has the standard course fields that can be included in the track import files. ELIS custom fields can also be included.
| action: | The action field is always required. Enter create, update, or delete. |
| context: | The context is always a required field. Enter track. |
| idnumber: | The track idnumber is a required field. This value must be unique. |
| name: |
This is a required field for track creation. Enter the name of the track. |
| description: |
The description of the track if it has one. |
| startdate: |
The startdate of the track. The new format is MMM/DD/YYYY, e.g., Jan/01/2014. Formats from previous versions of Data Hub will work as well, MM/DD/YYYY. |
| enddate: |
The date the track ends. |
| autocreate: | Auto-create the classes of the track - a class for each course in the program the track is an instance of. Enter 1 to auto-create classes and 0 or leave blank if classes won't be auto-created. |
| assignment: |
The idnumber of the program/curriculum the track is assigned to. |
The required fields for track creation are:
- action
- context
- idnumber
- name
- assignment
The required fields for updating or deleting tracks are:
- action
- context
- idnumber
Note: For auto-created classes of a track to be automatically set to auto-enroll, the course descriptions the classes are instances of must be set to required in the program. So when a program has course descriptions set to required, track instances of that program will have auto-created classes automatically set to auto-enroll. Class instances auto-created for course descriptions that are not required will have auto-enroll set to No.
ELIS Data Hub tells ELIS what needs to be done with imported data via the Actions column. The sample csv file below illustrates this function. The following example is a course file with all 5 course contexts being added. Row 5 is adding a track with the auto-create field set to no.
Note: The two Moodle template courses identified in the course "link" field have to be added to the site before the file will run successfully. To run the file without adding Moodle template courses delete the four values in the "link" column.
Importing User Sets
On the Course fields tab you can set the user set properties for your import. Because the course.csv file can create five different ELIS items - courses, classes, programs, tracks, and user sets, the file mapping contains more information. Go to the Administration block > Site Administration > Plugins > Local plugins > Data Hub plugins > Version 1 ELIS import > Field mapping > Course fields tab. Refer to the course field map images in the Importing ELIS Courses section of this page. If you make changes to any property values, be sure to select the Save changes button.
The following table has the standard course fields that can be included in the user set import files. ELIS custom fields can also be included.
| action: | This is a required field. Enter create, update, or delete. |
| context: | This is a required field. Enter cluster. We use cluster for the context field even though clusters are now called user sets in ELIS 2.0. |
| name: | This is a required field. Enter the name of the user set. |
| display: |
User set description. |
| parent: |
The name of an existing user set, or "top" to make the user set a top-level user set. |
| recursive: | Enter yes or no, or 1 for yes and 0 for no. This setting is only used during delete. Selecting yes will delete user sets and user sub-sets. Selecting no with delete the user set and promote user sub-sets to the user set level. Default is to promote user sub-sets to user sets when deleting the parent user set. |
The required fields for creating user sets are:
- action
- context
- name
The required fields for updating or deleting user sets are:
- action
- context
- name
ELIS Data Hub tells ELIS what needs to be done with imported data via the Actions column. The sample csv file below illustrates this function. The following example is a course file with all 5 course contexts being added. Row 8 is adding a user set/cluster.
Note: The two Moodle template courses identified in the course "link" field have to be added to the site before the file will run successfully. To run the file without adding Moodle template courses delete the four values in the "link" column.
Importing Enrollment Information
Enrollment in Moodle and ELIS is dependant on the context. If a user is enrolled as a student in a course, then they are given the role called 'student' - with permissions that are set for that role in Moodle's roles administration area, in the context of a course. A teacher could also be enrolled in a course - in this case they are given the role of teacher (with the permissions that are set for that role), in the context of a given course. In ELIS, we extend the roles concept to include ELIS Programs, Courses, Tracks, and Classes, though users can not be assigned to roles on the ELIS roles tabs with ELIS Data Hub.
ELIS Data Hub enables you to enroll, update, and unenroll student users and instructors in classes. ELIS DH also enables you to assign users to programs, tracks, and user sets. Users can also be enrolled in a user context, e.g., a user can be assigned the parent role for another user. The most common types of enrollment are for students and instructors in ELIS classes.
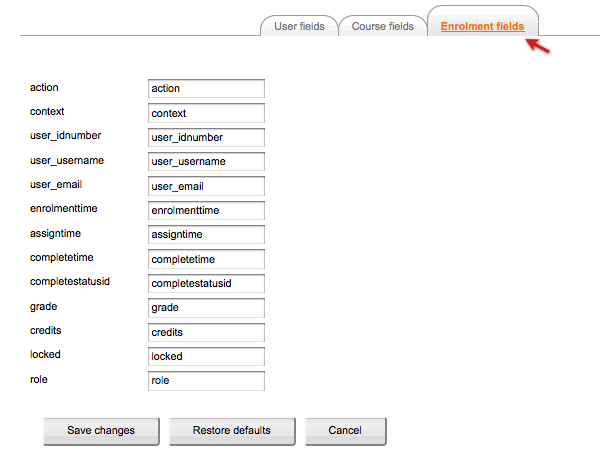
The Enrollment fields tab is where you can set the import parameters for enrollment fields. Go to the Administration block block > Site Administration > Plugins > Local plugins > Data Hub Plugins > Version 1 ELIS import > Field mapping. Then select the Enrollment fields tab.
The names of the different properties can be set in the mapping table - for example if your system's data export calls a locked record a "frozen" record, you can map the Data Hub property "locked" to "frozen".
If you make changes to any property values, be sure to save your changes with the Save changes button on the bottom of the screen. Use the Restore defaults button to restore the profile fields to their original state.
The properties that can be set via the enrollment file are listed below with brief descriptions.
| action: | The action field is always required. Enter create/enrol/enroll, update, or delete/unenrol/unenroll. |
| context: | The context in which the enrollment occurs, e.g. user A is enrolled as an instructor in class B, etc. The available context are track, class, user, cluster (user set), curriculum (program). The format here is context_instance. For example, class_idnumber. The only time it is different is for user sets because there is no id number. The user set format is cluster_name. |
| user_idnumber: | The idnumber for the user - as the idnumber is the key identifier that all user data is tied to, you can't update it, only create it. |
| user_username: | The username for the user. |
| user_email: | The email for the user. |
| enrolmenttime: | the time for the enrollment in question - e.g. if you are enrolling a user via the csv file, and need to set a different enrollment time than the current time. |
| assigntime: | This field is for class instructor enrollments only. Use the new date format of MMM/DD/YYYY, e.g., Jan/01/2013. Date formats used in Data Hub 1.0 will work as well. |
| completetime: | The completion date for a student is for class enrollments only. Use the MMM/DD/YYYY format or any of the Data Hub 1.0 date formats. Make sure the record is locked after setting a completion date or the completion date will change to the current day when the cron runs. |
| completestatusid: | This field is for class enrollments only. The completion status for the user - this can be set to 0,1,2, with 0 = incomplete, 1 = fail, and 2 = pass. |
| grade: | This is for class enrollments only. The grade a user earned for the enrollment (if they earned one). |
| credits: | The credits a user earned for the enrollment (if they earned any). |
| locked: | Is the enrollment locked (if it is locked, then the grade can't be changed unless by administrator over ride). The values for this field are 0 for unlocked, and 1 for locked. |
| role: | This field is required for instructor enrollment in classes and for enrollments in a user context. Enter the role shortname. For instructor assignments in classes enter "instructor" for this field. |
The required fields for enrollments are:
- action
- context
- user_idnumber or user_username or user_email
- role - the role field is required for instructor assignments in classes and for enrollments in a user context, e.g., a user is assigned the parent role in a user context.
Example file
In the example above:
- Row 2 and row 3 are enrolling students in a class, this assigns them to the Enrollments tab of the class. When assigning a student user to the class Enrollments tab, the role field is not required.
- Row 4 is enrolling a user as an instructor in the class, instructors are located on the Instructors tab of the class. When adding a user to the Instructor tab of the class the role field is required, enter "instructor".
- Row 5 is assigning a user to a program/curriculum, on the Users tab.
- Row 6 is assigning a user to a track, if the classes of the track are set to auto-enroll then the user will be enrolled in the classes of the track as well. Users assigned to tracks can be located on the Users tab.
- Row 7 is assigning a user to a user set/cluster, on the Users tab.
- Row 8 is assigning a user the parent role for a another user.
For the file to process successfully the users, class, program/curriculum, track, and user set/cluster have to be added to the site.
Note: When a student user is enrolled in an ELIS class the are also assigned the student role in the attached Moodle course. If you want Instructors to be automatically assigned a role in the attached Moodle course you must use a setting in the ELIS Admin > Configuration screen. Go to the Program Management block > Admin > Configuration and then locate the "Default Instructor Role" setting. Use the drop down menu and select the Teacher role. This will automatically add the user to the Teacher role in the Moodle course when they are assigned as an instructor in the ELIS class.
Instructor/Teacher Enrollment
The following test cases demonstrates how to enroll instructors in ELIS classes with ELIS Data Hub files and automatically assign them a role in the linked Moodle course.
Assigning Instructors in ELIS Classes
The following needs to be setup before the Data Hub enroll file can be processed:
- A Moodle course.
- An ELIS course linked to the Moodle course.
- An ELIS class linked to the Moodle course.
- Create the enroll file.
The following image is showing an example of the enroll csv file. The fields in the file are all required for an enroll file. In the role column, either "instructor" or "teacher" can be entered. Both entries will add the user as an instructor on the Instructor tab of the class. Once the user is added on the Instructor tab of the ELIS class they will automatically be added to the teacher role for the linked Moodle course.
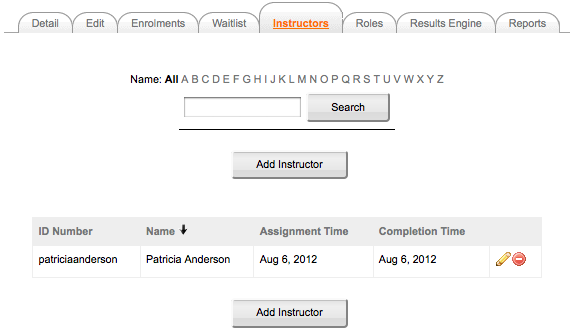
The next image is showing the Instructor tab of the class that Patricia was added to when the enroll file was processed.
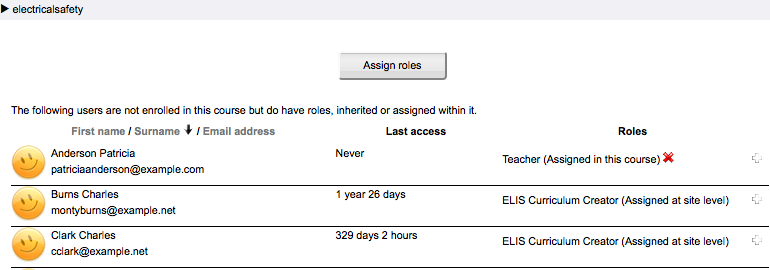
The following image is showing the Moodle course Other users page. From the Moodle course go to the Administration block > Course Administration > Users > Other users page. Patricia is the first user shown, she is assigned the Teacher role.
Data Hub Export
Data Hub can export final grade information (number and/or letter grades) in csv format. This can be imported to an SIS/ERP record keeping program (Banner, Peoplesoft, SAP, etc.). What is provided by Data Hub is a regularly exported csv file with either incremental data (grades changed/updated since the previous export) or a full export of all grade data on the system. Custom user profile fields can be added to this export.
For a record to be included in the export:
- a program management user (ELIS user) must exist
- that user must be enrolled in a class instance and have an enrollment status of "Passed".
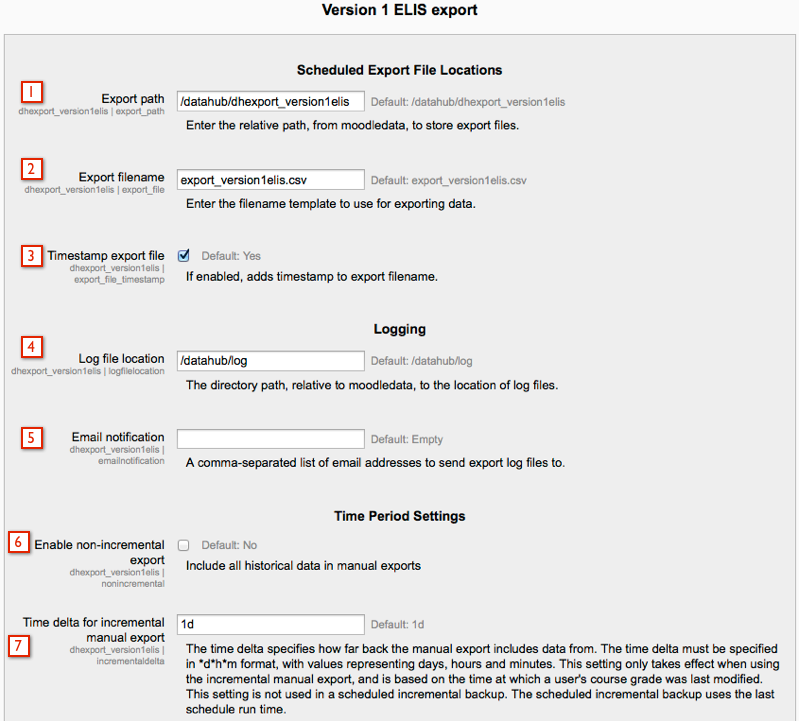
Access export settings by going to the Administration > Site Administration > Plugins > Local plugins > Data Hub plugins > Version 1 ELIS export. The screen in the following image will be shown.
- Export path: This is the file location where scheduled exports are stored.
- Export filename: The name of the export file, enable timestamp to make it unique.
- Timestamp export file: This gives each export file a unique time stamp. If this isn't selected then the previous export file will be replaced when a new export file is processed.
- Log file location: This is where log files are stored. Use SFTP to access the file location.
- Email notification: Enter the email addresses of users that should receive export log files.
- Enable non-incremental export: Include all historical data in manual exports.
- Time delta for incremental manual export: The time delta specifies how far back the manual export includes data from.
Export files show course data for users in a CSV format. The export files include the following data:
- first name
- last name
- username
- user idnumber
- course description idnumber
- start date
- end date
- status
- grade
- letter grade
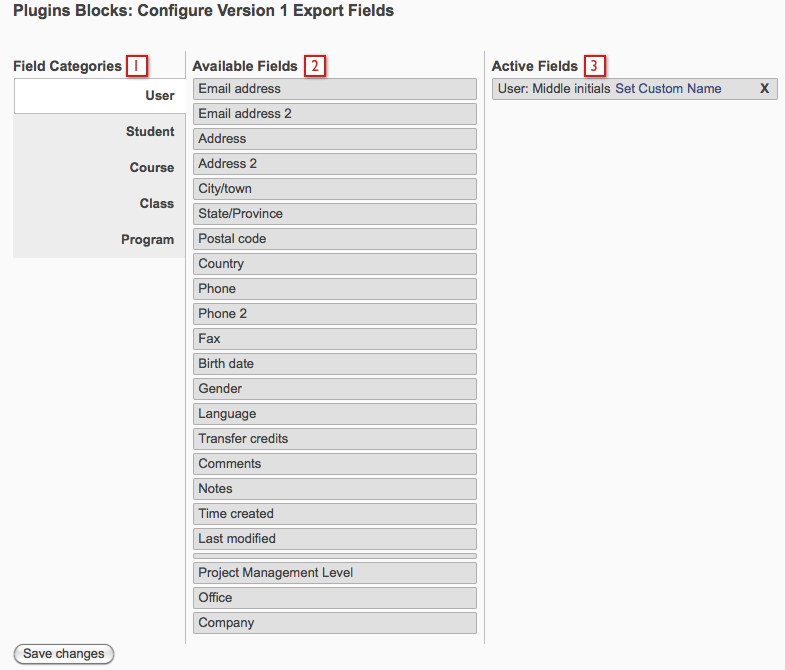
Data Hub versions 2.4.1.1+ and 2.3.1.9+ have the capability to add additional fields to the export file. In prior versions only ELIS custom user fields could be added to the export. The new user interface to configure version 1 export fields is shown in the next image. To open the screen go to the Administration block > Site Administration > Plugins > Local plugins > Data Hub plugins > Version 1 ELIS export > Field Mapping.
The screen has three columns:
- Field Categories: This column shows the different categories. When a category is selected the available fields for that category are listed in the Available Fields column.
- Available Fields: This column shows the fields for each category. ELIS custom fields will be listed below the standard fields. Drag and drop fields from this column to the Active Fields column to add the field to the export.
- Active Fields: This column shows the additional fields that will be added to the export file. To change the name of a field for the export file select the Set Custom Name link to open a text box where the new name can be entered. To change the order of fields drag and drop the field to a new location. Use the X icon on the right hand side of the box to delete the field from the Active Fields column.
Select the Save changes button on the bottom left hand side of the screen to save any changes made.
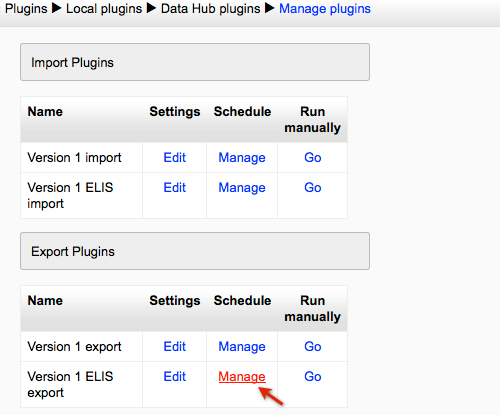
Export files can be run manually or can be scheduled to run automatically. To schedule an export to automatically run go to the Administration block > Site Administration > Plugins > Local plugins > Data Hub plugins > Manage plugins. Under the Export Plugins section Version 1 ELIS export row select the "Manage" link under the Schedule column.
Then select the "New Job" button.
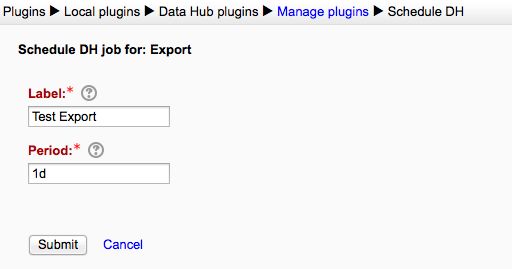
Enter the Label and Period for the job. The example in the next image has the period set for one day. So this export will run one day from the time this job is created and then it will run once every day at about the same time. If you only want the scheduled job to run once it needs to be deleted after it has run.
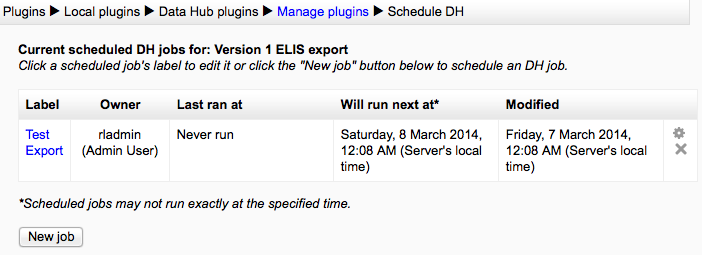
Files from scheduled exports are saved in the Export path, which is displayed in the Administration > Site Administration > Plugins > Local plugins > Data Hub plugins > Version 1 ELIS export link. The following image is showing scheduled jobs. So on 8/March/2014 after 12:08 AM there should be one export file saved in the Export path.
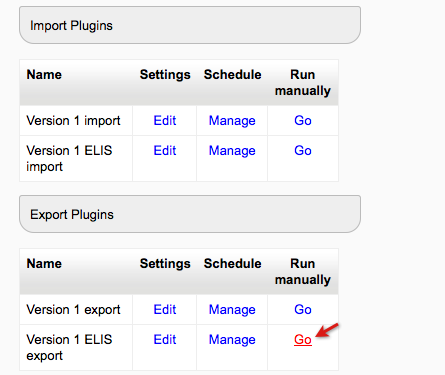
To run a export file manually go to the Administration block > Site Administration > Plugins > Local plugins > Data Hub plugins > Manage plugins. Under the Export Plugins section select the "Go" link in the Run manually column.
Then select the Run Now button. The file will be presented for download. If the file takes to long to run then the file will be saved in the Export path (displayed on the Version 1 ELIS export settings screen).
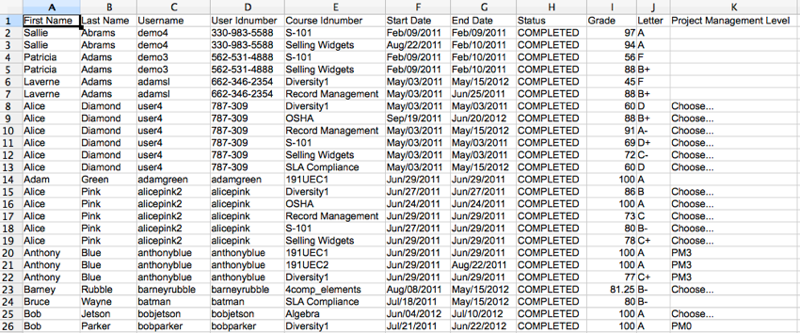
The following image shows an example of an export file. In the ELIS export, each row of data represents one completed class enrollment.
This file is displaying completion information for all users that have completed a course description. If a user is in multiple courses, each course will have a separate row in the file.
Importing large user and enrollment files
Importing very large user and enrollment files:
Moodle relies on a timed procedure, know as the Moodle cron, to run many recurring tasks, such as sending notifications, forum posts, and messages, running reports such as ELIS reports and completion checking, and integration related batch processes such as LDAP synchronization. By default, Data Hub also uses the Moodle cron to process enrollment files. When these files exceed 40,000 lines of data, it may take too long to run, causing other operations to fail to run.
To address this issue for very large enrollment/user creation files, we implemented a separate system-level cron process to call the Data Hub processes by itself which will not impact the Moodle cron from running regularly.
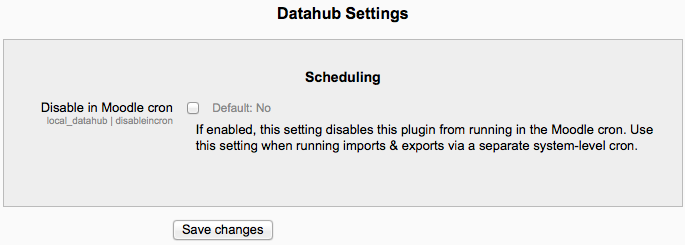
To disable Data Hub plugin from running in the Moodle cron go to the Administration block > Site Administration > Plugins > Local plugins > Data Hub Settings. This will turn off the standard cron process for Data Hub - this will stop Data Hub from processing files, so please makes sure Remote-Learner support confirms that the Data Hub Cron is operational before this is activated.
If you need to run very large enrollment files, please open a support ticket to have the optional large file processing cron task setup for you - checking the box in the example above will not setup the Data Hub cron for you, it will just disable the standard cron, meaning DH will no longer run.
Remote-Learner support will have to configure your server to run the actual cron to process the Data Hub files. Running the specialized DH cron also requires that your hosting level be at our Hosting Level 3, or above, or on our Red Hat Enterprise Virtual server system.
Disable in Moodle Cron Override
This feature enables you to hide the Disable in Moodle cron setting and force the setting on by going into your site's config.php file and adding the following line: $CFG->forcedatahubcron = true;
Navigate to the Administration block > Site Administration > Plugins > Local plugins > Data Hub Settings. A new message replaces the setting shown in the image above, "Disable in Moodle cron" has been forced on in config.php: $CFG>forcedatahubcron.
To restore the hidden setting remove the line added to the config.php file and refresh the page.
