Certificate customizing
A certificate can be customized beyond the standard downloaded install by the site administrator. In general:
- This can be done by uploading additional image types through the site administration menu. Or by uploading images into one of the certificate/pix folders.
- The displayed text can be changed by customizing the language in site administration. Or directly editing the /certificate/lang file.
- The location of certificate images and text can be change by creating/editing a certificate type's code.
Certificate examples
- Certificate examples - click on any to enlarge
-
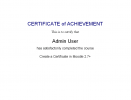 Shows no options selected, standard title, course name, user name and words.
 -
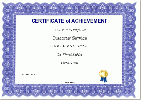 Fancy border, signature line, seal, code
 -
 Shows many text and images selected, signature, seal, watermark, code, grade, teachers name, custom text and border
 -
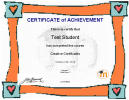
 Lines, signature, seal, watermark, code, grade, outcomes, custom text
 -
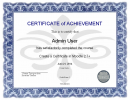
 Uploaded border, signature, watermark and seal
 -
 Custom everything, new certificate type, with new text strings, new text and image positions, plus uploadd watermark, seal, signature and border.


Customizing
The certificate code is located in the /mod/certificate folder. There are sub-folders for backup, db, lang (holds language sub-folders), type (holds standard certificate types, each in their own sub-folder) and pix. The pix folder holds the sub-folders for the default borders, seals, signatures and watermarks. These will be used at the time of installation and become the default standard choices, after that they will not be used.
Adding images

The easiest way to customize your certificate is for the site administrator to add your own JPG or PNG images for borders, seals, signatures and watermarks to the default images found at the time of installation. The system administrator should go to the site administration block, Plugins>Activities>Certificate>Upload images.
Make sure your new files are the same size as the standard images. For example, the standard signature file is 150x31 pixels. If the signature file is a different size, you may need to modify the code line. The same will be true for seals, borders and watermarks.The sample seals are 80x80 pixels in size.
In the creative example, a custom border, watermark, signature and seal were uploaded. All were sized and in the same file format as the one supplied with the initial certificate install.
Customize format

You will need to be able to edit your Moodle code to create a custom format. It is a good idea to create your own custom certificate type, that will appear on a list along with the standard certificates types. You will know which is your custom certificate type and it will survive when you upgrade. Here is how:
1. Choose the one of the certificate/type folders, copy and paste it in the certificate/type folder. Give the copied folder a new name. For example copy the /type/letter_non_embedded folder and rename it 'mycertificate'.
2. Open the certificate/lang/en/certificate.php file and add the name of your new folder type. Following the above example, you would add:
- $string['typemycertificate'] = 'My New Certificate';
Now, when you add a certificate to a course, your new type will appear on the drop down list as "My New Certificate".
- Tip: You should add the proper string as shown in step 2 above or you may receive an error message and it will appear as if the code is broken. And remember if you update your certificate module that this file may be erased with a new version.
- Tip: The sections below give examples of how to change text and image position in a certificate type file. It also covers how to create a new text string in the certificate lang file.
Modifying text and text position code examples
Changing the location of text is done by using code to set the x,y position on the page. The "x" is the distance from the left margin and the "y" is the distance from the top. All the certificate type code files start off with defining x,y points for various strings or images.
Here are some examples which set the position in the same place:
- certificate_print_text($pdf, 28, 183, 'C', 'Times', 'B', 20, get_string('certifymoodle', 'certificate')); //This fixes the start of the text at 28,183.
- certificate_print_text($pdf, $x, $y + 55, 'C', 'Times', 'I', 20, get_string('certifymoodle', 'certificate')); // This uses the x string (which is $x= 28) and adds 55 to the y string (which was $y=128).
- certificate_print_text($pdf, $certx, $certy, 'C', 'Times', ' ', 20, get_string('certifymoodle', 'certificate')); //This uses new string definitions that were added to top of the in both Landscape and Portraits sections.
In the above examples we centered the text, used the Times font, used bold, italic and none and kept the font size to 20.
We also created a new text string called certifymoodle. In the /certifcate/lang/en/certificate.php file we copied the $string['certify'] = 'This is to certify that'; string line, pasted it underneath the original and changed it to read $string['certifymoodle'] = 'This is to say that'; See the section below for more examples of changing text.
- Tip: Text not changing? You might want to go to the site administration language settings and turn off cache. Remember this will slow loading times for all users, so turn it back on as soon as you are done.
Modifying image position code example
We will change the signature position that is found in the type/letter_non_embedded/certificate.php file when we generate a pdf in landscape mode. There are at least 2 ways to change the code. Say we want to move it to the left to the 100 position from 130 and up to the 435 line from the 440 line.
- Near the top of the file, you should notice there are a set of variables for "Landscape" which are followed by another set for "Portrait". We can overrule some of the landscape and portrait codes the $sigx and $sigy position variables, so they read $sigx = 100 and $sigy = 435 .
- Alternatively, we can overrule some of the landscape and portrait codes, in this case the signature block. In the "// Add images and lines" section we see the code that actually prints in the position by using the landscape and portrait variables:
- print_signature($pdf, $certificate, $sigx, $sigy, , );
By changing the variables to fix numbers it will not matter if the teacher selects landscape or portrait mode for this custom type. For example:
- print_signature($pdf, $certificate, 100, 435, , );
If others have not added a standard signature line, you might want to fix it to a certain size. For example, you want the image to print 150px by 75px.
- print_signature($pdf, $certificate, $sigx, $sigy, '150', '75');
This should give you a good idea about how to change the position of other images.
Adjusting transparency of an image
It is possible to put in a strong image as a watermark and adjust the transparency setting when the PDF is created. Look for the SetAlpha code in front of a print element. For example infront of the "print_watermark.." line, you will see $pdf_SetAlpha(0.1); It is currently set to .1, the .3 in our example is less transparent.
- Tip: In older version of certificate, the watermark image itself was dimmed before it was placed in the folder. If you had a custom watermark, this is the way it was done. You can change the SetAlpha in the code to 1 and it should appear as it did in previous version of certificate.
Changing printed text
There are two ways to change the language strings. A best practice is to customize your language pack via site administration. You will find the certificate.php in the mod group. If you use the method below, when you update all your certificate files, then your changes will not be saved.
You can edit the language file found in the certificate folder, such as certificate/lang/en/certificate.php if you are not worried about losing you changes. Lets say you want to change the words at the top of all certificates on your site.
Find the default strings:
- $string['title'] = 'CERTIFICATE OF ACHIEVEMENT';
- $string['intro'] = 'This is to certify that';
- $string['statement'] = 'has completed the course';
Change them to read (for example):
- $string['title'] = 'DIP0LOMA';
- $string['intro'] = 'I am proud to state that';
- $string['statement'] = 'has successfully passed the final exam';
Adding a New Line of Text
You have created a couple of custom certificate types. In these certificates you want some new words to appear. There are basically 2 choices, you can have it look up a new string, or hard code the words in the certificate type instead of looking for a string.
- Add new string method.
- Open the certificate/lang/en/certificate.php file and add your new string giving it a unique name.
- $string['mynewtext'] = 'This is what I want to print on the certificate';
- Open the file for your certificate type and change the string reference. For example, go to certificate/type/mycertificate/certificate.php. Near the end of the file find "// Add Text". This is the area that prints--you guessed it--text on the certificate. Find the current line below which you would like your new text to be printed. For example, if you want your text to print below the course name, find the line:
- cert_printtext($pdf, $x, $y, 'C', 'Helvetica', , 30, get_string('title', 'certificate'));
3. Add a new line below that to print your new text using the name you gave your new lang string like this:
- cert_printtext($pdf, $x, $y+25, 'C', 'Helvetica', 'B', 10, get_string('mynewtext', 'certificate'));
Quick review. We want the string mynewtext to start on the $x position from the left, on the $y+25 line, and the line should be center aligned (C, L, R or ' '), in Helvetica type, in bold, with a font size of 10.
5. You can add a hard coded line of text. For example, add signature title block line under the signature image:
- cert_printtext($pdf, $sigx, $sigy+30,, 'Helvetica', 'B', 10, 'Martin Dougiamas, Lead Developer');
Adding a second page
After you have created your first page (or copied an existing page), add this bit of code:
$pdf->AddPage();
Then you in the code for the second page. You can create a certificate with as many pages as you want.
Nov 2011 changes
PukunuiAustralia / moodle-mod_certificate version 2011110107 is the basis for these comments. There maybe earlier versions which are different.
- Standard types of certificates. There are 4 standard certificate types based upon paper size and if the fonts are embedded or non-embedded in the pdf documents. The orientation of landscape or portrait is located within each of these types. This is different from the 1.9.x versions.
- The code for printing strings has changed. While similar to the pre 2.0, be careful.
Tips & Tricks
- Start with one of the existing certificate types, copy it and modify it.
- Try your customized code on a non production site, such as a local host.
- In Administration>>Server set debugging to maximum (to show any coding error messages).
- While you can leave a php file open in edit mode, you must save the file before your changes become active.
- Make code changes one at a time, test and then backup after each successful change. For example,after adding a new string to the certificate lang file), go to your course page and click on a certificate to see if it appears on the list.
- If you broke the code you may get a blank screen for a certificate.
- So it might be a good idea to make a backup of each successful change before starting the next change. For example, after the 3rd code change, save certificate.php as certificate3.txt.
- Certificate icon location-If you are using your own theme you have to put the icon.gif inside a folder called certificate and put in your mod folder image. For example, if your theme uses custom icons, you must put a certificate folder with the certificate icon.gif in it under your theme/pix/mod folder.
- Consider editing you language pack rather than the /certificate/lang/en/certificate.php file. You can do this through the Settings > Site administration >Language > Language customization menu. Look for mod/certificate.php. Then when you update your certificate and it's language,it will keep your changes for the standard strings.
- Use a topic section heading as the certificate title. See in the certificate forum for a code tweak.
See also
- Add/Edit Certificate
- Viewing a Certificate
- Moodle 2.x and later versions of certificate can be found at PukunuiAustralia / moodle-mod_certificate.