Text editor: Difference between revisions
Helen Foster (talk | contribs) m (template fix) |
Eric Merrill (talk | contribs) (→Spell engine: Google spell is back.) |
||
| (37 intermediate revisions by 8 users not shown) | |||
| Line 1: | Line 1: | ||
{{ | {{Editing text}} | ||
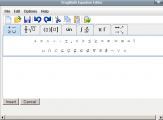
The text editor (sometimes referred to as the 'HTML editor' or even 'TinyMCE') has many icons to assist the user in entering content. Many of these icons and functions should be familiar to anyone who uses a word processor. Some examples of where you will see the text editor include: Editing Section headings, description of an activity, writing an answer to a quiz question or editing the content of many blocks. | |||
[[Image:HTMLeditor tools M2 1.png| | [[Image:HTMLeditor tools M2 1.png|thumb|The standard version of the text editor tool bar]] | ||
==List of groups== | ==List of groups== | ||
| Line 38: | Line 39: | ||
===Insert images and media=== | ===Insert images and media=== | ||
[[Image:HTML_editor_group_insert_MU_1.png|thumb|The Insert images and media group]] | |||
[[Image:Files_File_picker_upload_files_add_1.png| | * 1 Insert Image - uses [[File picker]] | ||
* 2 Insert Emoticon (only visible if the site administrator has enabled the "show emoticons as images" ''filter in Settings>Site administration>Plugins>Filters>Manage filters'') | |||
* 3 Insert Media - uses [[File picker]] | |||
* 4 Insert Equation - uses java script editor | |||
* 5 Insert Non breaking space | |||
* 6 Insert Custom character - Special keyboard characters | |||
* 7 Insert Table - | |||
<gallery widths="300px"> | |||
Image:Files_File_picker_upload_files_add_1.png|File picker Upload file screen | |||
Image:HTML editor equation editor 1.png|Equation editor | |||
Image:HTML_editor_custom_character_selector_1.png|Custom character selector | |||
</gallery> | |||
====Insert table==== | |||
<gallery widths="300px"> | |||
Image:HTMLeditor_Insert_Table_general_1.png|General tab | |||
Image:HTMLeditor_Insert_Table_advanced_1.png|Advanced tab | |||
</gallery> | |||
'''To add borders to a table''' | |||
Cell borders are crucial for helping readers to follow the rows across the screen. If they aren’t showing already you can add them as follows: | |||
#In the Wiki page containing your table, click its Edit tab | |||
#Carefully select all the cells of the table | |||
#Then right click (Macs: Command+click or Ctrl+Click) over any part of your selection to get a context menu; from it select Cell > Table Cell Properties; the cell properties dialog box then loads. | |||
#Click on its Advanced tab, set Border Color to black (for instance), then click Apply, and then click Update. | |||
#Click Save; the Wiki page containing your table will then load displaying its borders. | |||
==Site administration settings== | |||
===Manage editors=== | |||
A site administrator can enable / disable text editors in ''Settings > Site administration > Plugins > Text editors > Manage editors''. By default the TinyMCE HTML editor and plain text area are enabled. | |||
====Spell engine==== | |||
[[File:Spellengine.png]] | |||
If PSpellSpell is selected then aspell 0.50 or later must be installed on your server and the path to aspell set in Settings > Site administration > Server > System Paths. | |||
[[File:Spellcheck.png]] | |||
====HTML settings==== | |||
A site administrator can edit the emoticons (or smileys) used in the text editor in ''Settings > Site administration > Appearance > HTML settings''. | |||
====Available fonts list==== | |||
{{New features}}In addition to the default fonts, a site administrator can add extra fonts by typing their name and string in the box in ''Settings > Site administration > Plugins > Text editors > TinyMCE HTML editor'' as demonstrated in the screencast [http://youtu.be/udP7Bnur30Y How to add extra fonts]. | |||
==See also== | ==See also== | ||
[[ | * [[Text editor FAQ]] | ||
* [http://www.youtube.com/watch?v=xJE6UhqnyjU HTML editor in Moodle 2.0 video] | |||
[[Category:Site administration]] | |||
[[de:Text-Editor]] | |||
Latest revision as of 16:37, 5 April 2013
The text editor (sometimes referred to as the 'HTML editor' or even 'TinyMCE') has many icons to assist the user in entering content. Many of these icons and functions should be familiar to anyone who uses a word processor. Some examples of where you will see the text editor include: Editing Section headings, description of an activity, writing an answer to a quiz question or editing the content of many blocks.

List of groups
For those who are not familiar with the tool bar, here are the functions listed by group using the above example. Remember that the site administrator can edit or provide additonal toolbars.
Row 1
 - Font, size and heading group
 - Undo and Redo group
 - Find and Replace group
 |Full screen toggle
Row 2
 - Text effect group
 - Line format group
 - Formatting group
 - Color group
 - Paragraph group
Row 3
 - Number and Bullets and indents
 - Link group
 - Insert group
 - HTML source toggle & spellchecker
Special features
Color pickers
There are 4 levels of selecting a font or background color,
- A quick pick 5x8 matrix of colors
- "More colors" that links to Picker, Pallet and Named tabs
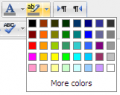
A quick pick 5x8 matrix of colors
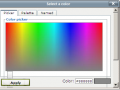
A rainbow color picker tab
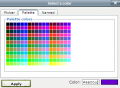
A Pallet tab with a 18x12 matrix of colors

A Named tab with custom pallets


Insert images and media

- 1 Insert Image - uses File picker
- 2 Insert Emoticon (only visible if the site administrator has enabled the "show emoticons as images" filter in Settings>Site administration>Plugins>Filters>Manage filters)
- 3 Insert Media - uses File picker
- 4 Insert Equation - uses java script editor
- 5 Insert Non breaking space
- 6 Insert Custom character - Special keyboard characters
- 7 Insert Table -
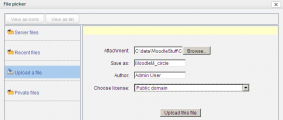
File picker Upload file screen
Equation editor
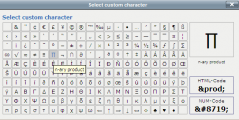
Custom character selector


Insert table
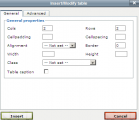
General tab
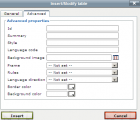
Advanced tab


To add borders to a table
Cell borders are crucial for helping readers to follow the rows across the screen. If they aren’t showing already you can add them as follows:
- In the Wiki page containing your table, click its Edit tab
- Carefully select all the cells of the table
- Then right click (Macs: Command+click or Ctrl+Click) over any part of your selection to get a context menu; from it select Cell > Table Cell Properties; the cell properties dialog box then loads.
- Click on its Advanced tab, set Border Color to black (for instance), then click Apply, and then click Update.
- Click Save; the Wiki page containing your table will then load displaying its borders.
Site administration settings
Manage editors
A site administrator can enable / disable text editors in Settings > Site administration > Plugins > Text editors > Manage editors. By default the TinyMCE HTML editor and plain text area are enabled.
Spell engine

If PSpellSpell is selected then aspell 0.50 or later must be installed on your server and the path to aspell set in Settings > Site administration > Server > System Paths.

HTML settings
A site administrator can edit the emoticons (or smileys) used in the text editor in Settings > Site administration > Appearance > HTML settings.
Available fonts list
New feature
in Moodle 2.3!
In addition to the default fonts, a site administrator can add extra fonts by typing their name and string in the box in Settings > Site administration > Plugins > Text editors > TinyMCE HTML editor as demonstrated in the screencast How to add extra fonts.