mod/coursetracking/view
Moodle1.9
Main Documentation Page For The "Coursetracking" Activity Module
You may come to this documentation through the automatically generated link at the bottom of some screen of the "coursetracking" module. This module was developed and is maintained by Valery Fremaux at http://www.valeisti.fr
The Coursetracking Module (Overview)
The course tracking module is an advanced module for tracking learner's activity on resources and content using ajax asynchronous notification capability.
The module can be set in a course for collecting tracking markers notifications on a measurement track. You may have any independant tracks within a course as you added instances of coursetracking modules.
The module is dependant on a filter (ajaxtracking filter) that will be responsible of transforming dynamically all inserted markers in active measurement portlets.
When editing a content, you will be able to add a marker within any content edited through the Moodle whysiwhyg editor. A marker is an image, preset with some specific property values the above filter can recognize. Basicallyn adding a marker is just adding an image.
You NEED to have Moodle filtering passing over the content to get marker activated. Thus the tracking cannot work on uploaded documents such as PDF, Powerpoints or flash... It will also not work on static HTML files stored within the Files directory of the course.
Once inserted, the filter will convert markers depending on your capabilities :
- If you are a "student": the marker will automatically initialise itself when being scrolled at a visible location of the browser window. You will know EXATCLY WHAT PART OF THE DOCUMENT is being seen. The marker will turn to a "I'm reading" notice for some amount of time. Once this time is elapsed, the marker will turn to a declarative checkbox asking for feedback: "I understod...".
Each time the marker changes state will it call the server to notify its status. The notifications are collected within a table into the module's data model. When the marker has been triggered by a user, the course module will remember this state forever. The marker will continue sending reading time (i.e. each time range passed within a visible location) to the server.
- If you are a teacher: the marker is show as the marker image (the moodlus oculi) if in editing mode, or as a small local report on visits.
Teacher will able to access a much more complete graphical reporting tool that shows popularity of topics within the course, or allows seing individual paths in the content among the time...
Module installation/setup
To install the coursetracing module, you need first of all being familiar with non standard Moodle plugin installation. Then will you be able to install:
- the coursetracking module itself
- the ajaxtracking filter
- finally may you be willing having the possibility to easy drop markers within your online texts. You will have to install a little patch to the whysiwhyg editor.
Patching the editor
Patching the editor will add a new button in the editor's top control row. To let things as harmless as possible, we only added this button to the "full screen" view of the editor.
The files for patching the editor are in the lib subfolder of the module distribution.
Here comes:
- An additional module called "Tracker" for the whysiwhyg editor.
- rewritten files for the editor that allow using the module (unluckily, we discovered that the htmlarea editor module strategy was a little buggy, and did not discover fluently our modules).
Normally, just changing the popups/fullscreen.php file in the editor implementation SHOULD BE ENOUGH, after having dropped the plugin.
Using the coursetracking features
Now it's time to use the tracking capability.
Step one: instanciating one tracker in a course
You just need adding a new Coursetracking activity instance in the course. You will be prompted to setup some parameters as usual.
Step two: setting up markers
First you have to insert markers within your content. Anywhere you have texts edited with the whysiwhyg editor in your Moodle, you'll e now able to drop a marker.
Only use this possibility within moodle activity modules. Avoid using it in blocks or other areas (such as section or course description) as the course module context will not be valid here (the most probable effect is just that those markers will not be compiled in reports).
To drop a marker :
- Open the full screen mode of the editor.
- Notice the Moodlus Oculi
 icon in the tool bar and click on it.
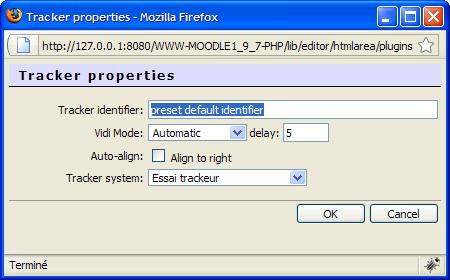
 - In the raised popup, you will be able to define:
- The marker's identifier. Note that you need this identifier being unique in the whole course. But iot's syntax is free, so it's your job...
- The marker timeout. A timout for reading before the marker turns to the declarative checkbox. A read notification will be sent to Moodle after this timeout, so choose it as realistic as possible.
- The marker mode. Actually, only the automated mode is implemented.
- The position. You may want the marker to be left or right aligned in your page.
- Finaly, if you are using multiple trackers in the same course, you might whoose which tracker will this marker be assigned to.
All this resumes in the following properties popup:
Step 3: collect track impacts
Once properly tuned the course tracking module, it will be enabled for receiving markers notifications as often as students will browse over your marked content.
Note that the notification flow, although being tiny messages, will increase the load of the server with a significant amount of additional queries. Setup of the server might be reviewed in consequence.
The recollection of impacts will be accepted in the given capture range, if defined.
Step 4: analyse/track results
Interactive tracking
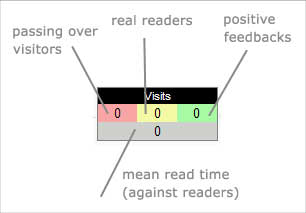
You may track interactively results on marked documents if you are a teacher, watching at small report portlets at same location you droppedthe markers. A portlet will indicate you the up to date follwing information:
- Amount of distinct "passing over" users (VENI)
- Amount of distinct readers (VIDI)
- Amount of distinct users having given feedback (VICI)
Beneath will you find a "mean read time" among users indicator.
Compilation reports
The module also gives access to a complete graphical or HTML generated reports among the whole capturing period. Graphical reports are generated with GD as images. There are some latent projects of developping dynamic tracking browsers in FLEX or Java, but it will need some time to go further on that way (and maybe motivated students...).
Module capabilities
Development status
We have still some little work to do in this module :
- review the group handling and change group related calls to officiel grouplib calls.

