Windows-Installation mit XAMPP
Vorwort
XAMPP ist ein Webserverpaket, welches neben dem reinen Webserver (Apache) auch eine ganze Reihe von Zusatzprogrammen (MySQL, PHP, Perl und diverse weitere Plugins wie OpenSSL, Freetype2, ...) enthält, so dass man nach der Installation eine voll funktionsfähige Webserverumgebung vorliegen hat.
Die Distribution XAMPP wurde erstellt, um Anfängern einen einfachen Einstieg in die Welt der Webserver zu ermöglichen und den Profis eine einfach zu installierende Entwicklungsumgebung bereitzustellen. XAMPP ist so konfiguriert, dass man direkt nach der Installation alle Features des Webservers Apache und der Zusatzprogramme nutzen kann. Das ist ideal für Entwickler, für Testzwecke und für den Einsatz in einem internen Netz eines kleinen Unternehmens, aber wegen dieser Offenheit (Sicherheitsaspekte) ist dringend davor abzuraten, XAMPP ohne Veränderungen für den Produktions-Betrieb zu verwenden.
Dieser Artikel soll die Vorgehensweise beschreiben, wie man sich eine XAMPP Webserver Umgebung auf einem Windows Rechner einrichtet und darauf ein Moodle System installiert.
Einleitung
Grundlage dieser Anleitung sind die Versionen XAMPP 1.5.1 und Moodle 1.9.4+.
Um Moodle auf einem Windows XP Rechner installieren zu können, bedarf es einiger Vorarbeiten, die in diesem Artikel Schritt für Schritt beschrieben werden.
Der Installationsprozess beinhaltet folgende Punkte:
- Der erste Schritt wäre, das Moodle Paktet herunterzuladen und danach das XAMPP Software Paket. XAMPP wird benötigt, um die erforderliche Laufzeitumgebung auf Ihren Windows XP Rechner zu installieren und für Moodle bereitzustellen. Wie bei anderen auf Windows zu installierenden Programmen auch, werden Sie durch die Installation geführt. Bei unserer Anleitung werden wir hierbei eine vorzunehmende Änderung bei einer zu installierenden Komponente beschreiben, bevor wir erläutern, wie Sie XAMPP starten und eine Datenbank anlegen, die Sie später bei der Moodle Installation verwenden werden.
- Having set up the environment you must then place the Moodle files downloaded earlier into the correct location so that they can be accessed for the purposes of initiating the installation process (now) and later to run Moodle. (The installation and use of Moodle is conducted entirely from your web browser e.g. Internet Explorer, Firefox).
Hinweis:
Diese Anleitung geht davon aus, dass Sie das Webserverpaket XAMPP und Moodle
getrennt heruntergeladen haben und manuell installieren möchten.
Diese Anleitung beschreibt nicht die Installation des Moodle Gesamtpakets,
welches neben Moodle auch XAMPP enthält (s.a. Complete install packages for Windows).
Unter Umständen finden Sie jedoch im Fehlerbehebungskapitel
Lösungsansätze für ein bei Ihnen aufgetretendes Installationsproblem.
Vorbereitung
Moodle Softwarepaket herunterladen
- Laden Sie von der englischen Internetseite Moodle.org, die Version herunter, die Sie installieren möchten. Für die Installation auf einem Windows Rechner wählen Sie bitte das gepackte Softwarepaket im .zip Format.
.
XAMPP Softwarepaket herunterladen
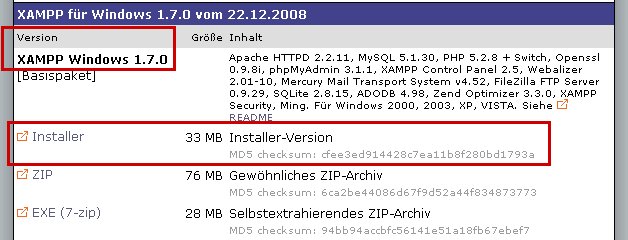
- Laden Sie XAMPP für Windows von Apachefriends.org herunter. XAMPP wird augenblicklich in drei Varianten zum Download angeboten. In dieser Anleitung werden wir dabei davon ausgehen, dass Sie die "Installer-Version" heruntergeladen haben.
Zeitbedarf für die Installation
- ca. 45 Minuten.
Installation von XAMPP
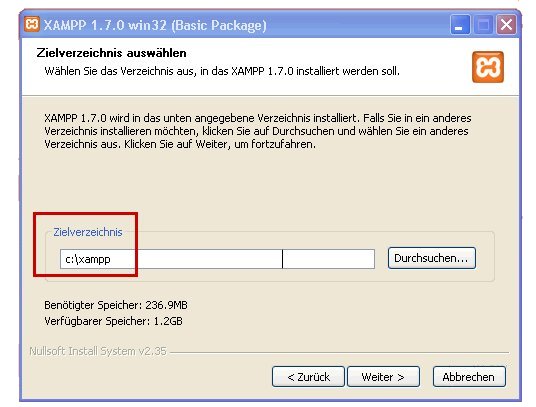
- Starten Sie die heruntergeladene Installer-Anwendung durch einen Doppelklick auf den Dateinamen. Im Laufe der Installation werden Sie dazu aufgefordert werden, das Installationsverzeichnis anzugeben.
- In unserem Beispiel wurde die Standardvorgabe c:\xampp unverändert übernommen. Sie können natürlich diese Pfadangabe entsprechend Ihren Anforderungen oder Wünschen auch verändern.
- Fahren Sie mit der Installation fort.
- Sie werden hierbei gefragt werden, ob Sie Apache, MySQL oder Filezilla als Service installieren möchten.
- Zum augenblicklichen Zeitpunkt ist es sicherlich das Beste, die Auswahlfelder nicht anzukreuzen. Sie können die Anwendungen jederzeit später noch als Service anmelden.
- Als nächstes werden Sie gefragt werden, ob Sie das XAMPP Control Panel starten möchten.
- Klicken Sie auf die "Nein" Schaltfläche.
Starten des XAMPP Control Panel's
- On your Desktop, locate the XAMPP icon and double click to launch the Control Panel.
- When the XAMPP Control Panel has launched, click the “Start” buttons for Apache and MySQL.
- If all is well you will see something like this.
If Apache fails to run i.e. the "Running" text with the green background keeps disappearing) and you are using Skype - please review "Troubleshooting" at the end of these instructions.
Datenbank anlegen
- To create a database for your Moodle “site” we will use the phpMyAdmin utility included with XAMPP.
- To access this launch the web browser of your choice (Firefox is used in this example), type http://localhost in the address bar.
- The XAMPP default page is displayed, click the link for your preferred language – we will be using English.
- From the menu on the left, click on “phpMyAdmin”
- When phpMy Admin has launched in your browser window, enter the name of your database in the “Create new database” field. In this example we are naming our database “moodle153”.
- From the "Collation" drop down list select "utf8_unicode_ci"
- Click the “Create” button to create the database.
The new database should be present in the dropdown list when the page has refreshed.
Extract the downloaded Moodle files to the correct location.
- Locate the file downloaded from Moodle.org and either copy or cut the file to the Windows clipboard.
- Open the XAMPP Control Panel and click on the “Explore” button.
- A Windows Explorer view similar to the one below will be displayed.
- Open the “htdocs” folder.
- Paste the file cut/copied earlier into this folder.
- Extract the Moodle files from the file downloaded earlier. A default folder named “moodle” is created with the Moodle files within.
Windows Vista
- If you are running Windows Vista, you will need to manually create your moodledata folder and assign it permissions.
- First, go to the "htdocs" folder and create a new folder called "moodledata".
- Second, right click and select "Properties".
- In the box that pops up, select the "Security" tab.
- Click on the "Edit" button.
- Another box will pop up. Select "Users" and give them "Modify" and "Write" permissions, along with whatever existed already.
Start the installation
- In your web browser, type the path to the folder containing the Moodle files in te address bar – in this example it’s http://localhost/moodle.
- The initial install page is displayed.
- Choose your preferred language (English is used in this example) and click the “Next” button.
- A diagnostic report is displayed – hopefully it will look like this, if not you may need to address some issues.
- Click the “Next” button to continue.
- The paths for your Moodle installation are shown – accept these or amend as desired.
- Click the “Next” button to continue.
- In this screen we enter the database settings. The fields are populated with some suggested values.
- In this example the database created is “moodle153”. The “root” user will be used without a password.
- DO NOT USE THE “ROOT” USER WITHOUT A PASSWORD FOR PRODUCTION INSTALLATIONS AS THIS CREATES A SECURITY VULNERABILITY
- When the fields have been populated, click the “Next” button to continue.
- Provided the Moodle folder is writable a message confirming the configuration has been completed will be displayed.
- Click the “ Continue” button to proceed.
The Moodle copyright / licence notices are displayed.
- Click the “Yes” button to continue, then follow the instructions on the following screens.
Troubleshooting
Bitnami
- If you have previously created a Moodle install with the Bitnami installer you may find that Apache will not start. This is because Bitnami installs a service for Apache and MySQL. To disable these go to Control Panel > Administrative tools > Service to locate and disable these services.
Skype
- If XAMPP does not work when you launch your browser and you have Skype enabled it may be necessary to change the port settings in Skype.
- Locate "Options..." in Skype.
- Locate the "Connection" options.
- Remove the tick / check from the Checkbox.
- Click the "Save" button.
- You may need to re-start your computer for this to take effect.
Still having problems but do not have Skype installed?
- Check for another program which may be using port 80. IIS is commonly found to be the culprit.
Moodle Networking does not work
You may need to enable curl. Instructions at this link Enable curl in XAMPP on XP


